Managing access to SharePoint Online can become complex, especially when dealing with multiple applications and services. Instead of using traditional methods like Connect-SPOService with usernames and passwords, organizations can configure applications in MS Entra and grant them permissions to SharePoint Online and other Microsoft 365 services.
By leveraging certificates for authentication, only authorized applications with the correct certificate and private key can securely connect to these services. This approach not only strengthens security by eliminating the vulnerabilities associated with passwords. It also streamlines the authentication process for seamless and efficient access management.
This guide will help you set up certificate-based authentication in SharePoint Online (SPO), offering a secure and efficient method to manage your access. Let’s begin!
Advantages of Using Certificate Authentication to Call SharePoint REST API
While Microsoft offers modern authentication methods like MFA for some scenarios, certificate-based connections are still a valuable option for admins who need to securely connect automated applications to SharePoint Online. Connecting to SharePoint Online (SPO) using certificate-based authentication offers several advantages:
✅ Security: Using a client certificate is often considered more secure than using a username and password. Certificates are less prone to phishing attacks and credential theft because they are stored securely and not transmitted over the network in plaintext.
✅ Automation: Certificates allow for non-interactive authentication, making them ideal for scripts and automation tasks where manual intervention (such as entering a password) is not feasible.
✅ Service Principal: When using a certificate, you typically authenticate as a service principal rather than an individual user account. This distinction can be important in scenarios where you want to perform actions on behalf of an application or service rather than a specific user.
✅ Credential Management: Certificates can be managed centrally. This simplifies the task of maintaining authentication credentials, especially in environments with strict security policies.
✅ Token Lifetime: Tokens obtained through certificate authentication have longer lifetimes compared to tokens obtained through other authentication methods, reducing the frequency of re-authentication.
How to Connect to SharePoint Online with a Certificate?
When setting up app-only access for SharePoint Online, there are two primary methods: Azure AD app-only and SharePoint app-only authentication. However, Azure AD app-only authentication is generally preferred. It allows you to manage app principals through the user-friendly Azure portal and grants permissions not just for SharePoint but also for other Office 365 services if necessary.
Setting up app-only access to SharePoint using the Azure AD application involves the following steps:
- Create a self-signed certificate using PowerShell
- Register an application with Azure AD
- Connect to SPO using a certificate
Step 1: Create a Self-signed Certificate Using PowerShell
Self-signed (SSL) certificates are perfect for testing purposes and provide a secure solution for administrators who require a certificate-based solution. To configure app-only access to SharePoint using an Azure AD application, start by creating a self-signed certificate. This certificate authenticates your application with Azure AD when requesting the app-only access token.
To create a self-signed certificate using PowerShell, run the following command in PowerShell:
$Certificate = New-SelfSignedCertificate -Subject <certificatename> -CertStoreLocation Cert:\CurrentUser\My
Replace <certificatename> with the desired name for your certificate.
For example,
$Certificate = New-SelfSignedCertificate -Subject spocertificate -CertStoreLocation Cert:\CurrentUser\My
By default, when you run the New-SelfSignedCertificate command without specifying additional parameters, it creates your own self-signed certificate and places it in the current user’s personal certificate store (Cert:\CurrentUser\My).
Export Self-signed Certificate Using PowerShell
To export the certificate in both .cer and .pfx formats, use the script below. Having both formats exported is necessary to connect to SharePoint Online using a certificate.
# Get the certificate by its subject name
$Cert = Get-ChildItem -Path Cert:\CurrentUser\My | Where-Object {$_.Subject -eq "CN=<certificatename>"}
# Export certificate to .cer file
$CertCerPath = "<certificatepath>.cer"
Export-Certificate -Cert $Cert -FilePath $CertCerPath -Type CERT
# Export certificate to .pfx file with password protection
$CertPfxPath = "<certificatepath>.pfx"
$Password = ConvertTo-SecureString -String "YourPassword" -Force –AsPlainText
Export-PfxCertificate -Cert $Cert -FilePath $CertPfxPath -Password $Password
- Replace <certificatename> with the actual name of your certificate.
- Replace <certificatepath> with the path where you want to save the .cer and .pfx files.
- Replace “YourPassword” with your desired password to protect the .pfx file.
For example,
$Cert = Get-ChildItem -Path Cert:\CurrentUser\My | Where-Object {$_.Subject -eq "CN=spocertificate"}
$CertCerPath = "C:\Users\Alex\Downloads\spocertificate.cer"
Export-Certificate -Cert $Cert -FilePath $CertCerPath -Type CERT
$CertPfxPath = "C:\Users\Alex\Downloads\spocertificate.pfx"
$Password = ConvertTo-SecureString -String "Certificatesecurity@2000" -Force –AsPlainText
Export-PfxCertificate -Cert $Cert -FilePath $CertPfxPath -Password $Password
Step 2: Register an Application with Azure AD
To configure the Azure AD application for invoking app-only access for SPO, follow the steps below.
Registering an Azure AD App:
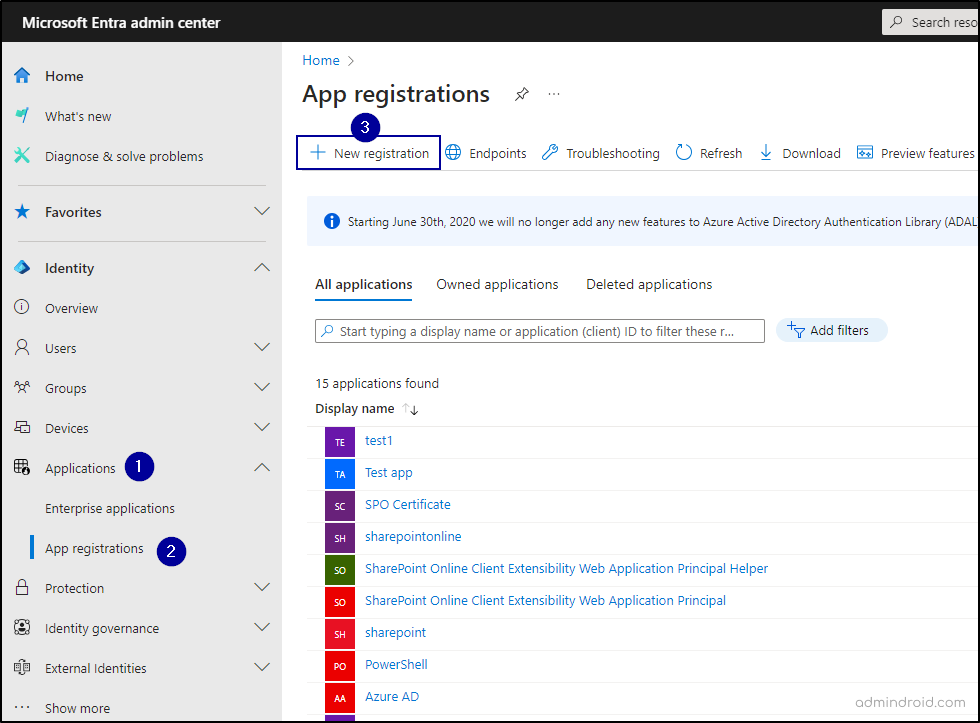
- Log in to the Microsoft Entra admin center.
- Navigate to “App registrations” under “Applications” in the left-hand navigation. Click on “+ New registration”.
3. Enter a name for your app, choose the appropriate account type (like “Accounts in this organizational directory only”), and register the app. Leave the redirect URL field as it is.

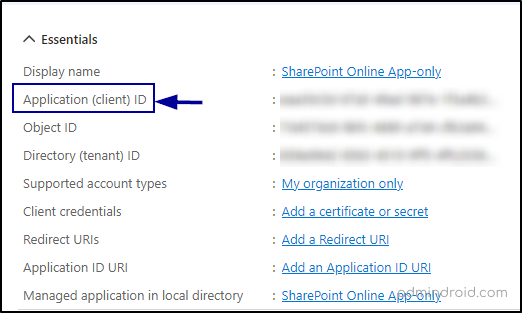
4. After registering the application, you will receive essential details such as display name, client ID, tenant ID, etc. Note down the generated client ID, as it will be used in the next steps.
Grant API Permissions:
5. The next step is to configure permissions for the application. For that navigate to “API Permissions” under Manage.
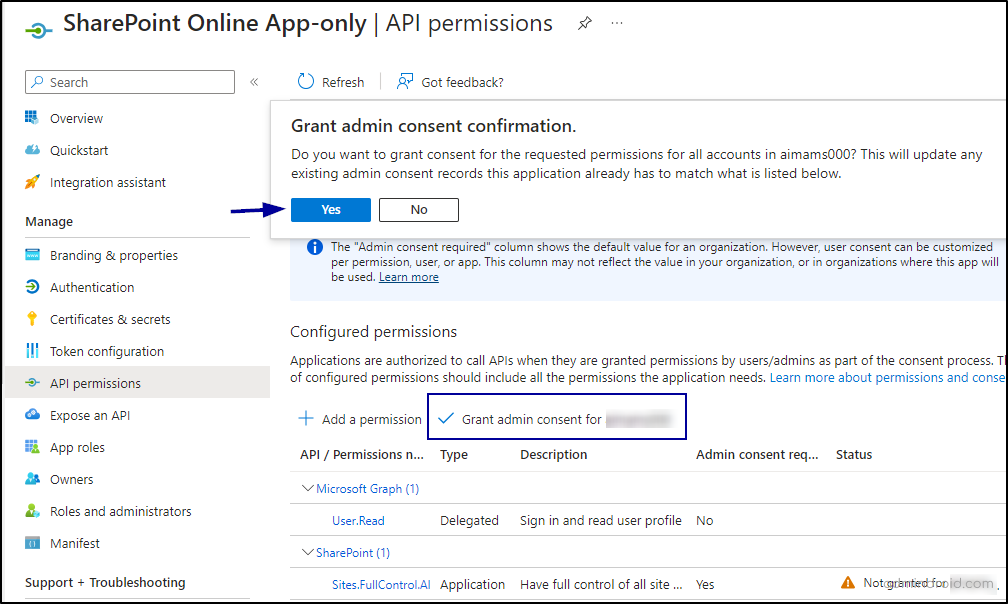
6. Click on “Add a permission”. In the pop-up window, select SharePoint -> Application permissions.

7. In the ‘Select permissions’ section, choose “Sites.FullControl.All” -> Add Permissions.
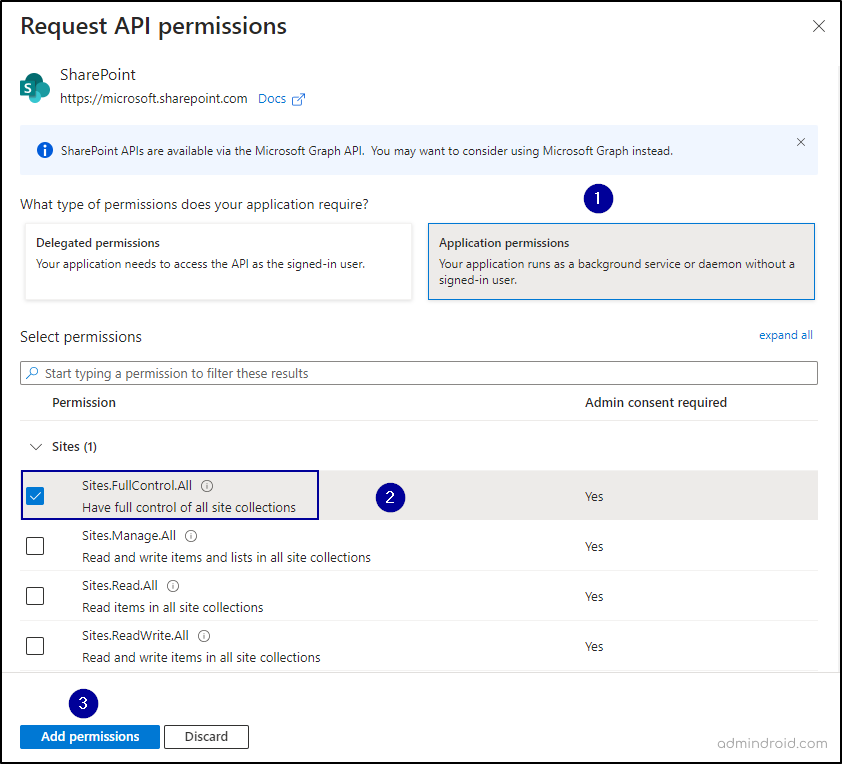
8. To use the Sites.FullControl.All permission, admin consent from your tenant is required. Click the “Grant admin consent for {{organization name}}” button, then confirm by clicking “Yes” at the top.
Connect SSL Certificate to the Application:
9. To connect the certificate to the application, go to “Certificates & secrets” under “Manage.” In the certificates tab, click “Upload certificate,” choose the .CER file from your file location, and click “Add.” Your certificate is now successfully added.

Note – If you feel Entra app registration tedious, you can check out the PowerShell script to automate Azure app registration!
Step 3: Connect to SPO using a Certificate
Now, to connect to SharePoint Online with the Azure AD application from PowerShell, use the following command.
Connect-PnPOnline -ClientId <$application client id as copied over from the AAD app registration above> -CertificatePath '<$path to the PFX file generated by the PowerShell script above>' -CertificatePassword (ConvertTo-SecureString -AsPlainText "<$password assigned to the generated certificate pair above>" -Force) -Url https://<$yourtenant>.sharepoint.com -Tenant "<$tenantname>.onmicrosoft.com"
For example,
Connect-PnPOnline -ClientId "f761d0e3-1f93-4dff-9e49-28abb6dfvf345" -CertificatePath "C:\Users\Alex\Downloads\spocertificate.pfx" -CertificatePassword (ConvertTo-SecureString -AsPlainText "Certificatesecurity@2000" -Force) -Url "https://contoso.sharepoint.com" -Tenant "contoso.com"
Once you have successfully connected to SharePoint Online using the Connect-PnPOnline cmdlet with the necessary parameters, such as client ID, certificate path, password, SharePoint URL, and tenant, you can execute various commands to manage your SharePoint environment such as Get-PnPTenantSite, Get-PnPUser, etc.

Similarly, you can also connect to Exchange Online using certificate. In summary, switching to certificate-based authentication enhances security, streamlines automation, and simplifies credential management. This approach is particularly beneficial in enterprise environments and for scenarios involving frequent, automated interactions with SharePoint Online.
We trust that this blog has provided you with all the necessary information to successfully connect to SharePoint Online using a certificate. Thanks for reading! For any additional questions, feel free to reach out to us through the comments section.
Related Posts:
 Connect to Exchange Online with Certificate
 Connect to Microsoft Graph PowerShell using Certificate
 How to Create Self-signed Certificate using PowerShell
 A Guide for Efficient SharePoint Online Reporting…
 Preservation Hold Library in SharePoint Online and OneDrive
 A Detailed Guide to Manage Storage Quota in…