As an administrator, ensuring secure communication over networks is a top priority. One way to achieve this is by using secure certificates. While CA-signed certificates (issued by a trusted third-party organization) provide a high level of security, they can be expensive and may not be necessary for all use cases. In such scenarios, a self-signed public certificate can serve cost-effective and convenient alternative.
Self-signed certificates are perfect for testing purposes and provide a secure solution for administrators who require a certificate-based solution. With just a single PowerShell cmdlet, you can easily create an SSL certificate that fits your needs and requirements.
This blog provides a comprehensive guide on creating certificates for various purposes, making the process simple and straightforward for administrators.
- Create own SSL certificate with PowerShell
- Export self-signed certificate using PowerShell
- Find certificate expiration date
- Create self-signed certificate with longer expiry date
- How to use single certificate for multiple domains?
- Clone an existing SSL certificate
- Generate code-signing certificate
- Delete self-signed certificate
Create Your Own SSL Certificate using PowerShell
This is simple as it looks. Using the ‘New-SelfSignedCertificate’ cmdlet, you can create self-signed certificate in a jiffy.
|
1 |
$Certificate=New-SelfSignedCertificate –Subject testing.com -CertStoreLocation Cert:\CurrentUser\My |

The above cmdlet will create a self-signed SSL server authentication certificate for the domain testing.com in the current user certificate store. By default, the certificate is valid for a year. You can set expiry through ‘NotAfter’ parameter. We will see additional parameter details later in the blog.
Note: When you create a certificate in the current user store, it is only available to the current user, whereas creating the certificate in Cert:\LocalMachine\My makes it available to all users on the local machine.
Export Self-signed Certificate using PowerShell
To export the certificate from certificate store to file, run the ‘Export-Certificate’ cmdlet.
The $Certificate variable in the previous command stores your certificate in the current session and allows you to export it.
|
1 |
Export-Certificate -Cert $Certificate -FilePath "C:\$certname.cer" |
Now, the certificate is exported and stored in the given ‘FilePath.’
To export a specific certificate, you can use the following example
|
1 |
$Certificate=Get-ChildItem –Path <Certificate path> Export-Certificate -Cert $Certificate -FilePath "C:\Users\admin\Desktop\$certname.cer" |

You can use the certificate’s Thumbprint for further use. For example, if you are an Office 365 admin, you can use it to connect MS Graph PowerShell with certificate.
To export all the certificates available under cert:\CurrentUser\my store, run the below cmdlet
|
1 |
Get-ChildItem -Path cert:\CurrentUser\my | Export-Certificate -FilePath c:\certs\allcerts.sst |
When you export a single certificate, the default format is CERT. If you export multiple certificates, the default format is SST. You can use ‘Type’ parameter to change the file type.
Export Certificate with Private Key:
If your application or script running from another machine or cloud, you can export the certificate with the private key.
|
1 2 |
$Pwd = ConvertTo-SecureString -String "Testing" -Force -AsPlainText Export-PfxCertificate -Cert $Certificate -FilePath "D:\$certname.pfx" -Password $Pwd |
The private key (.pfx file) is encrypted and can’t be read by other users.
Find Certificate Expiration Date with PowerShell
Self-signed certificates have limited time span. By default, it has one year from the creation date. But we can set expiry while creating the certificate.
To view certificate expiry date, run the following cmdlet.
|
1 |
Get-ChildItem -path <CertPath> | select ThumbPrint,Subject,NotAfter |
You can use the below PowerShell script to check expiry date for all the SSL certificates in the current user store.
|
1 |
Get-ChildItem -path Cert:\CurrentUser\My | select ThumbPrint,Subject,NotAfter |
Create Self-signed SSL Certificate with Longer Expiry:
With PowerShell, you can set or customize certificate expiry date during creation. To create self-signed certificate with a specific validity, you can create it with ‘NotBefore’ and ‘NotAfter’ parameters.
For example, the below cmdlet creates certificate with 36 months validity.
|
1 |
$Certificate=New-SelfSignedCertificate –Subject testing.com -CertStoreLocation Cert:\CurrentUser\My -NotAfter (Get-Date).AddMonths(36) |
You can also use .AddYears(<RequiredYears>, to set certificate expiry in years. For example,
|
1 |
$Certificate=New-SelfSignedCertificate –Subject testing.com -CertStoreLocation Cert:\CurrentUser\My -NotAfter (Get-Date).AddYears(5) |
The above cmd creates a certificate with 5 years validity.
How to Use Single Self-Signed Certificate for Multiple Domains?
“Is it possible to use a single self-signed SSL certificate for multiple domains?” Yes, it is indeed possible. This is a common question asked in various technical forums.
By utilizing a single self-signed SSL certificate for multiple domains, you can streamline your certificate management and reduce administrative overhead compared to having a separate certificate for each individual site. This can be achieved by creating one certificate with Subject Alternative Name (SAN).
Let’s explore how to create a SAN certificate for multiple sites.
You can use ‘DNSName’ parameter to mention a multiple subject as follows.
|
1 |
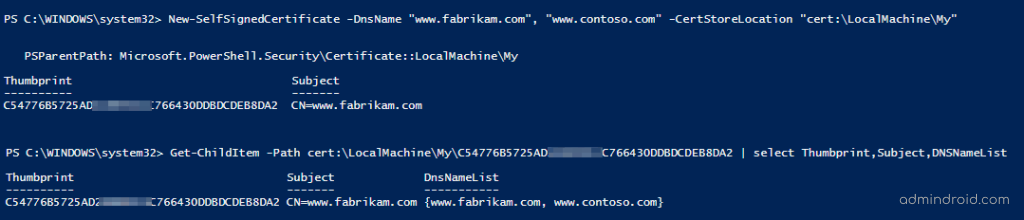
New-SelfSignedCertificate -DnsName "www.fabrikam.com", "www.contoso.com" -CertStoreLocation "cert:\LocalMachine\My" |
The given example creates a self-signed SSL certificate for multiple websites as shown in the ‘DNSNameList’ attribute. The first string in the ‘DNSNameList’ considered as a certificate’s Subject.
How to Clone Existing SSL Certificate?
You cannot renew expired self-signed certification but you can use the cloning feature to prevent the need to create a new certificate from scratch.
Cloned certificate inherits the properties from old certificate except Publickey, Thumbprint, NotBefore, and NotAfter properties.
|
1 |
$CertToBeCloned= Get-ChildItem -path <CertPath> New-SelfSignedCertificate -CloneCert $CertToBeCloned |
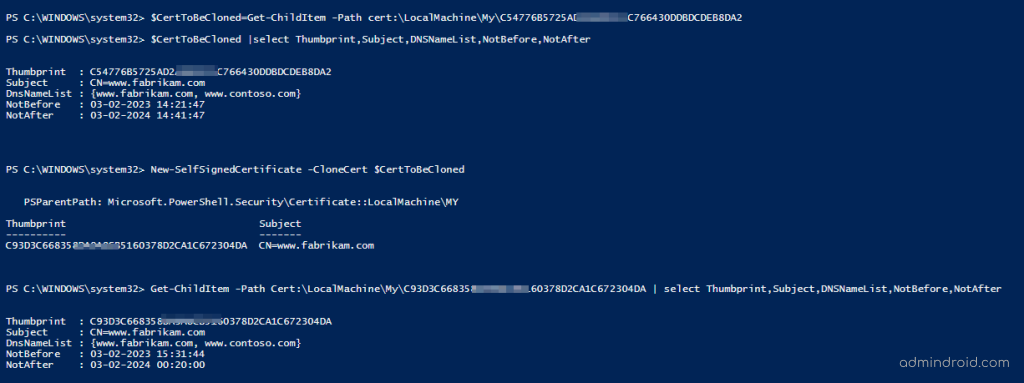
If you create a clone certificate without specifying NotBefore and NotAfter parameter, the cloned certificate will have the same validity period from the date of creation. If you want to modify validity period, you can use the NotBefore and NotAfter parameters while creation.
How to Create Code Signing Self-Signed Certificate?
You can use code signing certificates to sign your PowerShell scripts and applications. It’s important to note that self-signed code signing certificates are not automatically trusted by the operating system and applications. As a result, they should only be used for testing purposes, and not for production or other critical systems.
To create code-signing certificate, run the below cmdlet
|
1 |
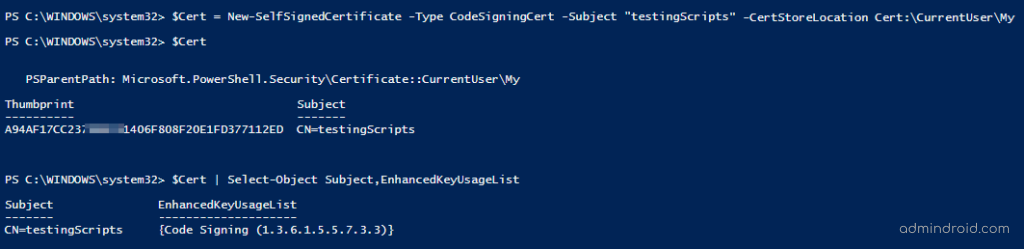
$Cert = New-SelfSignedCertificate -Type CodeSigningCert -Subject "testingScripts" -CertStoreLocation Cert:\CurrentUser\My |
You can validate the successful creation of your code signing certificate by examining the ‘EnhancedKeyUsageList’ attribute. This attribute helps ensure that the certificate is fit for its intended use.
Similarly, you can create certificate for document encryption using the New-SelfSignedCertificate cmdlet. To create self-signed document encryption certificate, run the cmdlet with the ‘Type’ DocumentEncryptionCert. For example,
|
1 |
New-SelfSignedCertificate -Subject "DocEncryption" -CertStoreLocation Cert:\CurrentUser\My -Type DocumentEncryptionCert |

This example creates a document encryption certificate which is helpful to encrypt and decrypt documents.
Delete Self-Signed Certificate using PowerShell:
In some cases, admins want to remove certificates from certificate store. It can be done using the Remove-Item cmdlet.
|
1 |
Remove-Item -Path Cert:\CurrentUser\My\{PasteTheCertificateThumbprintHere} -DeleteKey |
With this method, you can delete expired certificates and cleanup certificate store.
In conclusion, self-signed certificates provide a cost-effective and secure solution for organizations without relying on external certificate authorities. Also, admins can automate PowerShell scripts using certificates. I hope our guide on creating and managing self-signed certificates simplifies your certificate management process. If you have any queries, you can reach us through the comment section.


