According to Microsoft, 93% of organizations are concerned about insider risks, with around 25% breaches happening yearly. These figures are indeed alarming!🚨 Implementing robust data security measures like Data Loss Prevention, Conditional Access, sensitivity labels is crucial. However, finding the right balance between security and productivity can be challenging. While strict policies may enhance security, they could potentially hinder workflow efficiency. Conversely, more lenient policies may boost productivity but at the expense of increased vulnerability to data loss. To navigate this delicate balance, insider risk management adaptive protection has been introduced.
UPDATE: This feature is now generally available.
Before jumping into the details of adaptive protection, you first need to understand the concepts of Microsoft Purview Insider Risk Management (IRM).
What are Insider Risks in Microsoft 365?
Insider risk is a threat to the security or information that comes from the users within that organization. These can be former employees, temporary employees, contractors, or any other person with access to the organization’s data, information, and systems.
Insider Risk Management in Microsoft Purview
Insider risk management simply is to quickly identify, investigate, and take action on insider threats. It correlates various signals to detect insider risks like IP theft, data leakage, insider trading, security violations, etc. It enables admins to create insider risk management policy to manage security and compliance.
Microsoft 365 insider risk management license requirement:
The Microsoft 365 insider risk management solution is part of,
- Microsoft 365 E5
- Microsoft E5 compliance add-on
- Insider Risk add-on for Microsoft 365
Note: Any user who needs to be investigated also requires any one of the above licenses.
Adaptive Protection for Insider Risk Management
Adaptive protection is part of insider risk management. It uses IRM machine learning to understand how users are interacting with data security incidents, automatically customizing controls in response to the most critical risks identified. Adaptive protection ensures that effective policies are applied to high-risk users while maintaining the productivity of lower-risk users.
How Does Adaptive Protection in Microsoft Purview Work?
Microsoft Purview’s adaptive protection feature helps in the exfiltration of user activities based on risk levels in the organization. This helps in acting beforehand by applying protective measures from Data Loss Prevention (DLP) and Conditional Access (CA) policies.
By working together with DLP and Conditional Access, it becomes easier to respond to insider risks, reducing the time it takes to alert on potential threats. By combining these tools, organizations can create a strong security setup that deals effectively with both inside and outside risks to their data and systems.
Prerequisites to Configure Adaptive Protection in Microsoft Purview
To configure adaptive protection and update its settings, users must be assigned to one of the following insider risk management role groups.
- Insider risk management
- Insider risk management admins
How to Set Up Adaptive Protection in Microsoft Purview?
Adaptive protection can be turned on from the Microsoft Purview portal with a single click. To reach the setup page, navigate to,
Microsoft Purview Compliance portal -> Insider risk management -> Adaptive protection (preview).
Based on the role group you are in, you may find some of the tabs below missing.
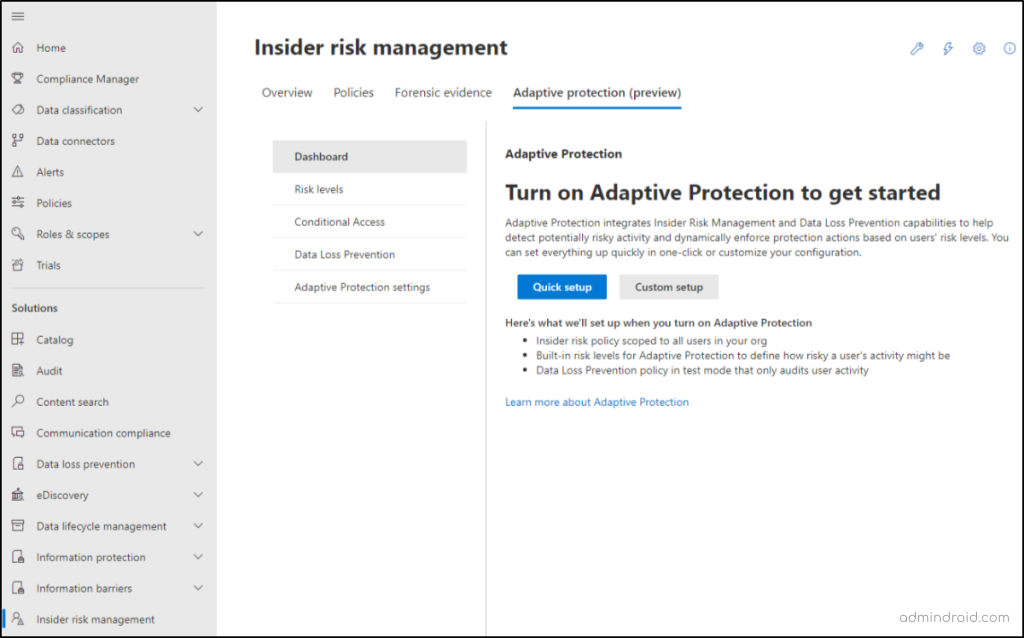
When you first access the Dashboard tab, you’ll be prompted to choose between two setup options: Quick setup or Custom setup. Quick setup streamlines the process by configuring all policies for you, requiring no pre-configuration of settings or features. This option typically takes 72 hours to complete.
For a more tailored approach, with finer control over settings and features, we’ll walk through the detailed steps for custom setup in this blog.
Configure Adaptive Protection in Insider Risk Management
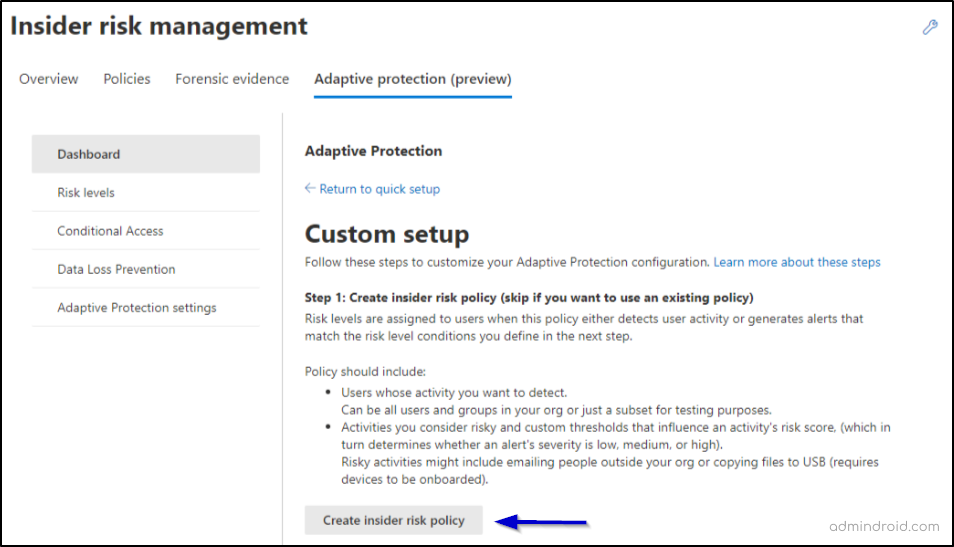
The custom setup option enables you to customize the insider risk management policy, adjust risk levels, and configure DLP and Conditional Access policies for adaptive protection. To configure adaptive protection using a custom setup, follow these steps:
- Create an Insider Risk Policy
- Turn on Adaptive Protection
- Configure Risk Levels for Adaptive Protection
- Integrate with DLP/Conditional Access
Step 1: Create an Insider Risk Policy
- After selecting ‘Custom setup’, to create a new insider risk policy, click on ‘Insider risk policy’. You can also create a new policy by navigating through ‘Insider risk management -> Policies -> Create policy’.
- In the Choose a policy template, choose the template based on your requirements. We have chosen the “Data leaks” policy template.
- Select ‘Next’.
- Name your policy and add a suitable description.
- In the next step, you can use admin units, a preview feature that lets you designate users within specific admin units for the policy.
- In the ‘Choose users and groups’ page, select the users to whom you want to apply this policy.
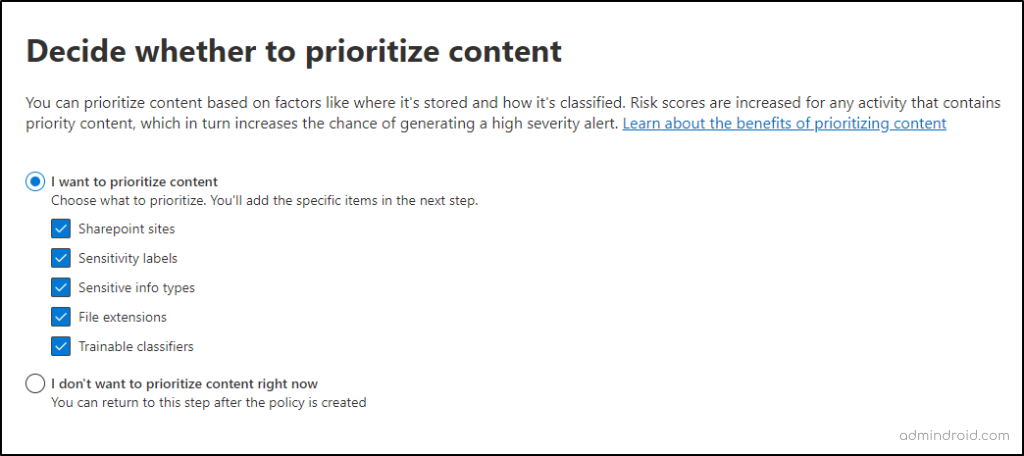
- In the ‘Decide whether to prioritize content’ page, insider risk management policies enable organizations to prioritize content or activities based on where they’re stored, content type, or classification. This process increases the risk score for relevant activities, making it more likely to generate alerts.
Note: Priority content is defined by factors such as its location. E.g., all SharePoint sites, sensitive information types, sensitivity labels, file extensions, or trainable classifiers.
- In the following steps, you need to add specific items for each location you selected in the previous step.
For example, if a highly confidential project is stored in a dedicated SharePoint site, prioritizing this site in a data leak policy increases the risk scores for activities related to it. You can also skip this step if you don’t want to prioritize any content right now.
9. Decide whether to score only activity with priority content: Here, you can decide whether to assign risk scores & generate alerts for all activities or only those involving priority content.
10. The next step is to choose a triggering event for the policy. It determines when a policy will begin assigning risk scores to a user’s activity. You can find detailed information here. Proceed by choosing thresholds for your triggering events in the next step.
11. Now, choose the indicators for your policy. These indicators serve as triggers for detecting activity outlined by the policy template.
12. Select detection options to generate alerts for the detected activity:
- Sequence Detection: This feature identifies a series of two or more activities performed in a specific order over a week. It helps flag potentially risky behavior. Activities are grouped into four types: download, exfiltrate (send out), obfuscate (make unclear), and delete.
- Cumulative Exfiltration Detection: This detects when a user shares more data than usual within a certain period (compared to the organization’s average over the past month). This helps spot potential data breaches or unauthorized sharing.
- Risk Score Boosters: Certain circumstances can increase the risk score for policy alerts. For instance, a medium-severity alert might be raised to high if these boosters are triggered.
13. Choosing the threshold type for indicators: The indicators you chose set levels that affect how risky an activity is, which then decides if an alert is low, medium, or high severity. Thresholds are based on the number of events recorded for an activity per day. Here, you can use recommended thresholds or specify your own.
14. Review your indicators and other settings and click on the Submit button to create an IR policy.
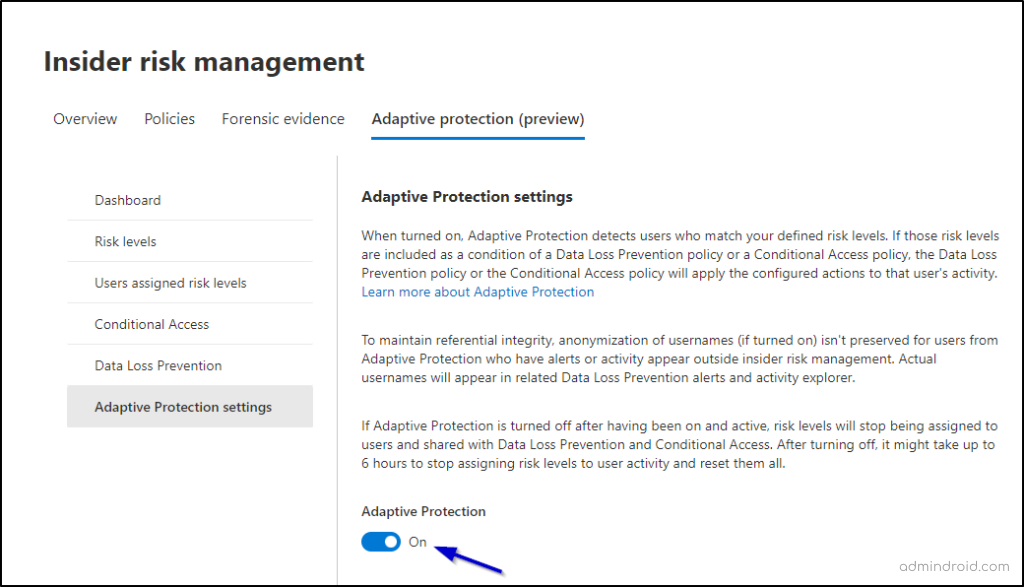
Step 2: Turn on Adaptive Protection in Microsoft Purview
To enable Adaptive Protection in Microsoft Purview, select the Adaptive Protection settings tab and toggle Adaptive Protection to On. If the adaptive protection is turned off, risk levels won’t be assigned to users.
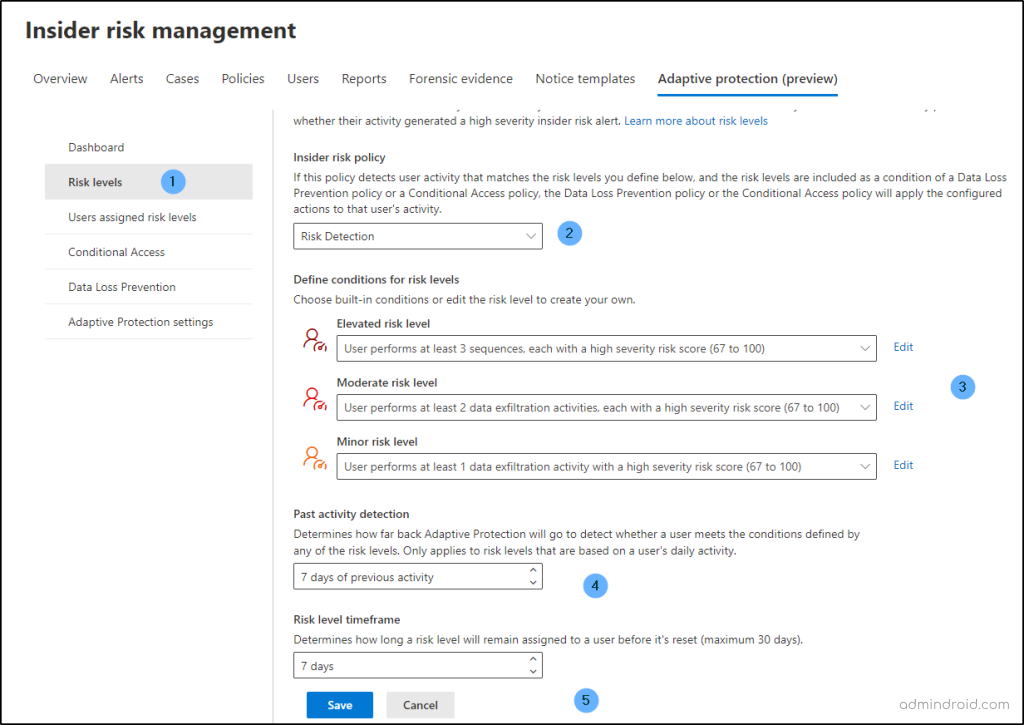
Step 3: Configure Risk levels
In this section, you’ll configure risk levels for adaptive protection to assess the level of risk associated with a user’s activity. This involves considering factors such as the frequency of exfiltration activities or the generation of high- severity insider risk alerts.
1. Choose the insider risk management policy
In the ‘Insider risk policy’ dropdown, select the policy that you just created.
2. Defining conditions for risk levels
The following are the built-in risk levels associated with adaptive protection. You can also customize them based on your requirements.
🔴Elevated Risk Level: This represents the highest level of risk. It includes users with high-severity alerts, multiple sequence insights triggering high-severity alerts, or confirmed high-severity alerts.
🟠Moderate Risk Level: This denotes a moderate level of risk. It covers users with medium severity alerts or users who have engaged in at least two data exfiltration activities with high severity scores.
🟡Minor Risk Level: This indicates the lowest level of risk. It includes users with low severity alerts or users who have been involved in at least one data exfiltration activity.
These levels are determined by data-related activities and risky user contexts. It automatically moves the user in and out of policies as their risk level changes. The protection is adaptive based on the user context and the controls fluctuate to adapt to the user risk level as it changes over time. Below is an example that shows user activity along with its corresponding control measures.
| User Activity | Risk level | Control |
| Downloaded confidential files | Minor | Policy tip |
| Downgraded sensitivity labels | Moderate | Requires strong authentication |
| Sharing sensitive data | Elevated | Block |
To assign a risk level to a user, the number of insights and their severity must match the risk level definition where insights can comprise single or multiple activities. For instance, downloading 10 high-severity files from a SharePoint site in a day counts as one insight. To elevate a user’s risk level to “Elevated,” two more high-severity insights are needed. You can also customize the risk levels based on your organization’s requirements. Additionally, the ‘Edit’ option allows you to choose the user activity conditions to detect its severity and number of daily occurrences during the past activity detection window.
Risk level customization encompasses two primary aspects:
- Alerts generated or confirmed for a user: Users can establish conditions based on alert severity, with a risk level assigned if any condition is satisfied.
- Specific user activity: Conditions regarding severity of the activity and frequency are established. A risk level is only assigned if all conditions are met.
3. Past Activity Detection: Determines how far back to examine user activity. The default is 7 days, customizable between 5 and 30 days.
4. Risk Level Timeframe: Determines how long a risk level remains assigned before reset. The default is 7 days, customizable between 5 and 30 days.
User assigned risk levels are determined within the adaptive protection system based on detected user activity or alerts that align with predefined risk level conditions outlined in the insider risk policy.
Step 4: Create a DLP Policy/Conditional Access Policy for Adaptive Protection
DLP in adaptive protection: Create or edit an existing DLP policy to restrict actions for users who match your risk level conditions in adaptive protection.
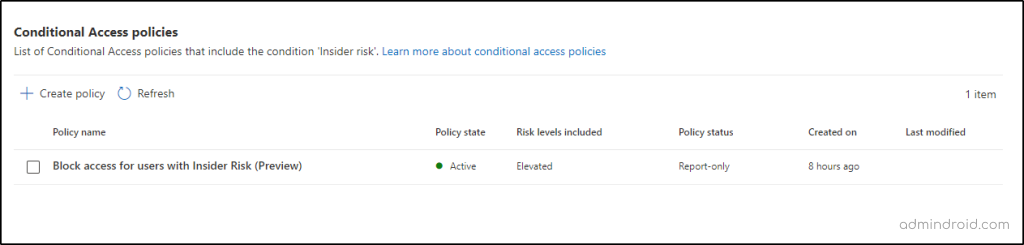
Conditional Access policy: Configure a Conditional Access policy with insider risk feature to regulate user actions based on the risk level identified through adaptive protection.
After setting up DLP and Conditional Access for Adaptive Protection, Microsoft Purview’s DSPM can be used to track and refine these policies. By correlating activity patterns and risk data, DSPM offers recommendations that help ensure Adaptive Protection continues to respond appropriately to evolving insider risks.”
Disable Adaptive Protection in Microsoft Purview
There might be situations where you need to temporarily turn off Microsoft Purview adaptive protection. You can toggle off ‘Adaptive Protection’ in the ‘Adaptive Protection Settings’ tab to disable adaptive protection in Microsoft Purview.
Here’s what happens when you disable it:
Risk Level Updates Pauses: Assigning risk levels to users will be halted. This information won’t be shared with Data Loss Prevention (DLP) and Conditional Access systems.
Existing Risk Levels Reset: Any risk levels currently assigned to users will be erased.
Delay in Effect: It can take up to 6 hours for these changes to take full effect.
Disabling adaptive protection doesn’t delete your insider risk management, DLP, or Conditional Access policies. They’ll still be in place. You can always turn adaptive protection back on later.
Closing Thoughts
Mitigating insider risk is as important for your security & compliance posture as defending against threats from outside the organization. Traditional security measures like DLP, Information barriers, and Azure information protection are essential, but for a truly robust & adaptive defense solution, consider adding adaptive protection to your insider risk management strategy.
We hope this guide will help you create and manage adaptive protection in Microsoft Purview. Thanks for reading! Reach us through the comments section for further assistance.


