On Day 11 of Cybersecurity Awareness Month, discover how to block employees from uploading confidential data in ChatGPT to prevent data leaks, maintain compliance, and protect your organization’s sensitive information. Stay tuned for upcoming blogs in the Cybersecurity blog series.
Protecting sensitive data in the age of AI is a growing concern for IT admins. Despite policies and training, employees often copy-paste sensitive content like client datasets into ChatGPT to speed up their work. This unchecked use of AI, often called shadow AI, significantly increases the risk of data leaks, compliance violations, and security breaches in Microsoft 365. The truth is that awareness programs alone aren’t enough. The real challenge is finding the right balance: managing the productivity boost while keeping sensitive information secure. In this blog, we’ll walk through step-by-step configurations to prevent users from uploading sensitive data to ChatGPT, restricting AI usage without resorting to a full “ban everything” approach. Curious how? Let’s dive in for a closer look.
Understanding GSA Client, Netskope ATP, and DLP Policies
Before we dive into the steps, it’s important to understand the key components involved and how this integration works to ensure sensitive data never leaves your Microsoft 365 environment.
Global Secure Access client: The GSA client is a lightweight software installed on user devices. It routes all internet traffic through Microsoft’s secure gateway – Microsoft Entra Internet Access. Think of it as a secure “checkpoint” for all online activity. Global Secure Access Advanced Threat Protection in Microsoft Entra is currently in Preview.
Microsoft Secure Service Edge: Microsoft SSE is part of Global Secure Access (GSA) that inspects and controls traffic to ensure every request leaving the organization is monitored and managed.
Netskope ATP & DLP: Netskope is a cloud-native security platform that protects data and users across cloud services, websites, and apps by monitoring and controlling data transfers. Its Advanced Threat Protection (ATP) module detects malware, suspicious activity, and other security threats in real time to prevent data loss and ensure compliance.
Data Loss Prevention (DLP) identifies sensitive information like client data, financial records, or proprietary plans and ensures they cannot be pasted to AI tools like ChatGPT without authorization.
Transport Layer Security inspection: Transport Layer Security (TLS) Inspection is a process that decrypts and scans encrypted internet traffic to detect threats or sensitive data. In the context of ChatGPT, most traffic is encrypted using TLS.
TLS inspection allows the GSA + Netskope system to safely decrypt and scan this traffic. This ensures sensitive data is caught by DLP policies, without breaking encryption for legitimate secure communications.
ATP baselines & policy enforcement: ATP baselines are preconfigured rules that define what counts as risky behaviour or sensitive data exposure.
How Microsoft GSA and Netskope Integration Prevents Data Leaks to AI Tools?
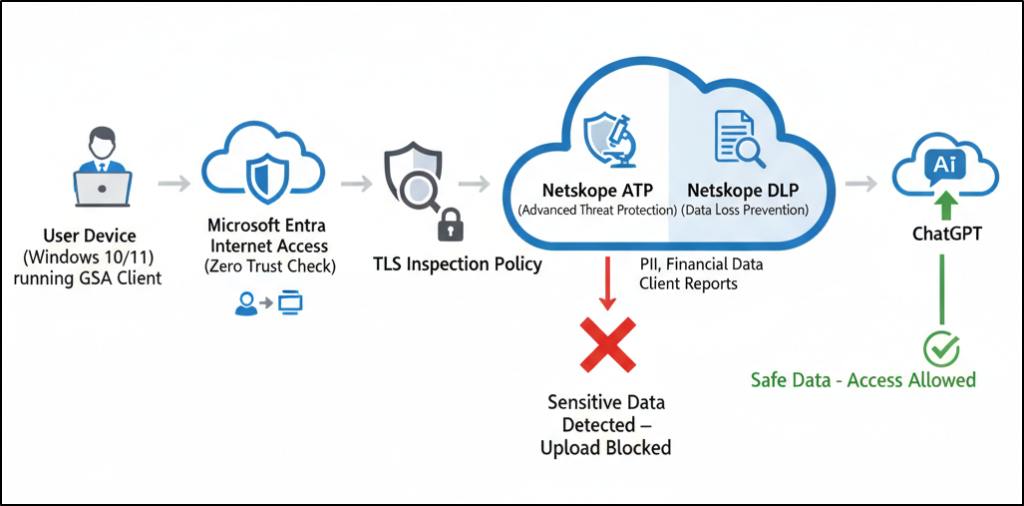
The integrated system, Microsoft Global Secure Access (GSA) with Netskope SSE, keeps confidential data protected by connecting all key policies through a central Security Profile. These policies include TLS Inspection, Advanced Threat Protection (ATP), and Data Loss Prevention (DLP).
When an employee attempts to upload a file or image containing sensitive information or even copy-paste sensitive data into ChatGPT, the GSA client on their device routes all traffic through a secure gateway. The Microsoft Entra Internet Access profile inspects and controls the traffic, enforcing security rules before allowing external connections.
Now, the TLS Inspection policy carefully analyzes encrypted traffic without breaking the secure connection. Then, Netskope’s DLP and ATP policies scan the data for any sensitive information like PII or proprietary client details. This coordinated setup ensures sensitive content is protected while allowing safe use of AI tools.
Note: Even when certain built-in data classifiers are blocklisted, small copied snippets may sometimes pass through, indicating that Microsoft Entra’s filtering still needs some fine-tuning.
Prerequisites:
To effectively restrict users from uploading sensitive content to ChatGPT, ensure you have the following prerequisites in place.
- Use Windows 10 or 11 devices that are joined, or hybrid joined to Microsoft Entra ID, to test configurations.
- Obtain trial licenses for Microsoft Entra Suite or Microsoft Entra Internet Access.
- Assign the Global Secure Access Administrator role to configure GSA settings and manage Security Profiles.
- Assign the Conditional Access Administrator role to create and enforce Conditional Access policies for applying security controls.
How to Block Confidential Information Uploads to ChatGPT Using Microsoft Entra?
After configuring the prerequisites, it’s time to set up and enforce policies. Follow these steps to block Microsoft 365 users from pasting sensitive documents to ChatGPT and secure AI usage.
- Install Global Secure Access (GSA) client
- Enable Microsoft Entra internet access traffic profile
- Configure Transport Layer Security (TLS) inspection
- Activate Netskope one advanced SSE in GSA marketplace
- Create Advanced Threat Protection (ATP) policy
- Set up Netskope Data Loss Prevention (DLP) policy
- Link all security policies to security profile
- Implement a Conditional Access policy to enforce security profile
Install Global Secure Access (GSA) client
To begin, you’ll need to install the Global Secure Access (GSA) client, which acts as the foundation for enforcing your organization’s security policies. Once installed and connected, make sure to run a health check (from the system tray → advanced diagnostics → health check) to confirm all requirements are met. If any checks fail, follow the troubleshooting steps before continuing with the configuration.
Enable Microsoft Entra Internet Access Traffic Profile
Enabling the Internet Access traffic profile ensures that all internet-bound traffic from your organization’s devices is securely routed through Microsoft’s Security Service Edge (SSE) proxy.
- Sign in to the Microsoft Entra admin center and navigate to Global Secure Access → Connect → Traffic forwarding.
- On the traffic forwarding page, locate the internet access profile and toggle on the switch to enable the policy
- Click the User and group assignments section, click on the link text → Add user/group and select the users or groups who should have this profile applied.
- Click Assign to complete the process.

Verifying internet access traffic profile on client devices
After enabling the Internet Access traffic profile, you can check that it’s applied correctly on your test device.
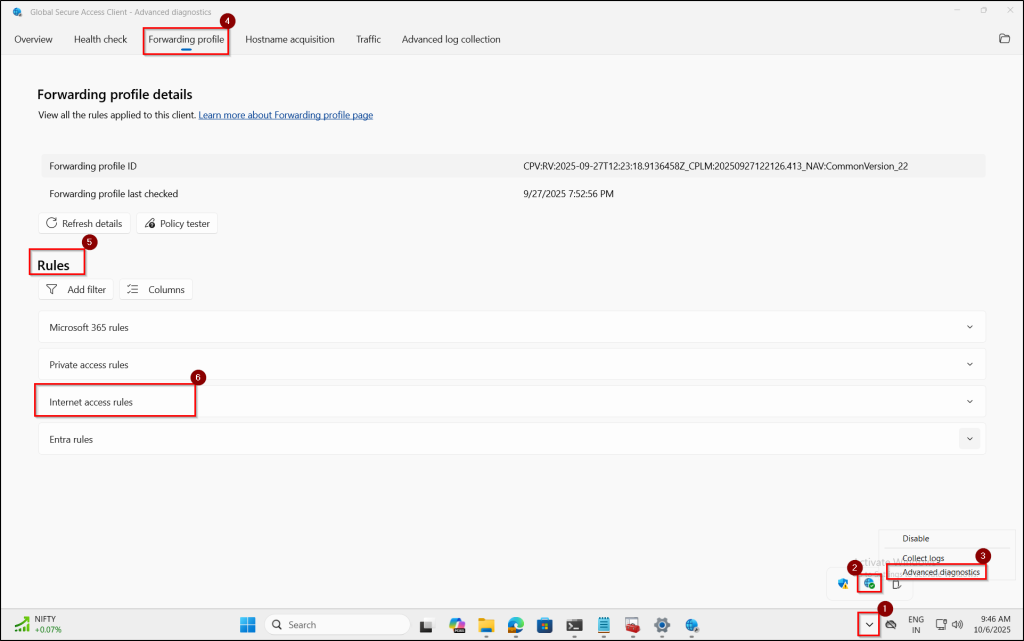
- Right-click the Global Secure Access (GSA) icon in the system tray and select Advanced diagnostics.
- Go to the Forwarding Profile tab and ensure that the Internet Access rules appear in the Rules section.
Note: It may take up to 15 minutes for the configuration to fully apply to client devices after enabling the profile.
Configure Transport Layer Security (TLS) inspection
The next step is to configure Transport Layer Security (TLS) inspection. You first need a certificate authority (CA) in place or a self-signed certificate for testing. Once that’s ready, generate and upload the TLS certificate. After the upload, the certificate status will change to Active. Then, create an inspection policy to scan encrypted traffic, and link the policy to your security profile. Finally, test the setup by ensuring clients trust the root certificate and validate that traffic inspection is working as expected.
Activate Netskope One Advanced SSE in GSA Marketplace
You must configure TLS inspection on your tenant before you can purchase Netskope from the marketplace. Follow the below steps to activate Netskope One Advanced SSE in the GSA Marketplace. It enables real-time monitoring and control of data traffic, ensuring sensitive information is detected and protected.
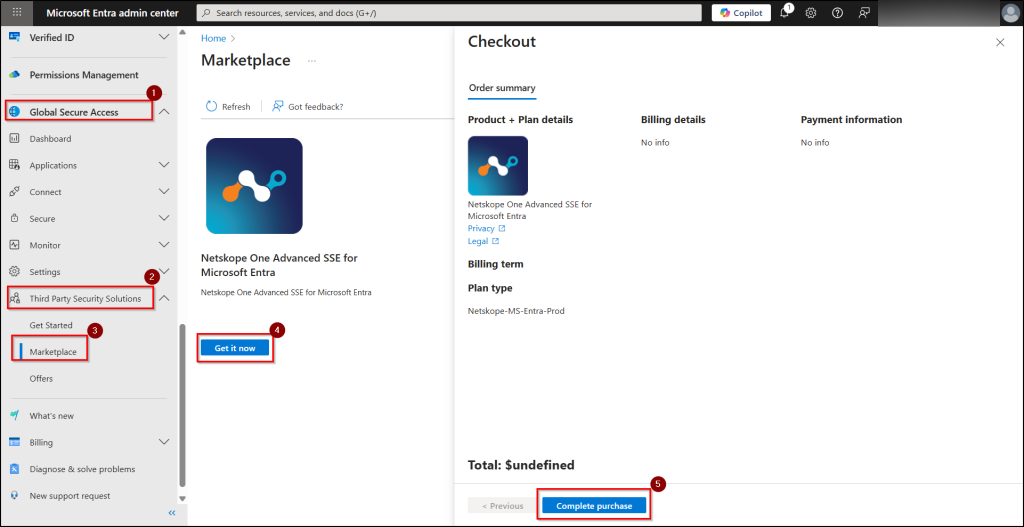
- Navigate to Global Secure Access → Third-Party Security Solutions → Marketplace.
- Find the Netskope offer and click “Get it Now”. Click ‘continue’ by checking terms and conditions, then select ‘Complete purchase’ to activate it.
- After activation, verify that the Netskope status shows as Active in the Offers page.
Create Advanced Threat Protection (ATP) Policy
Follow the steps to create an Advanced Threat Protection (ATP) policy to detect and block malware, suspicious activity, and other security threats.
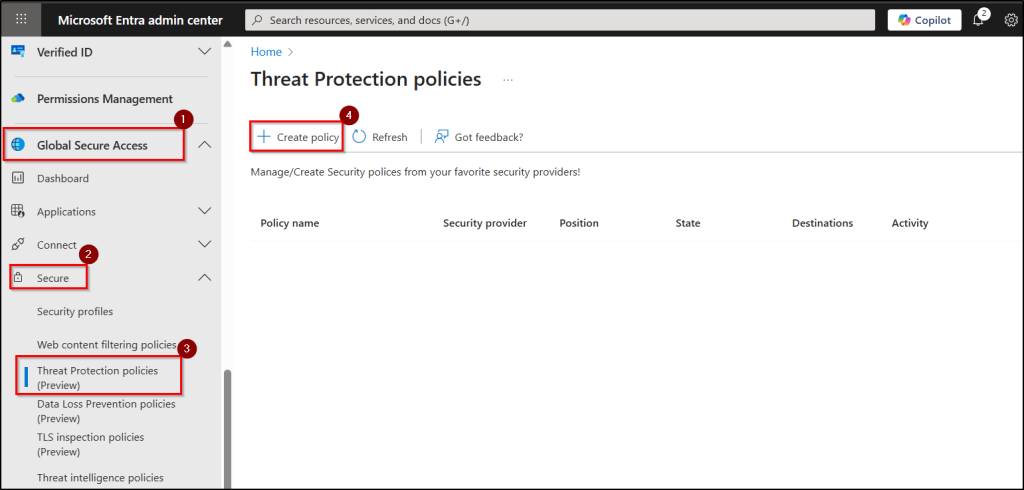
- Navigate to Global Secure Access → Secure → Threat Protection policies and click “+ Create policy”.
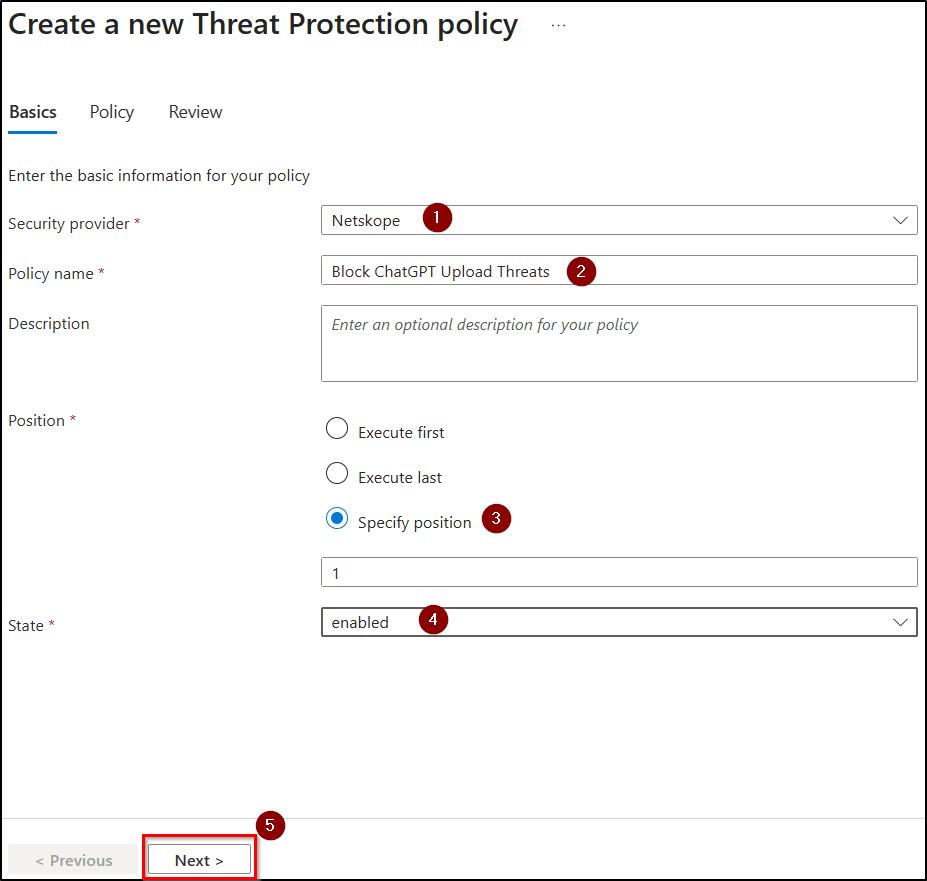
- In the basics tab, set Security provider to Netskope, give the policy a name, set Position, set State to enabled, and click Next.
- In the Policy tab, click Select destination, choose Destination Type as application, search and select ChatGPT, then apply your selection.

- Choose Activity Type as upload download, now click Select action, for each threat severity level (Low, Medium, High), set an Action (Block, Alert, Allow), and then click Next.
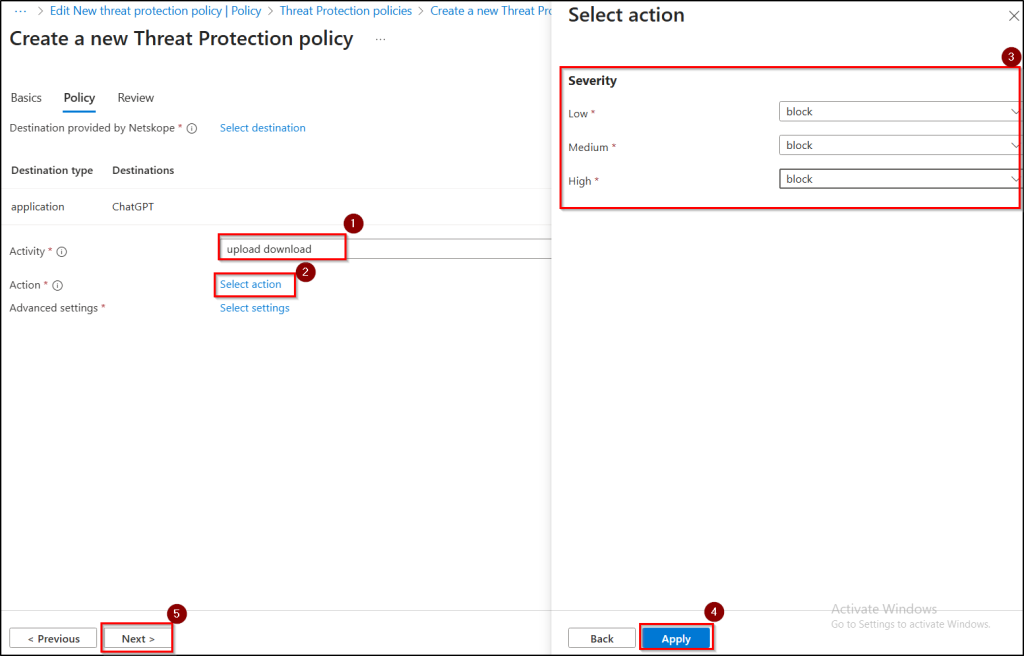
5. Review all the settings and click Submit to create the policy.
Set Up Netskope Data Loss Prevention (DLP) Policy
Follow the steps below to create a Netskope Data Loss Prevention (DLP) policy. By configuring DLP, you can stop organization users from uploading/pasting company data into generative AI tools like ChatGPT.
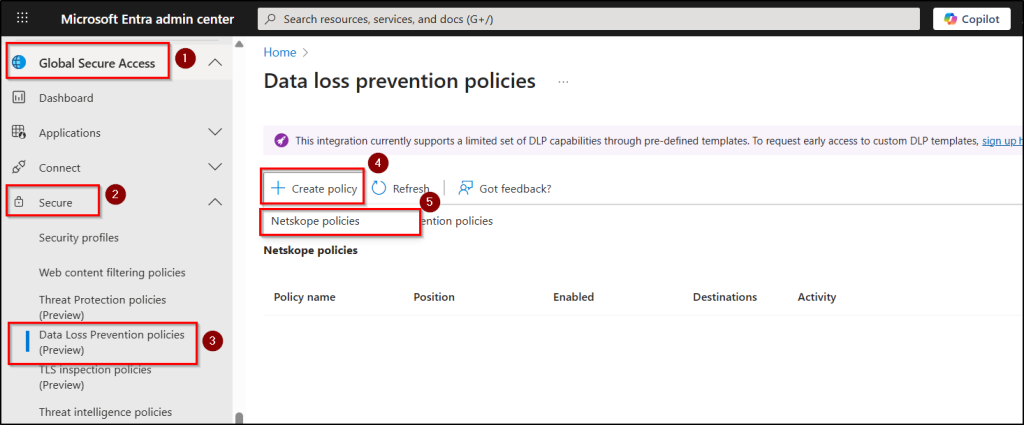
- Navigate to Global Secure Access → Secure → Data Loss Prevention policies and click + Create policy → Netskope policies.
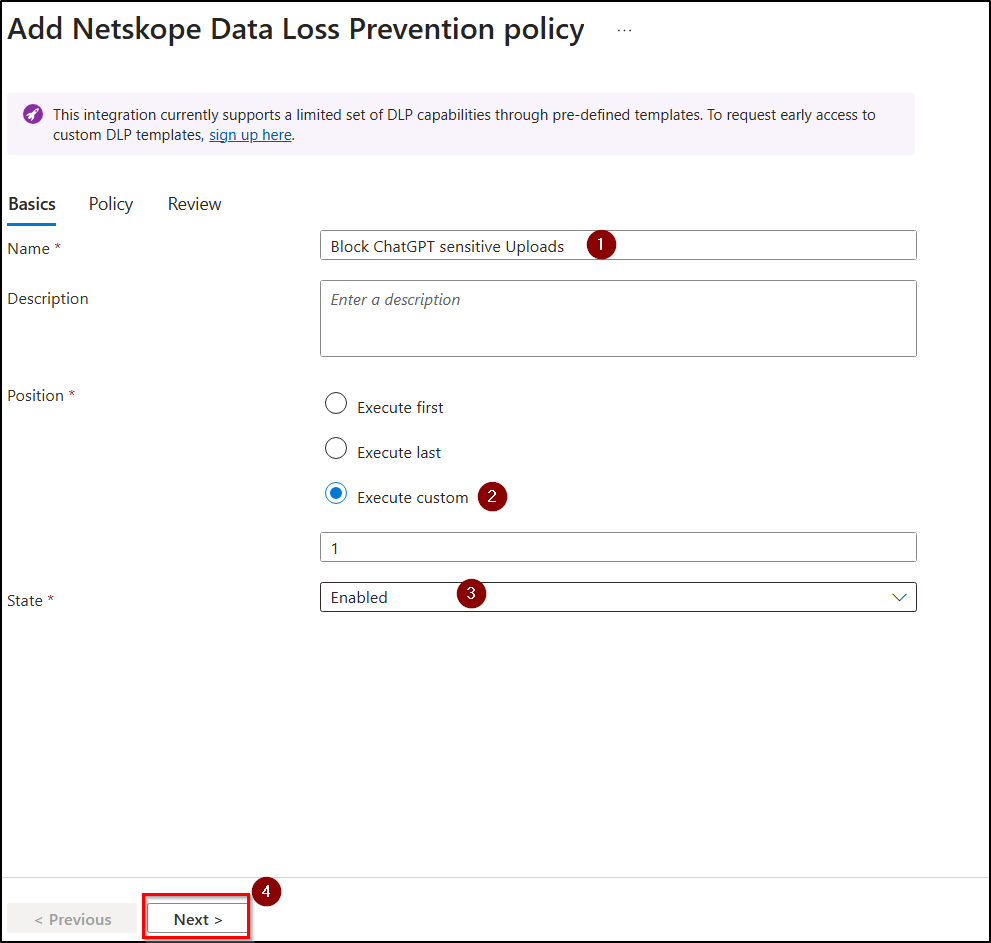
- Give your policy a Name, set the Position, set State to enabled, and click Next.
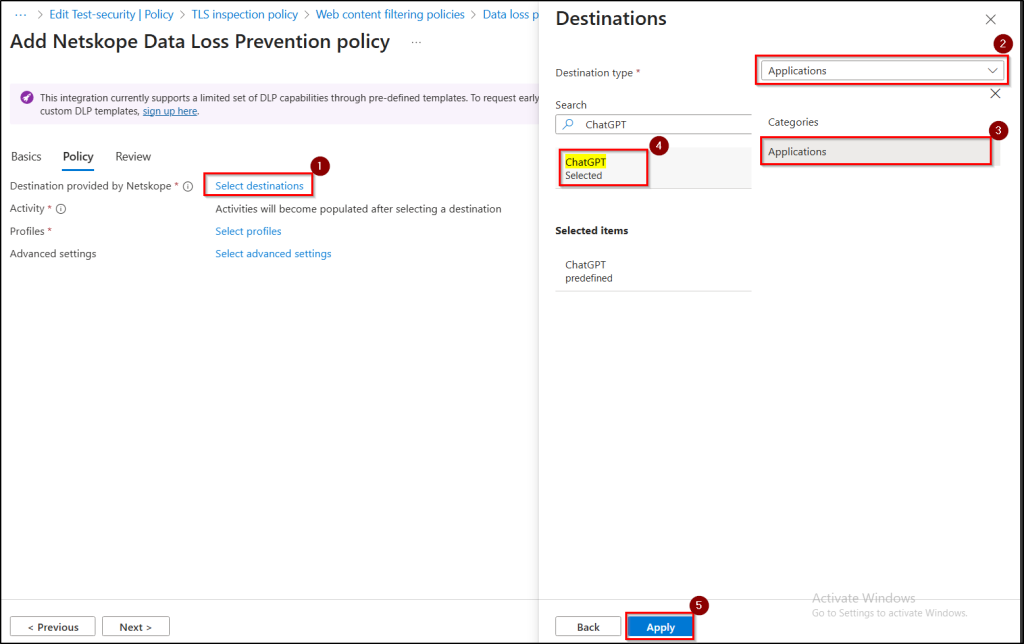
- Click Select destinations, choose Destination type as Applications, select ChatGPT and then click Apply.
- Choose Activity as Upload, click Select profiles, pick from prebuilt profiles: DLP-PCI, DLP-PII and set the action as Block. DLP-PCI protects sensitive payment card information, while DLP-PII safeguards personally identifiable information to prevent unauthorized exposure.
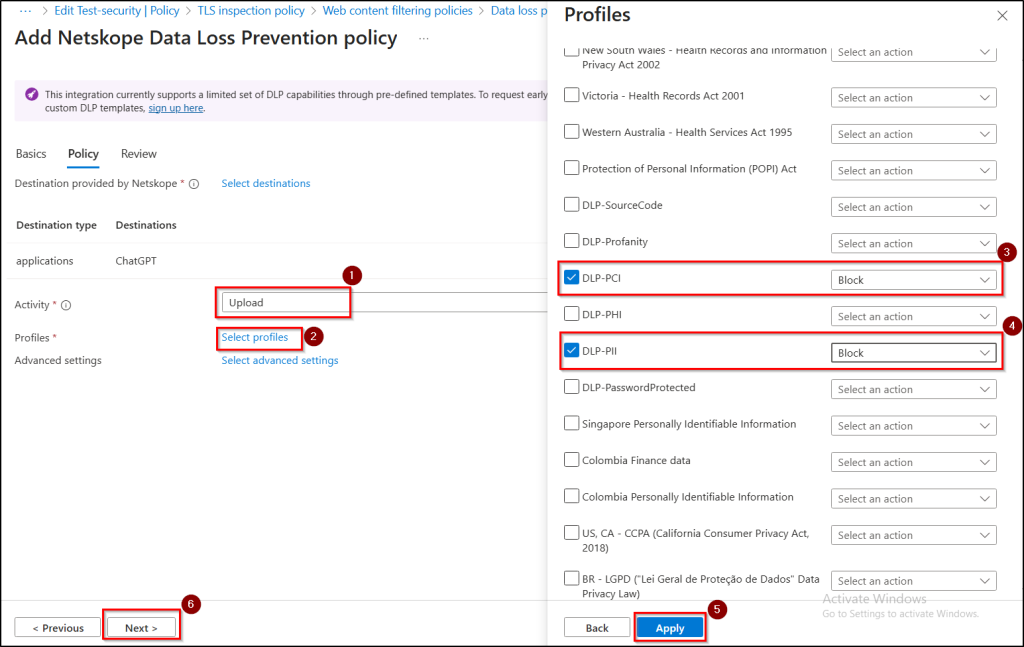
- Review all your settings and click Submit to create the DLP policy.
Link Security Policies to Security Profile
After creating your TLS, ATP, and DLP policies, follow these steps to link them to a security profile so they can be applied to user traffic.
- Navigate to Global Secure Access → Secure → Security profiles and create a new security profile by clicking + Create profile.
- Enter security profile a suitable name, leave state and priority as default.
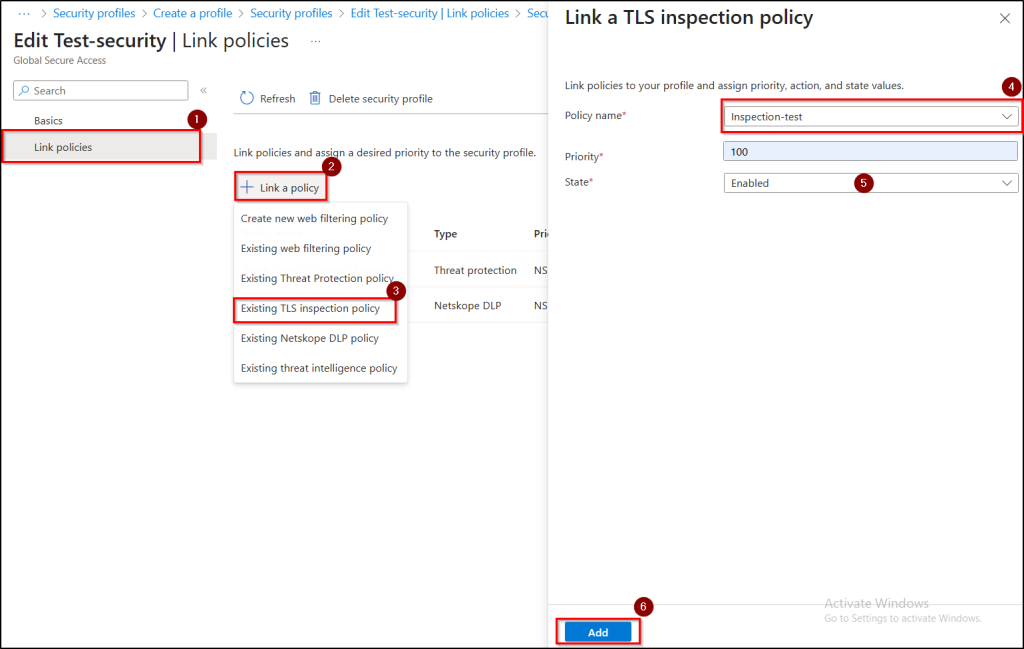
- In the“Link policies” tab and click + Link a policy → Existing TLS inspection policy.
- From the drop-down menu, select your TLS inspection policy, leave Priority, State unchanged and click Add.
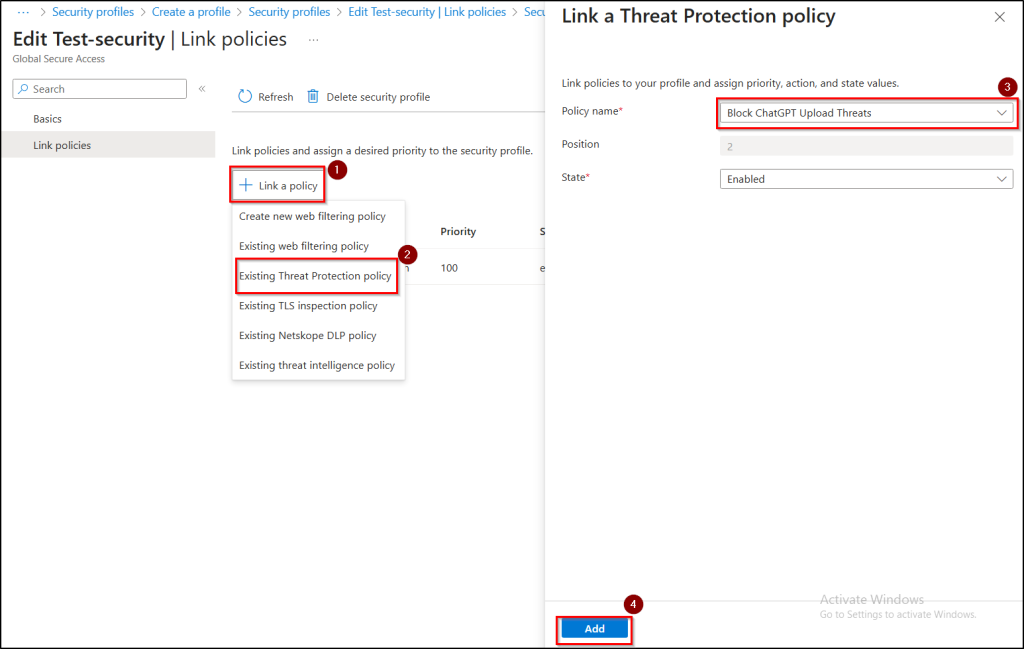
- Click Link a policy → Existing Threat Protection policy, choose the ATP policy you created and leave Position and State as defaults, then click Add.
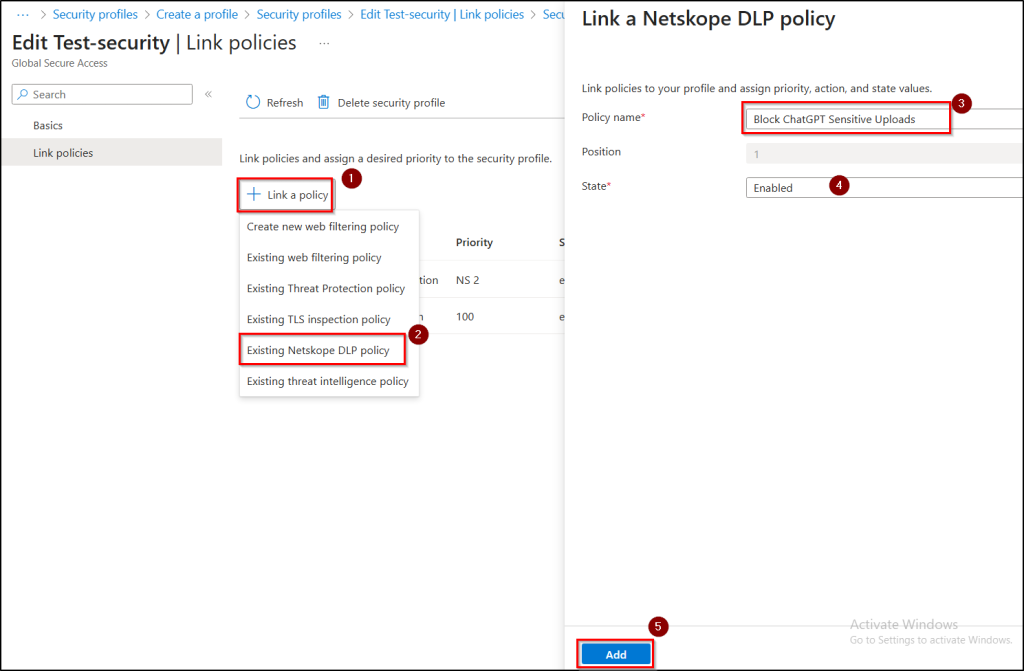
- Click + Link a policy → Existing Netskope DLP policy, select the DLP policy you created, leave Position, State as defaults and then click Add.
- Review all the configurations and click Create a profile to complete.
Implement Conditional Access Policy to Enforce Security Profile
To enforce the security profile, you need to configure a Conditional Access policy in Microsoft 365 that targets specific users or groups. This policy uses session controls to mandate profile delivery and compliance checks.
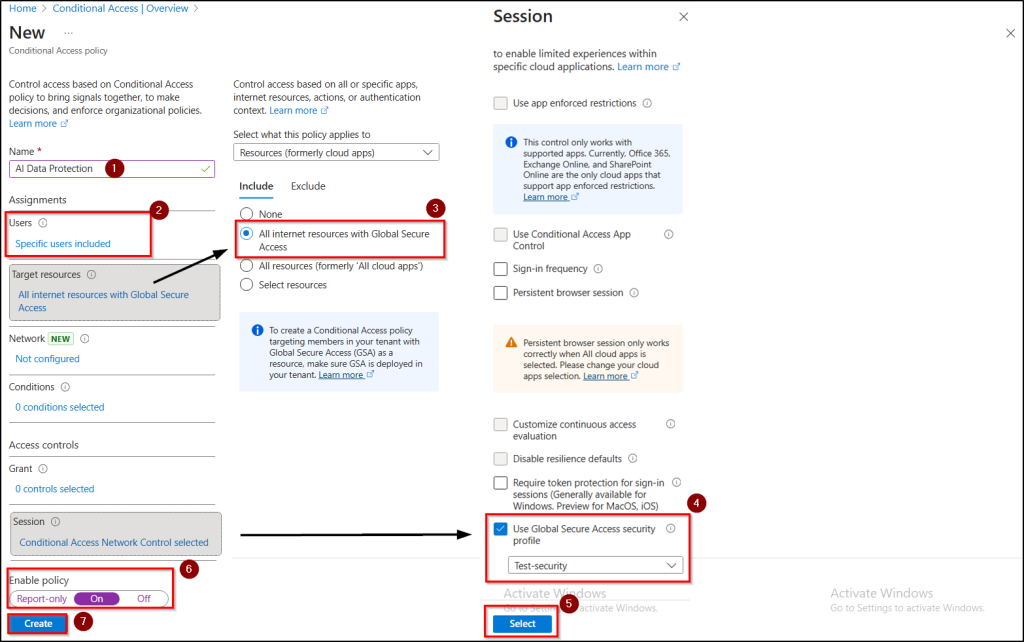
- Give your policy a name, then under Assignments, select the users or groups to whom this policy applies.
- Under target resources, choose “All internet resources with Global Secure Access”.
- Under Session, select “Use Global Secure Access security profile” and pick the security profile you linked with your ATP, DLP, and TLS inspection policies.
- Ensure the policy state is set to On, and then click Create.
Note: You can also apply Just-in-Time (JIT) access to GenAI tools using Conditional Access to grant temporary, time-bound permissions. This ensures users only get access when required, minimizing the risk of shadow AI usage and data exposure.
Validating Security Profile policy configurations
All policies and configurations are complete. Now, validate your security profile settings to make sure everything works correctly and will block sensitive data pasting/uploads.
- Ensure GSA client is installed on the test device.
- Verify that the security profile is enforced via the Conditional Access policy.
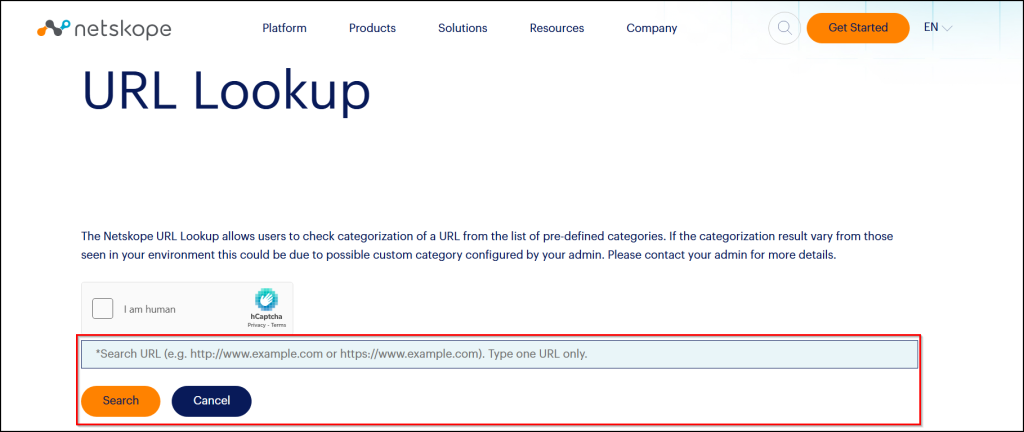
- Visit the Netskope URL lookup page, if you see a search field and button, it means Netskope is intercepting, analysing traffic and you’re ready to test.
Note: Configuration changes to the Security Profile or ATP policies may take up to one hour to fully apply.
End User Testing: Preventing Company Data from being Pasted into ChatGPT
We’ve put all the pieces in place. The ATP and DLP policies are ready, TLS inspection is active, and Conditional Access is doing its job. Now comes the real test, what happens when someone in your Microsoft 365 network tries to paste company secrets into ChatGPT?
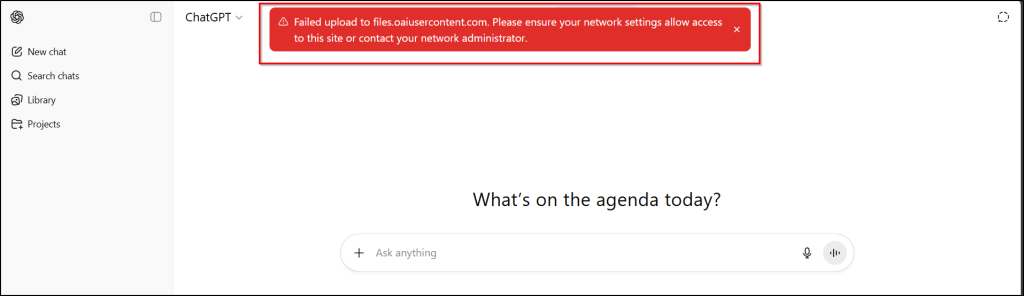
On my test device, where the GSA client is installed and all the configurations are applied, I open ChatGPT and attempt to upload a file or copy-pasting sensitive data like PII or PCI details. The moment I hit upload, the request is stopped in its tracks. Instead of the file going through, I get an error message at the top of the screen:
⚠️ “Failed upload to files.oaiusercontent.com. Please ensure your network settings allow access to this site or contact your network administrator.”
That error isn’t just a glitch; it’s proof that the safeguards are working exactly as designed. The policies step in quietly, blocking risky actions and preventing data exfiltration. To the employee, it’s nothing more than a simple “upload failed” message, but behind the scenes, it’s a quiet victory for security teams.
Wrapping Up
By configuring the GSA client, leveraging Microsoft Entra SSE, and setting up Netskope ATP and DLP policies, organizations can safely use AI tools like ChatGPT while preventing sensitive data from leaving the network. In addition, integrating DSPM for AI helps continuously monitor and protect sensitive data across AI tools, adding another layer of security. This approach allows Microsoft 365 users to work confidently with precise, risk-based controls rather than broad bans.
I hope this blog has helped with detailed steps to block organization’s sensitive content upload to ChatGPT. If you have any thoughts or questions, feel free to drop them in the comments below. Happy securing!


