Approvals are everywhere—from project proposals to content publishing, and even user access. In SharePoint Online, ensuring that sensitive information is shared only when it’s ready is just as critical. But with so much collaboration happening, it’s easy to miss a file’s approval status. That’s where content approvals for lists & libraries come in. This feature gives admins control over which files are visible to users, ensuring sensitive content meets security and quality standards.
In this blog, we’ll explore how to configure content approval for lists and libraries in SharePoint Online.
What is Content Approval in SharePoint?
Content approval in SharePoint Online enables admins to keep new items or changes in a draft state until they are approved. By requiring approval, you can ensure content is accurate and appropriate before it is made visible to everyone. Content approval in SharePoint is important for a number of reasons, including:
- Keeps confidential content private until it is finalized and approved.
- Enforces consistent quality and compliance with organizational policies.
- Allows teams to work on drafts while ensuring only approved content is shared.
- Supports regulatory or governance requirements by enforcing an approval process.
Here’s how you can implement content approval in SharePoint—explore the sections below:
- Configure content approvals for lists & libraries in SharePoint Online
- How content approval works
- Request sign-off in SharePoint
- New approval experience for SharePoint lists and libraries
Configure Content Approvals for Lists & Libraries in SharePoint Online
Follow these simple steps to set up content approval in document libraries and lists.
Note: The following method works on a list or document library level and not at the site level. To enable content approval for all lists and document libraries within a site, you will need to repeat this process for each list or library.
Require Content Approval for Lists
Follow these steps to add an approval to a SharePoint Online list:
- Open the list you want to configure.
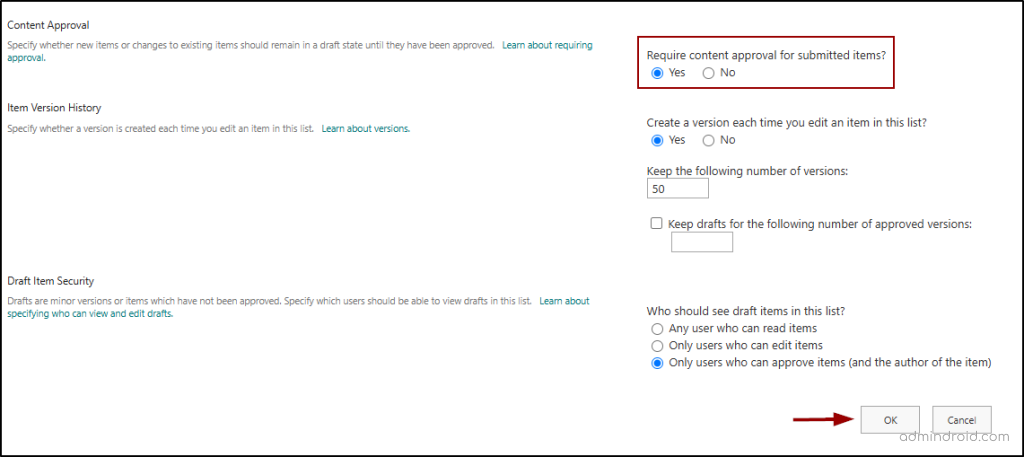
- Go to Settings → List settings → Versioning settings.
- Under “Require content approval for submitted items,” select Yes.
- Enable versioning by selecting Yes, and specify the number of versions/drafts to retain.
- Choose who can view draft items:
- Any user who can read items.
- Only users who can edit items.
- Only users who can approve items and the item’s author (default option).
- Click OK to save changes.
Require Content Approval for Libraries
To enable content approval for SharePoint Online libraries:
- Navigate to the desired library.
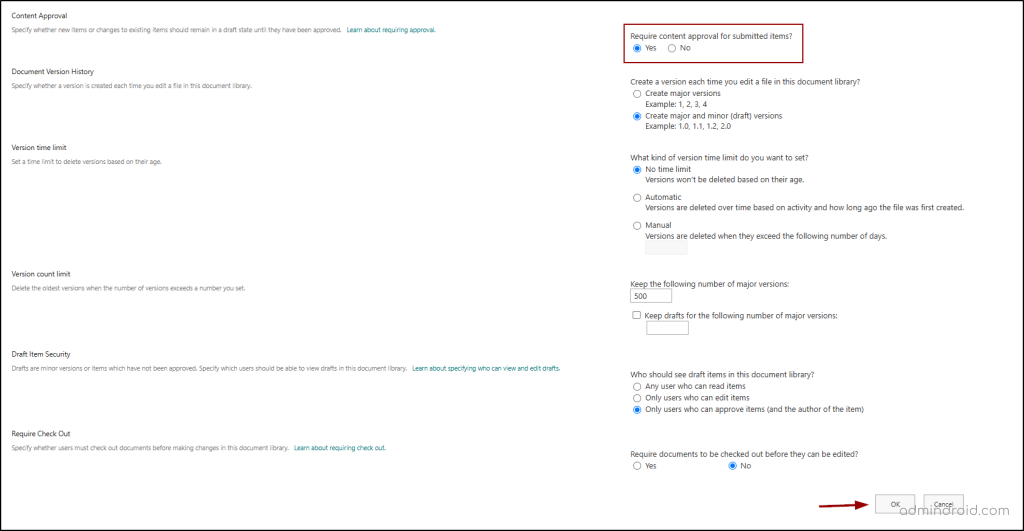
- Go to Settings → Library settings → More library settings → Versioning settings.
- Under “Require content approval for submitted items,” select Yes.
- Configure versioning and draft security options as needed.
- Click OK to save changes.
How Content Approval Works
Once SharePoint content approval is enabled:
- Any newly uploaded item or file enters a pending/draft state.
- Draft state only shows when ‘Create major and minor (draft) versions’ option is enabled for the doc library in the versioning settings. A draft document signifies that the content is still a work in progress, not finalized, and has not undergone approval.
- While in the pending/draft state, the item is visible only to its creator and site owners.
Users need to submit draft copies for approval to transition them into the Pending state. To submit a file for approval:
- Navigate to the document.
- Right-click the file → Submit for approval.
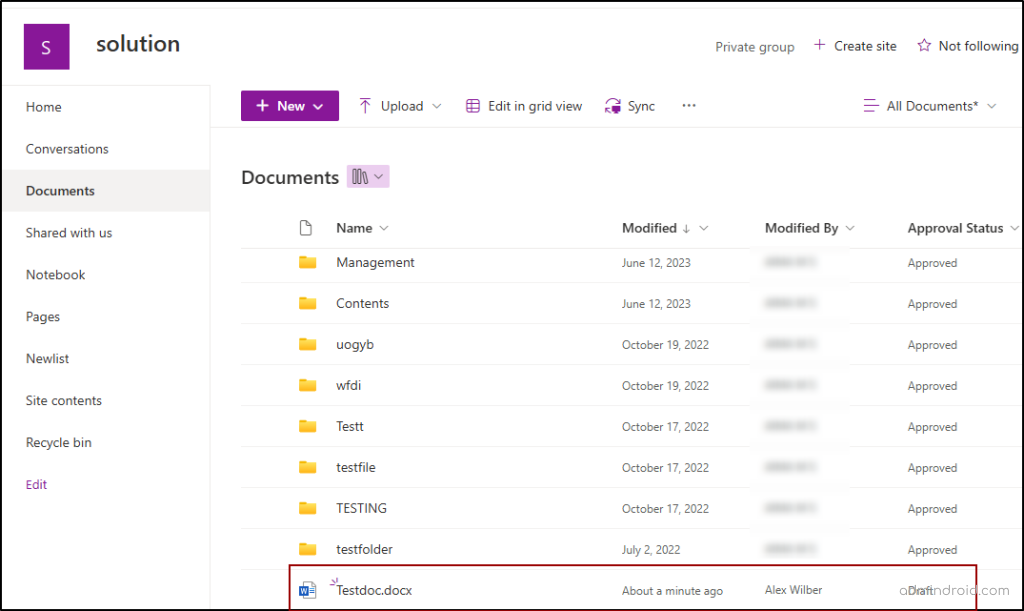
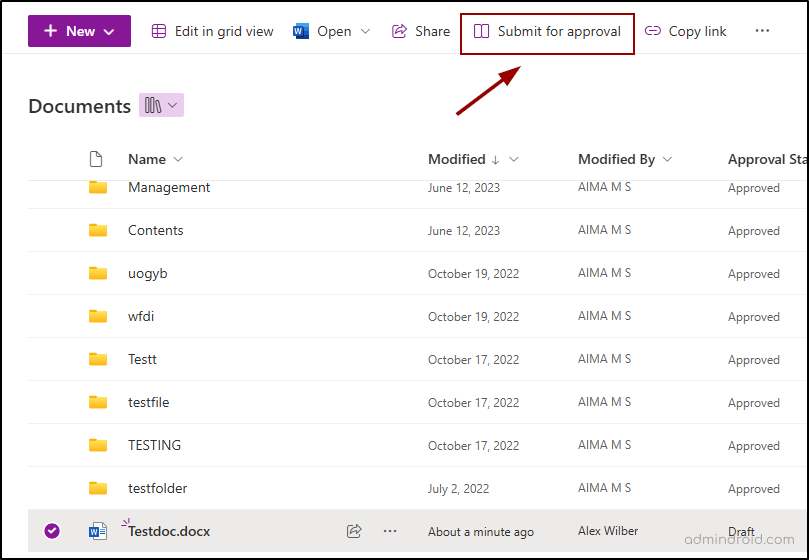
When a user clicks Submit for Approval, the document’s status changes from Draft to Pending and is sent to the designated approvers to approve/reject it. However, if the document is edited after submission, its status will automatically revert to Draft, requiring the user to resubmit it to move back to the Pending state.
📝 Note: Some users have reported that the “Submit for Approval” option is missing in SharePoint Online. While Microsoft has acknowledged the issue, they have not provided a clear explanation and have suggested navigating away from the page and returning as a possible solution.
In the Pending state, the document remains visible to its creator and users with draft-view permissions. Only in this state, approvers can review the document and either approve or reject it. To take action, approvers can select the item, go to More, and choose Approve/Reject.
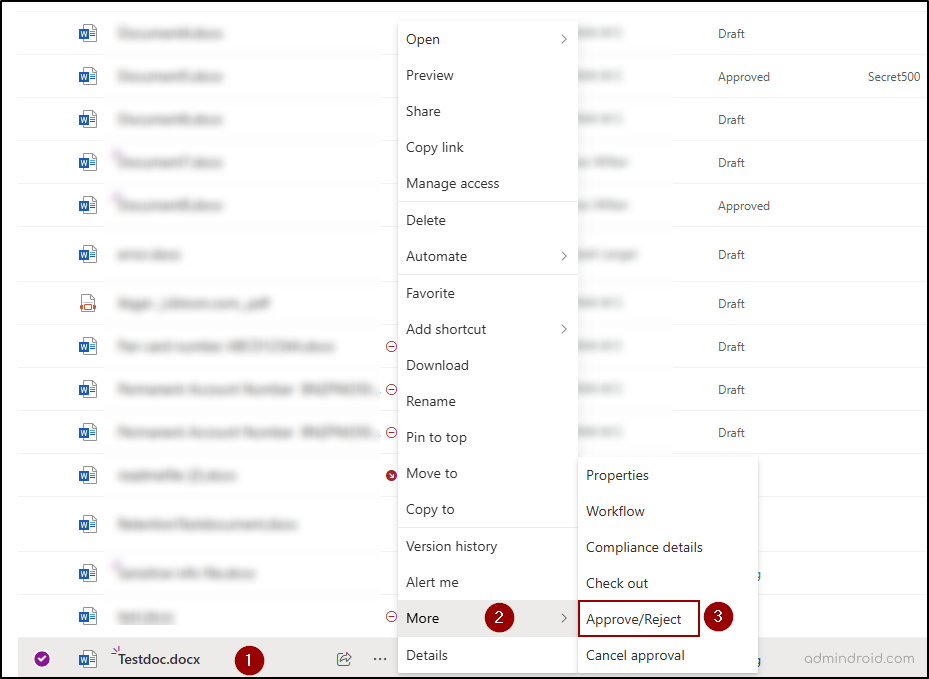
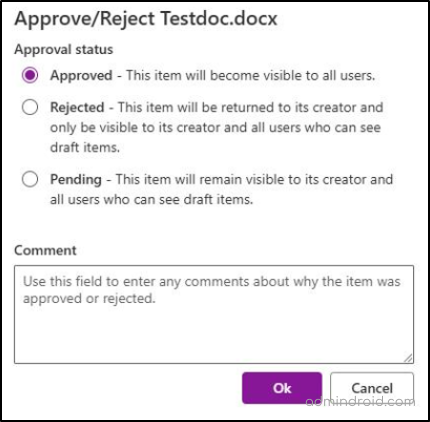
Once approved, the status updates to Approved, and the file is visible to all users.
Here’s an example scenario:
When Alex uploads a document to a library with content approval enabled, its status is set to Pending. If minor and major versions are enabled, the document remains in a draft state. While Alex and site owners can view the file, Grady, another site member, cannot.
Once a site owner or a user with the necessary permissions approves the document, it becomes visible to all users, including Grady. After approval, when Grady revisits the library, Alex’s document will appear.
Request Sign-off in SharePoint
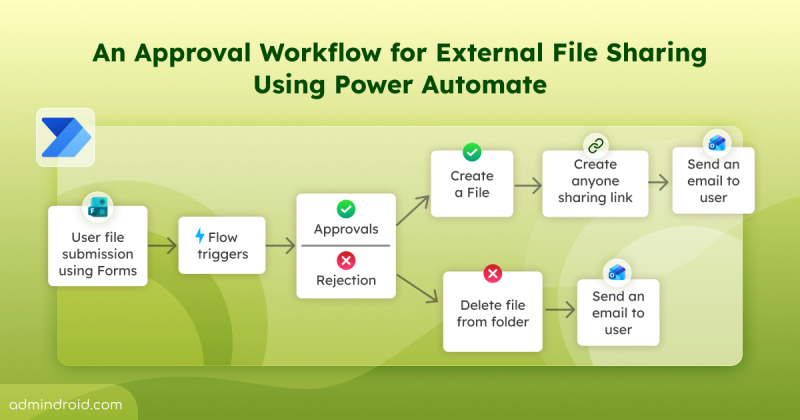
To enhance the approval process, SharePoint also offers a Request Sign-off feature, which integrates seamlessly with Power Automate. Once you select an item in a list or library, you can trigger this flow by navigating to Automate > Request Sign-off.
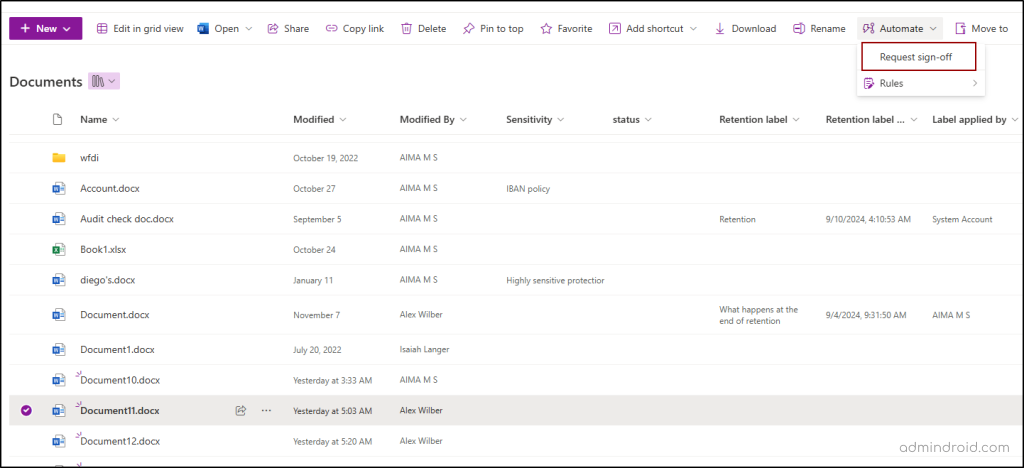
This process adds a new text column to your library, called Sign-off status, which tracks the approval process. The SharePoint approval workflow sends an email to the selected approvers, allowing them to approve or reject the document directly from the email. As they take action, the Sign-off status column is updated accordingly.
However, unlike the previous method, documents marked as “pending” remain visible to all users who have access to the site.
⚠ Important: If content approval is already enabled for the list or library, the Request Sign-off option will be unavailable.
New Approval Experience for SharePoint Lists and Libraries
Microsoft has introduced a modern approval functionality for SharePoint Online. It was initially rolled out to SharePoint Lists and is now being expanded to document libraries. Unlike the old method, this new experience provides a more streamlined way to assign and manage approvers.
- You no longer need to enable content approval from the versioning settings to use the new approval system.
- Users can create approval requests for list items, assign approvers, respond to approval requests, and view approval statuses.
- The process is integrated with Microsoft Teams, allowing approvers to manage requests directly within the Teams approval app.
💡 Tip: Additionally, Teams workflows can be created to schedule recurring reminders for pending approvals or send notifications for status updates, enhancing team productivity.
How to Enable Approvals for SharePoint Lists:
To create a document approval workflow in SharePoint, follow the steps below.
- Go to the SharePoint List.
- From the command bar, select Automate > Configure Approvals.
- Toggle the Enable Approvals switch to On, then click Apply.
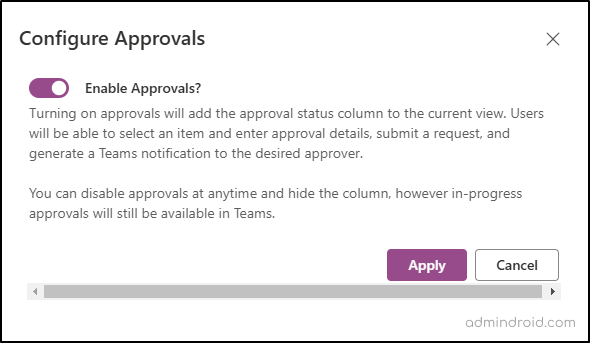
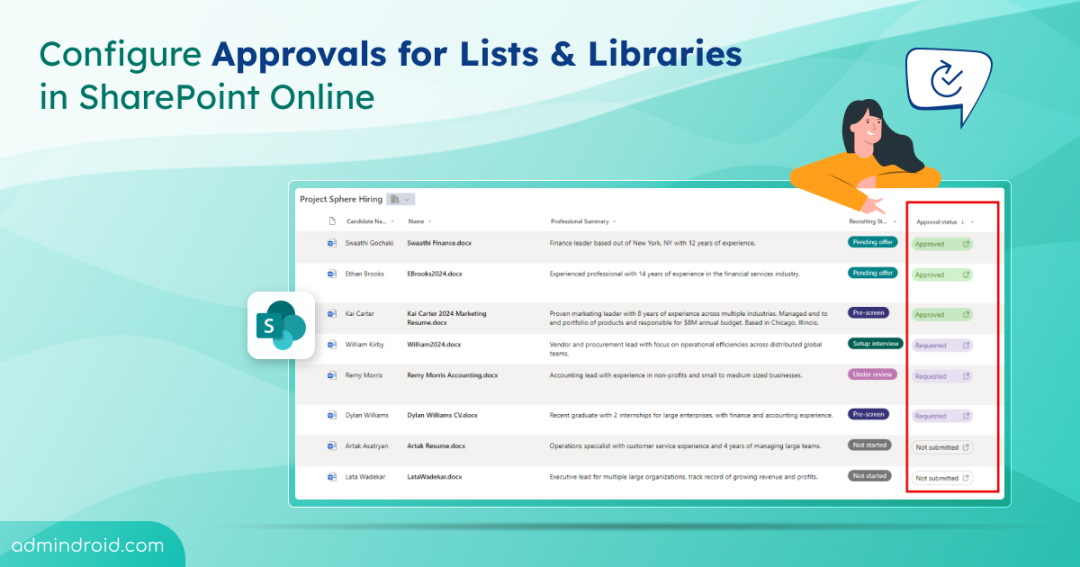
Once enabled, a new Approval Status column will appear in your list view. Users can select an item, enter approval details, and submit the request. The request will then be shown in the Approvals app within Teams, and the file metadata will be updated once it’s approved.
📝 Note: If you disable approvals, the approval columns will be hidden, but in-progress approvals can still be managed in Teams. You can always re-enable the approval columns when needed.
When a user submits an item for approval, the Approval Status will initially display as Not Submitted.
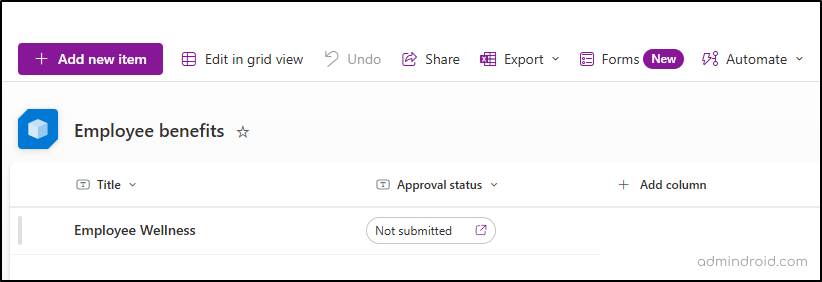
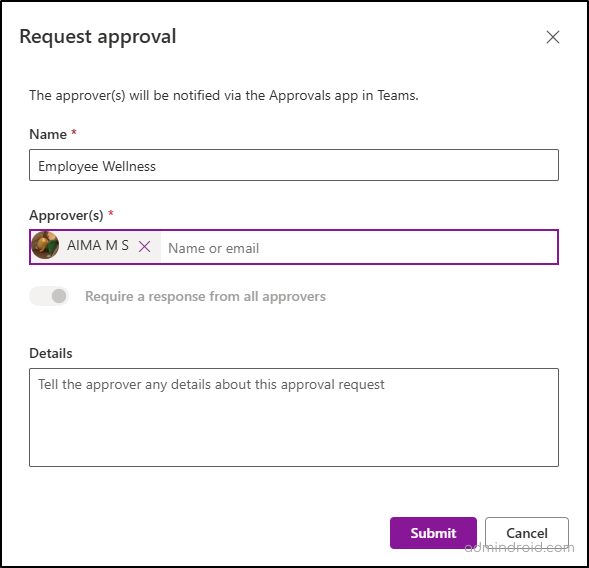
Clicking on the ‘Not submitted’ lets the user enter approval details, including the approvers and any additional comments. Once submitted, the status will change to Requested.
⚠ Important: If a file is being reviewed and the user saves changes, the current approval process will be canceled.
To minimize disruptions, Microsoft has introduced the following protections:
- View-Only Mode in Online Apps: If a file is under approval, users can only view it in the web versions of Microsoft Word, Excel, or PowerPoint. This prevents accidental edits.
- Marked as Final in Desktop Apps: In the desktop versions of Word, Excel, and PowerPoint, files under approval are marked as “Final” to discourage editing during the approval process.
Additionally, other users who have access to the list can still view the content, unlike the “content approval” setting. However, they will not be able to make any changes or edits until the approval process is complete.
Approver Experience:
Approvers will see the approval status marked as Requested.
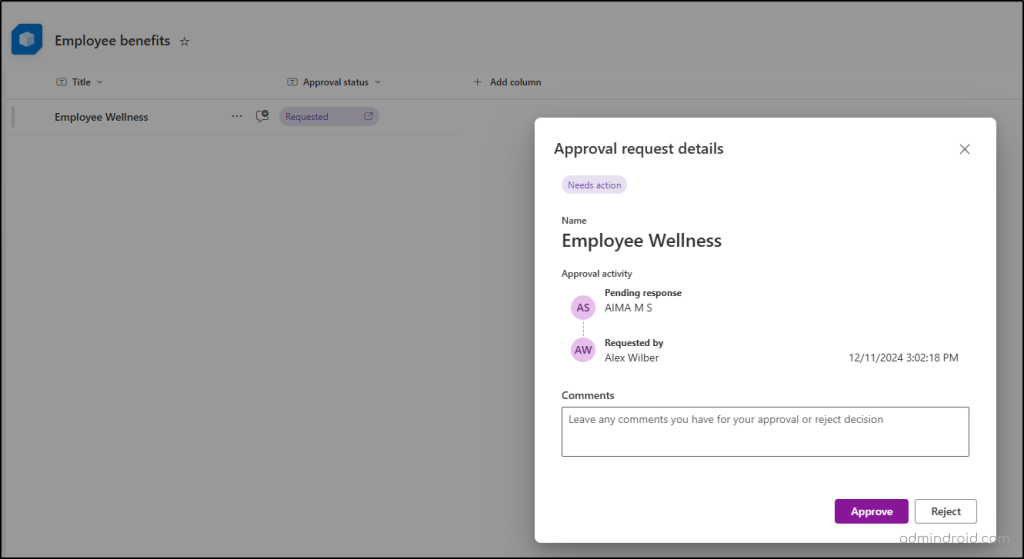
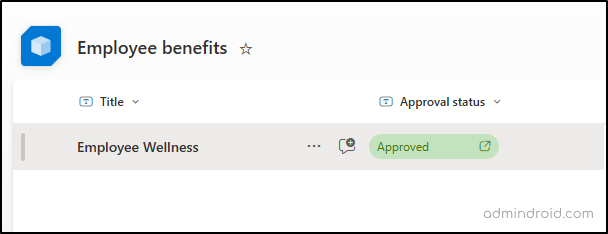
They can approve or reject the request and provide comments if necessary. The approval status will be updated based on their response.
Configure Approvals for SharePoint Document Libraries
Until now, modern user-based approvals were not available for document libraries in SharePoint Online. However, starting in November 2024 (Targeted Release) and December 2024 (General Availability), SharePoint will extend the approval functionality to document libraries.

📝 Note: SharePoint will support only one approval experience at a time (either the old method or the new one). The old method doesn’t provide item creators the flexibility to choose their approvers, as approvers are typically site owners. In contrast, the new system allows for the assignment of approvers.
We hope this blog has provided you with all the information you need on how to request document approvals in SharePoint Online. Up next? Explore how to automate SharePoint content approvals using Power Automate for effortless management and streamlined workflows. Thanks for reading! If you have any questions or need further clarification, feel free to leave a comment below.
