If you manage an Active Directory environment long enough, you eventually experience the familiar panic of realizing that a user or group has been deleted by mistake. Maybe someone clicked the wrong item, or an automated task didn’t behave as expected. Situations like these can disrupt operations and even lead to data loss.
Before the Active Directory Recycle Bin existed, getting deleted objects back was frustrating. You had to search through backups or perform complex recovery steps that often didn’t restore everything properly. But with the Recycle Bin, accidental deletions can be undone in seconds, with no downtime and no data loss.
In this blog, we explore the Active Directory Recycle Bin, including:
- What the Active Directory Recycle Bin does
- How the AD Recycle Bin works behind the scenes
- Steps to enable the Active Directory Recycle Bin
- How to restore deleted objects using the Recycle Bin
- Procedure to adjust Recycle Bin retention lifetime
- Limitations of the Active Directory Recycle Bin
What is Active Directory Recycle Bin?
The Active Directory Recycle Bin is a built-in AD DS feature. It lets administrators recover deleted directory objects such as users, groups, and computers, and more quickly, without relying on complex recovery procedures.
When the Recycle Bin is not enabled, most attributes of a deleted object are stripped during the initial deletion, which makes the restoration process difficult and limited.
With the Recycle Bin enabled, deleted objects are preserved in a logically deleted state, retaining all attributes—including key details like group memberships, SIDs, and ACLs. By keeping the object intact, the Recycle Bin makes restoring deleted directory objects much faster and far more reliable.
Life Cycle of Deleted Object in Active Directory
When an object is deleted in Active Directory, it does not disappear right away. Instead, it goes through a sequence of stages that control how long it can be recovered. These stages also determine whether to preserve the entire object, retain only its necessary attributes, or permanently delete the object.
This lifecycle behaves differently depending on whether the Recycle Bin feature is turned on.
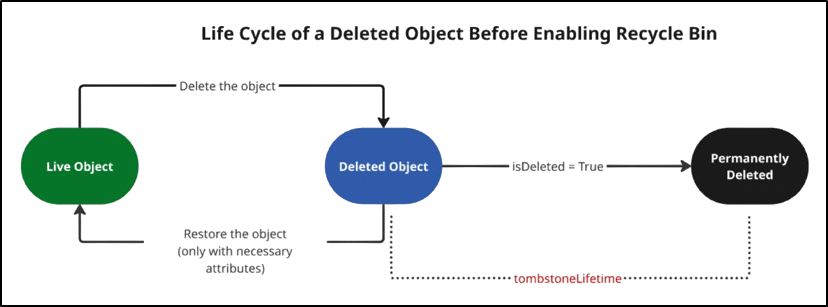
Before Enabling the Recycle Bin
When an object is deleted in Active Directory, its IsDeleted attribute is set to TRUE. AD then updates the object’s WhenChanged attribute and changes its Distinguished Name to something unusable like: CN=Fuji\0ADEL:63f85f13-aafe-4d78-87b2-87c1a188e36d,CN=Deleted Objects,DC=contoso,DC=com.
The object is then moved to the Deleted Objects container and kept there for the tombstone lifetime. The tombstone time period is controlled by the tombstoneLifetime attribute.
The default tombstone lifetime varies depending on the forest’s functional level of your Active Directory environment.
| Window Server Functional Level | Default Tombstone Lifetime |
| Windows Server 2003 SP1, Windows Server 2003 SP2, Windows Server 2003 R2 SP2, Windows Server 2008, Windows Server 2008 R2, Windows Server 2012, and later versions. | 180 days |
| Windows Server 2003 R2, Windows Server 2003 RTM, Windows Server 2003 R2 SP1, and earlier versions. | 60 days |
During this time, most of its important attributes are removed, except for a few identity attributes such as GUID, SID, DN, and USN, which significantly limits recovery options. Even if restored, the object is largely unusable because it has already lost essential attributes such as group memberships and other critical metadata.
When the tombstone period ends, the AD garbage collector permanently deletes the object from the database. At this point, it cannot be recovered and restoring it earlier requires an authoritative restore from a backup.
After the Recycle Bin is Enabled
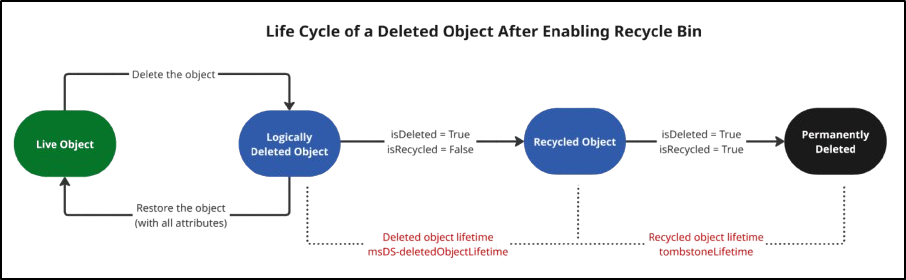
When an object is deleted, it enters the logically deleted state. Active Directory sets the isDeleted attribute to TRUE and moves the object to the Deleted Objects container.
The object remains in this state for the duration defined by the msDS-DeletedObjectLifetime attribute. If this attribute is not already set when the Recycle Bin is enabled, it is automatically set to match the tombstoneLifetime value. During this logically deleted state, all linked-value and non-linked-value attributes are preserved, allowing the object to be fully restored using PowerShell or the Active Directory Administrative Center (ADAC).
After the Deleted Object Lifetime (msDS-DeletedObjectLifetime) expires, the object transitions into the recycled state (tombstone), where most of its attributes are stripped, and only minimal metadata is retained. The object stays in this state for the tombstoneLifetime period, depending on your configuration. Although a tombstone object can still be recovered with LDAP tools, it cannot be restored to its original state—its attributes and group memberships are permanently lost.
When the tombstoneLifetime also expires, the garbage collector permanently removes the object from the database, making it unrecoverable.
How to Enable Recycle Bin in Active Directory
Before you can enable Active Directory Recycle Bin, make sure the following prerequisites are met.
- The forest functional level must be Windows Server 2008 R2 or higher.
- You must be a member of the Enterprise Admins group in the forest where you want to enable the Recycle Bin.
- You need either the Active Directory Administrative Center or the AD PowerShell module to enable the Recycle Bin. If you’re using a domain-joined workstation instead of a domain controller, make sure you install the required RSAT tools.
You can follow the steps below to enable Recycle Bin using ADAC,
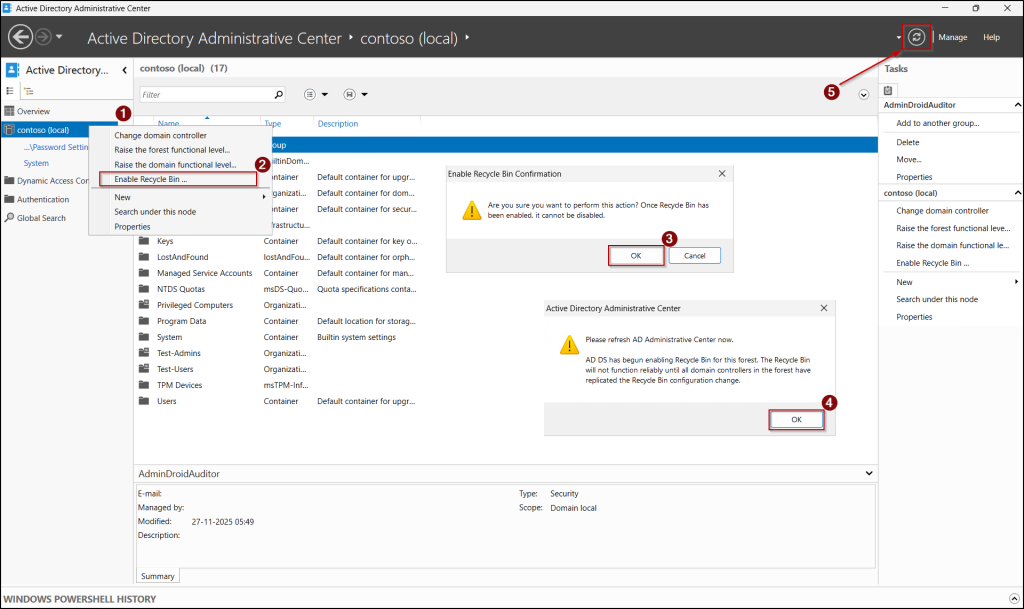
- Open Server Manager, click Tools in the top-right corner, and select Active Directory Administrative Center.
- In the left navigation pane, right-click on the domain name and select the Enable Recycle Bin option.
- Then, click OK on the confirmation prompt, and click OK again when the refresh warning appears.
- Finally, click the Refresh 🔄️ button in the top-right of the ADAC window. Once you refresh the window, the list will include the Deleted Objects container.
If you prefer PowerShell, you can use the following cmdlets, replacing <RootDomainName> with your forest root domain name.
|
1 2 |
Import-Module ActiveDirectory Enable-ADOptionalFeature 'Recycle Bin Feature' -Scope ForestOrConfigurationSet -Target <RootDomainName> |
Then, select Yes to All in the confirmation prompt to enable Recycle Bin in your Active Directory.

Restore Deleted Objects in Active Directory
You can restore deleted objects in Active Directory depending on whether the Recycle Bin is enabled. Below are the available methods you can use to restore deleted objects.
1. How to Restore Deleted Objects from AD Recycle Bin
If the deleted object’s lifetime is not expired, you can follow the steps below to restore that from the Recycle Bin.
- Open Run dialog box (Win + R), type dsac.exe, and press Enter to launch the ADAC. Then, navigate to the Deleted Objects container.
- Next, right-click on the object that needs to be restored and select Restore.
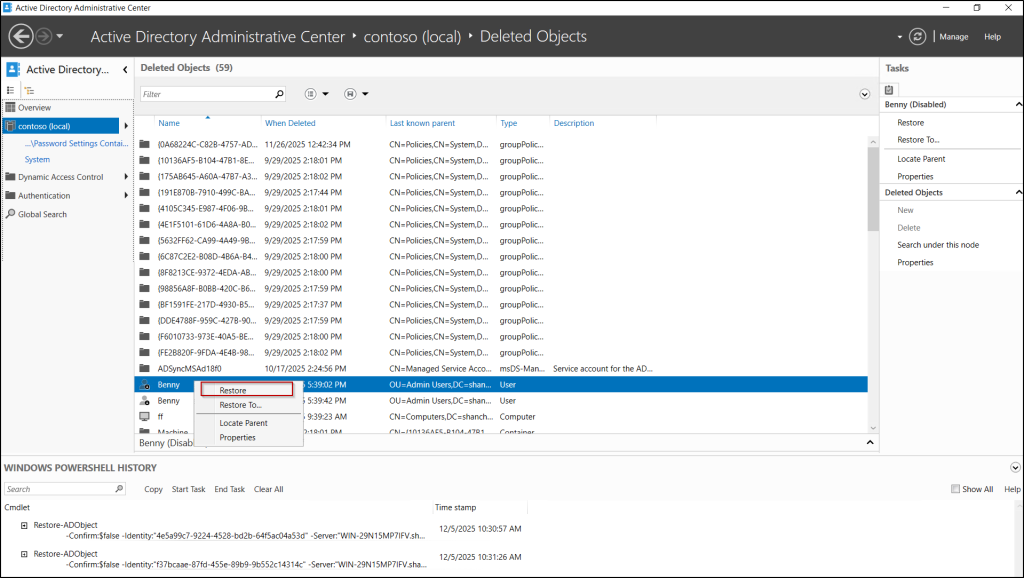
Now, the object will be restored to its original location in Active Directory.
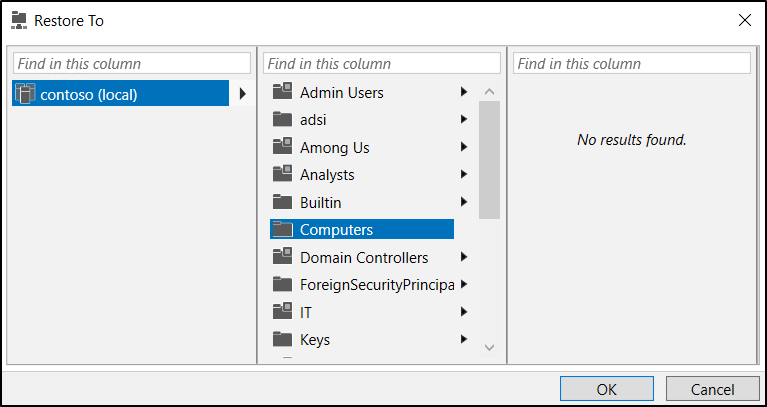
If you want to restore the object to a different location than its original one, select Restore To and choose the location in the pop-up window.
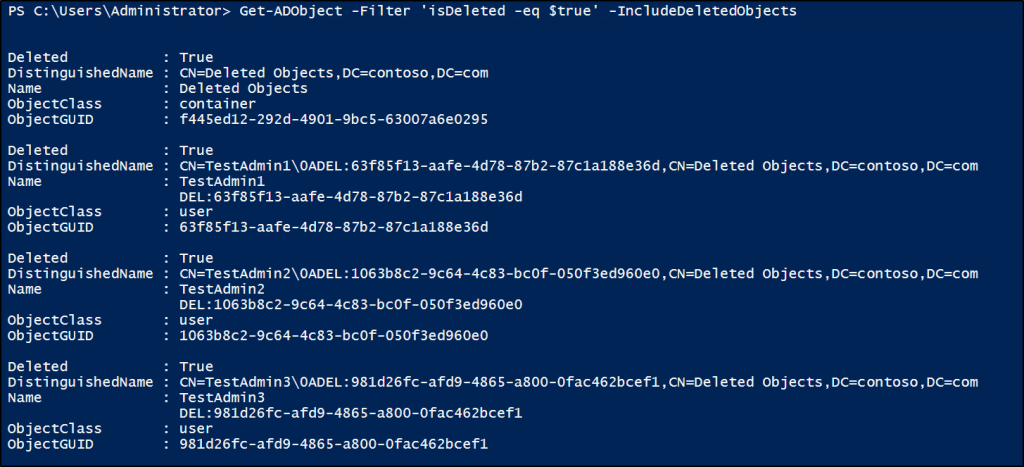
Similarly, you can use the Active Directory PowerShell module to restore deleted objects.
To view all the deleted objects in the Deleted Objects container using PowerShell, run the following cmdlet.
|
1 |
Get-ADObject -Filter 'isDeleted -eq $true' -IncludeDeletedObjects |
To restore a specific object from the Deleted Object container, use the following cmdlet, replacing <DeletedObjectDN> with the distinguished name of the deleted object.
|
1 |
Restore-ADObject –Identity '<DeletedObjectDN>' |
To restore a deleted object to a specific location, use the following cmdlet, replacing <NewLocationDN> with the distinguished name of the target location.
|
1 |
Restore-ADObject –Identity '<DeletedObjectDN>' –TargetPath '<NewLocationDN>' |
2. How to Restore Tombstone Objects in Active Directory
Once the deleted object’s Recycle Bin lifetime (msDS-DeletedObjectLifetime) expires or if the Recycle Bin is not enabled, it’ll become a tombstone object. Despite the fact that the object is potentially recoverable, its lost properties can’t be recovered at this point.
If you want to restore tombstone objects, follow the steps below.
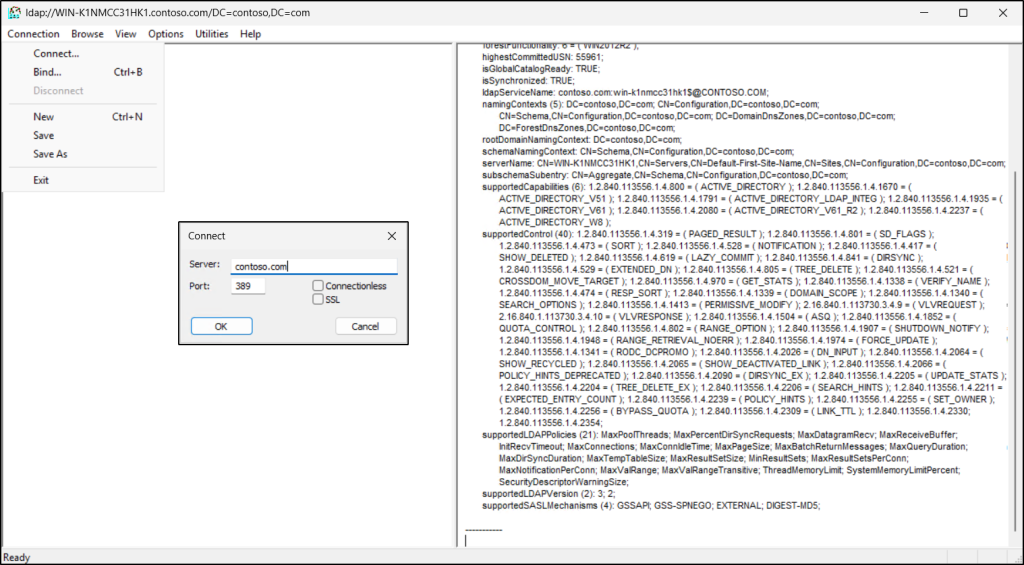
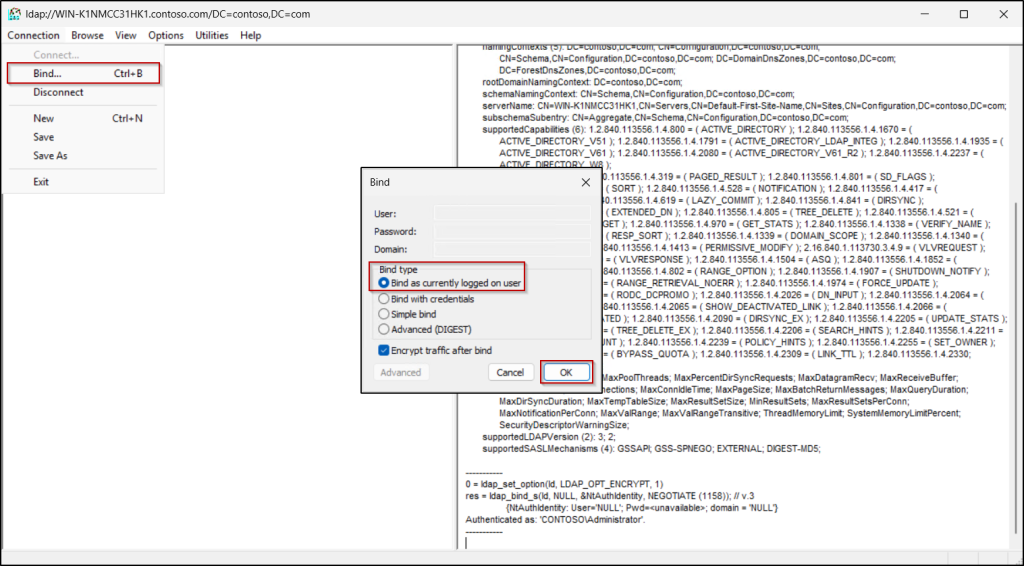
- Open Run (Win + R), type LDP.exe, and press Enter to launch the tool.
- From the menu bar, choose Connection, select Connect, enter the FQDN of the forest root domain, leave the default port (389 or 636), and then click OK.
- Again, open the Connection menu, select Bind, ensure that “Bind as the currently logged on user” is selected, and click OK.
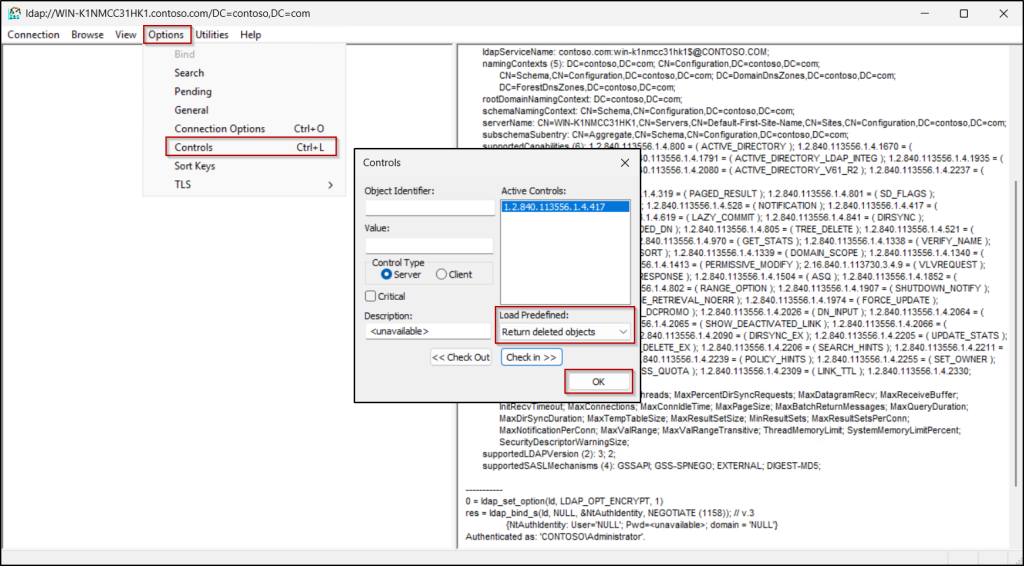
- Next, go to the Options menu and choose Controls. Here, select Return deleted objects under Load Predefined dropdown and click OK. This enables LDP.exe to expose objects that are marked as deleted.
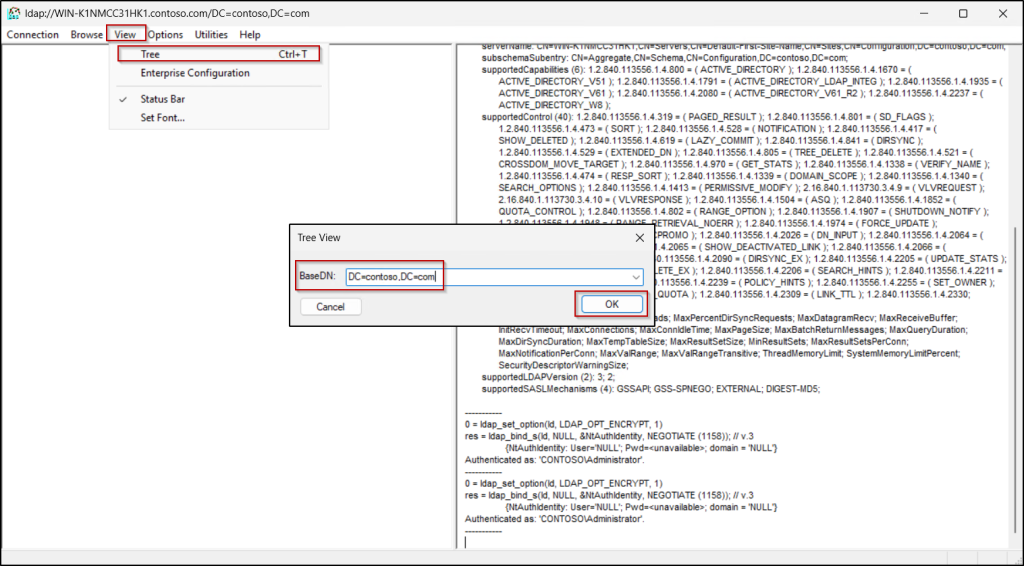
- Then, open the View menu, select Tree, and choose the fully qualified distinguished name (FQDN) of your domain. For example, if your domain name is contoso.com, then your BaseDN will be DC=contoso,DC=com.
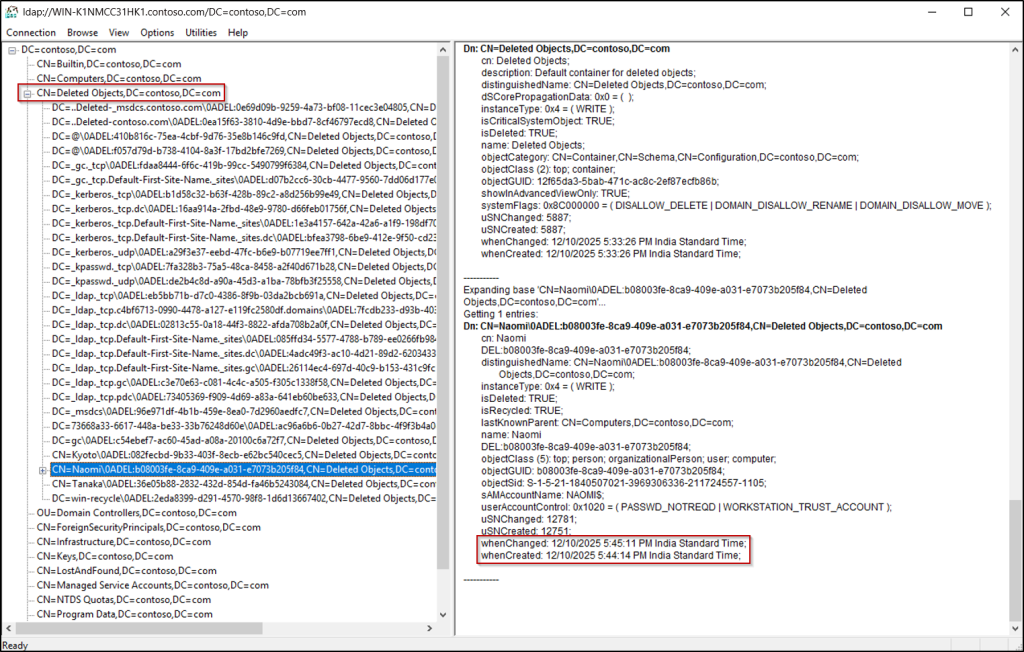
- Once loaded, expand the domain node on the left panel and open the container that lists deleted objects.
- Browse through the deleted entries and double-click the object you want to examine. Use the whenCreated and whenChanged attributes to verify that you’ve selected the correct object, especially if you’ve multiple objects with similar names.
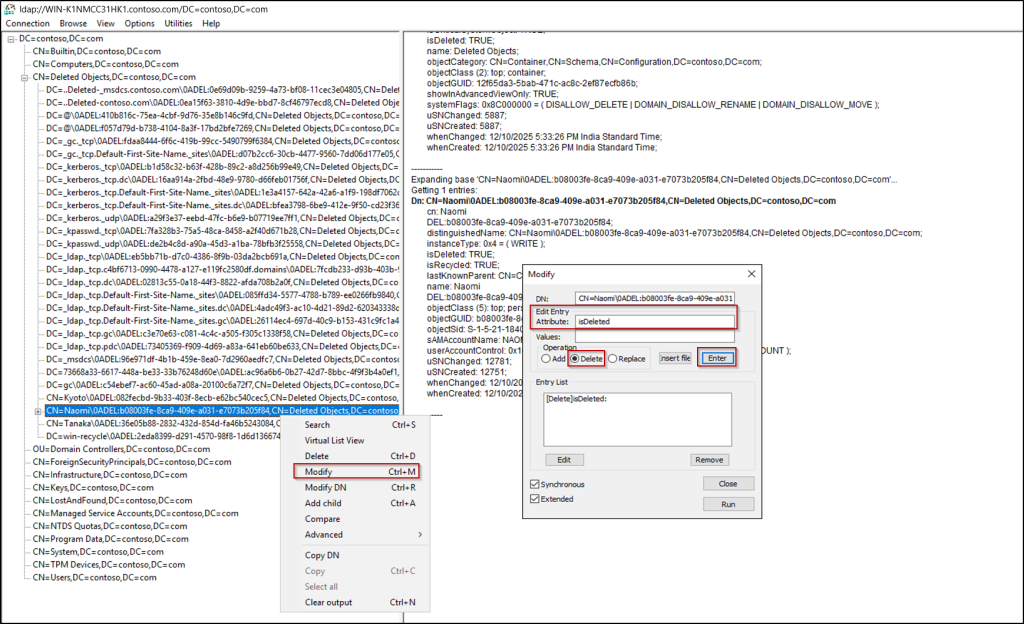
- Once you’ve identified the right object, right-click it and select Modify.
- In the Edit Entry section, enter isDeleted in the Attribute field, select Delete in the Operation field, and click Enter. This removes the flag that marks the object as deleted.
- With the deletion flag cleared, you now need to set the object’s restore location. To do this, set distinguishedName in the Attribute field, enter object’s distinguished name in the Value field, and choose Replace under Operation.
Note: If you want the object restored to a different location, specify the alternative distinguished name when updating the Values field. - Then, provide the DN location for restoration in the Values field and click Enter. For example, CN=Naomi,CN=Users,DC=contoso,DC=com.
- Finally, ensure that the Synchronous & Extended checkboxes are selected. This ensures preserve attributes during recovery and forces immediate replication. Then, click Run to restore the object.
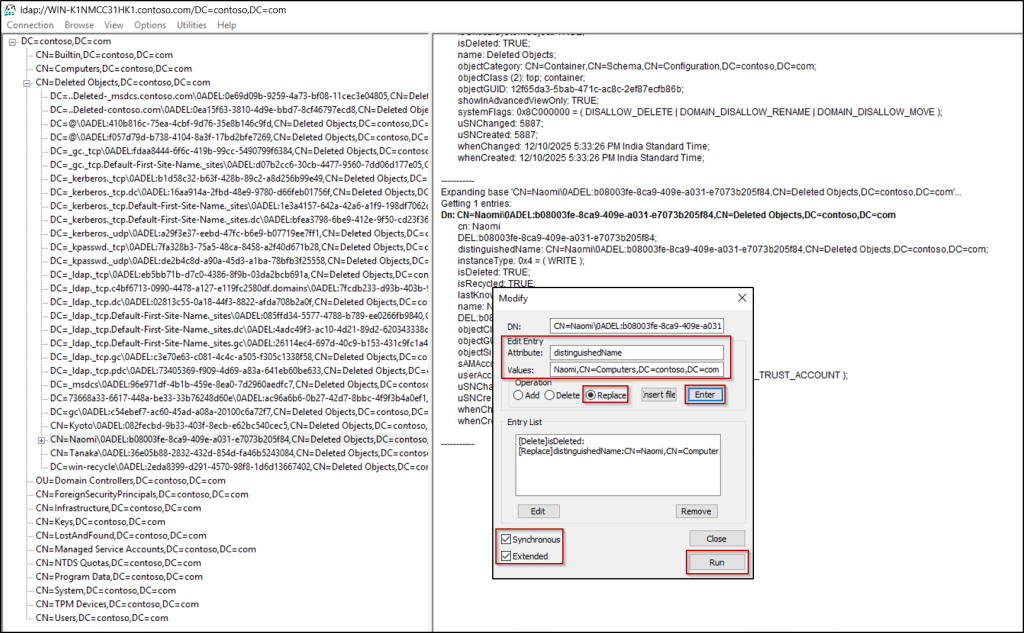
- After the modification is completed, the object is restored to the provided location (for example, CN=Users,DC=contoso,DC=com).
How to Change Recycle Bin Retention and Tombstone Lifetime in AD
Since both Recycle Bin retention and tombstone lifetime determine how long deleted objects remain recoverable, these settings play an important role in your recovery strategy. That’s why it’s essential to configure them in a way that aligns with your environment’s needs.
You can follow the steps below to modify their values.
- From the Server Manager’s Tools menu, open the ADSI Edit console.
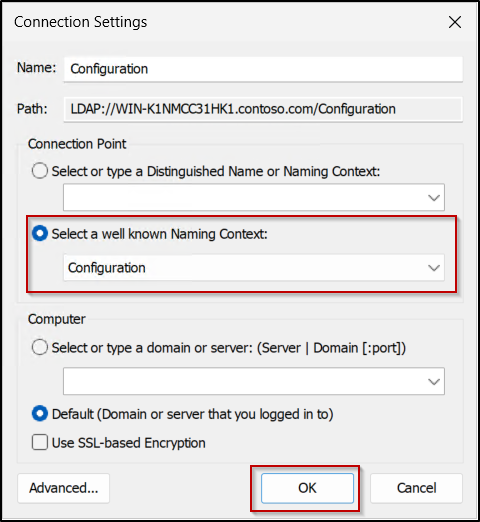
- Next, connect to the configuration partition by right-clicking ADSI Edit in the left-pane and select Connect to.
- In the Connection Settings dialog, ensure Select a well known naming Context is selected and choose Configuration from the drop-down list. Click OK.
- Next, go to Configuration [DCName.DomainName] → CN=Configuration → CN=Service → CN=Windows → CN=Directory Service.
- Then, right-click on the CN=Directory Service, click Properties, and select the tombstoneLifetime from the list of properties.
- To edit the value, click Edit, enter the new value that you need, and click OK.
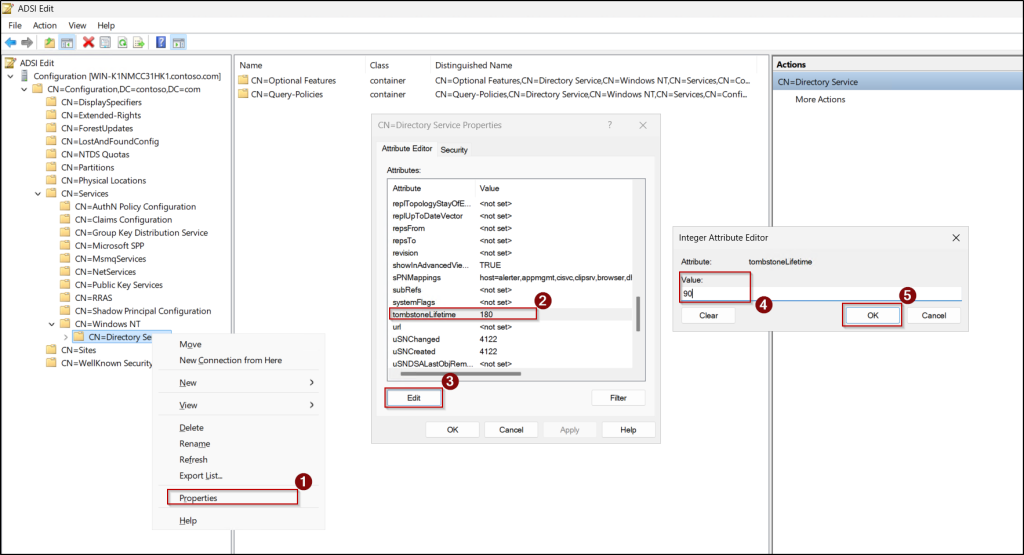
- To change the Recycle Bin retention period, select the msDS-DeletedObjectLifetime property from the list of properties and follow the previous step.
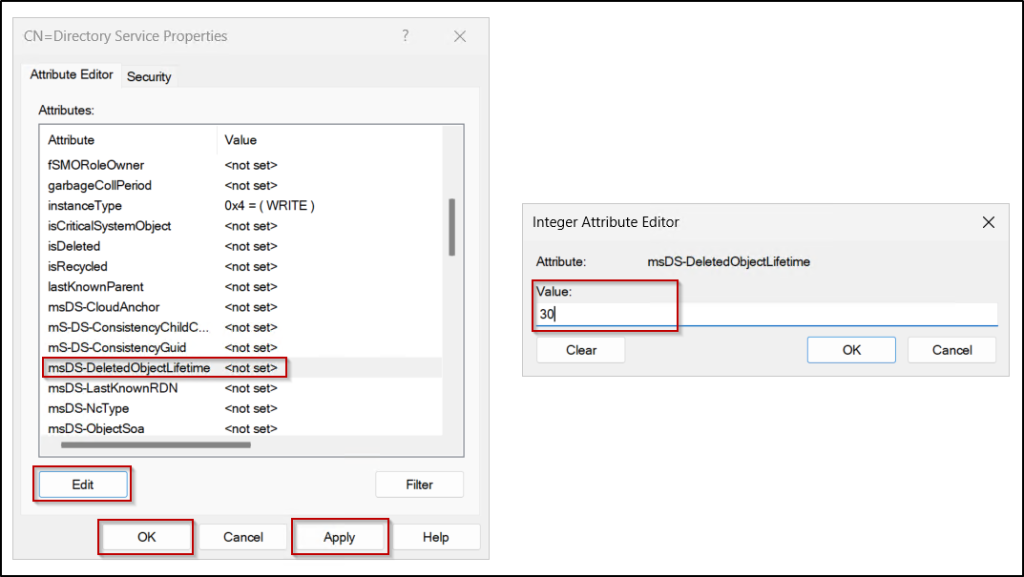
- Once done, click Apply to save the changes and click OK to close the configuration window.
You can also modify these Deleted Object Lifetime (msDS-DeletedObjectLifetime) attributes using PowerShell. To do that, first import Active Directory module by running the cmdlet below.
|
1 |
Import-Module ActiveDirectory |
To update the Recycle Bin retention period (Deleted Object Lifetime), execute the following cmdlet, replacing <days> with required number of days.
|
1 2 |
$ADConfigNamingContext = (Get-ADRootDSE).configurationNamingContext Set-ADObject -Identity "CN=Directory Service,CN=Windows NT,CN=Services,$ADConfigNamingContext" -Partition $ADConfigNamingContext -Replace @{‘msDS-deletedObjectLifetime’='<days>'} |
To modify the default tombstone lifetime value, run the following cmdlet, replacing <days> with the required number of days.
|
1 2 |
$ADConfigNamingContext = (Get-ADRootDSE).configurationNamingContext Set-ADObject -Identity "CN=Directory Service,CN=Windows NT,CN=Services,$ADConfigNamingContext" -Partition $ADConfigNamingContext -Replace @{tombstonelifetime='<days>'} |
Note: The minimum period can be specified for msDS-DeletedObjectLifetime is 2 days. When it’s set to null, the Deleted Object Lifetime is set to the value of the tombstone lifetime.
Limitation of Active Directory Recycle Bin
While the Active Directory Recycle Bin greatly simplifies the recovery of deleted objects, it does come with several important limitations you should be aware of.
- Windows Server 2008 and earlier forest functional levels are incompatible with the Active Directory Recycle Bin.
- Once the Recycle Bin enabled in your Active Directory forest, it cannot be disabled again.
- When you enable Recycle Bin, all the existing tombstone objects will be deleted immediately in your Active Directory. If you want to restore existing tombstone objects before enabling Recycle Bin, you can use the LDP utility.
- The AD Recycle Bin will not help you restore the contents of the SYSVOL folder, Group Policy, and other system-related files in Active Directory.
- Recycle Bin retains only the latest version of the deleted object and does not restore any earlier attribute changes made to the object.
- If deleted OU is restored, all the objects within that OU will not be restored automatically. Instead, you need to restore OU first, then you need to restore its object separately.
- The Recycle Bin cannot restore an object if another object already exists with the same UPN or distinguished name, as UPN values must be unique across the forest.
- An object cannot be restored if its parent OU is uninstantiated or deleted, as Active Directory requires the original container to be present for restoration. In such cases, you must restore the object to another existing OU.
Recycle Bin Won’t Turn on in Active Directory? Here’s the Fix You Need
1. Error: The FSMO role ownership could not be verified because its directory partition has not replicated successfully with at least one replication partner.
Cause: This error occurs when the server or workstation can’t replicate the changes to the additional domain controllers in your AD forest.
Fix: To resolve this error, replicate changes to all domain controllers by using the PowerShell script below.
|
1 2 3 4 |
$DCs = (Get-ADForest).Domains | %{ Get-ADDomainController -Filter * -Server $_ } | select HostName foreach ($DC in $DCs){ repadmin /syncall $DC.HostName } |
2. Error: Unable to contact the server. This may be because this server does not exist, it is currently down, or it does not have the Active Directory Web Services running.
Cause: This error occurs due to a problem connecting with a domain controller running Active Directory Web Services.
Fix: Verify the server is online, and there are no network connectivity issues between your computer and server running ADWS.
3. Error: Enable-ADOptionalFeature : The specified value already exists
Cause: This error appears when you attempt to enable the Active Directory Recycle Bin even though it is already enabled in the forest.
Fix: You can verify whether the Recycle Bin is already enabled by running the following PowerShell command:
|
1 |
Get-ADOptionalFeature "Recycle Bin Feature" | select-object name,EnabledScopes |
Conclusion
Microsoft hasn’t clearly stated why the Recycle Bin isn’t enabled by default or why turning it on is irreversible, but the reasons are fairly clear. Enabling it requires forest-wide changes to the Active Directory schema and functional level—changes that could affect older environments, legacy applications, and replication behavior. These design decisions help ensure compatibility, optimize storage, and provide safer object recovery across domain controllers.
We hope this blog gives you clear steps to enable the Recycle Bin in Active Directory and understand its importance. If you have any questions, feel free to drop a comment below. Stay tuned for more insights on Active Directory administration!


