Is your Active Directory environment running with enough domain controllers? Relying on just one or a few DCs can easily become a hidden single point of failure. Even a short disruption can affect authentication, DNS processing, and access across the entire domain. This is where adding an additional domain controller makes a real difference.
Expanding DC infrastructure gives your environment the resilience, redundancy, and peace of mind it needs to stay available. And if you still have only one DC, introducing a second one is the most critical step you can take to avoid major outages.
In this blog, we’ll walk through why adding an extra domain controller matters and how to deploy one safely and correctly in an existing domain.
Why Need to Add an Additional Domain Controller in Active Directory?
Adding more domain controllers isn’t just best practice, it’s what keeps your AD environment resilient and highly available when things inevitably go wrong.
Fault Tolerance: If your DC goes offline because of a failed update, a hardware issue, or a sudden failure, your entire domain doesn’t have to freeze. With additional DCs in place, authentication keeps working, users can still sign in, and DNS services remain responsive.
Load Balancing: Instead of pushing every logon request and query through a few DCs, including additional domain controllers split the load to maintain smooth operation. This distribution reduces latency and keeps services running efficiently for all users.
Data Integrity: With replication happening across multiple domain controllers, the chance of data loss is significantly reduced. It ensures that your critical identity information is always available from alternate domain controllers.
Disaster Recovery: Additional domain controllers play a vital role in disaster recovery and FSMO role continuity. If a DC holding an operations role fails, having other DCs available allows administrators to transfer or seize the FSMO role quickly. This prevents disruptions to domain-wide operations and ensures critical Active Directory functions continue without prolonged downtime.
DC Demotion: Before demoting a domain controller, having another healthy DC ensures authentication, replication, and other directory services continue without interruption. This is especially important when an existing DC is being removed from the directory for an OS upgrade or hardware replacement.
Prerequisites for Adding Secondary Domain Controller to a Domain
Before adding the domain controller to an existing domain, ensure that the following prerequisites are met:
- Confirm that the new server is on the same network and can communicate with the existing domain controller through LAN or VPN. You can check this by pinging a domain controller from the system you intend to join.
1Ping <DomainControllerIP/HostName>
- Your account needs Domain Admin or Enterprise Admin privileges to complete the ADDS installation.
- Verify the date, time, and time zone match between the existing DC and new DC you’re going to add.
Add Secondary Domain Controller to Existing Domain
To join an additional domain controller to your existing domain, follow the steps below.
- Add a server to an existing domain
- Install the AD DS role
- Promote to domain controller
- Verify secondary domain controller
- Update DNS record on both DCs
1. Configure DNS Settings to Join a Secondary Domain Controller to the Domain
Before a server can be promoted as domain controller, it must first be joined to the existing domain as a standard member server. This step is essential to establish trust and secure communication with the existing Active Directory forest. This allows the server to use domain credentials necessary for the new DC promotion.
Follow these steps to configure DNS settings on the server before joining the Active Directory domain.
- Open the Network and Sharing Center by navigating to Control Panel → Network and Internet.
- Click Change adapter settings and right-click your network adapter, then select Properties.
- Select Internet Protocol Version 4 (TCP/IPv4) and click Properties. Then, choose the Use the following DNS server addresses option.
- Remove any external or public DNS servers (such as 8.8.8.8 or 1.1.1.1) to avoid domain resolution issues.In the Preferred DNS server field, enter the IP address of your existing domain controller. Click OK to save.
- To find the IP address of a domain controller, run ipconfig in the Command Prompt on the existing DC.
Now, to join this server to the domain, we need to add existing domain address in Workgroup settings. To do that,
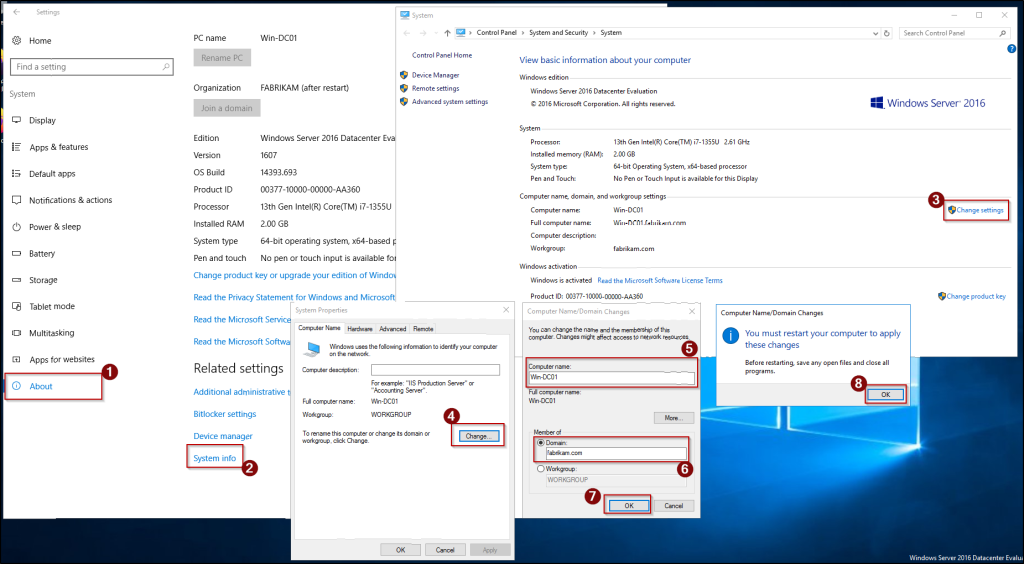
- Click Window icon on the taskbar and open Settings. Then, navigate to the System → About → System info and click Change settings under Computer name, domain, and workgroup settings.
- In the Computer Name tab, select Change. Then, change the name of the server under Computer name. Under, Member of section, choose Domain and enter the domain address of the existing domain.
- Note: Renaming the server after it becomes a domain controller causes SYSVOL or replication issues.
- Now, authenticate with existing domain controller’s admin credentials. Then, click OK on the following welcome and restart prompts.
Once it’s done, the new DC server will automatically restart.
2. Install Active Directory Domain Services
After successfully joining the server to the existing domain, the next step is to install the Active Directory Domain Services (AD DS) role.
You can follow the steps below to install AD DS on the new server that is going to be an additional domain controller.
- In the Server Manager, go to Manage → Add Roles and Features. If the Before You Begin page appears in the Add Roles and Features Wizard, click Next to continue.
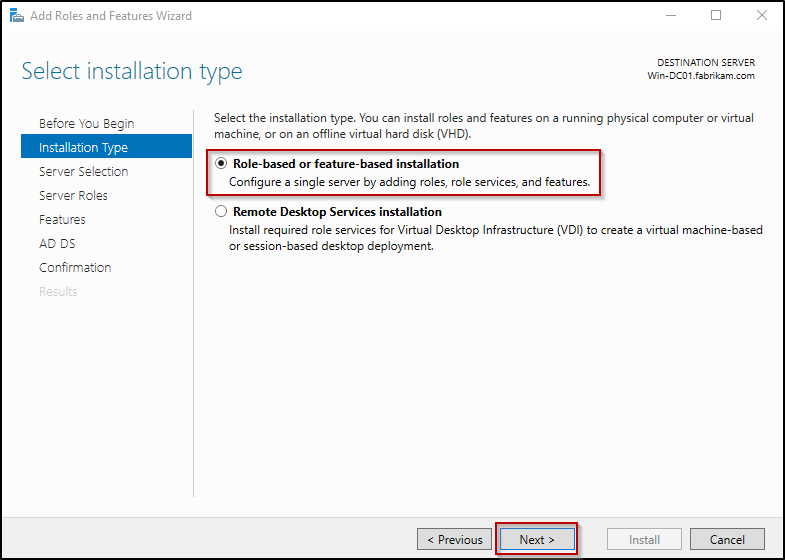
- On the Select Installation Type page, ensure Role-based or feature-based installation is selected and click Next.
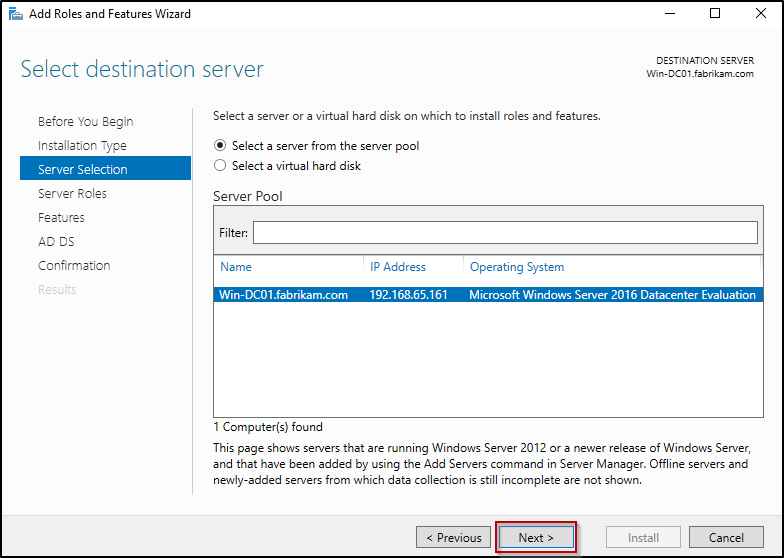
- The Select Destination Server page will list available servers. Here, confirm the current server is chosen and click Next.
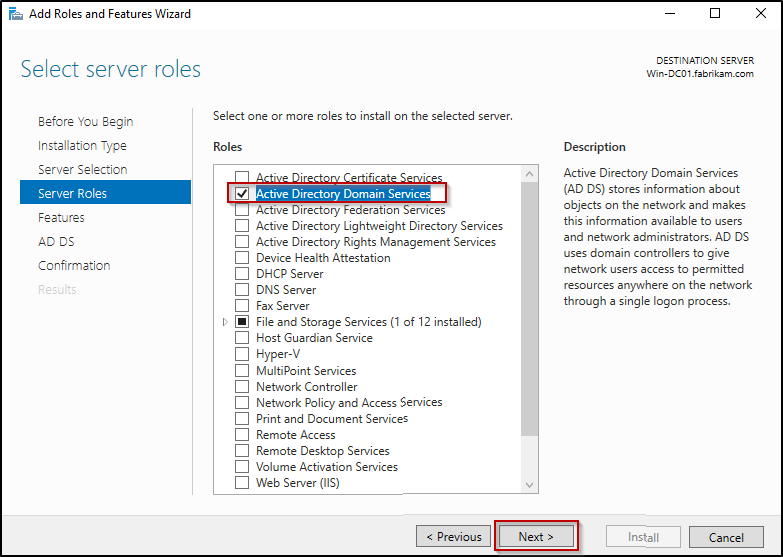
- On the Select server roles page, choose Active Directory Domain Services and select Add Features in the prompt to include required features, then click Next.
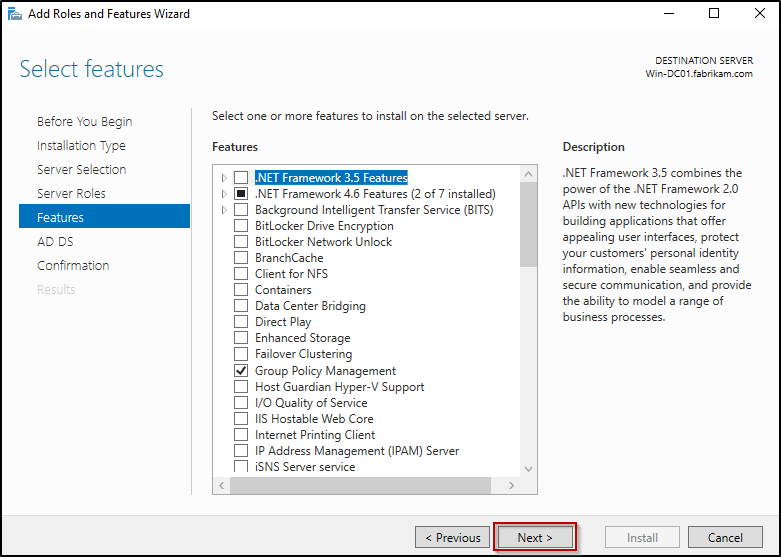
- In the rest of the pages, keep the default selections and move through clicking Next.
- Finally, review the AD DS overview on the Confirmation page and click Install to begin the AD DS role installation.
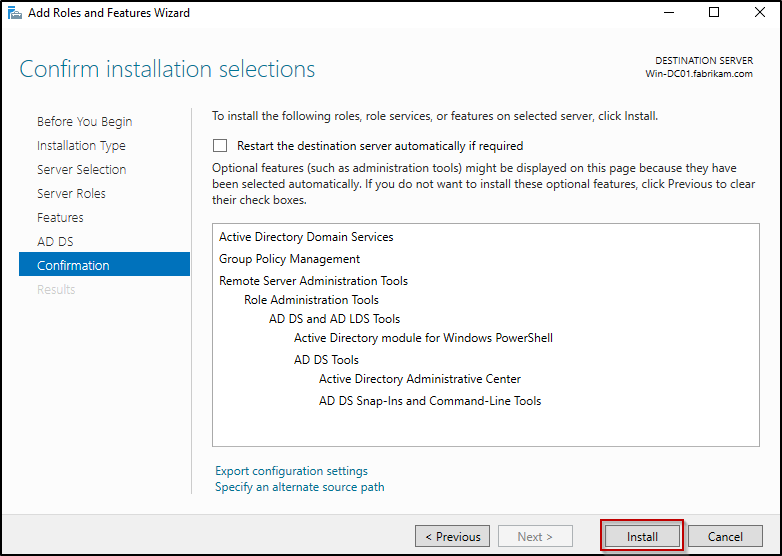
- Once the installation is completed, click Close to finish.
3. Promote the Server to Secondary Domain Controller
Once the AD DS installation is done, we can proceed with promoting this server as a domain controller.
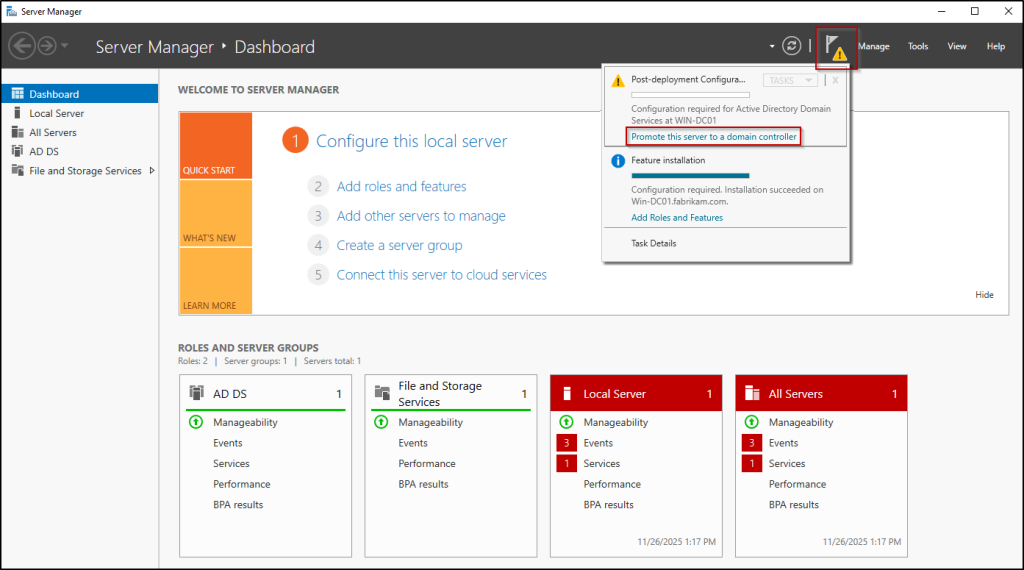
- In the Server Manager, select the flag/yellow exclamation icon ⚠️ and click Promote this server to a domain controller.
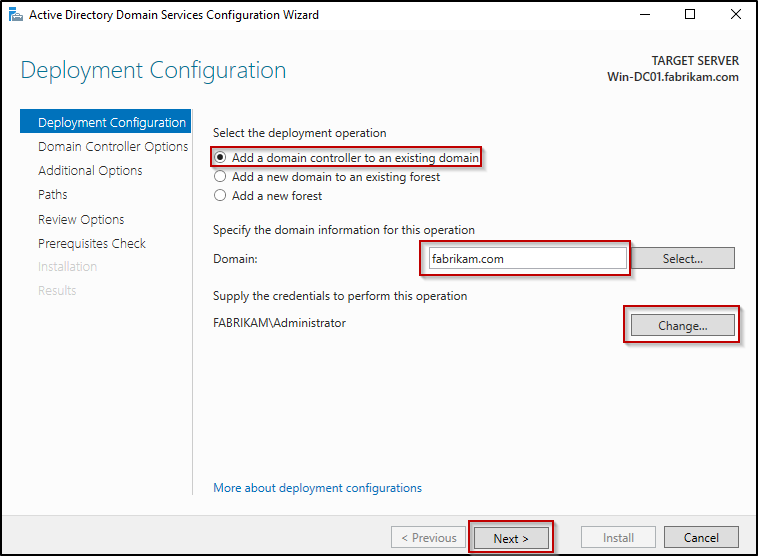
- On the Deployment Configuration page, ensure Add a domain controller to an existing domain is selected, and enter the domain address straight to the Domain.
- Then, click Change under Supply the credentials to perform this operation and provide existing domain’s administrator credentials. Hit Next to continue.
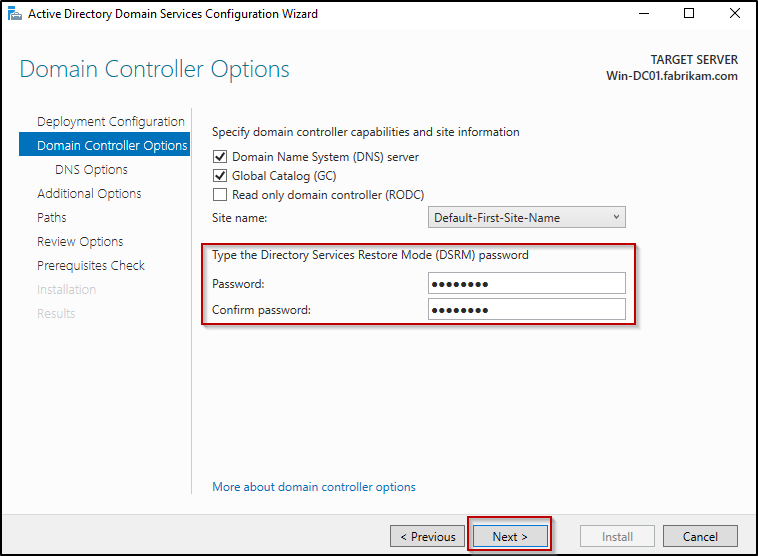
- On the Domain Controller Options page, keep the default selections and enter only the DSRM password and confirm that, then click Next.
- Next, ignore the informational warning on the DNS Options page and proceed by clicking Next.
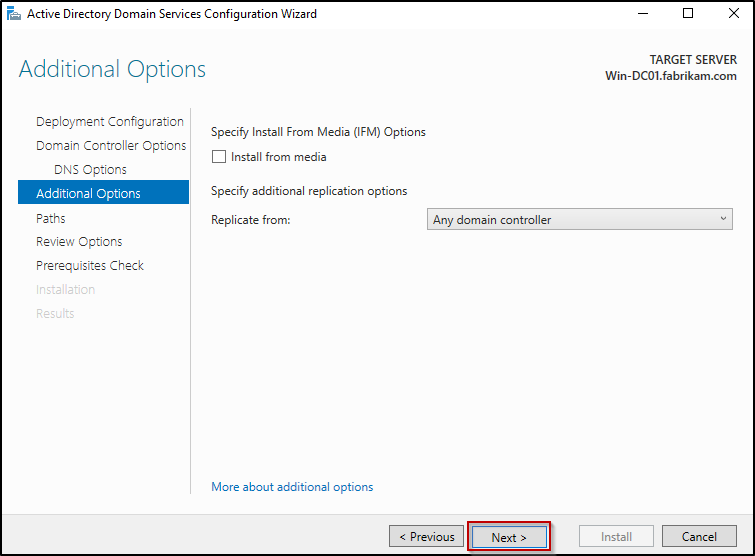
- In Additional Options, choose a replication source by using drop-down list under Specify additional replication options if you want to replicate from the data center.
- However, keeping it default (Any domain controller) is recommended to allow replication from any available domain controller. Click Next.
- However, keeping it default (Any domain controller) is recommended to allow replication from any available domain controller. Click Next.
- On the Paths page, keep the default selections and click Next. Then, on the Review Options page, verify your selections and click Next.
- After the Prerequisites Check completes (two warnings are expected), hit Install.
- Finally, allow the installation to finish. Once it is done, the server will automatically restart.
4. Verify Secondary Domain Controller and AD Replication
After the secondary domain controller restarts, we need to verify a few things to confirm that the new DC was added to the existing domain correctly.
To do that, open the Active Directory Users and Computers (ADUC) from the secondary domain controller and expand the domain name, then select Domain Controllers container. This will show the list of domain controllers added to the domain.

The next important thing to confirm that Active Directory replication is functioning properly. Healthy replication ensures that all domain controllers stay in sync, preventing inconsistent Group Policy behavior, authentication issues, and mismatched directory information across your environment.
To verify that replication completed without errors, open the PowerShell and run the cmdlet below on the added domain controller.
|
1 |
repadmin /replsummary <DomainControllerName> |
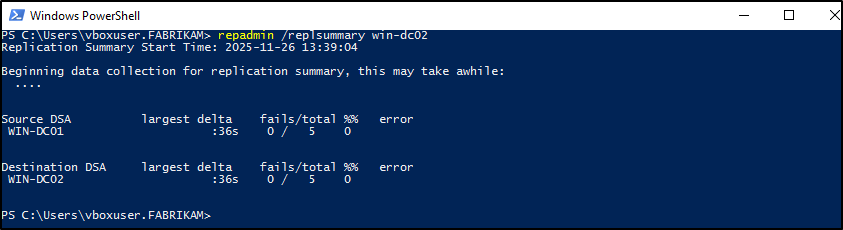
Note: Replace the <DomainControllerName> with the hostname of your secondary domain controller.
This helps verify that the secondary domain controller is successfully synchronized with its replication partners, and that no errors, latency issues, or connection failures exist.
5. Update DNS Settings on Domain Controllers
Active Directory replication and many AD services require domain controllers to query DNS records such as, SRV records (_ldap._tcp, _kerberos._tcp), A-records for other domain controllers, global catalog service records. These DNS lookups are required for replication, authentication, and overall directory health.
If a DC points only to itself as the Preferred DNS, it will face the DNS Island problem. In this state, the DC may fail to locate other domain controllers, leading to replication failures and disrupted directory services.
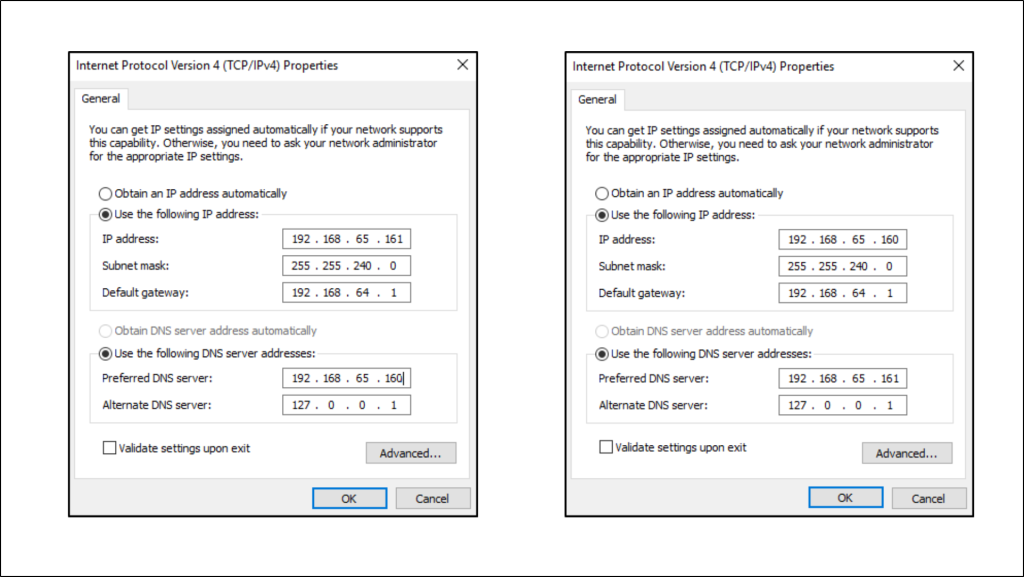
To avoid this, configure each domain controller so that:
- Preferred DNS points to the other domain controller
- Alternate DNS points to the local server’s own IP address or the loopback address (127.0.0.1)
For example, if the secondary DC uses the IP address 192.168.65.160, that address should be set as the Preferred DNS on the primary domain controller—and the primary’s IP should be used as the Preferred DNS on the secondary.
Unable to Add a Domain Controller to an Existing Domain? Here are the Quick Fixes
1. Error: An Active Directory Domain Controller (AD DC) for the domain “<DomainName>” could not be contacted. DNS name does not exist.
Cause: The server can’t locate or communicate with an existing domain controller. This usually happens due to incorrect DNS settings.
Fix: Verify the domain name, ensure the new server’s preferred DNS points to an existing DC’s IP address, and confirm that the existing DC is online.
2. Error: The Active Directory Domain Services Installation Wizard (Dcpromo.exe) was unable to convert the computer account <HostName> to an Active Directory Domain Controller account.
Cause: This access denied error occurs when the user account used to promote domain controller hasn’t been granted the “Enable computer and user accounts to be trusted for delegation” user right.
Fix: Verify that the account used to promote the system as a domain controller must be a member of the Administrators security group. Also, verify that the “Enable computer and user accounts to be trusted for delegation” user right exists in the account’s security token by running following cmdlet in Command Prompt.
|
1 |
whoami /all |
For additional troubleshooting steps and guidance, refer to the MS doc.
3. Error: The domain controller was not found because the DNS lookup failed.
Cause: The server is unable to find or connect to a domain controller, often because the DNS configuration is incorrect.
Fix: Update DNS settings of the server as mentioned in the earlier section.
Conclusion
Adding a domain controller is a straightforward way to strengthen the stability and availability of your Active Directory environment. With the steps outlined in this guide, you can expand your domain safely and ensure continuous availability, DNS services, and smoother operations overall. If you have any questions or require additional help, please feel free to drop a comment below.
Stay tuned for more insights on Active Directory administration!


