
On Day 8 of Cybersecurity Awareness Month, learn how to restrict the usage of Gen AI tools like ChatGPT, Gemini, Copilot, and more in your tenant to ensure security and compliance. Stay tuned for upcoming blogs in the Cybersecurity blog series.
We all know the famous quote by Alan Kay:
“The best way to predict the future is to invent it, but every invention carries unintended consequences.”
This rings especially true for Generative AI tools. These innovations can dramatically boost productivity, from drafting Outlook emails to analyzing complex Microsoft 365 reports. Yet they also introduce risks that can affect your organization in unexpected ways. In fact, a recent study found that 93% of Microsoft admins are either underprepared or only somewhat prepared to handle the security challenges posed by AI.
In this blog, we’ll explore the security risks associated with GenAI tools like OpenAI ChatGPT, Google Gemini, Microsoft Copilot, and more. More importantly, we’ll discuss practical ways to block GenAI websites using web content filtering in Microsoft Entra, ensuring AI innovation doesn’t come at the cost of security.
Security Risks of Using Generative AI in Your Microsoft 365 Organization
Imagine this: you give all users free access to AI tools, like ChatGPT, Gemini, Copilot, DeepSeek, and more. At first, it seems like a win: reports are drafted faster, emails are summarized, and tasks are completed efficiently. Productivity is soaring.
Like a coin with two sides, here comes the risk. Mia from finance uploads a confidential project file to an AI tool, just hoping for a quick summary. She doesn’t realize that her data could leave your organization or be used to train AI models outside your control. That single innocent action becomes a data leak risk.
- This isn’t just a “what if” scenario — it’s already happened. In May 2023, a Samsung employee inadvertently uploaded sensitive internal source code to ChatGPT. The company soon realized that the data might be stored on third-party servers with no easy way to retrieve or delete it. Concerned about long-term exposure, Samsung decided to restrict access to Generative AI tools entirely across the organization.
And mistakes aren’t the only threat. Some dangers can come from within the organization. A malicious insider or compromised account could exploit AI to create convincing deepfake phishing emails or voice messages, tricking other users into revealing credentials or sharing sensitive information.
This example shows the risk posed by a few users. Now imagine dozens of users, each interacting with AI tools, potentially exposing tenant data. The risk multiplies with every input, every question, and every click.
Some of the other known Generative AI risks in Microsoft 365
- Shadow AI – Users using unauthorized AI apps outside IT governance can inadvertently expose sensitive data, bypassing monitoring and security controls.
- Incorrect Output – AI tools can sometimes generate responses that seem correct but are actually misleading or factually wrong, which can lead to misinformed decisions or flawed reporting.
- Reputational & Financial Impact – Missteps in AI usage, such as accidentally exposing customer data, can severely damage trust with clients and stakeholders. They can also trigger serious regulatory fines, including penalties of up to €35 million or 7% of a company’s global annual turnover under the EU AI Act.
These examples represent just a glimpse of the potential risks associated with Generative AI in a Microsoft 365 tenant. Just as Newton’s third law states that every action has a reaction, each shortcut or efficiency gain with AI in Microsoft 365 comes with potential hidden costs. Understanding these risks and implementing strategies to block unauthorized internet destinations (GenAI) is essential to protect your organization’s data and prevent costly mistakes or reputational damage.
Restrict Generative AI Using Web Content Filtering in Microsoft Entra
Completely blocking Generative AI in Microsoft 365 might feel like the safest move, but it often slows innovation and keeps your teams stuck in outdated workflows. A smarter approach is to allow AI where it adds value, while keeping it out of sensitive or high-risk areas. That’s where Microsoft Entra Internet Access web content filtering comes in.
Web content filtering serves as a secure web gateway, allowing you to control which AI sites or tools users can access from your tenant. Integrated with Microsoft Entra ID and Conditional Access, it ensures that AI usage aligns with your organization’s policies and compliance needs.
Think of a scenario where you want to restrict finance team users from accessing AI sites like ChatGPT, Gemini, and DeepSeek. To achieve this, you need to follow a structured approach.
Here are the steps to block Generative AI using web content filtering in Microsoft Entra.
- Download and install the Global Secure Access client
- Run a health check on the GSA client
- Enable internet access traffic forwarding profile
- Create web content filtering policies in Microsoft Entra
- Create a security profile in the Microsoft Entra admin center
- Enforce web content filtering with Conditional Access
Prerequisites: To create and manage web content filtering policies, you need to have one of the following Microsoft Entra Roles.
- Global Administrator
- Global Secure Access Administrator and Conditional Access Administrator.
Download and Install the Global Secure Access Client
The GSA client is a key component of Global Secure Access, helping manage and secure network traffic on all end-user devices. Before you begin, there are a few important prerequisites to keep in mind:
- You must have a Microsoft Entra Suite license to install GSA. If you’d like to try it out, you can activate a Microsoft Entra trial subscription.
- The client requires a 64-bit version of Windows 10 or 11, or an Arm64 version of Windows 11.
- Only Microsoft Entra joined or Entra hybrid joined devices are supported. Entra registered devices are not supported.
- Installation or upgrades must be performed by a local administrator on the device.
Once all these requirements are met, follow the steps below to install the Global Secure Access Client in all Microsoft Entra-joined devices of users from the finance team.
- Open the Entra-joined device where you want to block AI.
- Sign in to the Microsoft Entra admin center.
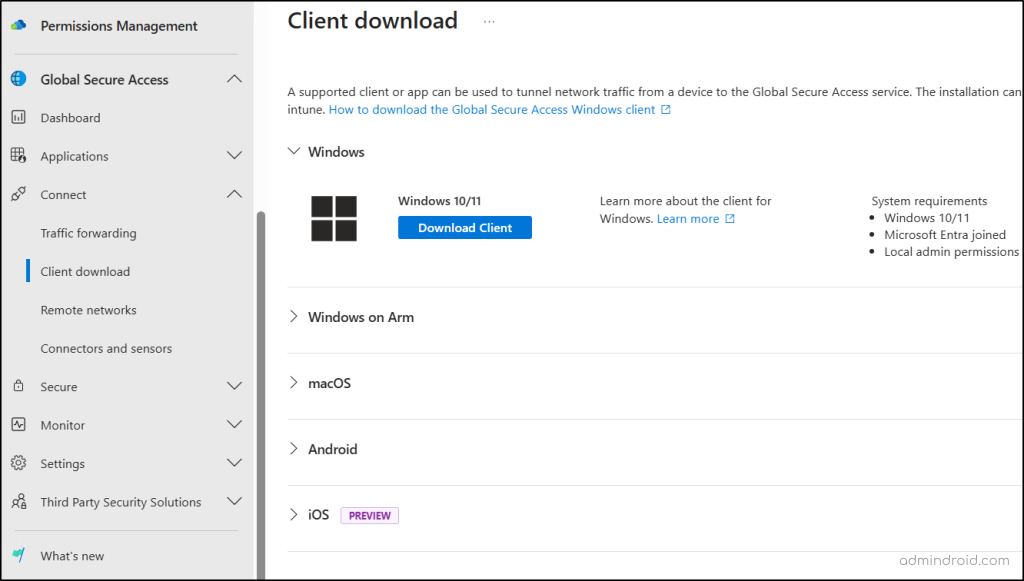
- Expand the Global Secure Access section, click Connect, and select Client download.
- Choose the client version based on your device’s operating system and click Download Client.
- Once downloaded, install the Global Secure Access client.
Run a Health Check on Global Secure Access Client
Before using the Global Secure Access (GSA) client, certain requirements must be configured correctly. For example, DNS over HTTPS should be disabled, the client should prefer IPv4 over IPv6, and other network requirements must be met. To ensure these settings are correctly applied, follow the steps below for all GSA clients installed in the devices of finance team users:
- Right-click the GSA client icon in the system tray (taskbar).
- Select Advanced Diagnostics and go to the Health Check tab.
- Review the listed requirements and verify whether each check is successful.
- If every check passes successfully, proceed to the next step.
- If any check fails, troubleshoot the Global Secure Access client until all requirements pass.

Enable Internet Access Traffic Forwarding Profile in Entra ID
The Internet Access profile in Microsoft Entra routes all public internet and SaaS apps traffic from all client devices to the Security Service Edge (SSE) proxy. All routed network traffic is inspected at this checkpoint, and the web content filtering policies are applied to the appropriate traffic. Use the following steps to enable the Internet Access forwarding profile for your tenant.
- Sign in to the Microsoft Entra admin center.
- Expand the Global Secure Access section and choose Connect.
- Click Traffic forwarding and toggle Internet access profile to On.
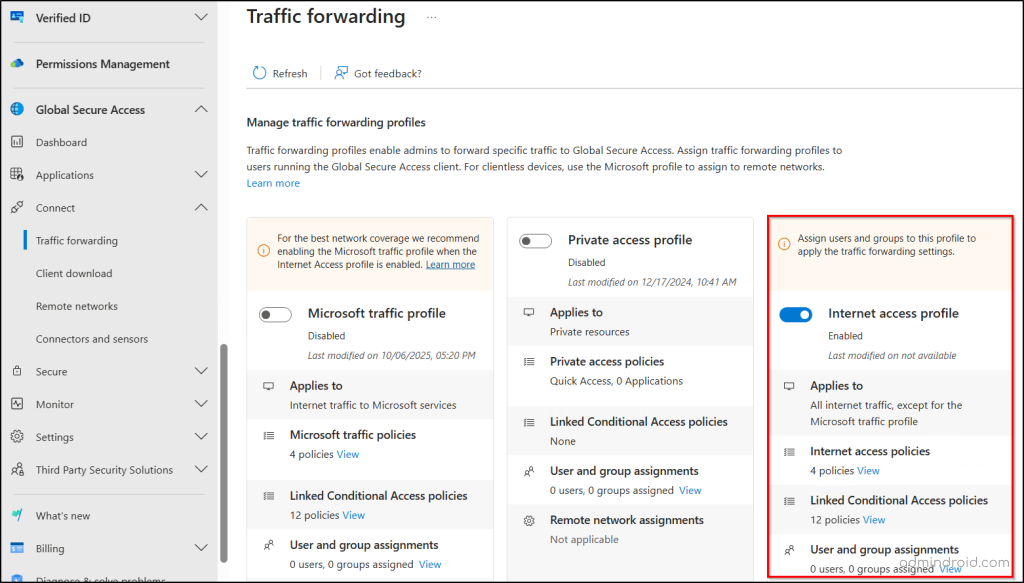
- Under “User and group assignments”, click View.
- If you want to route all users’ traffic, toggle Assign to all users to Yes.
- To route network traffic of specific users to the SSE proxy, click “0 users, 0 groups assigned”, choose +Add user/group, choose the users or groups, click Select, and click Assign.
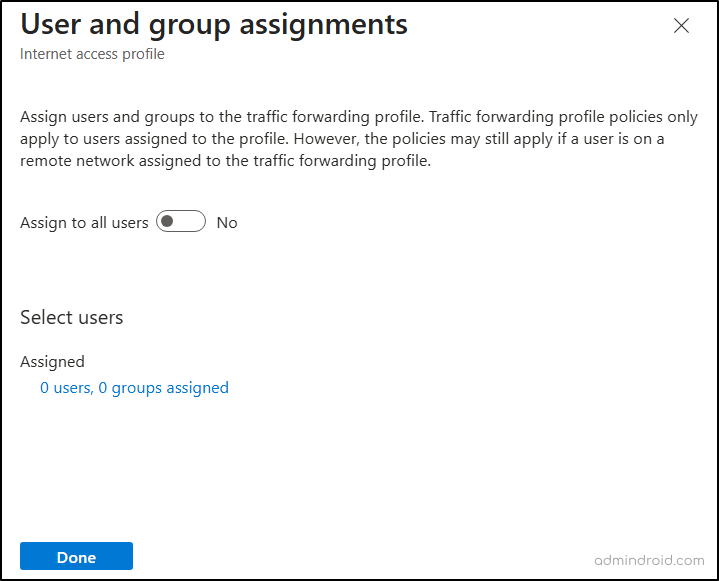
- As we need to block only finance team members, we can specify the finance group members in the assignments.
Note: If you assign the profile to specific users or groups, the web content filtering policy will only apply to them. All other users will bypass the policies by default.
Create Web Content Filtering Policies in Microsoft Entra
Web content filtering policies give you control over which AI websites and services your users can access. Think of it as setting the boundaries for safe and secure Generative AI usage in your organization.
With these policies, you can specifically configure restrictions through web categories or specific Fully Qualified Domain Names (FQDNs) to:
- Block all Generative AI websites or domains.
- Restrict access to selected AI domains, such as chatgpt.com, google.gemini.com, or deepseek.com.
Follow the steps below to create a web content filtering policy in the Microsoft Entra admin center.
- Expand the ‘Global Secure Access’ section in the Entra admin center.
- Click Secure and select Web content filtering policies.
- Click Create policy and enter a name and description for the policy.
- In the “Action” dropdown, choose Block and click Next.
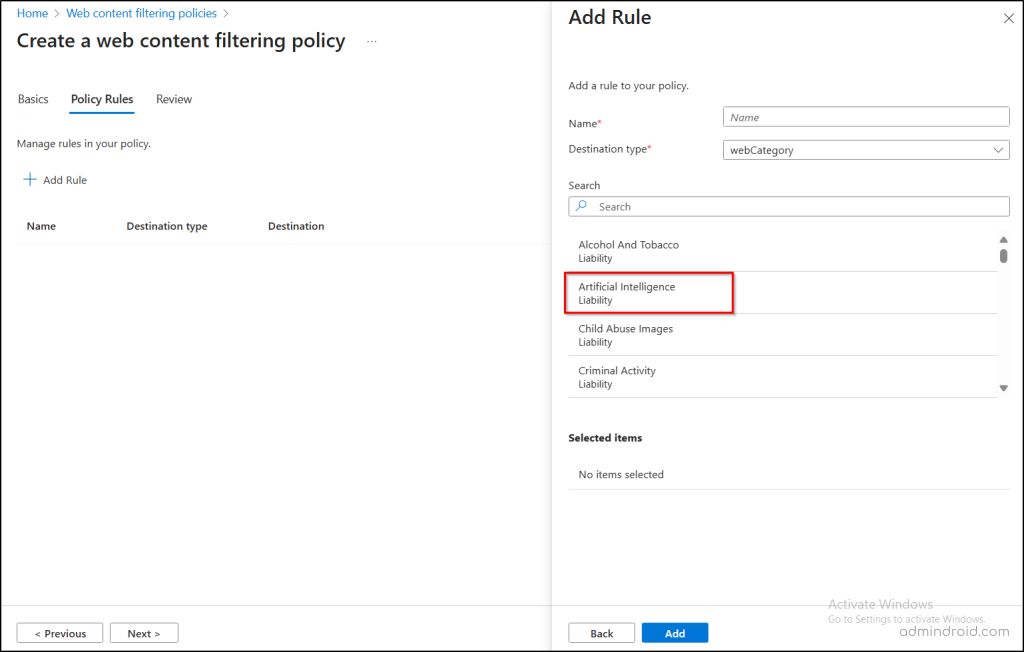
- Click Add Rule, enter a name for the rule, and choose any of the following restriction types based on your requirement.
- In the “Destination Type” field, choose webCategory, select Artificial Intelligence, and click Add. This will block your finance users from accessing all Generative AI.
- To block specific AI domains, select fqdn in the “Destination Type” field, enter the domains (chatgpt.com, deepseek.com, etc) you want to block, and click Add.

- Since our requirement is to block all AI access for finance team users, let us go with webCategory and click Next to review the policy.
- In the “Destination Type” field, choose webCategory, select Artificial Intelligence, and click Add. This will block your finance users from accessing all Generative AI.
- Finally, click Create Policy to save your web content filtering policy.
Tip: You can also apply Just-in-Time (JIT) access to GenAI tools to allow temporary, time-bound access instead of granting permanent permissions. This ensures users access AI platforms only when required, reducing the risk of shadow IT and data exposure.
Create a Security Profile in the Microsoft Entra Admin Center
After setting up your web content filtering policy, the next step is to organize it into a security profile. Think of security profiles as a container that groups multiple filtering rules and makes it easy to apply them to users via Conditional Access policies.
Follow the steps below to create a security profile and link your web content filtering policies.
- Browse to Global Secure Access > Secure > Security profiles in the Microsoft Entra admin center.
- Click Create profile and enter a name for the profile.
- Ensure the state is set to enabled, set the Priority value between 100 to 65000, and click Next.
Note: When you set the priority of a security profile to 65000, it doesn’t require any Conditional Access policy to take effect.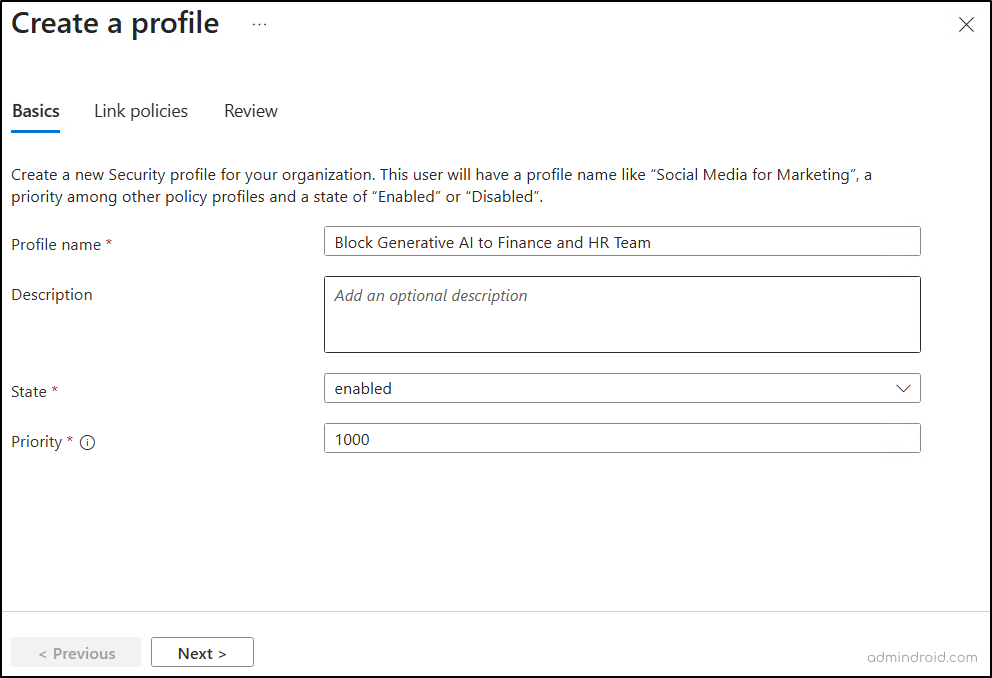
- Click Link a policy and choose “Existing web filtering policy”.
- From the Policy name drop-down, choose the web content filtering policy you created earlier.
- Click Add and then click Next.
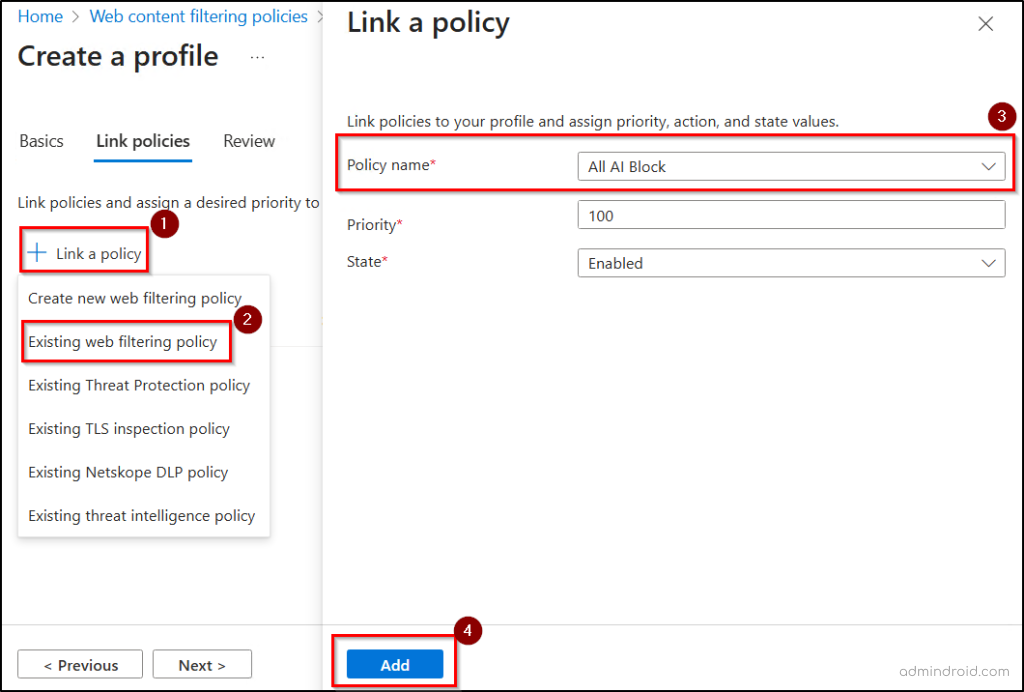
- Review the profile settings and click Create a profile to save the security profile in Microsoft Entra.
It’s important to note that web content filtering cannot be applied to Copilot Chat. This is because Microsoft does not support managing Copilot via network-level restrictions. Since Copilot is deeply integrated with Microsoft 365 applications, applying such restrictions could result in unpredictable behaviour, blocked access, or service failures. Therefore, to prevent oversharing, it is recommended to control access to Copilot through Conditional Access policies so that only trusted users or specific groups can access it.
Enforce Web Content Filtering with Conditional Access
The final step in restricting access to Generative AI is creating a Conditional Access policy. This policy serves as the bridge that delivers your web content filtering rules to the right users and groups. Use the steps below to enforce web content filtering with a Conditional Access policy in Microsoft Entra.
- Navigate to Microsoft Entra admin center > Entra ID > Conditional Access.
- Click Create new policy and enter a name for the policy.
- Under ‘Users’, include all users in the finance team.
- In ‘Target resources’, select All internet resources with Global Secure Access under Include.
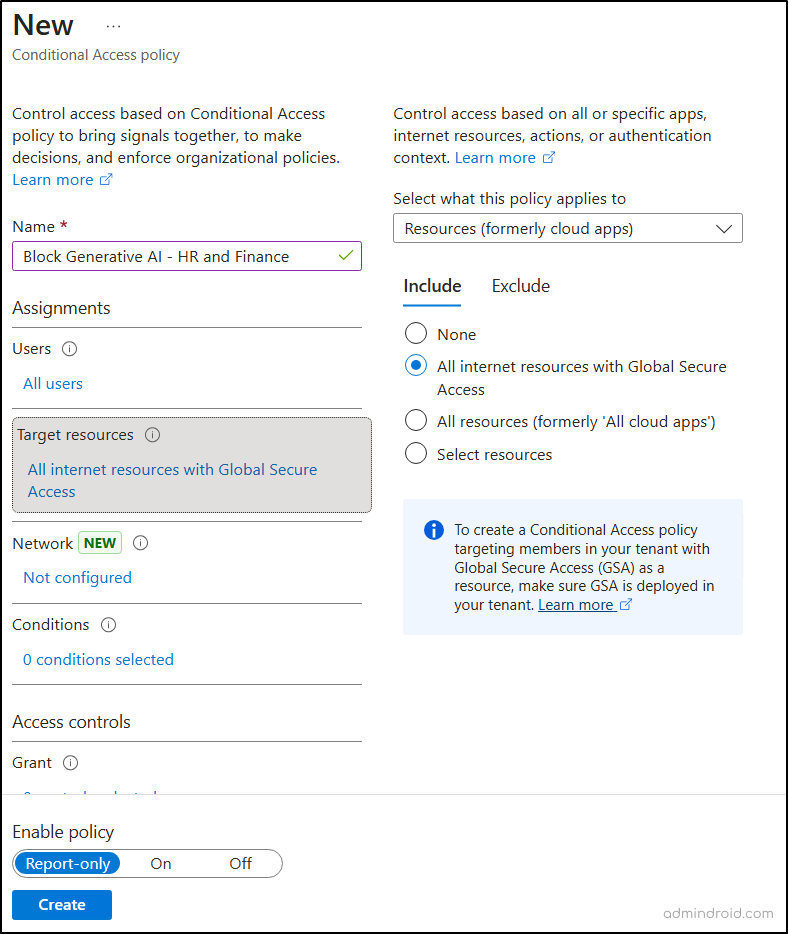
- Under “Session”, check the Use Global Secure Access security profile option.
- From the dropdown, choose the security profile you created in the previous step and click Select.
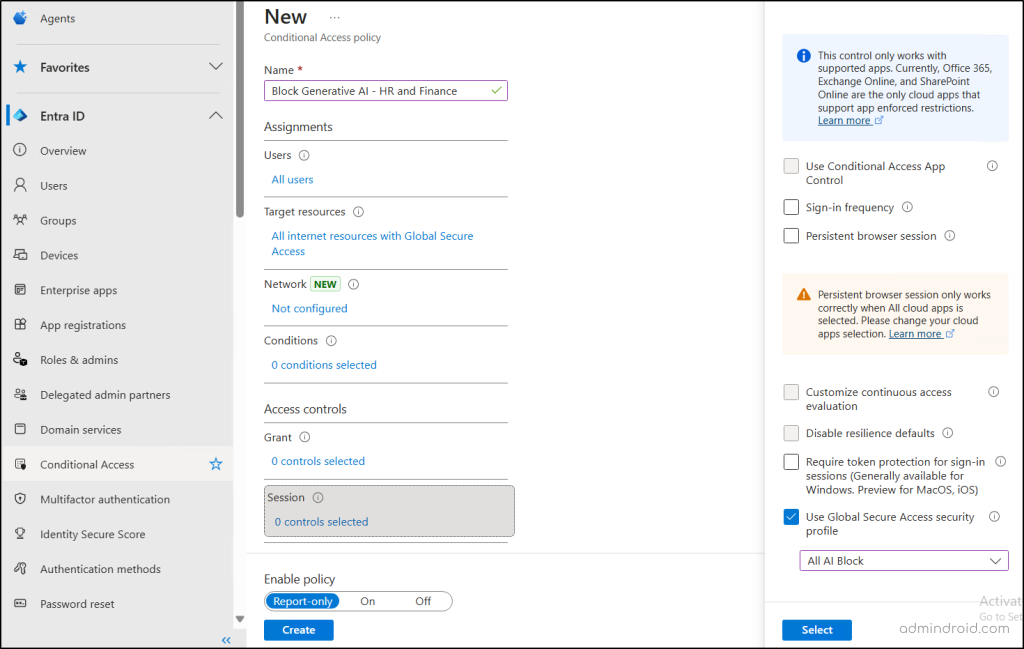
- Finally, set Enable policy to On, and click Create to activate the web content filtering enforcement.

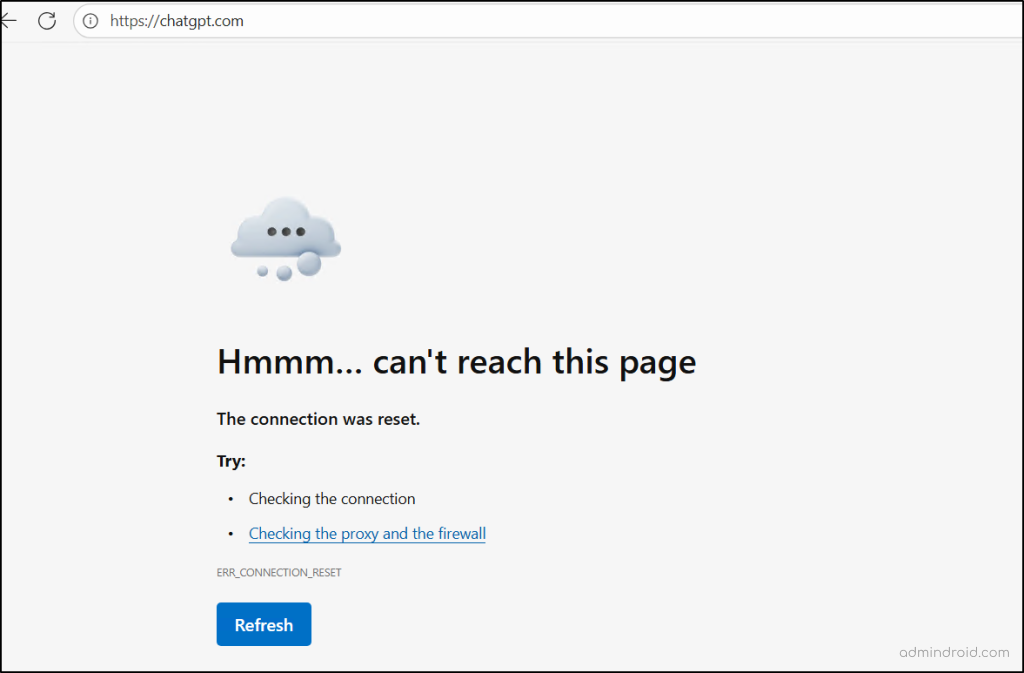
A Real-Time Look at How Web Content Filtering Policy Work in Microsoft 365
When a user from the finance team tries to access a blocked domain, such as an AI site, their network traffic is routed through the Security Service Edge (SSE) proxy. At this checkpoint, the traffic is evaluated against the Conditional Access (CA) policy and the linked web content filtering rules. If the domain or category is restricted, access is automatically blocked, and the user sees the following error message indicating that the site cannot be reached.
That’s it! We hope this blog helped you understand how to block Generative AI tools in Microsoft 365 using web content filtering. In addition, you can further strengthen your organization’s security by restricting AI apps on managed devices and by leveraging DSPM for AI to continuously monitor and protect sensitive data used in these tools. If you have any questions or thoughts, feel free to share them in the comments.
Stay tuned for more upcoming blogs in our Cybersecurity Awareness Month blog series.


