“On Day 24 of Cybersecurity Awareness Month, let’s learn how to enable passwordless authentication for hybrid user accounts. Keep following the Cybersecurity blog series for more practical tips to strengthen your organization’s security posture.”
Think about the last time you had to create a “strong” password. You probably typed a random mix of uppercase letters, a random symbol, and a number you knew you would forget by lunchtime. We have all been taught this is how we protect our digital lives. But what if that lock isn’t as strong as we think?
For years, the password has been the universal key to lock data, from on-premises to cloud apps. It’s familiar, it’s convenient, but it’s also the weakest link in our security chain. Why? Because no matter how complex your password is, it can be phished, stolen, or cracked. Modern attackers are not just guessing combinations. They are running sophisticated phishing campaigns to trick even the most vigilant users into giving up the passwords willingly. The simple truth is, passwords are no longer enough.
So, what comes next? Passwordless authentication. Imagine accessing everything you need without ever typing a secret phrase into a vulnerable prompt. This feature is not only stronger but also simpler for users.
In this blog, let’s explore how to configure passwordless authentication in a hybrid domain using Microsoft Entra Kerberos. Get ready to leave password risks behind and unlock your systems with just a tap of your fingerprint, a scan of your face, PIN, or security keys.
Kerberos Authentication Protocol
Before we jump straight into the setup, it’s important to understand what Kerberos is and how it works. The name “Kerberos” isn’t random. It comes from Greek mythology, where Kerberos (Cerberus) is the three-headed dog that guards the gates of the underworld. You might be wondering, why name it after a three-headed dog? It’s simple! Just like the three-headed guardian, the Kerberos authentication process has three major parts:
- The Client: The user or device requesting access to services or resources.
- The Server: This is the service or resource the client is trying to reach, like a file share or printer.
- The Key Distribution Center (KDC): This is the trusted authority that verifies the user’s identity and issues tickets to access resources.
In simple terms, Kerberos is a network authentication protocol. Its main job is to verify the identity of a client and server and then provide the user with a secure key to get in. Now that you have a rough idea of the pieces involved, let’s dive deeper into how it works in real life.
Think of Kerberos Like a Trip to an Amusement Park:
- The Authentication Server in Kerberos (The amusement park main gate): You walk up to the park’s entrance and show your ID to prove you have the right to enter. In the digital world, authentication server is the gate where user provides credentials, such as username and password to log in.
- The Ticket-Granting Ticket (Wristband): The attendant checks your ID and gives you a park wristband. This wristband proves you are a paid guest allowed to be in the park. Similarly, when you log in, your computer gets a special Ticket-Granting Ticket (TGT) from the Authentication Server. This TGT proves you are a valid user.
- The Service (Specific ride): Now you want to get on a specific ride, like the “Roller Coaster.” You can’t just walk onto the ride with only your general wristband. Similarly, TGT doesn’t give you direct access to a service; it simply proves you’re trusted and lets you request a ticket for that particular service.
- The Service Ticket (Ride ticket): You show your wristband to the ride operator. The operator checks it and then gives you a specific ticket for the “Roller Coaster”. In Kerberos, your computer takes your TGT to the Ticket-Granting Service (TGS) and says, “I need to access the finance file share”. The TGS validates your TGT and then gives your computer a Service Ticket for that specific file share.
- Access the Resource (Enter the ride): You hand your ride ticket to the operator, and you’re in! Likewise, your computer presents the Service Ticket to the file server, which sees the valid ticket and grants you access.
This whole process happens behind the scenes without any user interaction. With Kerberos at its core, Microsoft Entra Kerberos is a cloud-native authentication protocol that bridges the gap between cloud and on-premises resources. It takes the same tried-and-tested Kerberos ticketing model and extends it to hybrid environments.
How Microsoft Entra Kerberos Works in a Hybrid Setup
Microsoft Entra Kerberos brings traditional Kerberos into the cloud, letting organizations modernize identity infrastructure while staying compatible with legacy systems. This functionality enables seamless single sign-on (SSO) to on-premises resources for users signing in with modern passwordless credentials like Windows Hello for Business or FIDO2 security keys.
Essentially, it turns Microsoft Entra ID into a cloud-based Key Distribution Center (KDC), issuing Kerberos tickets that extend authentication beyond on-premises Active Directory into hybrid environments.
When you sign in to a hybrid joined or Entra ID joined computer, here’s what happens:
- Microsoft Entra ID verifies the user account and issues a Primary Refresh Token (PRT) that contains your user and device information. Along with PRT, it issues a Cloud TGT to access cloud resources.
- It also issues a special, partial TGT for on-premises resources. This partial TGT only contains your user details and is not enough to access on-premises resources.
- This partial TGT is securely sent to your on-premises Active Directory Domain Controller.
- The Domain Controller verifies the partial TGT and issues a full TGT that includes all the necessary authorization information needed to access on-premises resources.
- With the full Kerberos TGT, you can now access on-premises file shares and applications seamlessly.
Now that we understand what Microsoft Entra Kerberos is and how it works, it’s time to put it into action.
Prerequisites to Enable Passwordless Authentication
Before you begin, make sure your environment meets the following system requirements.
- Devices running Windows 10 version 2004 or later.
- Windows Server domain controllers must run Windows Server 2016 or later.
- You need to have two admin accounts:
- An Active Directory user with Domain Admin permissions for a domain and Enterprise Admin rights for a forest.
- A Microsoft Entra user with Global Admin or Hybrid Identity Admin role.
- Users must have all the following attributes synced through Microsoft Entra Connect.
- OnPremisesSamAccountName
- OnPremisesDomainName
- OnPremisesSecurityIdentifier
By default, Microsoft Entra Connect syncs these attributes. If you have changed the attributes for synchronization, make sure to include all the above attributes.
- You must configure the Kerberos encryption policy on the Domain Controller using the steps below.
- Go to Group Policy Management, right-click the Default Domain Controller Policy, and choose Edit.
- Navigate to Computer Configurations → Policies → Windows Settings → Security Settings → Local Policies → Security Options.
- Double-click the Network security: Configure encryption types allowed for Kerberos policy and check the Define these policy settings option.
- At this stage, review the available encryption types and ensure that RC4 is not selected. If RC4 is currently enabled, audit your environment to identify RC4 usage and determine which systems or accounts still rely on it before disabling the setting. This helps prevent authentication failures during the transition to stronger Kerberos encryption.
- Then, choose AES256_HMAC_SHA1 from the list, click Apply, and again click OK.
Supported Scenarios
This passwordless authentication supports Single Sign-On in the following cases:
- Cloud resources: Microsoft 365 and other SAML-enabled applications.
- On-premises resources: Resources like SharePoint sites that require IIS authentication or resources that use NTLM authentication. It also supports Windows-integrated authentication to websites.
Unsupported Scenarios
Passwordless authentication doesn’t support the following scenarios.
- Devices joined only to Windows Server Active Directory Domain Services(on-premises devices).
- Remote Desktop Protocol (RDP), virtual desktop infrastructure (VDI), and Citrix sessions.
- S/MIME email signing/encryption.
- Run As operations.
- Logging in to a server.
Configure Passwordless Authentication with Microsoft Entra Kerberos
Once all prerequisites are in place, follow the methods below to enable passwordless authentication for your hybrid environment. You can enable passwordless authentication to Windows using two modern credential methods.
- Enable passwordless security key sign-in for hybrid domain
- Configure passwordless authentication using Windows Hello for Business
Enable Passwordless Security Key Sign-in for Hybrid Domain
FIDO2 security keys use strong, asymmetric cryptographic algorithms to generate private-public key pairs for user authentication. Because each key is unique and tied to the device, attackers cannot easily compromise accounts through phishing, malware, or other cyber threats. Replacing passwords with the FIDO2 authentication method strengthens your hybrid domain security by providing phishing-resistant, hardware-backed credentials.
1. Install the Hybrid Authentication Module in PowerShell
You should install the Azure AD Hybrid Authentication Management Module to enable FIDO2 features for on-premises authentication.
Before following the steps below, ensure to enable the passkey (FIDO2) authentication method for your organisation in Microsoft Entra.
- Open the PowerShell prompt as an Administrator on any computer from which you can access an on-premises Active Directory Domain Controller.
- Run the following cmdlet to install the AzureADHybridAuthenticationManagement module.
|
1 |
Install-Module -Name AzureADHybridAuthenticationManagement -AllowClobber |
- When the confirmation prompt appears, type Y and press Enter to proceed with installing the hybrid authentication management module.
2. Create a Kerberos Server Object in the Active Directory Domain
A Microsoft Entra Kerberos Server Object is a computer object that represents the Kerberos Key Distribution Center (KDC) within a domain. It plays a crucial role in the secure exchange of Kerberos tickets, allowing users and devices to access resources safely. Once the object is created in your on-premises domain, it will be published to the cloud tenant.
The object must be created on the server running Microsoft Entra Connect or a server that has the Microsoft.Online.PasswordSynchronization.Rpc.dll dependency installed.
Follow the steps below in each domain and forest that synced with Microsoft Entra.
- Run PowerShell as an Administrator on a hybrid-joined machine.
- Execute the following cmdlet to create a new Microsoft Entra Kerberos Object in the on-premises AD domain.
|
1 2 3 4 5 |
$Domain = $env:USERDNSDOMAIN $UserPrincipalName = "<MicrosoftEntraAdminUserName>" //Enter the Domain Admin username and password $DomainCredential = Get-Credential Set-AzureADKerberosServer -Domain $Domain -UserPrincipalName $UserPrincipalName -DomainCredential $DomainCredential |
Replace <MicrosoftEntraAdminUserName> with the username of the Global admin or Hybrid Identity admin.
Note: If you’re creating the Kerberos Server object from a domain-joined computer using an account with Domain Administrator privileges, you can skip the -DomainCredential parameter. In this case, the command automatically uses your current Windows sign-in credentials to connect to the domain controller and create the Kerberos Server object.
By default, the Set-AzureADKerberosServer cmdlet will use the Commercial cloud endpoints. However, you can use the Set-AzureADKerberosServerEndpoint cmdlet to configure Kerberos in your desired cloud environment.
You can verify the newly created Microsoft Entra Kerberos server object by executing the cmdlet below.
|
1 |
Get-AzureADKerberosServer -Domain $domain -UserPrincipalName $userPrincipalName -DomainCredential (get-credential) |
You can also verify the object in Active Directory Users and Computers. It will be located under the Domain Controllers OU.
Configure Passwordless Authentication Using Windows Hello for Business
Windows Hello for Business replaces traditional passwords with secure PINs or biometric authentication, such as fingerprint or facial recognition. It combines a device-specific credential with a biometric passkey, creating strong, phishing-resistant two-factor authentication. Attackers will require both the device and the biometric or PIN to compromise an account, greatly reducing the risk of credential theft.
To enable this, first ensure the AzureADHybridAuthenticationManagement module is installed and the Microsoft Entra Kerberos server object is created in your on-premises environment. The prerequisite steps are the same as those for a FIDO2 security key setup. Once complete, you can follow the steps below.
1. Configure Windows Hello for Business Policy Settings and Cloud Trust
You can configure devices for Windows Hello for Business using one of the following methods.
Enable Windows Hello for Business Policy Using Intune Device Settings
To configure device settings in Microsoft Intune, follow the steps below.
- Sign in to the Microsoft Intune admin center.
- Navigate to Devices → Manage devices → Configuration → Create → New Policy.
- Enter the following properties and select Create.
- Platform: Windows 10 and later
- Profile type: Settings catalog
- In the Basics tab, enter a name for the policy and hit ‘Next’.
- Click + Add settings under “Configuration settings” tab. Then, search for and click Windows Hello for Business.
- Choose the following subcategories from the list and close the Settings picker prompt.
- Use Windows Hello for Business (User)
- Use Windows Hello for Business (Device)
- Use Cloud Trust for On Prem Auth
- Require Security Device
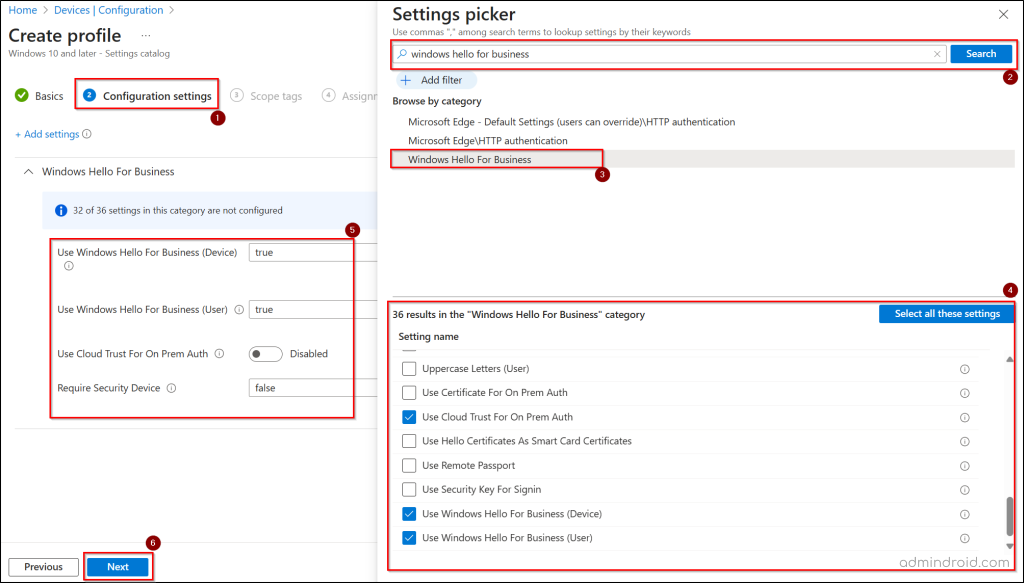
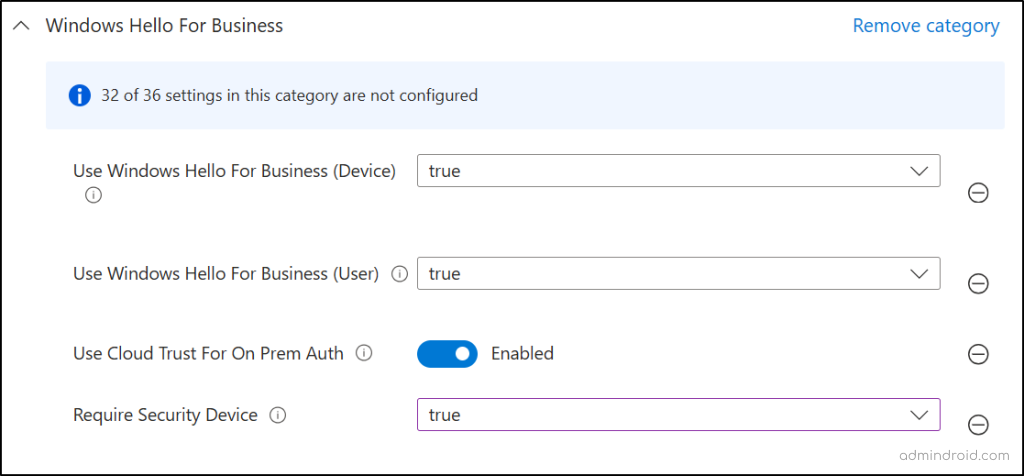
- All the selected settings will be shown in the ‘Configuration settings’ page with default values. Set the value as below and click Next.
- Use Windows Hello for Business (User) – True
- Use Windows Hello for Business (Device) – True
- Use Cloud Trust For On Prem Auth – Enabled
- Require Security Device – True
- Go to the Assignments tab and assign the policy to all users or a group that contains the users or devices that you want to configure passwordless authentication.
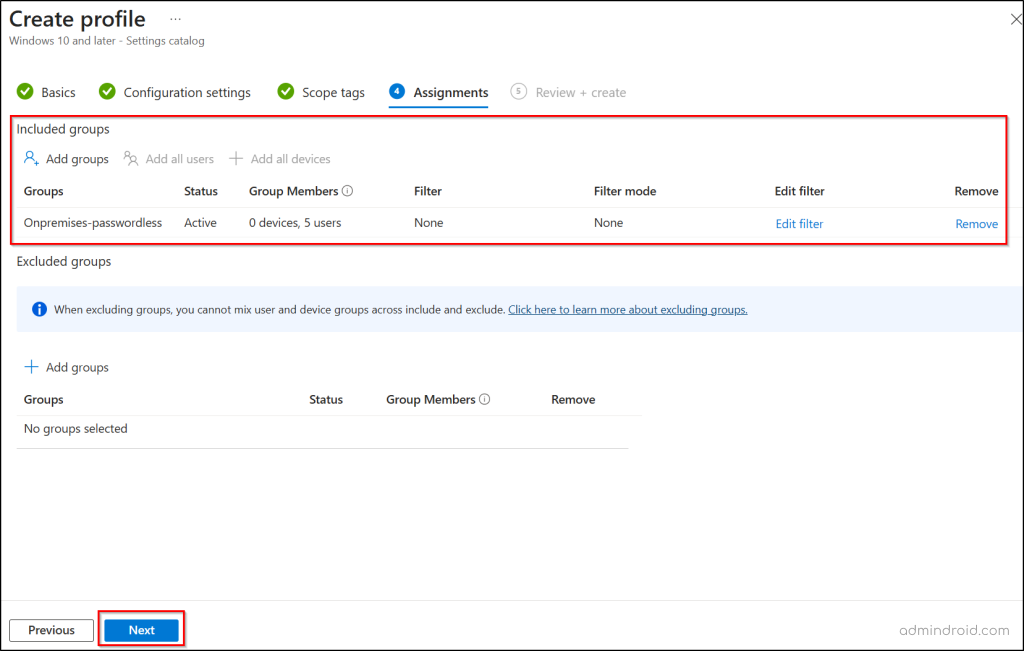
- Click Next, review all policy settings, and click Create to deploy Windows Hello for Business using Microsoft Intune.
Deploy Windows Hello for Business Policy Setting Using Group Policy Objects
Follow the steps below to configure Windows Hello for Business in the Active Directory domain.
- Open Group Policy Management and right-click the domain or OU where you want to enable Windows Hello for Business policy.
- Click Create a GPO in this domain, and Link it here…, enter the policy name, and click OK.
- Now, right-click the linked policy and choose ‘Edit’.
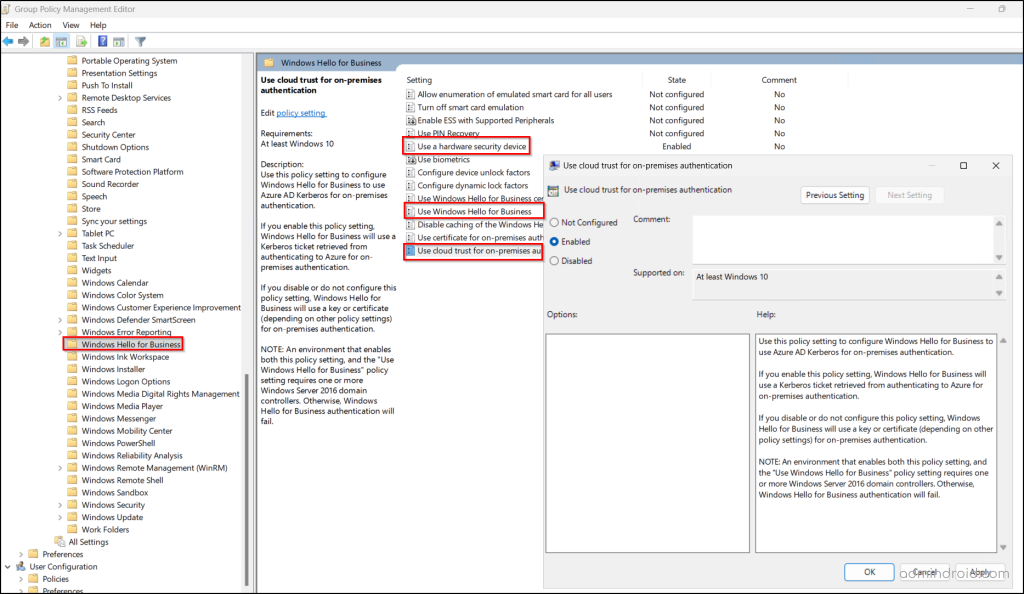
- Go to Computer Configuration → Administrative Templates → Windows Components → Windows Hello for Business.
- Right-click each of the following policies, click Edit, choose Enabled, and click OK.
- Use Windows Hello for Business
- Use cloud trust for on-premises authentication
- Use a hardware security device
Note: If you deploy Windows Hello for Business policy settings using both GPO and Microsoft Intune device configuration, Group Policy settings take precedence.
By embracing passwordless authentication with Microsoft Entra Kerberos, you minimize one of the most common attack vectors and strengthen your hybrid identity foundation. The result? A seamless balance between security and convenience, where authentication becomes something users barely notice — yet attackers can’t easily bypass. Take the first step, configure Entra Kerberos, and empower your users with their own unique, phishing-resistant identity. Keep your security sharp by following our Cybersecurity Awareness Month blog series for more essential tips & tricks.


