Cyber-attacks are on the rise⬆, and traditional security measures just aren’t cutting it anymore! With employees working from virtually anywhere and data moving to the cloud, there’s an urgent need for a secure, identity-aware network perimeter🛡🌐. This is where Security Service Edge (SSE) comes in—a game-changing approach to network security. Microsoft Entra Private Access, a key component of this SSE solution, plays a crucial role in securing access to private company resources. Let’s check why!
Microsoft Security Service Edge (SSE)
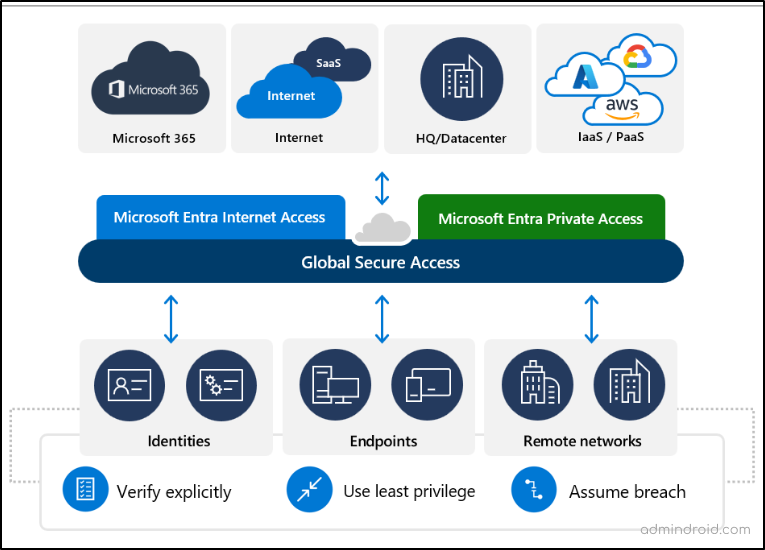
Microsoft’s Security Service Edge (SSE) solution is designed to enhance security by integrating identity, endpoint, and network access policies. It combines Microsoft Entra Internet Access and Microsoft Entra Private Access under the unified Global Secure Access in the Microsoft Entra admin center.
Key Benefits:
- Integrates network, identity, and endpoint security with Microsoft Entra and Defender for Cloud Apps, securing access from anywhere.
- Offers centralized policy management and real-time access adjustments for seamless control of users and resources.
- Utilizes Microsoft’s extensive network, spanning 140+ regions and 190+ edge locations, for optimal and secure connectivity.
What is Global Secure Access?
Global Secure Access combines the capabilities of Microsoft Entra Internet Access and Microsoft Entra Private Access, forming a centralized hub for managing secure access to both public and private resources. It is designed based on the core principles of Zero Trust, which include: least privilege, verify explicitly, and prepare for potential breaches. To provide a clearer distinction, here’s a quick comparison of Entra Internet Access and Entra Private Access:
| Feature | Microsoft Entra Internet Access | Microsoft Entra Private Access |
| Primary Function | Secure Web Gateway (SWG) for SaaS apps and internet traffic. | Zero Trust Network Access (ZTNA) for private resources. |
| Access Type | Public internet, SaaS apps, and Microsoft 365. | Private applications, internal resources, and protocols. |
| Threat Protection | Protects against malicious internet traffic, unsafe content, and data exfiltration. | Secures access to private applications with no full network access. |
| Unique Capabilities | Universal Tenant Restrictions, real-time threat detection, and precision risk assessment for Microsoft 365. | Multifactor authentication (MFA), device compliance checks, and single sign-on for TCP/UDP-based applications. |
| Deployment Options | Can be deployed as a main solution or alongside other SSE solutions; uses cross-OS agents or IPsec tunnels. | Connects to private apps with no changes needed to the apps; works with existing application connectors. |
| Advanced Features | Data exfiltration control, near-real-time threat detection, higher risk assessment precision. | Attribute-based Conditional Access, MFA, device compliance, app discovery, seamless integration with legacy authentication protocols. |
We have covered Microsoft Entra Internet Access in detail in our previous blog. Now, let’s explore Microsoft Entra Private Access and how it complements Global Secure Access.
This blog will walk you through the steps to configure Microsoft Entra Private Access, which is a crucial component of the Global Secure Access.
Microsoft Entra Private Access
Microsoft Entra Private Access, now generally available, enables users to securely access private company resources such as applications and data from any device and any network, whether they’re at home, remote, or in their corporate office. It is the new identity-centric zero trust network access (ZTNA) solution, which means:
Identity-Centric – The system verifies that it’s genuinely you trying to access the files, using methods such as passwords, fingerprints, or other security checks.
Zero Trust Network Access – ZTNA doesn’t automatically trust anyone, even if they’re within the company’s network. It assesses each access attempt, ensuring secure connections from any device or network. This approach helps your users securely reach the files and applications they need, without exposing them to potential threats from the internet.
Microsoft Entra Private Access Licensing
Microsoft Entra Private Access requires a subscription to either Microsoft Entra ID P1 or P2.
Microsoft Entra Private Access Pricing:
You can get the Microsoft Entra Suite, which includes Entra Verified ID, Entra ID Governance, Entra Internet Access, and Entra Private Access, for just $12 per user per month. Microsoft Entra Private Access is also available as a standalone product that costs $5 per user per month.
Capabilities of Microsoft Entra Private Access
Microsoft Entra Private Access builds on the Microsoft Entra application proxy’s features and extends secure access to any private resource, port, and protocol.
✅ Modern Replacement for Legacy VPNs
Remote workers no longer need a Virtual Private Network (VPN) if they have the Global Secure Access Client installed. This client provides a seamless, secure connection to the resources they need without the hassle of traditional VPNs.
✅ Enforce Multifactor Authentication on Legacy Protocols
Private Access supports multifactor authentication (MFA) for older protocols that don’t natively support it. This adds an extra layer of security to legacy systems, ensuring that your organization’s data remains protected with up-to-date security measures.
✅ Enable Adaptive Per-App Access
With Private Access, you can control user access on a per-application basis. Set specific access policies based on the application, user, or other conditions to enhance security and ensure users have the appropriate level of access to the resources they need.
How Does the Microsoft Entra Private Access Work?
Imagine a user on a different subnet needs to access a web server that doesn’t have a public IP address and is only accessible within its own subnet. Normally, this setup would block external access.
Microsoft Entra Private Access solves this by using a connector. You set up this connector on a Windows server, which links to the subnet you want to access. This setup lets users connect to the private server from their devices using the Global Secure Access client, even though the server doesn’t have a public IP.
How to Set Up Microsoft Entra Private Access?
Configuring Microsoft Entra Private Access involves the following steps.
- Activate Global Secure Access
- Activate Traffic Forwarding Profiles
- Enable Client IP Restoration
- Deploy Private Network Connector
- Set Up Applications for Private Access
- Grant Access to Users
- Configure Conditional Access
- Download the Global Secure Access Client
Step 1: Activate Global Secure Access
- To activate Global Secure Access, navigate to the Microsoft Entra portal. Ensure you have the Global Secure Access Administrator role or are using a Global Administrator account to activate the service.
- Expand ‘Global Secure Access’ menu in the left navigation and choose ‘Get started’.
- Click on Activate.

Step 2: Activate Traffic Forwarding Profiles
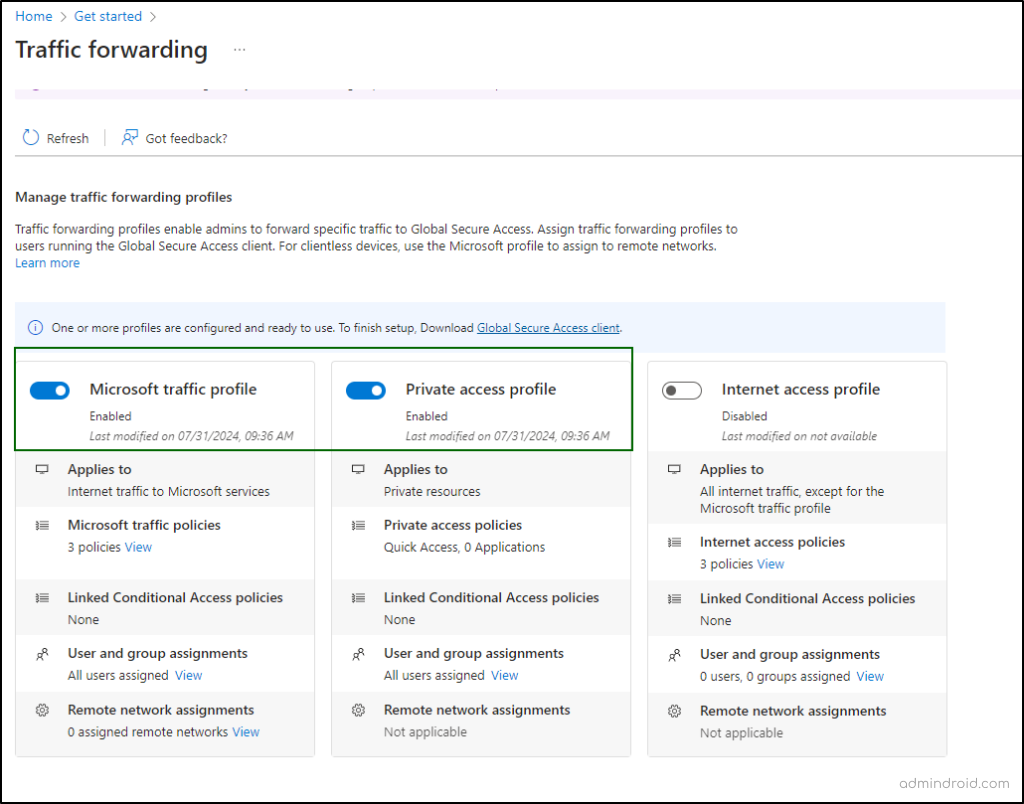
- Under Global secure access, choose ‘Connect’ -> Traffic Forwarding.
- Enable both the Microsoft 365 access profile and the Private access profile. Enabling this profile directs Global Secure Access clients to acquire traffic for this profile.
- Assign users and groups to both the profiles. Traffic forwarding profile policies only apply to users assigned to the profile.
This ensures that the connectors will handle private access information and connect to your private channel for the applications you set up.
Step 3: Enable Client IP Restoration
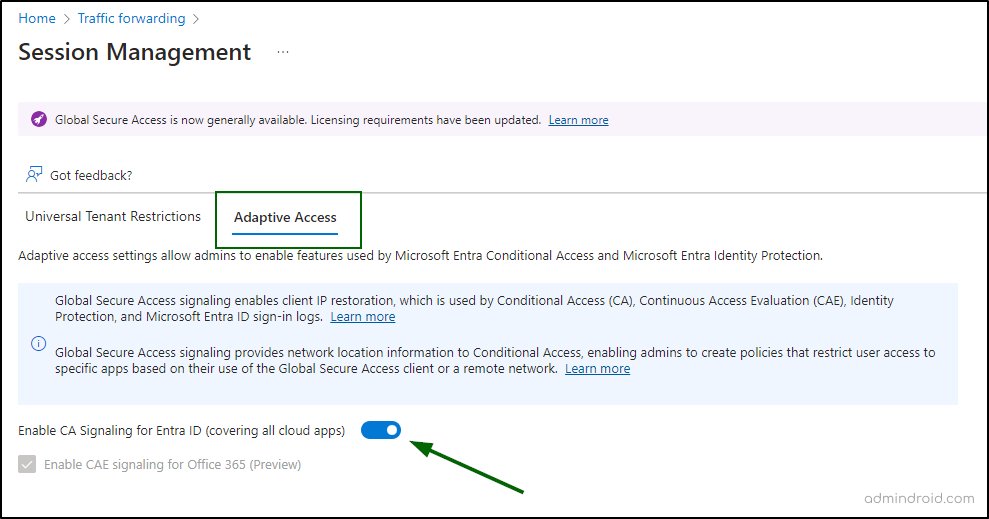
To fully benefit from the Conditional Access integration with Entra Private Access, leveraging Global Secure Access signaling is essential. This feature enables client IP restoration, which is crucial for Conditional Access (CA), Continuous Access Evaluation (CAE), Identity Protection, and Microsoft Entra ID sign-in logs. By providing network location information to Conditional Access, Global Secure Access signaling allows admins to create policies that restrict user access to specific apps based on their use of the Global Secure Access client or a remote network.
- Under Global secure access, navigate to Settings.
- Click Session management.
- On the Adaptive Access tab, toggle the ‘Enable Global Secure Access signaling in Conditional Access’ button to ‘On’.
Once you’ve enabled Global Secure Access signaling, the next step is to deploy the Private Network Connector, which is essential for establishing secure outbound connections to the Global Secure Access service.
Step 4: Deploy Private Network Connector
Connectors are lightweight agents installed on a server within a private network, enabling outbound connections to the Global Secure Access service. These connectors need to be installed on a Windows Server with access to backend resources and applications. This connector facilitates remote connectivity to the internal resources. You can organize them into connector groups, with each group managing traffic to specific applications.
To deploy a private network access connector, click on the ‘Connect’ dropdown -> Connectors. When you try to create a new connector group for the first time, you will be getting this error.
‘Private Network is currently disabled for your tenant’.
To enable private network connectors, you need to first download the connector service. For that,
- Click on ‘Download connector service’. Review the system requirements.
- Accept the terms and download the installer. This installs the connector service on a publicly accessible server.
- Authenticate with your Microsoft 365 admin credentials.
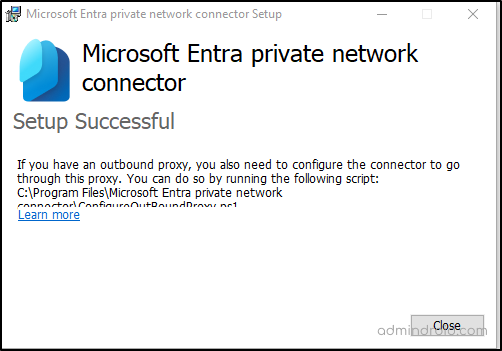
- Once the installation is successful, you will see the message below.
- Now, proceed to the Private network connectors page and click on ‘New Connector group’.
- Name the connector group, add the connector, and Click ‘Create’.
This activates the connector. The next step is to define and configure applications and services that we want to grant access to users via Entra Private Access.
Step 5: Set Up Applications
Private Access provides two ways to configure the private resources that you want to tunnel through the service.
Quick Access: Use this method to secure a main group of internal resources. Simply create a list of domain names (FQDNs) and IP addresses that you want to protect. This approach is straightforward for covering essential resources quickly. Quick Access also makes it easy to onboard private apps to Microsoft Entra, simplifying your app integration process.
Private DNS: Private DNS offers a seamless way to access IP-based app segments using FQDNs, making it easier for users to reach private apps and enhancing overall management.
Global Secure Access App (Per-App Access): This option offers more detailed control. You can create specific access policies for individual resources or users. This allows you to secure selected resources or apply different rules based on user roles, providing greater flexibility in managing access.
When you set up either Quick Access or Global Secure Access, you create an enterprise application in Microsoft Entra. This app acts as a gateway to your private resources. The application will have its own connector to link with your internal resources. You can assign users and groups to this application and then use Conditional Access policies to manage who can access it and under what conditions.
Configure Quick Access for Microsoft Entra Private Access
To configure quick access, navigate to Global secure access -> Applications -> Quick access.
- Name Your Application: Provide a relevant name for easy identification.
- Add Connector Group: Assign the application to the appropriate connector group you created.
- Configure Access Protocols: In the Add Quick Access Application segment, configure the protocols (like HTTP, HTTPS, IP, FQDN, Ports) that the applications will use.

Setting up applications ensures they are available for access through your configured connectors. This process helps in managing and securing access to your enterprise applications. Once the application is created, click on the new application and grant access to users.
Step 6: Grant Access to Users
- Navigate to Users and Groups tab.
- Add the users or groups who need access to the resources/applications.
To ensure only authorized users can access the applications, you need to specify who has access.
Step 7: Configure Conditional Access
Create a Conditional Access policy by navigating to the relevant section in your security settings and granting MFA or other authentication requirements as needed.
Step 8: Download the Global Secure Access Client
Download the client software from the Global Secure Access portal and install it on the user devices. For this, navigate to Connect dropdown, select Client Download -> Download the Windows client.
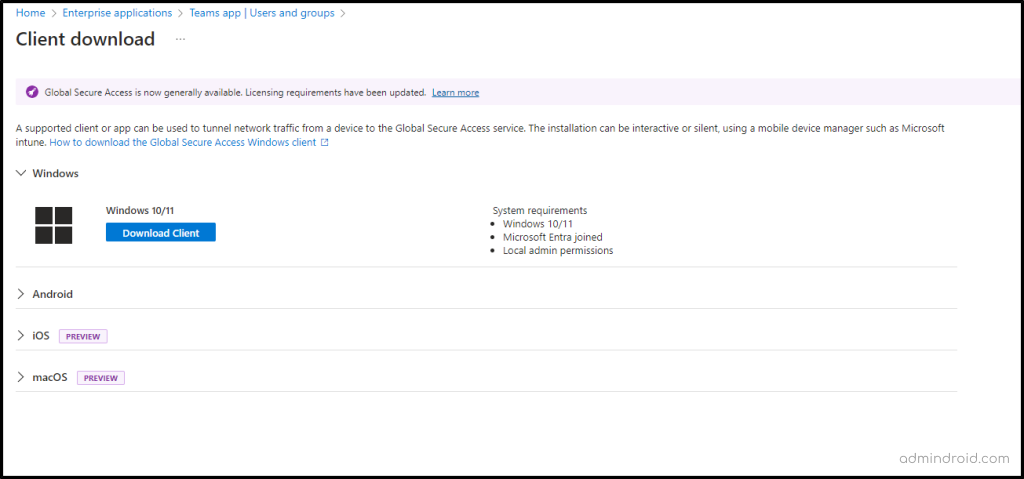
The client software is necessary for users to connect to and interact with the applications configured through the Global Secure Access. Once downloaded, install the global secure client.
Installing the Global Secure Access Client:
Organizations have multiple options for installing the client:they can do it interactively, use the /quiet switch for a silent installation, or deploy it through mobile device management platforms like Microsoft Intune.
Upon successful deployment and installation, users will be prompted to authenticate with their M365 credentials. If the endpoint is Entra ID or Hybrid Entra ID joined, these credentials should already be populated, allowing the user to simply click the relevant pre-authenticated account.
Thats it! Now you are ready to test the Microsoft Entra private access all by yourselves!
We hope that this blog has given you insights on how to get started with Microsoft Entra Private Access. Thanks for reading. If you have any questions or need further assistance, please leave a comment below.


