The modern M365 environment runs on approvals, yet the manual process for granting SharePoint guest access remains a huge administrative headache. Verifying if a guest user exists, confirming the access level, and ensuring the request is logged and actioned correctly requires constant, manual follow-up. What should be a quick delegation task turns into a constant source of frustration and potential security risk.
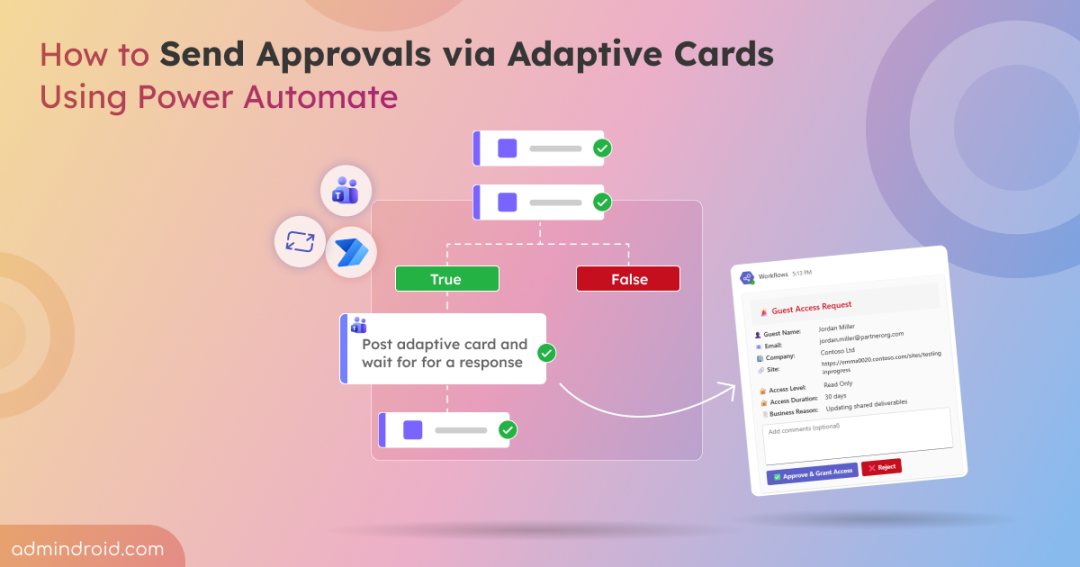
Power Automate Approvals with Adaptive Cards fixes that. It brings approvals directly into Microsoft 365 apps. In this blog, let’s explore how you can use Adaptive Cards in Power Automate to create interactive, one-click approval experiences right where your users work.
What are Adaptive Cards?
Adaptive Cards are an open-source framework for creating interactive UI content in a universal JSON format. They automatically adjust to match the look and feel of the host app. It can include text, images, buttons, and input fields – turning static notifications into actionable ones. They work seamlessly across Microsoft 365 apps like Teams and Outlook, and even extend to platforms such as Viva Connections, Power Virtual Agents, and Windows Notifications.
Adaptive Cards within Power Automate make approvals simple by allowing approvers to view request details, add comments, and take action – all without opening another app.
How to Send Approvals via Adaptive Cards in Power Automate?
Adaptive Cards are widely used across Microsoft 365 apps to simplify approval processes by delivering interactive, actionable messages. Among these, Microsoft Teams serves as one of the most popular hosts for approval tasks. Let’s now check the step-by-step process to use Adaptive Cards to solve a common use case in SharePoint Online.
Use Case: Automate SharePoint Guest Access Approvals for Existing Guests
In most organizations, managers often need to provide temporary or guest access to SharePoint sites — for example, when collaborating with external vendors, partners, or clients. However, giving SharePoint guest access directly isn’t always ideal. It requires site admin privileges, manual verification, and proper logging to ensure the right users get the right permissions.
To make this process smoother, we’ll create a Power Automate flow using Adaptive Cards in Teams to handle these guest access approvals.
️⚠️ Important Note: This setup applies only to guest users who already exist in your directory — similar to when your tenant-wide sharing settings are configured to “Existing guests only.” If you want to onboard new external users, they must first be invited to your tenant via Entra ID or through a SharePoint sharing invitation. We’ll cover how to automate external user invitations using adaptive cards in an upcoming blog.
How It Works:
- A manager submits a guest access request by entering the guest details — email ID, site URL, access level, and their purpose in a SharePoint list.
- When a new item is added in the list, the flow automatically triggers and searches Entra ID for the submitted guest user’s email ID.
- If the guest user is not found in the directory, the flow will fail the request. It then automatically sends an email notification to the requester or manager explaining that the user couldn’t be found.
- If the guest user is found, the flow proceeds and sends an Adaptive Card to the configured Teams channel. You can also customize the flow to send the Adaptive Card directly to a specific person (like the site owner or admin) instead of a Teams channel.
- The flow posts a card showing all request details and provides Approve and Reject buttons.
- When approved, the guest user is automatically added to the correct SharePoint group (Visitors, Members, or Owners).
- The list item is updated, and the requester receives an automatic email notification confirming the approval along with the site link.
Here’s how the complete flow looks in Power Automate:
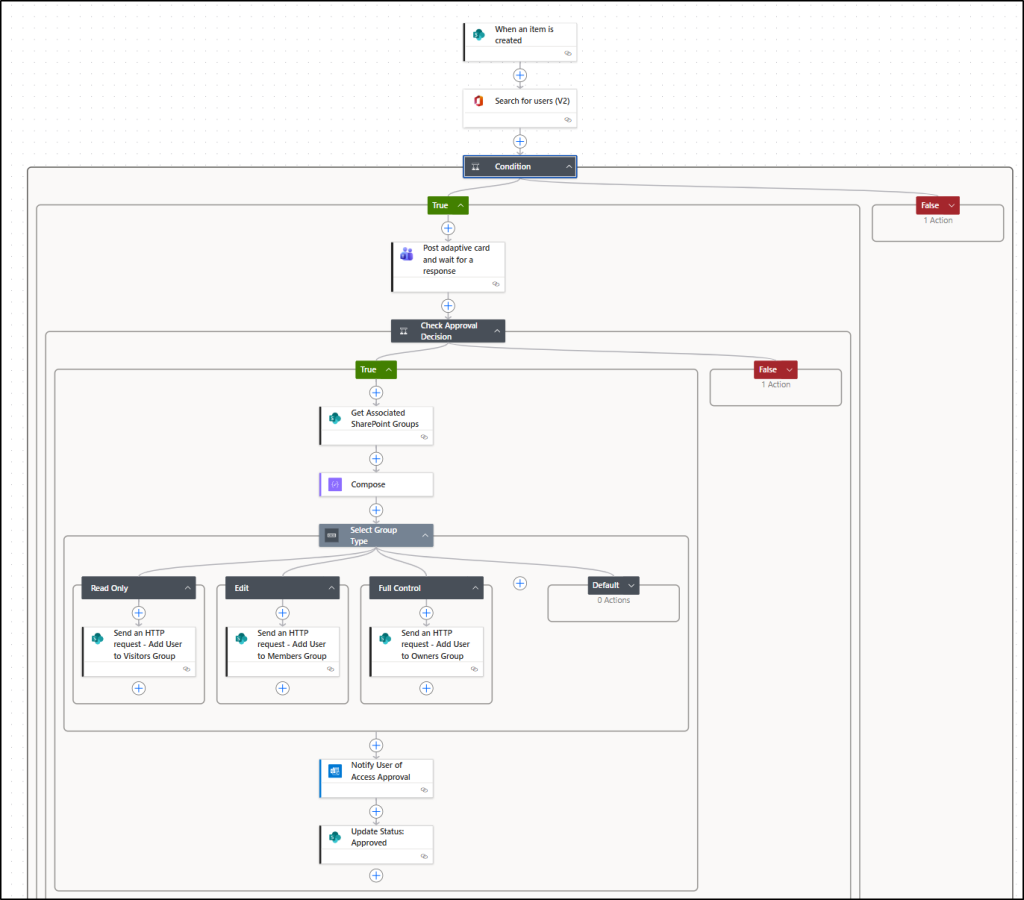
Let’s now check how to build this approval flow step by step in Power Automate.
- Prepare your SharePoint list
- Create an automated cloud flow
- Check if the guest user exists in Entra ID
- Add Adaptive Card action
- Add condition to check approval decision
- Retrieve the associated SharePoint groups
- Add a switch action to handle access levels
- Assign guest user to the correct SharePoint group
- Send notification email
- Update the SharePoint list
Step 1: Prepare Your SharePoint List
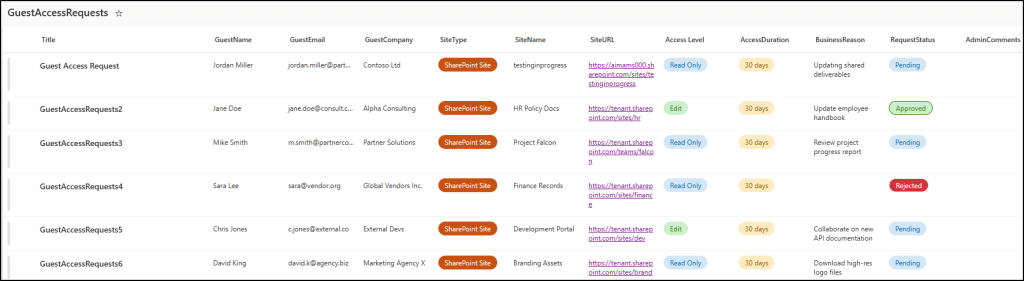
Before creating the Power Automate flow, you’ll need a SharePoint list to capture guest access requests. This list acts as the trigger for your flow and stores all key details such as guest name, email, company, site URL, access level, etc. If you want only specific users to submit entries, you can configure unique permissions on the list to restrict who can add or edit items.
To make it easy for you, we’ve provided a ready-to-use .csv template that you can simply download and import into your SharePoint site.
Download CSV: GuestAccessRequest.csv
To import the file,
- Go to your SharePoint site’s Home page.
- Click + New -> List -> Import CSV.
- Upload the downloaded .csv file.
- Review and customize column types if needed, then click Next.
This will import all required columns with their respective data types to be used in the Adaptive Card. The imported list will look like the screenshot below:
⚠️ Important note: Ensure that the column names match exactly, as they will be referenced in the Adaptive Card JSON.
Step 2. Create an Automated Cloud Flow
- Sign in to Power Automate.
- Select Create → Automated cloud flow.
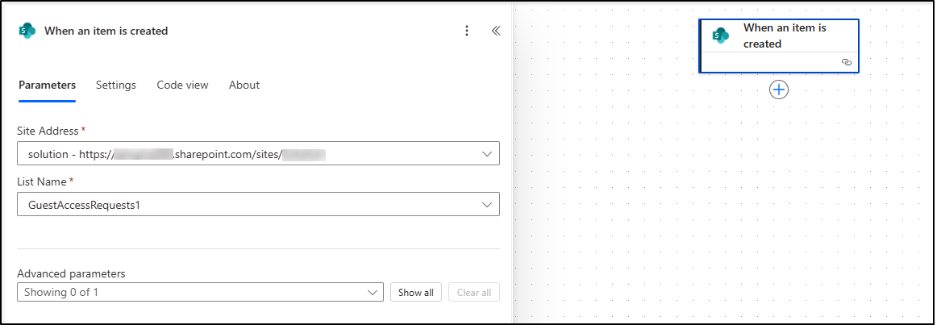
- Name your flow, then select the trigger When an item is created (SharePoint) -> Create.
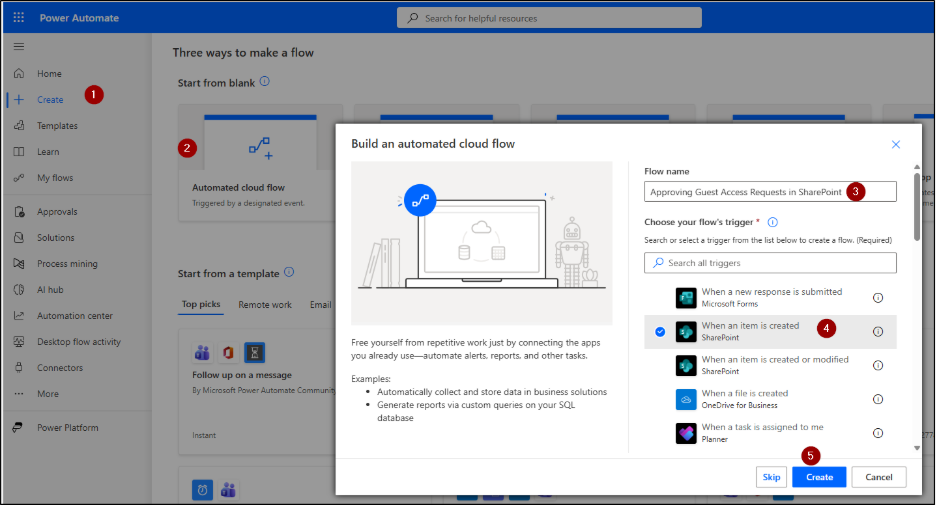
4. For the selected node, configure the action by selecting the Site Address and the List Name (the one you just created) from the dropdown menu.
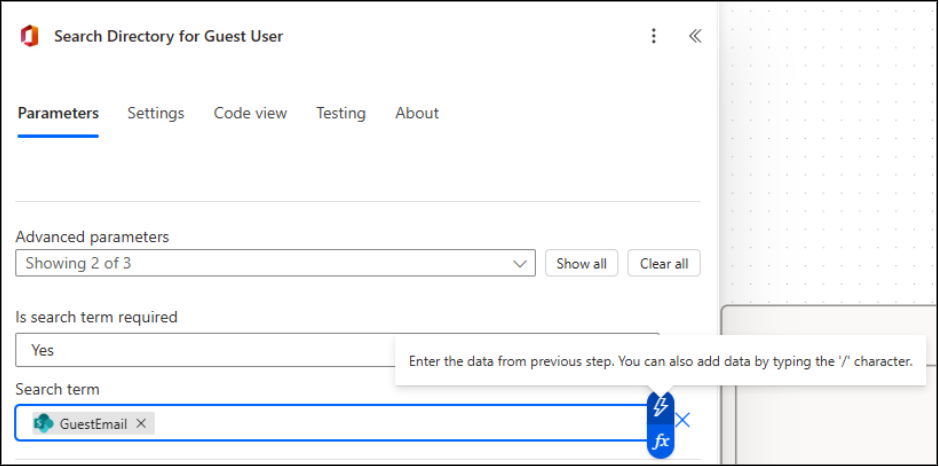
Step 3: Check if the Guest User Exists in Entra ID
This action searches Entra ID to see if the guest email from the SharePoint request already exists as a guest user.
- Click the ‘+’ icon below your trigger.
- Search and select the action Search for users (V2).
- In the Search term field, add the dynamic content for the guest’s email address from the SharePoint trigger.
- Insert a Condition action below the “Search for users (V2)” step and configure it as follows:
- Choose a value (Left): Click the Expression tab and paste the following:
length(body(‘Search_for_users_(V2)’)?[‘value’]) - Operator: is greater than
- Choose a value (Right): 0

This condition checks whether the “Search for users” action returned any results.
For handling scenarios where the guest user isn’t found in the directory:
- In the False branch of the condition, click + and add ‘Send an Email (V2) action.
- To: Add the dynamic content “Created By Email” from the SharePoint trigger.
- Subject: Guest Access Request Failed – User Not Found
- Body: The requested guest user (@{triggerOutputs()?[‘body/GuestEmail’]}) could not be found in the directory. Access could not be granted. Please contact your admin to add the user to the directory as a guest, and then request access again.
If no matching user is found, the flow stops here, and the requester is automatically notified via email.
For handling cases where the guest user already exists in the directory:
- In the ‘True branch, click + and continue with the next steps provided below.
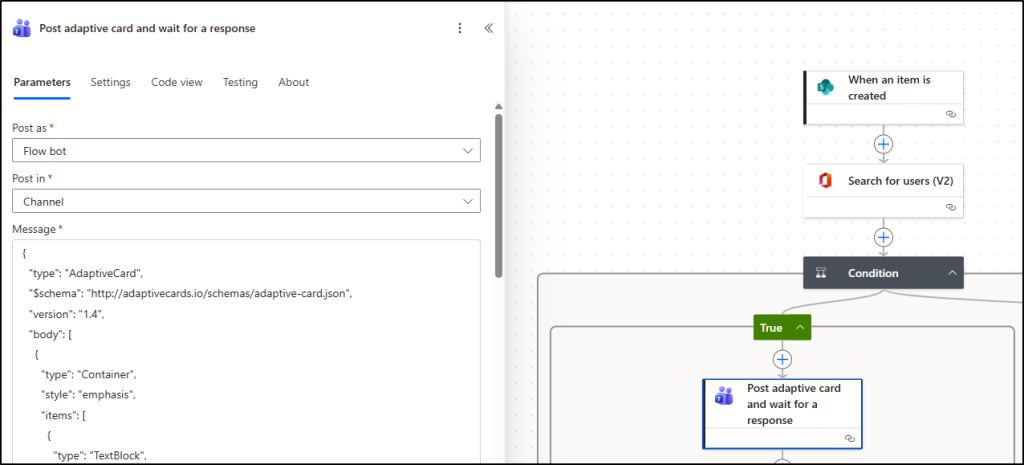
Step 4: Add Adaptive Card Action
- Click the ‘+’ icon below the True branch.
- Search and select the action Post adaptive card and wait for a response from the list. This action requires installing the Workflows app in your Teams environment.
- Configure the fields as:
- Post as: Flow bot
- Post in: Channel
- Team: Select the team where you want to post this message.
- Channel: Choose the channel.
- Message: Paste the following JSON code for your adaptive card:
|
1 2 3 4 5 6 7 8 9 10 11 12 13 14 15 16 17 18 19 20 21 22 23 24 25 26 27 28 29 30 31 32 33 34 35 36 37 38 39 40 41 42 43 44 45 46 47 48 49 50 51 52 53 54 55 56 57 58 59 60 61 62 63 64 65 66 67 68 69 70 71 72 73 74 75 76 77 78 79 80 81 82 83 84 85 86 87 88 89 90 91 92 93 94 95 96 97 98 99 100 101 102 103 104 105 106 107 108 109 110 111 112 113 114 115 116 117 118 119 120 121 122 123 124 125 126 127 128 129 130 131 132 133 134 135 136 137 138 139 140 141 142 143 144 145 146 147 148 149 150 151 152 153 |
{ "type": "AdaptiveCard", "$schema": "http://adaptivecards.io/schemas/adaptive-card.json", "version": "1.4", "body": [ { "type": "Container", "style": "emphasis", "items": [ { "type": "TextBlock", "text": "🚨 Guest Access Request", "weight": "Bolder", "size": "Large", "color": "Attention" } ] }, { "type": "FactSet", "facts": [ { "title": "👤 Guest Name:", "value": "@{triggerBody()?['GuestName']}" }, { "title": "📧 Email:", "value": "@{triggerBody()?['GuestEmail']}" }, { "title": "🏢 Company:", "value": "@{triggerBody()?['GuestCompany']}" }, { "title": "🔗 Site:", "value": "@{triggerBody()?['SiteURL']}" }, { "title": "🔐 Access Level:", "value": "@{triggerBody()?['AccessLevel/Value']}" }, { "title": "🔐 Access Duration:", "value": "@{triggerBody()?['AccessDuration/Value']}" }, { "title": "🗒️Business Reason:", "value": "@{triggerBody()?['BusinessReason']}" } ] }, { "type": "Input.Text", "id": "AdminComments", "placeholder": "Add comments (optional)", "isMultiline": true } ], "actions": [ { "type": "Action.Submit", "title": "✅ Approve & Grant Access", "style": "positive", "data": { "action": "approve" } }, { "type": "Action.Submit", "title": "❌ Reject", "style": "destructive", "data": { "action": "reject" } } ] } |
This delivers the request details directly into Teams, letting admins approve or reject access right from the channel. You can customize the Adaptive Card using the Adaptive Card Designer for a visual experience.
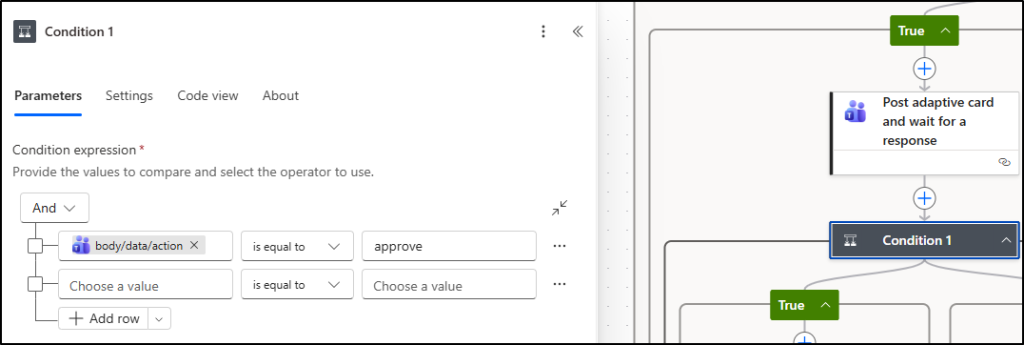
Step 5: Add Condition to Check Approval Decision
This condition checks whether the admin selected Approve in the Adaptive Card and directs the flow accordingly.
- Click the ‘+’ (New step) icon below your Adaptive Card action.
- Search for and select the Condition control.
- Configure the AND operation in the action as follows:
- Choose a value: Click inside the field. Two icons will appear — select the Insert expression (fx) icon and paste the following expression: outputs(‘Post_adaptive_card_and_wait_for_a_response’)?[‘body/data/action’]
- Condition: is equal to
- Choose a value: approve
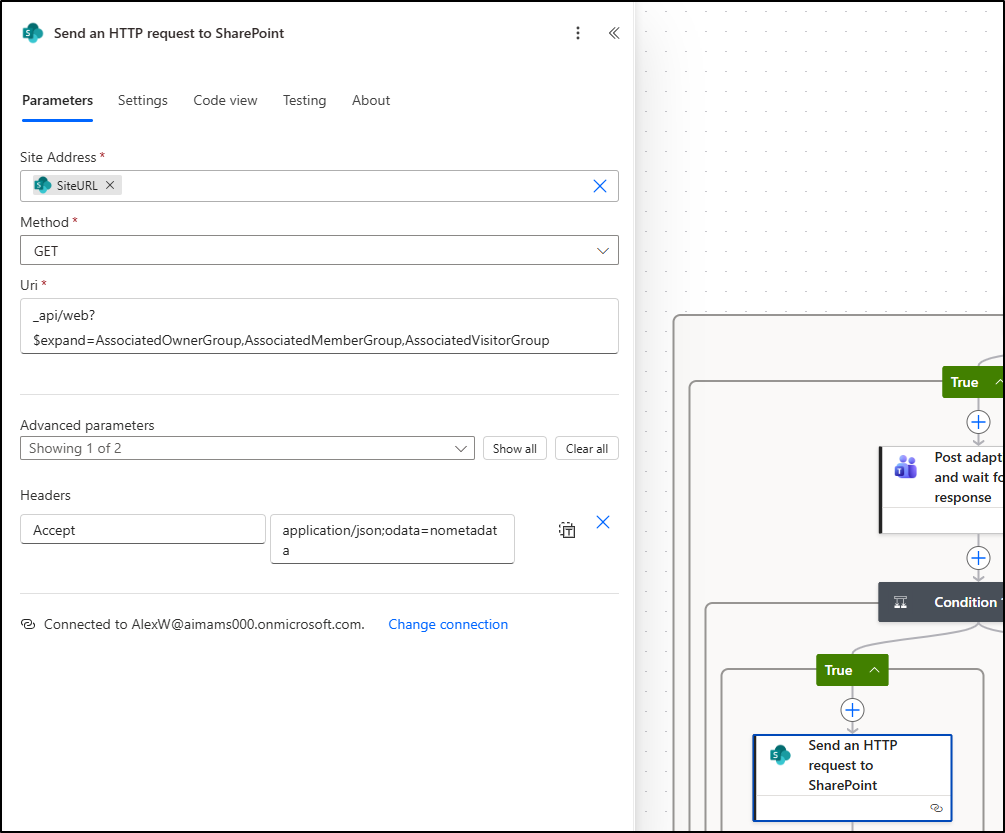
Step 6: Retrieve the Associated SharePoint Groups
In this step, the flow retrieves the site’s associated SharePoint groups — Owners, Members, and Visitors — to automatically assign the correct access level to the guest user.
Under the True branch:
- Click the ‘+’ icon.
- Search for and select ‘Send an HTTP request to SharePoint.’
- Configure the action as follows:
- Site Address: Select Enter custom value, then click the Dynamic content icon and choose SiteURL from the trigger action (If the list isn’t created with headers first, its properties won’t appear in dynamic content).
- Method: GET
- URI: _api/web?$expand=AssociatedOwnerGroup,AssociatedMemberGroup,AssociatedVisitorGroup
- Advanced Parameters -> Headers: Accept: application/json;odata=nometadata
- After this step, click the ‘+’ icon and add a Compose action.
- In the Inputs field, click Dynamic content and select Body under the Send an HTTP request to SharePoint.
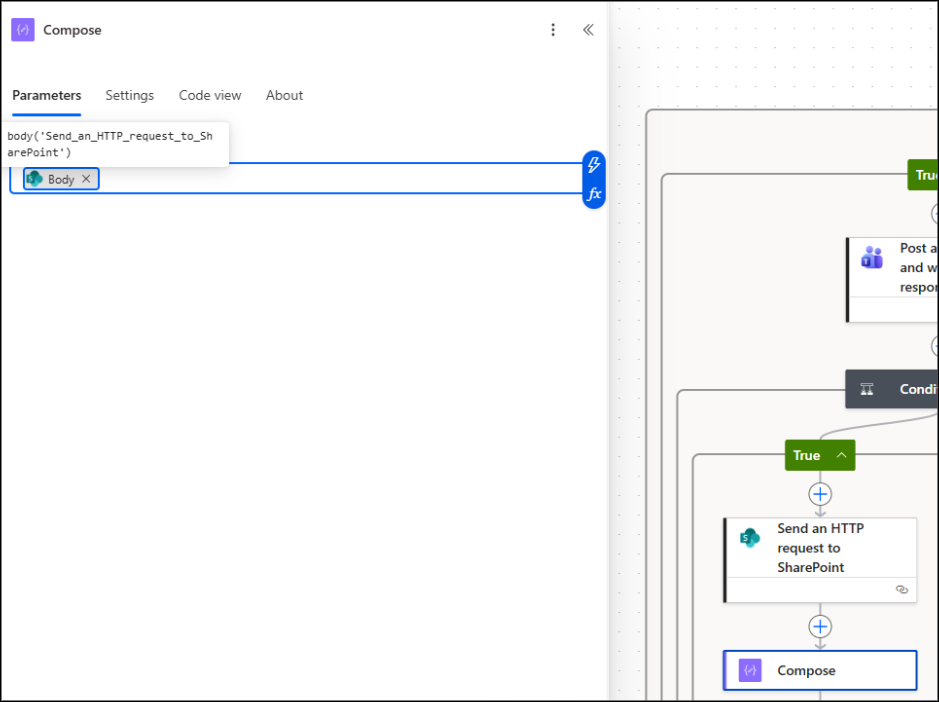
This allows you to view and verify the response returned from SharePoint before proceeding further.
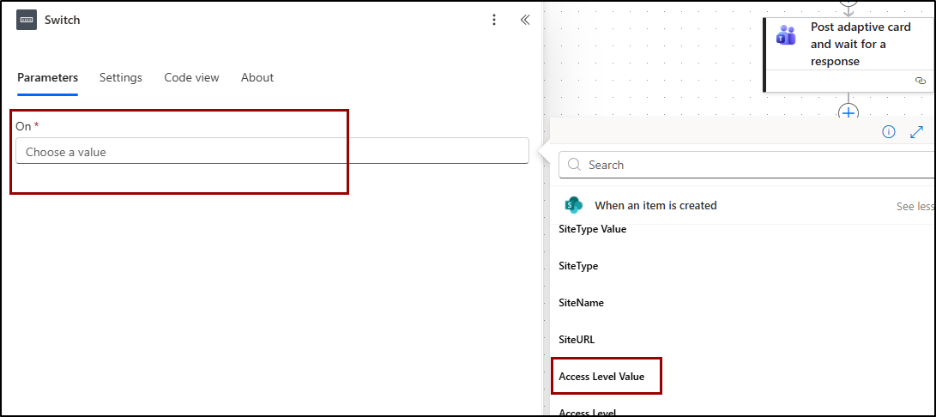
Step 7: Add a Switch Action to Handle Access Levels
This setup ensures the flow handles each access level separately, allowing you to define specific actions for every permission type.
- Click the ‘+’ icon under the previous action.
- Search for and select the Switch control.
- In the On field, select Access Level Value from Dynamic content.
4. Under the Switch control, click the ‘+’ (Add a case) button to create three separate cases.
In each case, configure the Equals field under Parameters as follows:
- Case 1: Read Only
- Case 2: Edit
- Case 3: Full control
The Default case acts as a fallback option – it runs if none of the specified cases (Read Only, Edit, Full Control) match the value in the Access Level field.
📌 Note: Make sure to give the case names exactly as they appear in the SharePoint list access value names.

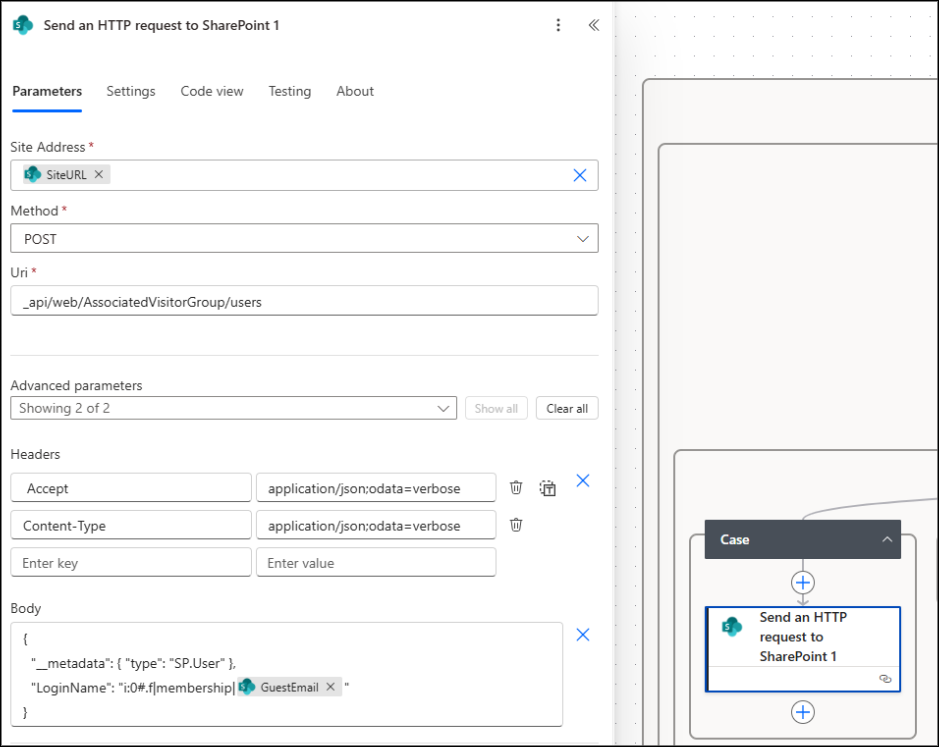
Step 8: Assign Guest User to the Correct SharePoint Group
For each case created under the Switch action, click ‘+’ ->Add an action and choose Send an HTTP request to SharePoint. Now, to let the flow add the guest into the respective SharePoint group defined by the manager, use the following configuration for each access level.
All parameters remain the same except the URI, which changes based on the access type (Read Only, Edit, or Full Control):
- Site Address: Select Enter custom value -> click Dynamic content -> choose SiteURL from the trigger.
- Method: POST
- URI:
- Case 1: Read Only -> _api/web/AssociatedVisitorGroup/users
- Case 2: Edit -> _api/web/AssociatedMemberGroup/users
- Case 3: Full Control -> _api/web/AssociatedOwnerGroup/users
- Headers: Accept: application/json;odata=verbose
Content-Type: application/json;odata=verbose
- Body: {
“__metadata”: { “type”: “SP.User” },
“LoginName”: “i:0#.f|membership|@{triggerBody()?[‘GuestEmail’]}”
}
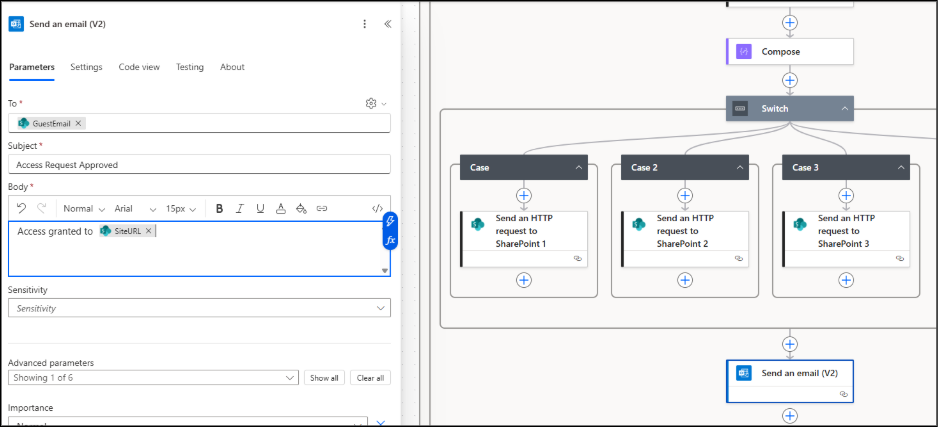
Step 9: Send Notification Email
After assigning the guest user to the appropriate SharePoint group, add a Send an email (V2) action to notify the guest about their approved access.
Set as,
- To: GuestEmail dynamic value from the trigger
- Subject: Access Request Approved
- Body: Customize the message as you wish, but make sure to include the Site URL dynamically in the email.
Step 10: Update the SharePoint List
Finally, add the ‘Update item action under the SharePoint section to mark the request as Approved in the SharePoint list.
- Site Address: Choose the same site where your request list is located.
- List Name: Choose your requests list.
- Id: Select the ID dynamic content from the trigger.
- Title: Select the dynamic content ‘Title’ from the trigger.
- Request Status Value: Approved.
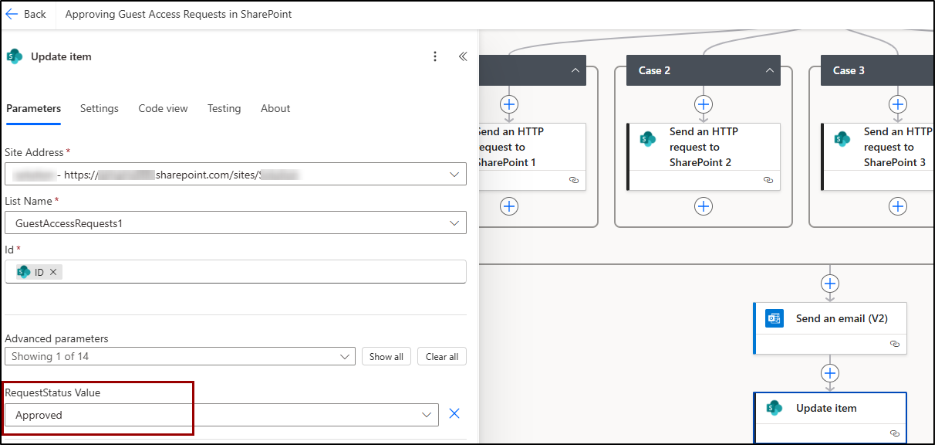
Similarly, configure another Update item action under the False branch and set the Request Status Value to Rejected.
That’s it! Now, save the flow and test it.
Flow Result
When a manager submits a new entry in the SharePoint list, the Power Automate flow triggers automatically. An Adaptive Card instantly appears in the channel, displaying all request details as shown below:
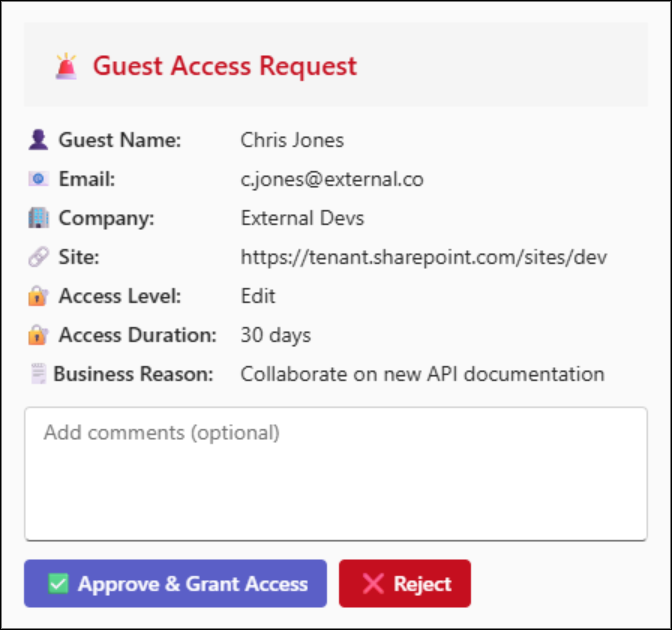
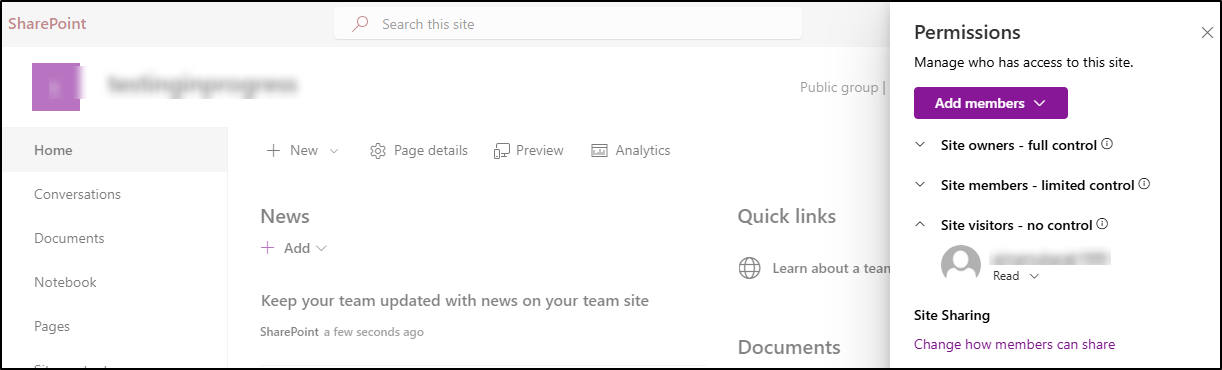
Anyone in the channel can approve or reject the request directly from Teams adaptive card. Once approved, the guest user is automatically added to the correct SharePoint group, receives a confirmation email, and the SharePoint list request status gets updated as ‘Approved’. You can verify this by navigating to your SharePoint site -> Settings -> Site Permissions and checking under the respective default group (Owners, Members, or Visitors).
Therefore, by integrating SharePoint, Power Automate, and Microsoft Teams, this workflow streamlines access requests, minimizes admin effort, and ensures a transparent approval process.
We hope this blog helped you set up the step-by-step flow to automate guest access approvals seamlessly. Power Automate flows can also help automate other admin tasks like onboarding, offboarding, password expiry notifications, and more. Thanks for reading! For any questions or suggestions, feel free to share them in the comments section below.


