
So, you have automated your Microsoft 365 user onboarding process with Power Automate, huh? That’s awesome! You’re saving time😉. Of course! I’m talking about our previous blog on ‘Microsoft 365 User Onboarding Workflow for Easy User Provisioning‘. Where we have provided you with a simple flow with basic steps such as user creation with manager approval, and notification processing to the manager. But what if I told you that you could make your user onboarding process even better? Yeah! Now, Just adding a few more steps to the process can improve your Microsoft 365 user provisioning tasks.
This blog post will show you how to assign a Microsoft 365 license to a user, update a user’s properties, add a user to the Microsoft 365 group and security group, and grant them access to the necessary SharePoint files, depending on their specific properties. I mean specific properties such as the user’s department, job title, country, location, etc. This will free up your time so that you can focus on other important tasks, like training and developing your new employees.
Here’s our video demonstration that will show you how to import our latest optimized flow package within your Power Automate environment and utilize the benefits straight away. Let’s get started!
A Sneak Peek into the Workflow!
In our previous blog, we described how, after the manager’s approval, a new user will be created, assigned a manager, and the manager will receive an email notification.
So, what’s new here?🤔
Automated Resource Access via Excel – We have created an Excel sheet with groups and files to be given access to the new user, based on the users’ properties such as department, job title, country, etc. So, using the data from the predefined Excel file, automated access provisioning for groups, sites, teams, files, and similar resources shall be accomplished easily.
Please find further inclusions below.
- Revise user details input: Modify the manual entry of user details by adding more properties like department, job title, usage location, and so on.
- Assigning license: Upon successful user creation, a Microsoft 365 license will be assigned to the created user’s account.
- Updating user properties: Additional user properties will be updated, like the user’s department, job title, address, preferred language, etc.
- Adding user to groups: Users will be added to relevant security and Microsoft 365 groups to enhance collaboration, based on specific properties like department, job title, usage location, and so on.
- Granting access to files: The user will be granted permission to access the specified files within the desired SharePoint document library.
- Welcome message in Teams: Finally, a welcome message will be sent via Microsoft Teams workflows to greet the new users as they join the organization.
Effortless Entra ID User Provisioning: Pick Your Preferred Automation Approach
You have a choice between two methods to integrate the flow into your environment. Feel free to choose the option that best fits your needs and requirements.
- Deploying user provisioning flow directly from ‘.zip’ file
- Creating a user onboarding flow: a step-by-step guide
I. Deploying User Provisioning Flow Directly from ‘.zip’ File
In our previous blog, we shared a video with instructions on how to import the Microsoft 365 user onboarding flow into your Power Automate environment. However, in this new flow, after importing, you’ll only need to make minor changes to ensure the flow runs smoothly. You can obtain the flow package from the provided GitHub link below.
Download Flow Package from GitHub: Microsoft 365 User Onboarding Flow with Power Automate
- In the ‘My Flows’ section, click ‘Import,’ upload the package file, modify the flow name as you wish, choose ‘Select during import,’ and authorize the connections, using your Office 365 account. The service account can also be used.
Connections used for this flow:

- After the flow is imported successfully, you should modify certain steps to match the data in your environment.
| Action | Modifications Required |
|---|---|
| Compose- File Name | Have to be removed |
| Compose- Table Name | Have to be removed |
| Action | Modifications Required |
|---|---|
| Add user to group- To assign license for the new user | Replace the value of ‘Group Id’ field with your security group’s Id which is created for Microsoft 365 license assignment. (Mail-enabled security groups and distribution lists are not supported) |
| List rows present in a table- To get the data from Excel sheet | Need to fill the Location, Document Library, File, and Table fields with data of the Excel file in your SharePoint/OneDrive. |
| Post message in a chat or channel- To post a welcome message for new user | Need to fill Team and channel name present in your tenant |
After the Modifications,
Once this is done, your flow is fully prepared to handle your entire user onboarding process. By default, it will be turned off, so remember to enable it when you’re ready to use it.
Note: Hey, just letting you know – those two compose actions? They’re there to prevent any import issues. But guess what? If you’re starting the flow from scratch, they won’t even be there. So, no need to be confused!
II. Creating a User Onboarding Flow: A Step-by-Step Guide
If you’d like to start creating the flow from scratch, we’ve got a step-by-step guide ready for you.
Things You Need Before Creating a Workflow:
Before you start making the flow, make sure you have these things ready:
- A valid Office 365 account with an active Power Automate license.
- A security group is assigned with a Microsoft 365 license.
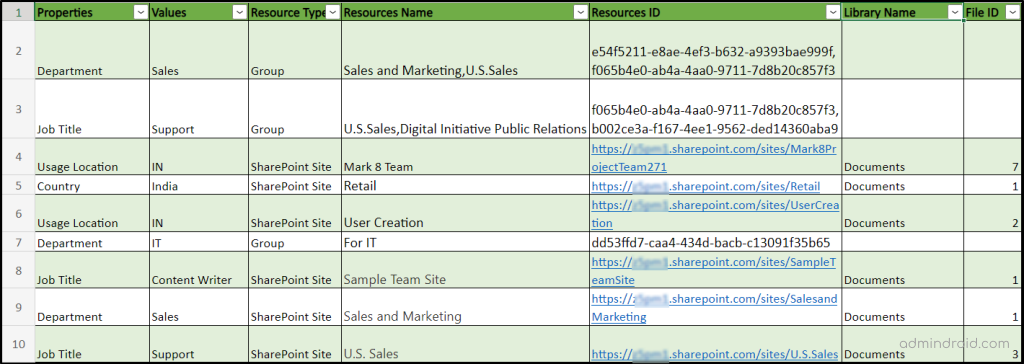
- An up-to-date Excel datasheet containing the Name and ID of Microsoft 365 and Security Groups and SharePoint Files to automate assigning group memberships and granting access to files.
Building Excel Data Sheet: Properties, Resource Info, and IDs
Let’s create a Microsoft Excel data sheet containing information about properties, resource types, resource names, resource IDs, and specific file IDs, upon which the users will gain access to files and be included in groups. We’ll smoothly incorporate this data into our workflow using a series of steps. Feel free to stick with the names we’ve given, as the following steps will incorporate dynamic content using the same column names we’ve used here.
You can access and make changes to the Excel sheet through the link provided below. You can upload it to either your SharePoint or OneDrive, and then use it within the workflow.
Let’s Kick Off the Process of Building the Flow!
In our previous blog, we provided a flow package for the user creation process. The flow includes,
- Generating a password for the new user
- Retrieving manager’s details
- Checking UPN existence
- Obtaining manager approval
- Creating the user and sending email notifications
Now, we’re introducing additional steps to elevate the process. This will include:
- Assigning a M365 license to the user
- Updating the user’s additional properties
- Placing the user into specific Entra ID group(s)
- Granting access to SharePoint files
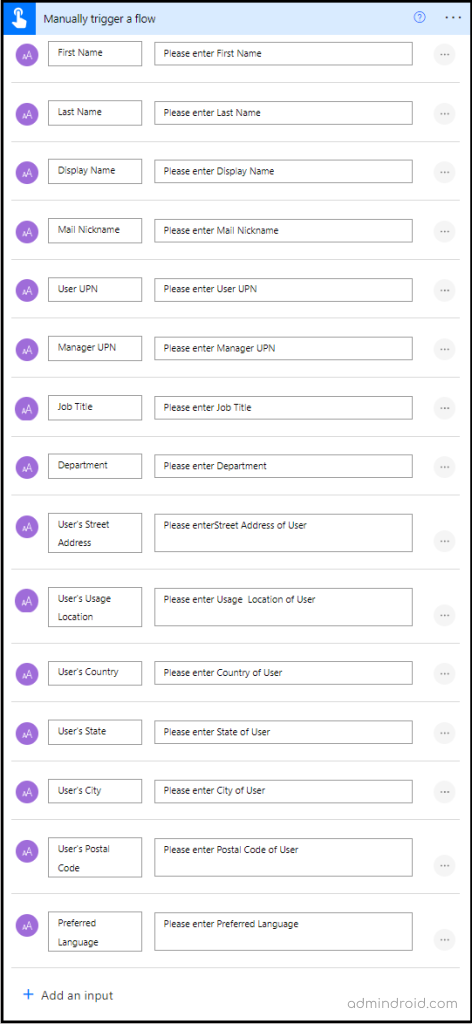
Step 1: Modify the Necessary User Details Inputs
We need to revise the manual input of user details to include the user’s properties such as department, job title, usage location, etc.
Step 2: Assign Microsoft 365 License to the User
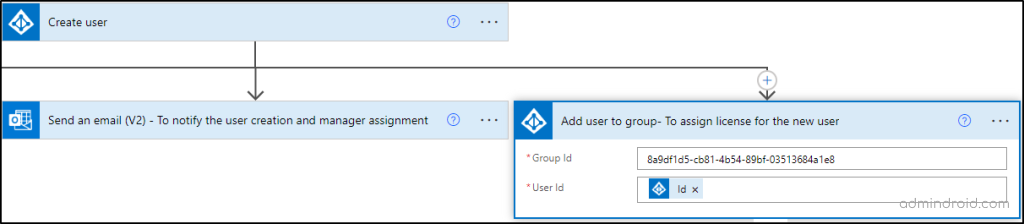
After setting up the flow to create a new user, as mentioned in our ‘Microsoft 365 User Onboarding’ blog, the next step is to assign a Microsoft 365 license to the created user. This task should be parallel with the ‘Send an email (V2) – To notify the user creation and manager assignment’ and ‘Assign manager’ actions.
- To assign a license, integrate an ‘Add user to group’ action, which comes under the Entra ID connector, as a parallel branch following the ‘Create user’ action.
- Enter the ID of the security group assigned with a license in the ‘Group Id’ field.
- In the place of ‘User Id’, enter the ID of the new user from dynamic content.
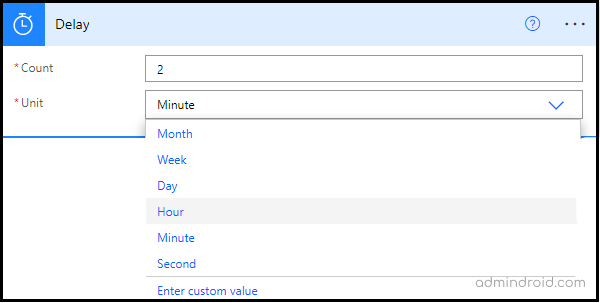
Step 3: Delay – To Wait for User Account Creation and License Assignment
A short pause is necessary for updating user and license information in the tenant before we can proceed with the next steps.
- So, add a “Delay” action from the ‘Schedule’ operation.
- Enter an integer value for the count. You can enter ‘2’ into this field, and set the unit as ‘minute’, as this will result in a 2-minute delay.
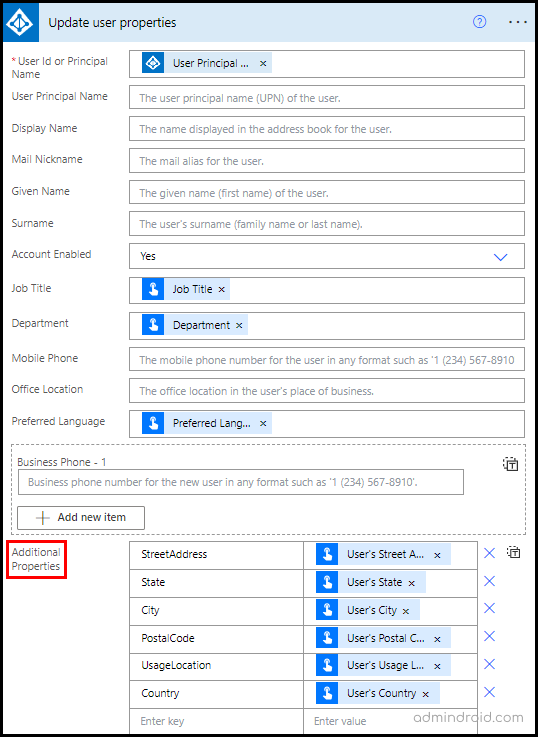
Step 4: To Update User’s Additional Properties
Moving forward, our next action involves updating user properties. This essential step ensures that user information remains current and accurate.
- Add the ‘Update User’ action from the Entra ID connector.
- Enter the user’s UPN from dynamic content in the ‘User Principal Name’ field.
- Enter the user’s properties from manual input in the relevant fields using dynamic content.
- For updating additional properties, you can use the option ‘Additional Properties’. In this case, you’ll need to manually input the property names and their corresponding values.
Step 5: Get Resource Data from an Excel Sheet
The next step involves extracting data from the Excel sheet and integrating it into the workflow.
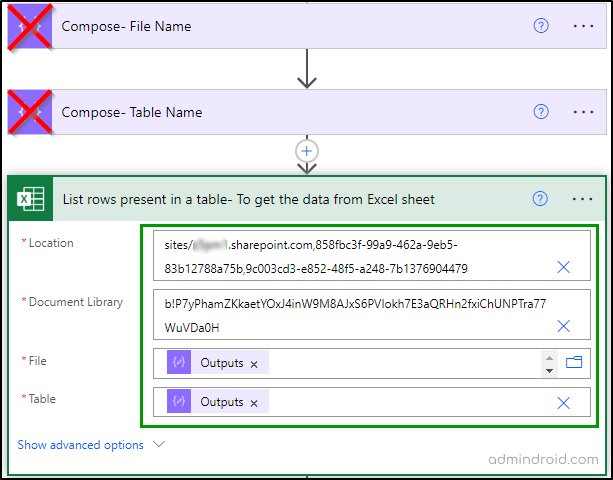
- Select the “List rows present in a table” action from the ‘Excel Online (Business)’ connector.
- Choose the location of the Excel file in SharePoint/OneDrive from the options in the ‘Location’ field.
- Similarly, select the Document Library, Excel file, and Table.

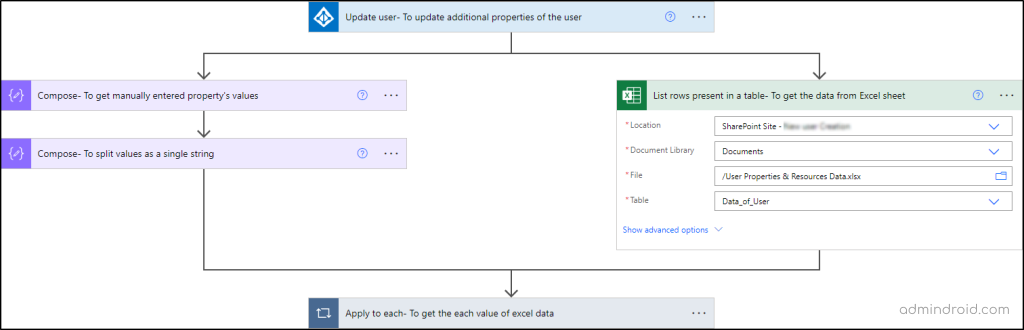
Step 5.1: Combining & Splitting Manually Entered Property Values
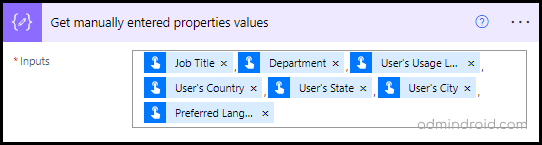
- For collecting user property values, select the ‘Compose’ action from ‘Data operation’.
- In ‘Inputs’, enter manually entered property values obtained from Step 1 using dynamic content.
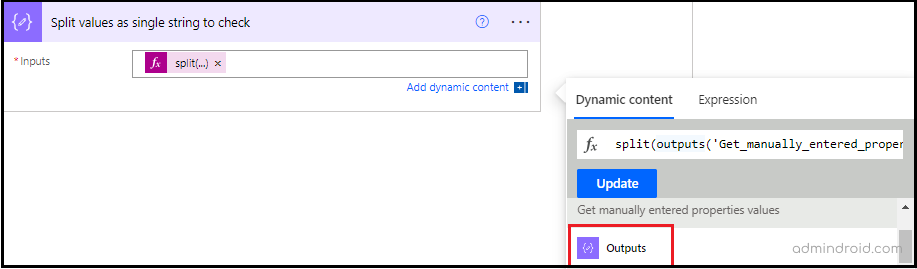
- To split these gathered values as a single string, add another ‘Compose’ action following this action.
- In the expression, use the ‘Split’ function, and within the parentheses (), input the output from the previous ‘Compose’ action followed by a comma within single quotation marks.
- In this case, the expression would be: ‘Split(outputs(‘Get_manually_entered_properties_values’), ‘,’)’
Step 5.2: Data Comparison: Excel vs. Manual Entry-Loop Process
To include a new user in an Entra ID group and provide permission to access a specific file in the SharePoint Library, we should see if the property value in our Excel file matches the ones we entered manually. This requires a nested loop to compare each value.
- So, add an ‘Apply to each’ action from the ‘Control’ operation.
- In the ‘Select an output from previous steps’, enter ‘value’ from the ‘List row present in a table’ action.
- This will get each value from the Excel sheet.
- Inside the ‘Apply to each’ action, add another ‘Apply to action’.
- Here, enter the output of the ‘Compose- To split values as a single string’ action.
- This will get each string value of the ‘Compose- To split values as a single string’ action.

Step 6: Resource Type-Based Actions: Group Member Addition and SharePoint File Access Permissions
We need to do two things: add a new member to the group and permit them to access specific files on the SharePoint site. These actions depend on the type of resource we’re working with.
- Inside the ‘Apply to each’ action, add the ‘Switch’ action from the ‘Control’ operation.
- In the ‘On’ field, enter the “Resource Type” value from an Excel sheet using dynamic content.
- Initially, you will be presented with ‘Case’ and ‘Default’ options. We can add more ‘Case’ options based on the available resource types.
- Here, two cases are used for groups and SharePoint Sites, respectively.
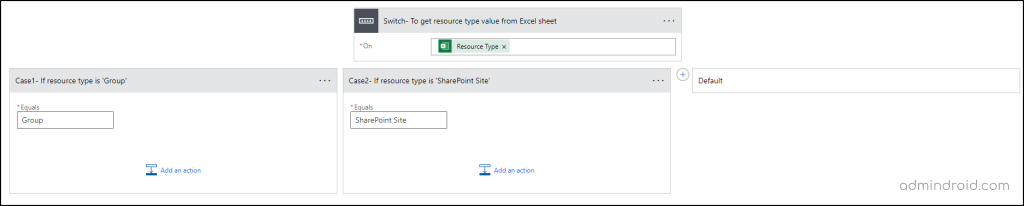
Resource type-based cases
Case 1: If the Resource Type is ‘Group’
If the resource type is ‘Group’, the new user will be added to the Entra ID group(s) depending on the user’s department, job title, or any property as specified in Excel. Since this action depends on a property, we must add a condition to the process.
- For Case 1, type ‘Group’ into the “Equals” field.
- Next, include a ‘Condition’ step to compare the values in the Excel sheet with the property value entered manually.
- In a single field, input the “Values” column from the Excel sheet. Choose the ‘is equal to’ option and input the ‘Current item’ from the ‘Apply to each – Manually entered data’ step.
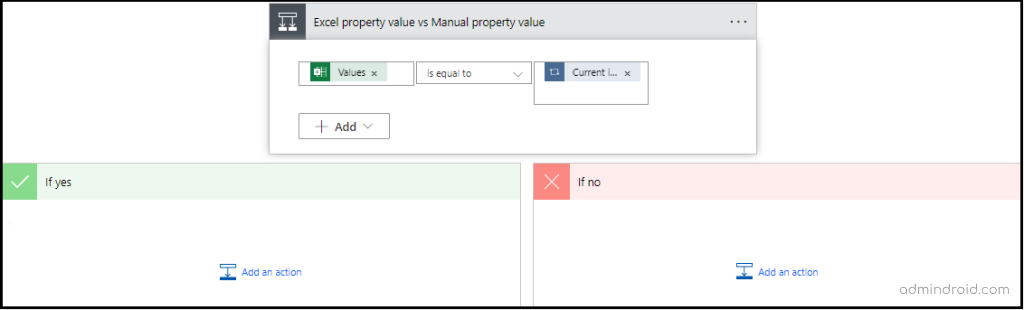
Let’s Now Concentrate Solely on the ‘If yes’ branch
When the property value in Excel matches the manually entered value, the user will be added to the appropriate security or M365 group after checking if the user already exists in the group or not.
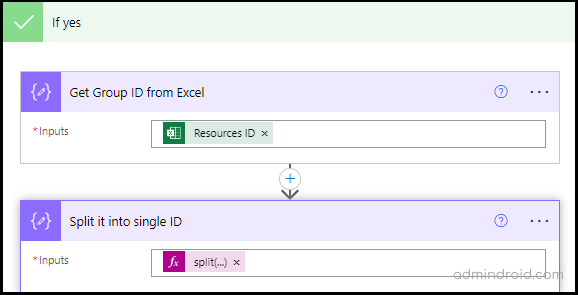
- To get the group ID from Excel, add a ‘Compose’ action and enter ‘Resource ID’ as input from dynamic content.
Since we might have cases where users should be added to multiple groups based on their property, and the ‘Add user to group’ action only accepts a single Group ID, we need to divide or split the cell content.
- In the expression, make use of the ‘Split’ function. Within the parentheses (), input the output from the previous ‘Compose’ action, then add a comma enclosed within single quotation marks.
- In this case, the expression would be:
‘Split(outputs(‘Get_Group_ID_from_Excel’), ‘,’)’.
Add User to Group,
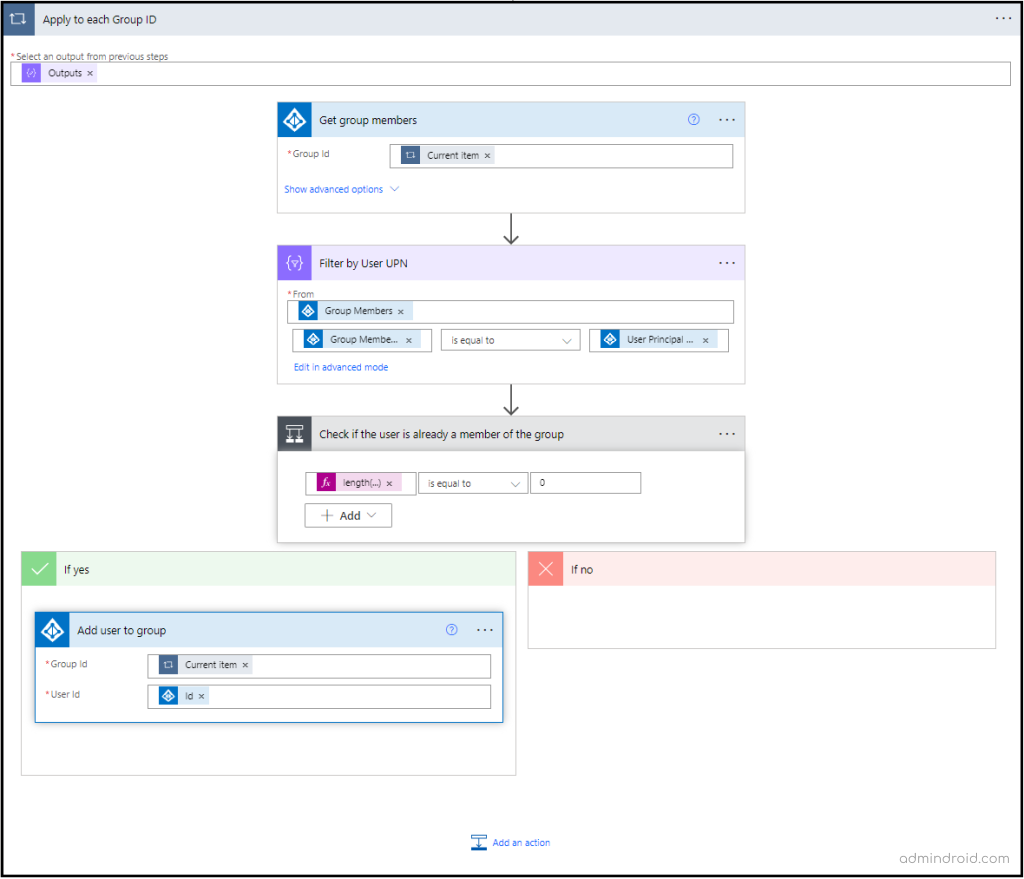
Before proceeding to add a user to a group using Excel, it is essential to confirm whether the user is already a member of the group.
- To verify each group ID, add an ‘Apply to each’ action and input the output obtained from the split compose action.
- Include the ‘Get group members’ action from Entra ID and input the ‘Current item’ from the ‘Apply to each’ action.
- Add the ‘Filter’ action from ‘Data operation’ to extract the ‘Group Members UPNs’ for comparison with the new User Principal Name.
- Then, add a conditional control action. In the value field of the condition action, input an expression using the length function to assess the existence of the user’s UPN.
- Define the condition: If the value of the expression is greater than 0, it indicates that the user UPN already exists. Based on the outcome of the condition, the flow will continue or halt the flow accordingly.
- Within the ‘If yes’ branch, add the action ‘Add user to group.’ Use the ‘Current item’ from the ‘Apply to each – Group ID’ step for the ‘Group ID’ field, and the new user’s ID from dynamic content for the ‘User ID’ field. This will be adding a new user to the group.
Case 2: If the Resource Type is ‘SharePoint Site’
- Similarly, a condition will be introduced, as in the initial step of Case 1.
- Within the ‘If yes’ branch, add a ‘Compose’ action to extract the file ID from the Excel sheet.
- Next, include the ‘Grant access to an item or a folder’ action from the SharePoint connector, and fill the Site Address, Library Name, Id and Recipient fields with relevant data using dynamic content.
- In the ‘Id’ field, input the output generated by the ‘Compose’ action.
- In the “Roles” field, you have the option to select either “Can view” or “Can edit” to specify what actions the new user is allowed to perform with the file.
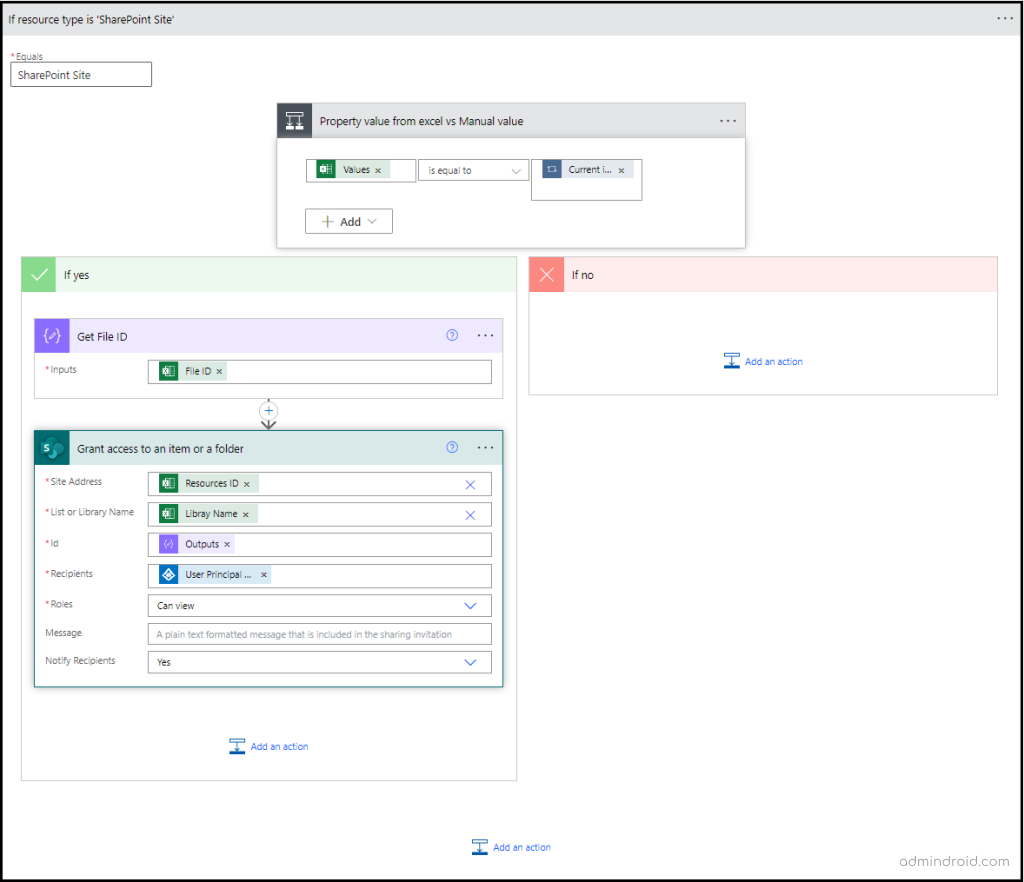
Note: You might be wondering, “What about the ‘If no’ branch in both cases?” Well, no actions are required to execute if the condition is false and keeping the ‘If no’ branch empty will not impact the flow’s execution.
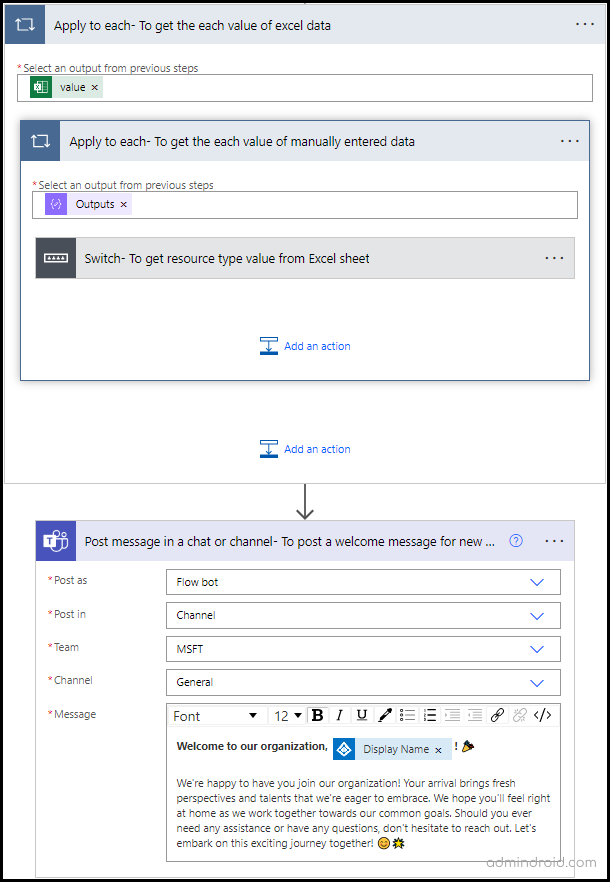
Step 7: Welcoming New User with Teams Message
It’s that exciting moment to extend a warm welcome to our new users through a Teams message and add them to our organization!
- Place the ‘Post message in a chat or channel’ operation from the ‘Teams’ connector outside of the ‘Apply to each- To get each value of Excel data’ action.
- Choose the Team name and channel name in which you’re going to post the message from the available choices, then personalize the welcome message before posting it.
Structure of the User Onboarding Workflow
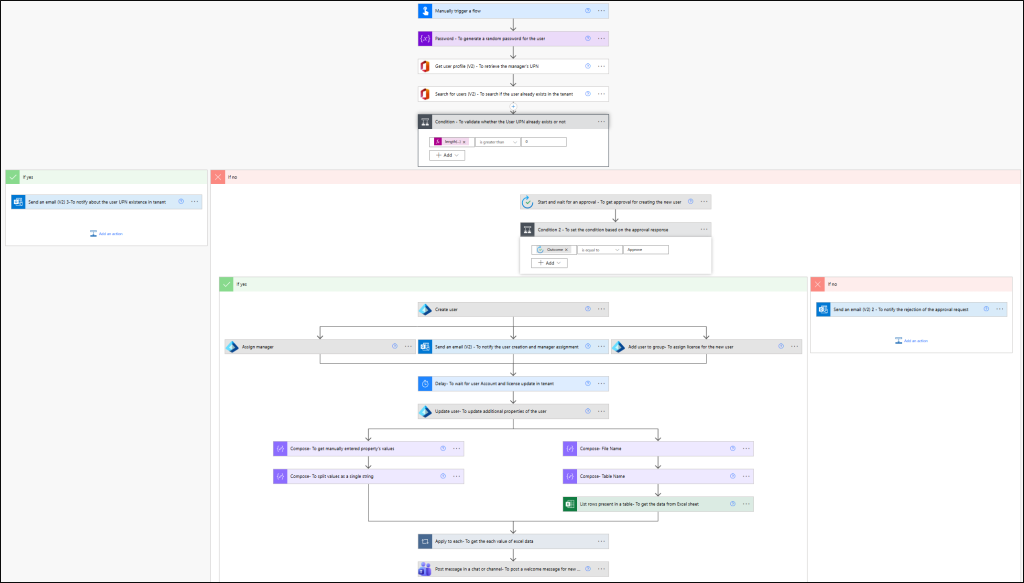
Don’t be scared by the complexity of this flow. It’s designed to make your onboarding process simple. To make it even easier, you can deploy the flow straight away using the provided zip file as instructed above.
And there you have it! 🌟 Your super smooth user onboarding journey is all set to go, from creating the perfect user profile to giving a warm virtual welcome 🎉 to the organization through a friendly Teams Message. 🚀 Don’t end up yourself with this! You can also try lifecycle workflows to automate M365 user provisioning tasks, which is a simpler, no-code solution that might seem much easier for you.
Turn Microsoft 365 User Onboarding into a One-Click Process with AdminDroid Agents!
Automating onboarding with Power Automate is good, but it will quickly become difficult. For instance, onboarding users often requires multi-stage approvals, which involves complex customization and makes workflows harder to manage. Similarly, assigning the right manager or approver dynamically is challenging and slows down the process. These gaps cause Microsoft 365 onboarding to take longer than expected.
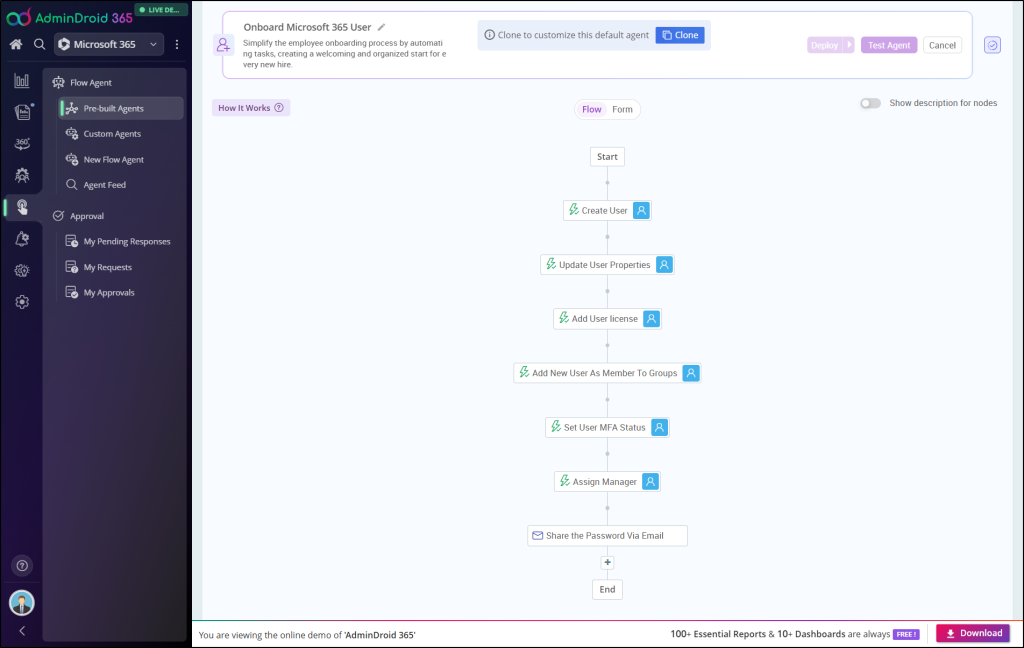
This is where AdminDroid’s Microsoft 365 automation tool steps in. With a pre-built user onboarding flow agent, you can streamline the entire process in just a few steps. Out of the box, the flow can:
- Create a new user
- Update user properties
- Add user licenses
- Add the user to groups
- Set MFA status
- Assign a manager
- Share the password via email
And it doesn’t stop there! You can easily customize the flow to include multi-stage approvals, dynamically assign approvers, and more on the fly.
Intelligent forms adapt to your organization’s needs and workflows can pause and resume seamlessly. With this automation tool, you can simplify and scale the entire user lifecycle in Microsoft 365 with ease.

Not just an onboarding agent, AdminDroid 365 comes packed with plenty of other pre-built agents that simplify everyday Microsoft 365 administration. Need to offboard employees securely, manage groups at scale, route distribution list emails to shared mailboxes, or roll out SharePoint Online site templates? AdminDroid has you covered.
Even bulk user provisioning, enforcing policies, or handling routine configurations can be done in just a few clicks, saving time without any scripting.
But AdminDroid doesn’t stop with automation. It also delivers:
- 3,500+ reports across Teams, Exchange Online, SharePoint, OneDrive, and more for actionable insights.
- AI-powered charts highlighting trends in licensing, user activity, security, etc.
- 450+ management actions to complete everyday tasks without switching portals.
- Reminder agents that automatically send password expiry alerts, MFA enabling reminders, and follow-ups until resolved.
- Active Directory integration with 200+ free reports, dashboards, and basic user management actions.
Whether you want 360° visibility, need compliance audits, seek deep insights, or manage hybrid AD, AdminDroid provides a single hub for efficient and centralized management.
Download AdminDroid now and experience hassle-free Microsoft 365 and Active Directory management with a 15-day free trial.
Got questions about the flow? We’re here to help! Feel free to reach out anytime. Happy onboarding, everyone! 🎈👋


