“Alerts” – The wake-up call that signals us to prevent looming threats. From the monsoon changes to the pandemic corona period, alerts are constantly buzzing around us💯. Same as this, to prevent cyber threats in Microsoft 365, the “Alerts” feature came into play in Microsoft Defender XDR (formerly called Microsoft 365 Defender).
A multitude of alerts may flood in, demanding the attention of security teams in the organization😐. Each alert requires meticulous analysis, presenting the challenge of sifting through false positives and low-priority notifications. This manual triage process is not only time-consuming but also raises the risk of overlooking critical alerts.
To streamline this process and automatically address low-priority alerts, Microsoft 365 Defender offers the “Alert tuning” functionality (formerly called ‘alert suppression’). By crafting alert tuning rules, admins can boost the detection and response flow in their organizations effectively.
Ready to focus on prime alerts alone? Then, dive into the blog to learn all about alerts from the beginning, and then explore the nifty alert tuning feature!
What are Alerts in Microsoft 365 Defender?
Alerts in Microsoft 365 are the early warning indicators of suspicious or malicious cyber threats posing an organization at risk. These alerts offer real-time insights into potential risks, empowering you to take swift and informed actions to mitigate threats.
Roles: To view alerts in Microsoft 365 Defender, you should have any of the following roles.
- Global Administrator
- Security Administrator
- Security Operator
- Global Reader
- Security Reader
- Compliance Administrator
- Organization Management
- Custom role
To view alerts in Microsoft 365 Defender, follow the steps below.
- Sign in to Microsoft Defender .
- Navigate to the “Incidents and Alerts” option.
- Click “Alerts” from the navigation pane.
Here, in the Alerts queues, you can view the active and current alerts in progress for the last 30 days by default. Also, if needed, you can use the filters to classify the alerts based on severity, impacted assets, alert status, and some more.
Among all, the main thing is effectively managing the alerts in Microsoft 365 Defender. Because leaving alerts unnoticed can open doors for attacks to sneak in! To achieve an effective alert management in Defender, you can use the alert tuning feature.
Tune Alerts in Microsoft 365 Defender
Alert tuning is a crucial process that allows you to customize the way you handle alerts. With alert tuning, you can create rules to automatically resolve common alerts, such as those resulting from legitimate file access or group changes. This allows you to prioritize and investigate only crucial Microsoft 365 alerts to improve M365 security.
Consider a scenario where you access a sensitive file for legitimate purposes. However, there raised an alert in the Microsoft 365 Defender portal. Despite it being an expectational alert, the security team is required to address and resolve the alert manually. This will eat up the time that can be spent on prime alerts.
In such a situation, if you have configured an alert tuning policy, it will automatically detect and perform alert exclusion in the portal.
Really a beneficial feature, right? Then dive into the below section to know how to tune alerts in Microsoft 365.
Terms to Know Before You Tune Alerts in Microsoft 365 Defender:
IOC – Indicators of Compromise are the evidence types that trigger the alerts, indicating the event of potential breaches or compromises. Ex: File, IP, and URL.
Service Sources – Alerts may come from solutions like Microsoft Defender for Endpoint, Microsoft Defender for Office 365, Microsoft Defender for Identity, and more. These solutions are referred to as service sources.
Create Rules to Tune Alerts in Microsoft 365 Defender Portal
You can create an alert tuning policy for efficient management of alerts in Microsoft 365 Defender using the two ways below.
- Tune alerts from the ‘Settings’ page of Microsoft 365 Defender.
- Tune Alerts from the ‘Alerts’ page of Microsoft 365 Defender.
1. Set Up Alert Tuning Policy from Settings Page of M365 Defender
To tune an alert from the Settings page of Microsoft 365 Defender, follow the steps below.
1. Sign into Microsoft Defender and click “Settings”.
2. From the Settings page, click “Microsoft Defender XDR”.
3. Under Rules, click “Alert tuning” on the left pane.
4. Click “+ Add new rule” to create a new rule. Also, if you already have one, you can make the necessary changes to it based on your needs.
5. In the Tune alert page, choose the service sources from the “Select service sources” dropdown to enforce the created rule on alerts raised from these selected services.
6. Specify the conditions to address the alerts triggered by a specific IOC or by any IOC added to the alert. To use multiple conditions, you can use the options below.
- AND – Requires all evidence types to be present.
- OR- Requires any of the evidence types to be present.
- Add subgroup- Creates subgroups of conditions to refine the logic (e.g., trigger if (A AND B) OR C).
Imagine a scenario where, as an admin on a business trip, you legitimately access a sensitive file from a different IP. Definitely there raises an alert for this case in the Defender portal. Recognizing it as an expected alert, you can auto-resolve/hide it, easing the burden on security teams.
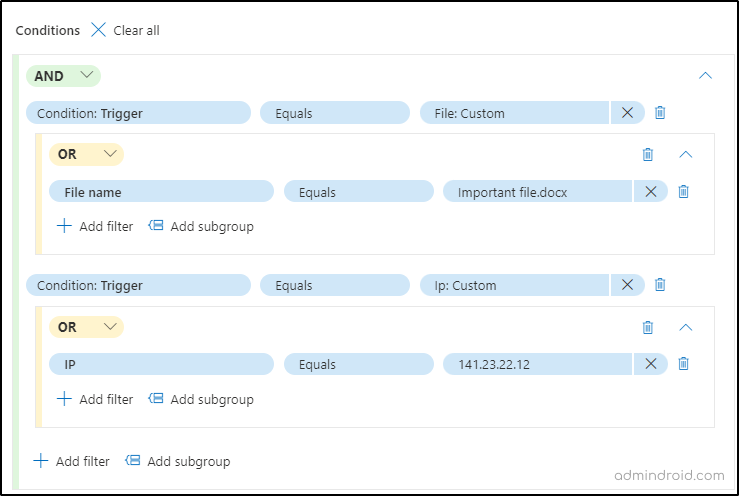
To accomplish this, employ a dual-condition approach based on Indicators of Compromise (IOCs) “IP” and “File” using the AND operation:
- File Condition:
- Set the condition as “Trigger > Equals > File” evidence type.
- Specify the file name in the “File name” option.
- Optionally, configure other properties associated with the file.
- IP Condition:
- Set the condition as “Trigger > Equals > IP“.
- Configure the respective IP and utilize additional properties if necessary.
Note: You should add at least one IOC to the rule conditions for alert tuning.
7. In the Action section, click either “Hide alert” or “Resolve alert” based on your need.
8. Finally, proceed to save the policy by giving the appropriate name and comment to the rule.
Note: The names of the alerts should be unique.
2. Tune Alert from the Alerts Page of Microsoft 365 Defender
To perform auto resolve/hide of alerts, create alert suppression rules from Alerts page in Microsoft 365 Defender with the following steps.
1. Sign into Microsoft 365 Defender.
2. Under “Incidents & alerts”, select “Alerts”.
3. Click any alert from the Alerts page. An automatic tab will open on the right side. From there, click “Tune alert”.
4. Under Alert types, you are given two options.
- Only this alert type: Use this option to apply the rule only to alerts of the same type as the selected alert. Once completed, navigate to the ‘Conditions‘ section. In this section, you have two choices:
- Use ‘Any condition‘ to address alerts triggered by any Indicators of Compromise (IOCs).
- Use ‘Set conditions‘ to configure the rule based on specific IOCs, mirroring the process found in the ‘Settings’ page.
→ You can also use the “Auto-fill rule conditions using existing alert properties” to use the same IOC conditions that trigger the selected alert. If you’ve finished this step, proceed with Step (Or)
- Any alert type based on IOC conditions: If you want to apply the rule on any alert type based on specific IOC conditions, click this option. When checked, you’ll need to define the service sources for which the specified rule can be applied to alerts originating from those service sources. Once done, you can go to configure the IOCs conditions, the same as the above. After that proceed with the following step.
Important: If you select the Defender for Endpoint service, you need to fill out the Scope section. There you need to select whether the rule applies to all devices in the organization or for a specific device. If you need to apply the rule for all devices in the organization, you need administrative role permission.
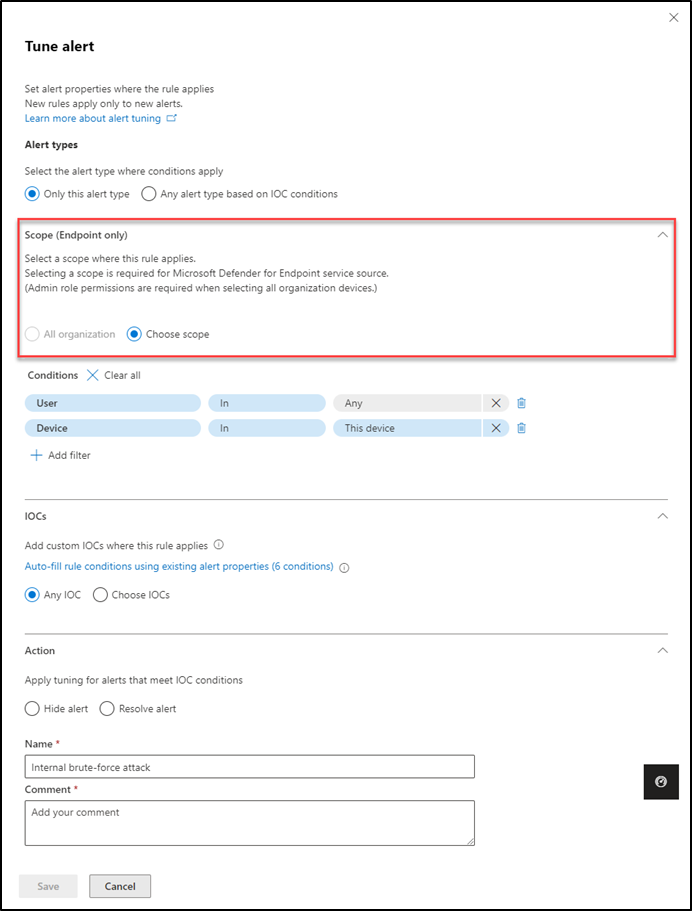
5. In the Action section, click either “Hide alert” or “Resolve alert” based on your need.
6. Finally, proceed to save the policy by giving appropriate name and comment to the rule.
That’s it! You have grasped the idea of effectively suppressing alerts in Microsoft 365 Defender. If you need to modify the conditions or make any other adjustments to the created policy, utilize the “Edit” option to implement the necessary changes.
So, why wait? Create an alert tuning policy, just focus on the crucial alerts, and increase Microsoft 365 security.
I hope this blog brings you more information regarding alert tuning. Furthermore, feel free to reach out to us in the comment section for any queries.


