
On Day 14 of Cybersecurity awareness month, learn how to use protected actions in Entra ID and lock specific Microsoft 365 admin activities. Stay tuned for the upcoming blogs in M365 Cybersecurity blog series.
We have been chatting quite a bit about the superhero duo of multi-factor authentication (MFA) and Conditional Access policies in our latest blog lists. 😌Not having MFA in place is like rolling out the red carpet for attackers!
But MFA isn’t just a supplementary one; it’s loaded with various features like advanced MFA push notification capabilities, authentication strengths, adaptive MFA, system-preferred MFA, suspicious MFA reporting, and more. While the MFA flew big with many new features, Conditional Access policies are no less! 💯
And there’s a new guest in town to join them – Protected Actions in Microsoft Entra ID. 🚀Previously, additional requirements were applied to various workloads, locations, and applications, right? 👀But this feature has taken on a new approach. Yeah! Admins can now demand MFA or even more robust requirements for specific Microsoft 365 admin activities.
Ready to dive deeper? Let’s see how configuring protected actions can be helpful, when to use them, and more importantly how to efficiently use them in Microsoft 365.
What are Protected Actions in Microsoft Entra ID?
Microsoft 365 admins hold power in their hands, managing crucial settings like Conditional Access policies and cross-tenant access. Yet, a few issues linger beneath the surface!
- One challenge is we cannot be 100% sure that the assigned admin is truly in charge.
- Moreover, a small misconfiguration can drastically affect both users and the organization.
- And then when multiple administrators share responsibilities, it often leads to confusion and disorganization.
Here’s where Azure AD’s protected actions come into play! With a name that says it all, it shields M365 admin activities from unauthorized changes. Even admins with the right roles must meet baseline requirements, ensuring secure and protected actions. It’s the key to a well-organized and safeguarded Microsoft 365 environment.
Protected action as a key feature of Conditional Access, provides an additional layer of security for safeguarding sensitive tasks within Microsoft 365. It mandates administrators to fulfill specific requirements to carry out the specific activity. It’s like having a secret code that grants access to the vault of security settings!
For instance, you can force administrators to implement passwordless Multi-Factor Authentication (MFA), utilize compliant devices, set up session timeouts, and allocate a dedicated session for task completion.
✅License Requirement: Microsoft Entra ID Premium P1 license.
✅ Role: Conditional Access administrator/ Security administrator/ Global administrator
Why is Enhancing Security for Microsoft 365 Admin Tasks Essential?
Here’s a real-world example of how protection actions can save the day: Your organization requires MFA for users logging in from outside the corporate network. This is a great security measure, but what happens if an attacker gains access to a user’s account? They could easily disable this policy, leaving your organization wide open to attack! 😥
But with protection actions enabled, you can prevent this from happening. Admins can lock down the “update basic properties for Conditional Access policies” rule with specific requirements. Changes can only be made if these requirements are satisfied, ensuring that only authorized users can modify security settings. 💯
This way, even if an attacker gains access to an admin’s account, they won’t be able to disable your MFA policy and wreak havoc on your organization.
How to Apply Protected Actions for Azure AD Conditional Access Policies?
We have already seen how powerful the new protected actions feature is and why it’s crucial. Now, let’s move on to the configuration process.
Adding protected actions can be done via both ways: one is the Microsoft Entra admin center and the other is Microsoft Graph. In this blog, we are going to go with a straightforward approach and learn how to apply protected actions to a specific Microsoft 365 activity. This can be classified into three key configurations:
- Create a Conditional Access authentication context.
- Apply the authentication context in the Conditional Access policy.
- Create a protected action and define the authentication context.
How Protected Actions in Microsoft Entra ID Work?
Alright, let’s take a quick spin through how all of this really works with a real-world scenario.
Conditional Access policies are crucial for an organization’s security, but even a minor misconfiguration could lock you out yourself! Therefore, it’s essential to prevent unauthorized changes to these policies.
To achieve this, you can require admins to use multi-factor authentication (MFA) before they can update Conditional Access policies. Admins can require compliance device usage (managed devices) or give shorter session timeouts for certain actions – you can ask for what you want!
This can be done easily via the protected actions feature in MS Entra ID. Here’s a simplified breakdown of the process:
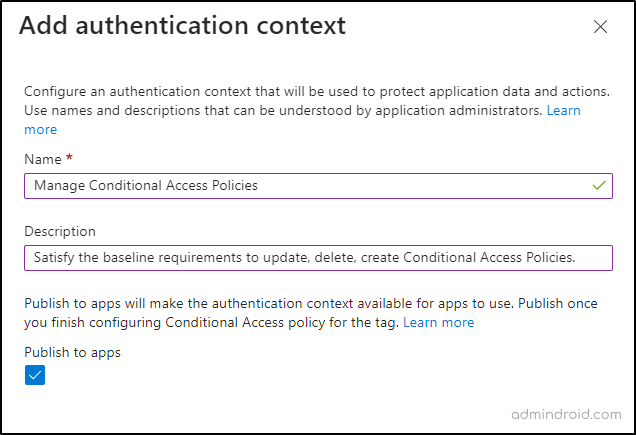
1. Create a Conditional Access authentication context: Start by setting up an authentication context, which will serve as a sensitivity label.
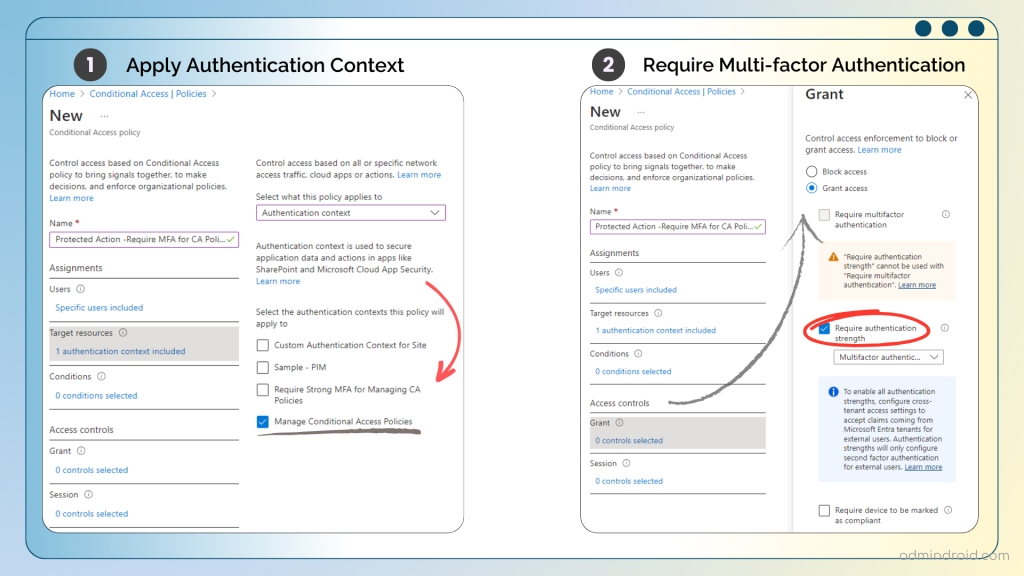
2. Apply the authentication context to a Conditional Access policy: Apply this authentication context to a specific Conditional Access policy that requires multi-factor authentication for the defined users.
➤ Now, the authentication context is equipped with demanding MFA.
3. Add a protected action: Lastly, create a protected action and define the newly created authentication context (the one that was equipped with the MFA requirement) for the specific task of “updating Conditional Access policies.”
Once you’ve wrapped up this step, the specified user will be prompted to satisfy the multi-factor authentication request when updating the Conditional Access policy. They will be able to make policy changes only after completing the MFA.
➤ This approach boosts security to the max, and here’s why: It adds an extra layer of security to crucial Conditional Access policies. The result? Fewer accidental lockouts and unauthorized policy tweaks!
Step-by-Step Explanation on How to Configure Protected Actions in MS Entra ID:
I hope the concept of protected actions and how they work starts to click! 💡So, let’s move from conceptual talk to technical talk and see how to configure them in the Microsoft Entra admin center.
Don’t want to wade through endless pages? Our handy cheat sheet has your back. Flip through for an effortless setup whenever you like!
Download Cheat Sheet: Protected actions in Entra ID.pdf
Step 1: Navigate the path below and create an authentication context with a name that meets your requirements.
Microsoft Entra admin center → Protection → Conditional Access → Authentication contexts (Under ‘Manage’ tab) → New Authentication context.
Step 2: Then, surf down this route and configure a Conditional Access policy with the following properties.
Microsoft Entra admin center → Protection → Conditional Access → Policies → New policy
- Name: A name that defines your actual policy configuration.
- Users: Include the required users who should undergo additional verification.
- Target resources: Here is where you need to apply the newly created Authentication context for this process.
- Grant: Grant access → Require authentication strength → Multifactor authentication (Choose the authentication type you wish to require)
- Enable policy: → Toggle the bar to “On” and create the policy.
Step 3: So far, we have defined what action the policy will take, and now it’s time to define where and when it takes center stage. Now, let’s apply the authentication context to a protected action, and you can do this by following the steps below.
Microsoft Entra admin center → Identity → Roles & admins → Roles & admins (From the ‘dropdown’) → Protected actions → Add protected actions.
1. Conditional Access authentication context: Select the newly created context from the drop-down.
2. Permissions: This is where a major part of this feature resides! There are 18 actions so far listed in the table. From this list, admins can select the Microsoft 365 permissions/actions to which they want to add additional requirements to strengthen security.
➤ The list covers Conditional Access policy management, Cross-tenant access settings management, custom rules that define work locations, and protected action management. Below is the list of actions available so far:
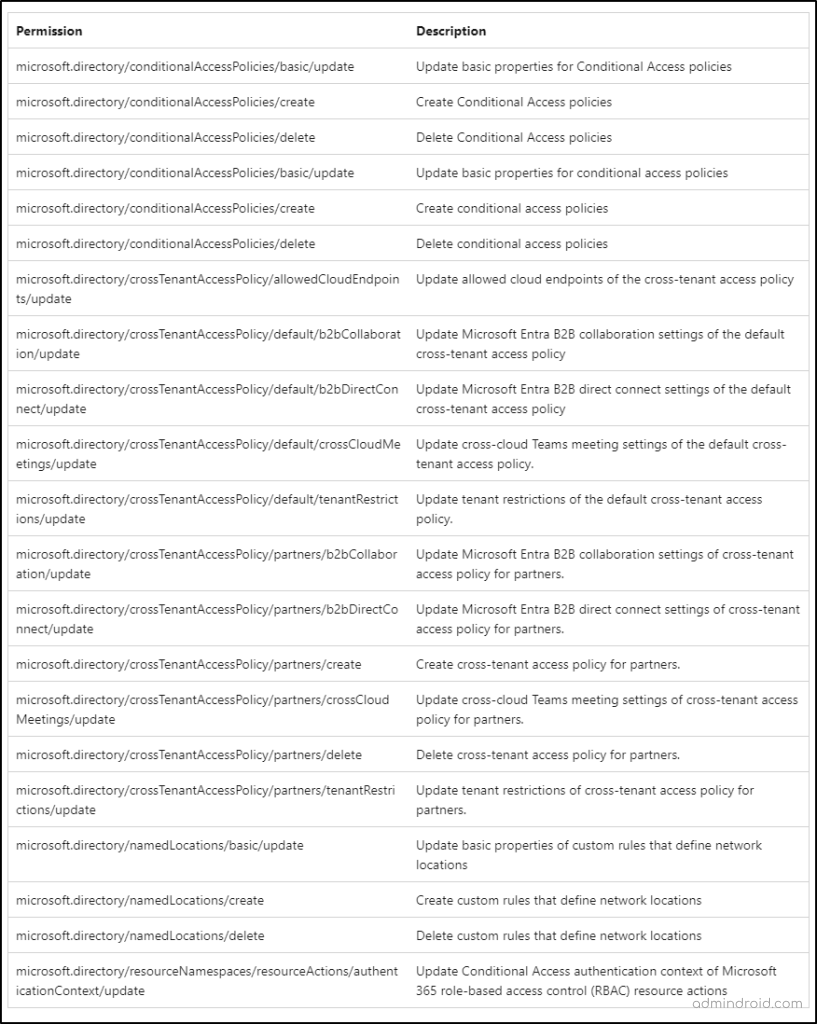
🡪 For our use case scenario, I’ve selected Update basic properties for Conditional Access policies – microsoft.directory/conditionalAccessPolicies/basic/update.
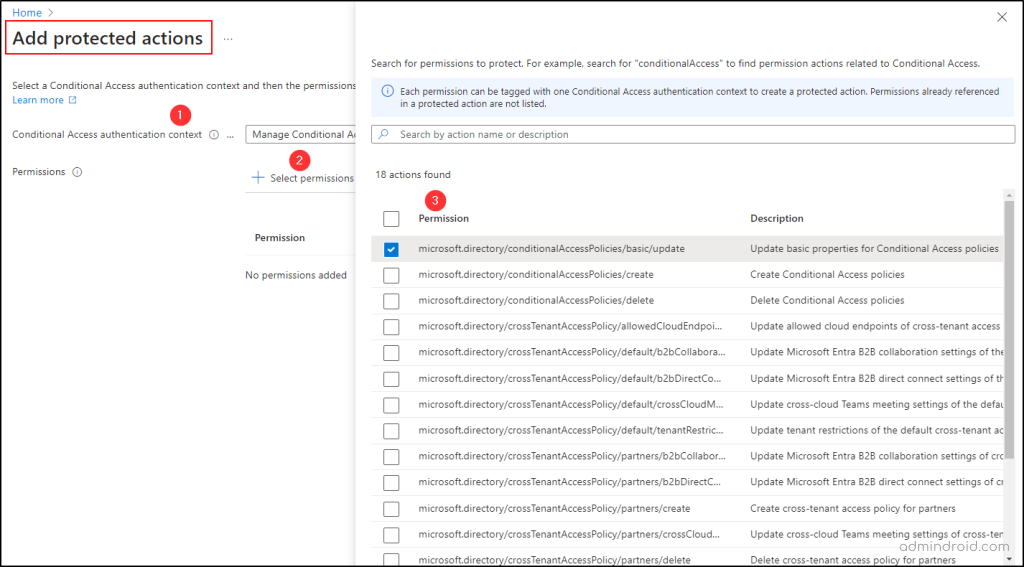
3. Finally, click ‘Add’ to save the protected actions, and you’re all set!
Test the Protected Action Rule for Effectiveness:
There you have it! We’ve successfully protected our policy editing process, and now it’s time to put it to the test.
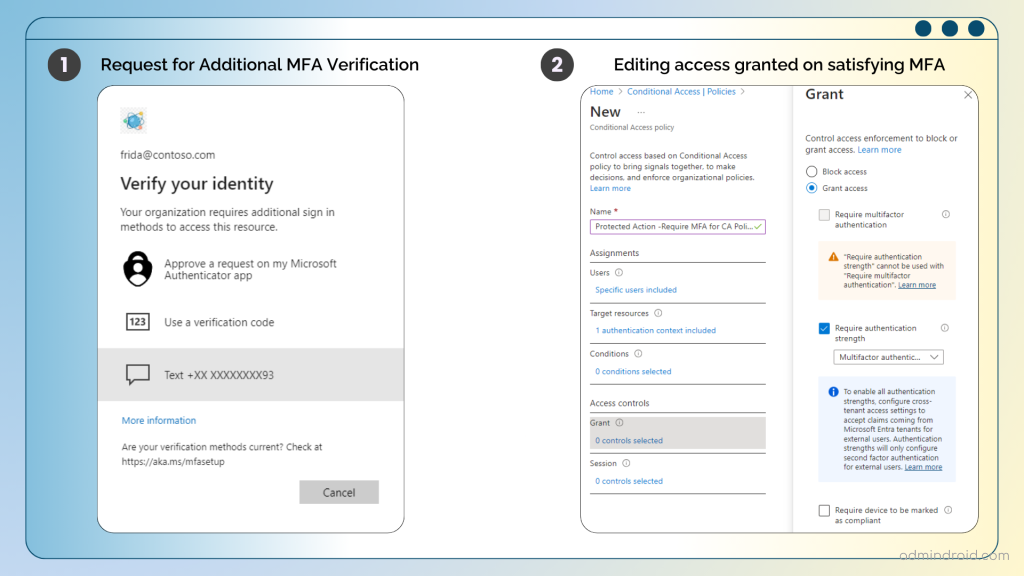
So, I logged in using another CA policy administrator account that was included in the policy and attempted to make changes to the Conditional Access policy. And success! 🎉Our Entra ID’s “protected action” rule kicked into action. It threw up a warning, basically saying, “Hold on, you need to authenticate before you can make any updates!” 🚧🔒
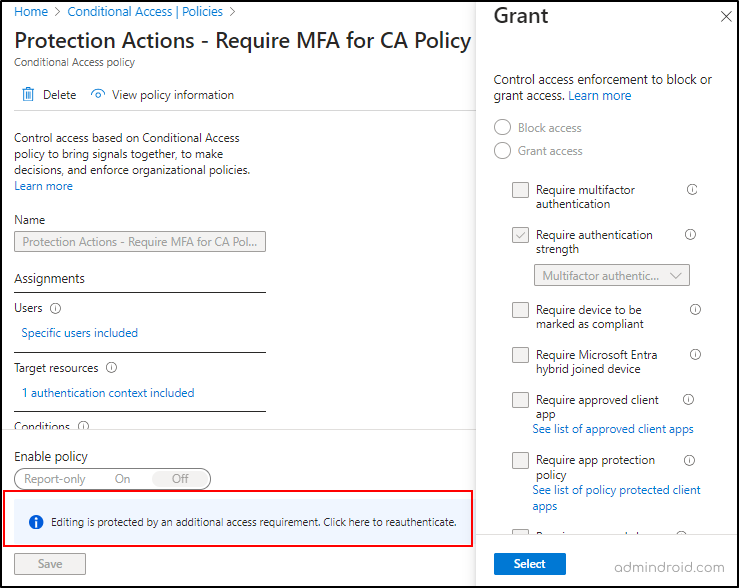
Did you spot the nifty part? All the editable actions were greyed out, so there was no way to get around it! When you click “click here to reauthenticate,” it prompts you to complete the MFA verification process. Once you’ve aced that, Conditional Access policy editing privileges are restored for the user!
That’s it! We’ve configured and tested the rule and ensured everything works as expected. And this is how we lock down Microsoft 365 activities and keep them safe from suspicious changes. 👏🛡️
Remove Protected Actions in MS Entra ID:
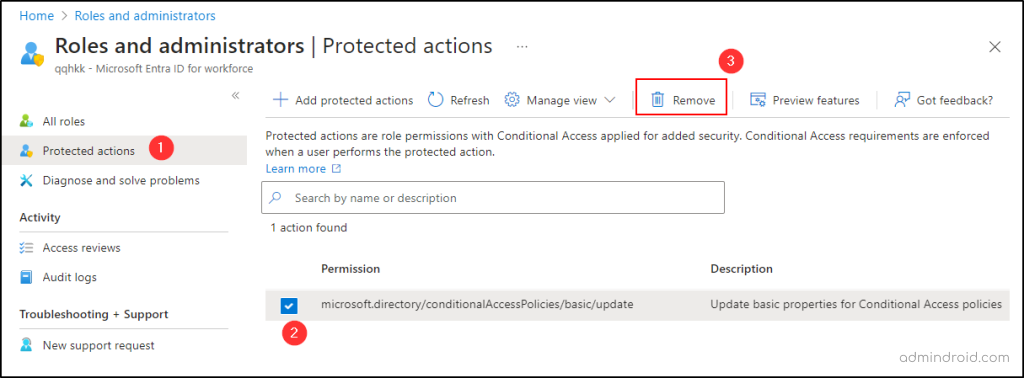
When your organization’s security needs shift, or you’re aiming to streamline your administrative procedures, you might need to remove protected actions. Unlike adding protected actions, it’s a straightforward process! 😉 Just follow these steps in the Microsoft Entra admin center:
Microsoft Entra admin center → Identity → Roles & admins → Roles & admins (From the ‘dropdown’) → Protected actions → Choose the specific “permission” that you want to remove → Remove
Once you’ve completed these steps, the permission will no longer be bound by Conditional Access requirements. You can assign a new Conditional Access policy to that permission. Remember, after you’ve made these changes, it’s essential to test your Conditional Access policies to make sure they work.
4 Tips for Securely Implementing Protected Actions in Azure AD
Protected actions in Microsoft Entra ID are a powerful way to add an extra layer of security to your organization’s resources. However, it’s important to use them correctly to avoid any problems! ⚠️So, by following these best practices, you can ensure that your protected actions are used effectively and securely:
Emergency Account: When configuring Conditional Access policies for protected actions, it’s crucial to have an emergency account exempt from the policy to prevent unintentional lockouts.
Authorization vs. Access: Remember that protected actions are designed to enforce access requirements for specific tasks, not to block access based on identity or group membership. Access permissions should be managed through role assignments and not protected actions.
Move User and Sign-in Risk Policies to Conditional Access: Conditional Access is a more powerful tool for managing risk, so it’s best to move sign-in risk policies there.
Leverage Named Network Locations: When managing multi-factor authentication trusted IPs, named network location permissions are not used. It is advised to use them since they provide a strong level of security and prevent unauthorized access.
Closing Thoughts:
Cybersecurity is not just about protecting data; it’s about protecting people.” –Robert Herjavec
Yeah, it’s all about protecting data, people, and the activities they carry out. Therefore, protecting your Microsoft 365 environment is not just a good practice; it’s a necessity. With features like Conditional Access, multifactor authentication, and threat detection, you’re well-equipped to defend your organization’s confidential data against even the most persistent attackers.
Don’t wait until the next security breach occurs! Start implementing these protected actions in Azure AD right away. Your organization’s security is too important to leave to chance.


