
On Day 17 of Cybersecurity awareness month, learn to set the allow or blocklist policy in Entra ID for secure external collaboration. Stay tuned for the upcoming blogs in our M365 Cybersecurity blog series.
In this digital age, Microsoft shines as the medium through which collaboration transcends boundaries. It’s not limited to your internal team; rather, it’s the gateway to a world of seamless external collaboration🤝, which we refer to as B2B collaboration. This key element plays a pivotal role in elevating organizational productivity to new heights.
But here’s the kicker: There are also lurking risks that exist in these B2B collaborations😐. Yes, inviting the wrong users can have serious consequences including vulnerability to cyber-attacks.
However, don’t hastily consider restricting guest user invitations. It’s not enough! In fact, it may have some effect on your organization’s collaboration and productivity. But how can you strike the perfect balance between security and collaboration? That’s where the allow or blocklist policy in Entra ID comes into play. These are like gatekeepers, allowing only necessary B2B users into your organization.
Interested? Then don’t wait! Step into this blog and configure these policies right away to safeguard your tenant from falling into the wrong hand.
Usage of Allow/BlockList Policy in Microsoft Entra ID
The allow/blocklist policy offers a means to control invitations to specific organizations for secure B2B collaboration.
1. Imagine you’ve encountered problems in the past with users from certain domains that pose a security risk. You’ve advised your users/admins not to send invitations to these troublesome domains. However, there are instances when, intentionally or unintentionally, they forget this guidance and send invites to these risky users. This will pose some security risks to your organization.
To prevent such cases, you can implement the blocklist policy in Microsoft 365. This policy operates as a safeguard, automatically denying invitations based on the predefined domains.
2. Now think of the case, you are a technology company handling highly confidential projects. So, you may have the need to collaborate with a selective group of trusted partners for further enhancement of the projects.
In such cases, to ensure the utmost security for your top-secret work, you can implement an allowlist policy in Entra ID. This policy permits sharing invitations solely with the specified partner domains.
Seems like a much-needed policy, right? Let’s delve into the steps to configure the allow or blocklist policy in Microsoft Entra ID.
Allow or Block Invites to Specific B2B Domains in Azure Active Directory
Microsoft allows you to manage the Azure AD B2B invites via external collaboration settings. You are given three options to gain control over the invitations sent to external users.
- Allow invitations to be sent to any domain
- Set blocklist policy in Microsoft Entra ID
- Add allowlist Policy in Microsoft Entra ID
Allow Invitations to be Sent to Any Domain
By default, the Allow invitations to be sent to any domain (most inclusive) setting is enabled. In this case, you can invite B2B users from any organization. But remember, allowing invitations to any domain can be risky. It might result in inviting external users who could harm your data security. So, it’s safer to use the allow or blocklist option for a more secure B2B collaboration. Let’s see how to set allow or block list in Azure Active Directory (MS Entra ID).
Set Blocklist Policy in Microsoft Entra ID
To prevent users of specific domains from becoming B2B users, you can include those domains in the blocklist policy by following the outlined steps below.
- Navigate to Microsoft Entra admin center → Identity → Users → User settings.
- Within the External users section, click on Manage external collaboration settings.
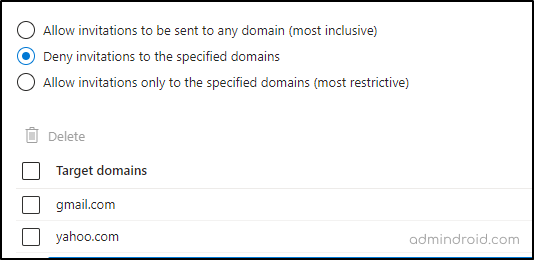
- In the Collaboration restrictions section, choose the option Deny invitations to specified domains.
- Under the Target domains, specify the domains you wish to block. Suppose you need to add multiple domains, make sure to list each one in a new line.
- Finally, continue to save the policy.
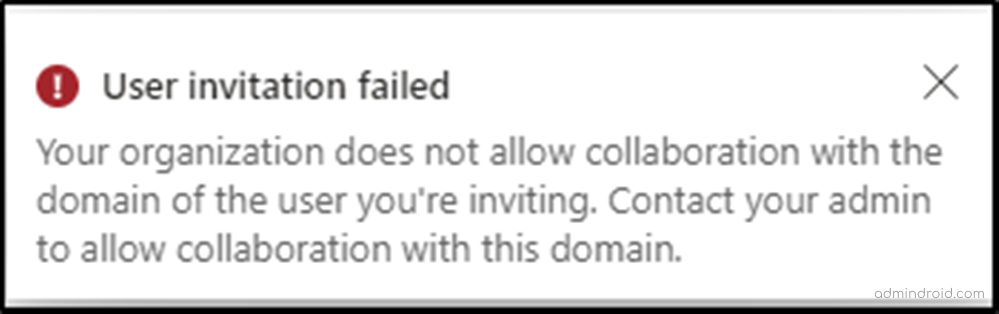
After configuring the policy, when you attempt to invite users from the blocked domains, you will receive the following notification.
Your organization does not allow collaboration with the domain of the user you’re inviting. Contact your admins to allow collaboration with this domain.
Add Allowlist Policy in Microsoft Entra ID
To configure the allowlist policy in Azure Active Directory, follow the steps below.
Note: Switching from blocklist to allowlist or vice versa will erase the current policy settings. So, it’s crucial to save your configuration details before making the switch.
- First sign into the Microsoft Entra admin center.
- Then, navigate to Identity → Users → User settings.
- Select External Users → Manage external collaboration settings.
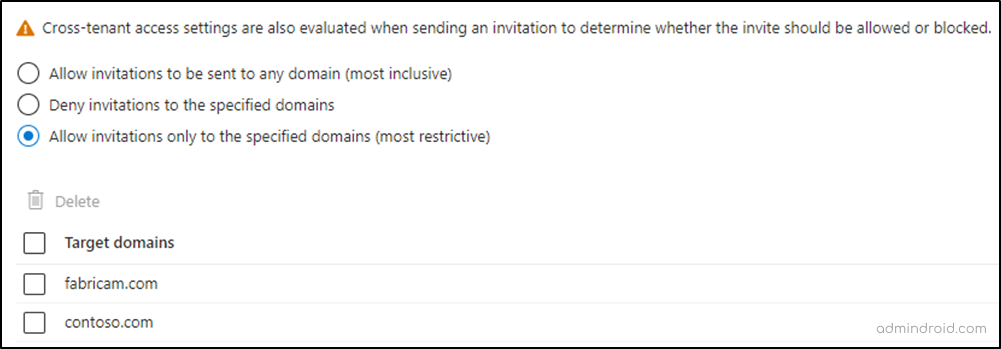
- Collaboration restrictions → Allow invitations only to the specified domain (most restrictive).
- Under the Target domains, specify the domains you wish to allow. Suppose you need to add multiple domains, make sure to list each one in a new line.
- Once done, click “Save”.
This policy serves to permit invitations to users from the specified domains, effectively blocking invitations to any other domains.
Note: For enhanced security, you can configure CA policies for external user type in MS Entra ID. This will help you to provide controlled access for external Azure AD organizations.
Furthermore, you can also manage the allow and blocklist policy using PowerShell. Let’s see that below.
Configure Allow or Blocklist Policy in Azure AD Using PowerShell
If you find managing B2B invitations through the UI to be time-consuming, you can opt for a more efficient approach using PowerShell. You can leverage the AzureADPreview module cmdlets to configure the allow or blocklist policy in Microsoft Entra. Before getting started, you’ll need to install and connect to the AzureADPreview module.
To install the latest AzureADPreview module, execute the following cmdlet in Windows PowerShell with administrator privileges:
|
1 |
Install-Module AzureADPreview |
Once the module is successfully installed, proceed to import it using the following cmdlet:
|
1 |
Import-Module AzureADpreview |
Afterward, connect to the module by running the below cmdlet:
|
1 |
Connect-AzureAD |
To configure the blocklist policy, simply run the provided command. In this case, we’ve used “gmail.com” as an illustrative example, but you can replace it to align with your organization’s unique requirements.
|
1 |
$policyValue = @("{`"B2BManagementPolicy`":{`"InvitationsAllowedAndBlockedDomainsPolicy`":{`"AllowedDomains`": [],`"BlockedDomains`": [`"gmail.com`"]}}}") $currentpolicy = Get-AzureADPolicy -All $true | ?{$_.Type -eq 'B2BManagementPolicy'} | select -First 1 Set-AzureADPolicy -Definition $policyValue -Id $currentpolicy.Id |
To configure the allowlist policy, you can utilize the provided command. In this example, we’ve used the “contoso.com” domain for demonstration purposes, but you can replace it with the domain based on your organization’s needs.
|
1 2 3 |
$policyValue = @("{`"B2BManagementPolicy`":{`"InvitationsAllowedAndBlockedDomainsPolicy`":{`"AllowedDomains`": [``"contoso.com`"],`"BlockedDomains`": []}}}") $currentpolicy = Get-AzureADPolicy -All $true | ?{$_.Type -eq 'B2BManagementPolicy'} | select -First 1 Set-AzureADPolicy -Definition $policyValue -Id $currentpolicy.Id |
There are some vital considerations to keep in mind when configuring the allow/blocklist policy. Let’s explore them below.
Points to Consider Before Setting Allow or Blocklist in MS Entra ID
- You can set up either an allowlist or a blocklist for your organization, but not both. When you set up an allowlist, any domains not included are automatically treated as part of the blocklist, and the same applies in reverse.
- The policy won’t affect users who have already redeemed the B2B collaboration invitation. If a user’s invitation is still pending and you apply a policy that blocks their domain, the user’s attempt to redeem the invitation will not be successful.
- The entire policy has a maximum size of 25 KB (equivalent to 25,000 characters). This flexibility allows you to accommodate either a higher number of shorter domains or a select few longer ones within this allotted space.
- Prior to sending an invitation, it’s essential to double-check both the allow/block settings and cross-tenant access once more for accuracy and security.
- If you wish to switch from an allowlist to a blocklist or vice versa, you must delete the existing policy before making the change.
- It’s important to note that this policy does not apply to external sharing in SharePoint and OneDrive. However, you have the option to set up allow and block lists separately for SharePoint and OneDrive.
I hope this blog provides you with valuable insights on achieving granular control over B2B collaboration invites. Moreover, please don’t hesitate to reach out to us in the comment section if you need any assistance.
Security is always excessive until it’s not enough
-Robbie Sinclair


