In today’s highly competitive business environment, the automation of business processes is no longer a choice but an inevitable necessity✅. Consider the task of creating a new user in Microsoft 365 – it may be simple, but things can get tricky when we have to wait for manager approval and send multiple emails afterward. Imagine how interesting it would be if automation stepped in to handle all of that for us💡. In this blog, we’ll provide a step-by-step guide on creating an automated user onboarding flow that includes a manager approval process.
With just one click👆, you can easily invite new employees into your organization. Exciting updates are on the way for this flow and blog! We’ll be expanding the process by adding steps like assigning properties (Job title, Department, Office Location, etc.) to new users and seamlessly integrating them into M365 groups, and much more🚀. Get ready for a series of M365 automation processes with Power Automate that will simplify your workflows and make your user management easier🥁!
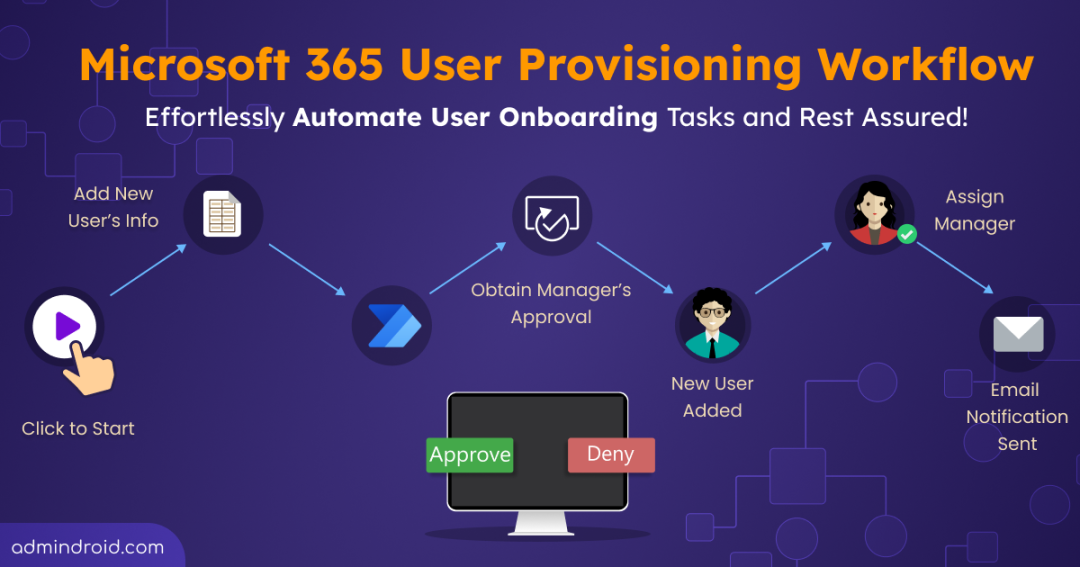
A Quick Glimpse of the Flow!
In this blog, we have created an “Instant cloud flow” to meet our requirements. Below, you will find a video demonstration that illustrates the process of importing the flow and running it in your Power Automate environment, providing a visual walkthrough for better understanding.
The flow comprises the following steps:
- In the Power Automate portal, the person who triggers the flow should fill out the mandatory properties for creating the new user.
- The flow will use an expression to generate a random password for the new user.
- The next step is to add a validation case where we need to check if the User Principal Name (UPN) used for the new user already exists or not to proceed with the flow.
- Then to get approval for user addition, an email will be sent to the manager.
- Once the manager approves, the new user will be created, a manager will be assigned, and this will be notified to the manager by email.
- If the manager rejects the approval request, a notification will be sent to the person who triggered the flow via email.
If you prefer a ready-to-use onboarding workflow that performs all these user provisioning steps, you can use AdminDroid’s Microsoft 365 onboarding agent. It allows you to create multiple users in seconds, with no setup or scripts needed.
How to Automate User Onboarding with Power Automate?
To streamline the automation of Azure AD user provisioning tasks, we offer two approaches for you to choose from. Feel free to select the option that best suits your needs.
- Import the user provisioning flow directly from ‘.zip’ and deploy
- A step-by-step guide to create user onboarding flow from scratch
I. Import the Microsoft 365 User Provisioning Flow Directly
To simplify your task, we have prepared an exported package of our flow that you can directly import and utilize in your environment. Instead of starting from scratch, you can quickly access the flow package file through the GitHub link provided below.
- In your Power Automate portal, you can find the ‘Import’ option in the ‘My Flows’ tab.
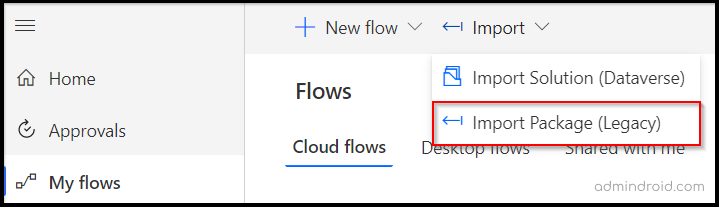
- After clicking “Import package,” upload the package file downloaded from the link and edit the flow name as required, using the ‘Create as new’ option.
- You can then click on ‘Select during import‘ and add the connections by authorizing with your desired Office 365 account.
Note: You will require a ‘User administrator’ or a ‘Global administrator’ account to authorize and use the Azure AD connection’s triggers and actions.
That’s it! Once done, turn on the flow and it’s ready to go! You can also customize the flow based on your organization’s requirements. At last, you can hit the ‘Run’ button on your ‘My flows’ page to start triggering the flow.
II. Step-by-Step Guide to Create User Onboarding Flow
Do you want to know how to create the flow from scratch? No worries! Follow the steps below to construct the flow on your own.
- Start Creating the User Onboarding Flow
- Generate a Unique Password for the New User
- Get the User Profile of the Manager
- Check If the User Already Exists
- Getting Approval from the Manager for User Onboarding
- Condition for Onboarding Flow
Prerequisites for Creating the Flow
Before creating the flow, one should have,
- An Office 365 account with a Power Automate license
- Connections to Azure AD, Office 365 Outlook, Office 365 Users, and Approvals resources to make use of their triggers and actions.
A connection is an intermediary for an API that links services to Microsoft Power tools. It offers users pre-built actions and triggers to create their apps and workflows by connecting their accounts.
- If you are creating the flow for the first time, you’ll be prompted for signing into connections, you can just proceed signing into them, to use the triggers and actions from each service.
- User administrator privilege to make sure Azure AD connection-based actions such as ‘Create User’ and ‘Assign Manager’ work seamlessly as these are administrative actions.
Now let’s get into the steps!
Step 1: Start Creating the User Onboarding Flow
Ready with the prerequisites, start to create a flow by following the steps below.
- Login into your Power Automate portal, and click on the ‘Create’ tab.
- Choose ‘Instant cloud flow’ and give a name for your flow.
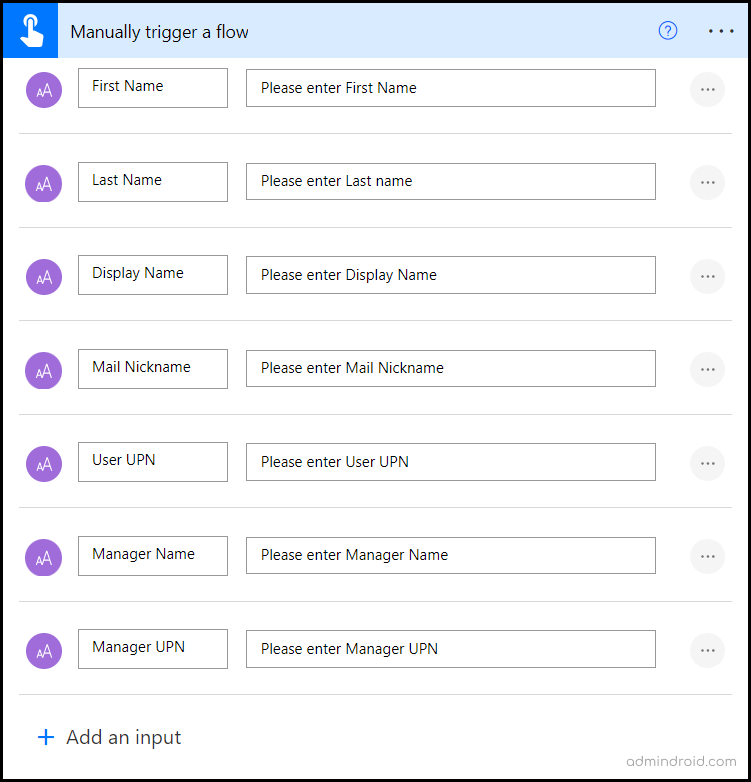
- Select “Manually trigger a flow” as the flow’s trigger and give the details that are required to create the user. We have used the basic user details like First Name, Last Name, Display Name, Mail Nickname, User UPN, Manager Name, and Manager UPN.
Step 2: Generate a Unique Password for the New User
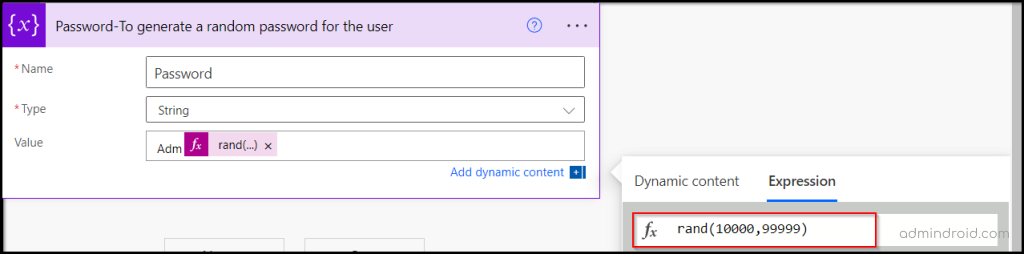
The next step is to create a password for the new user. Generating unique passwords for new users is made easier with the “Variable” operation.
- Click on the new step and search for the ‘Variable’ operation; then select the action – ‘Initialize variable’.
- Here the variable is the password; So, choose the type as ‘String.’
- The password length must be up to 14 characters with uppercase, lowercase, and non-alphanumeric characters. So, give an expression like “rand (10000, 99999),” along with uppercase and lowercase characters in the value field.
Step 3: Get the User Profile of the Manager
Now that the password generation step is set, next, we need to assign a manager for the new user, who needs to approve the creation of that new user. Here are the steps to get the manager’s account info.
- Click on the new step and search for the “Office 365 users” connector.
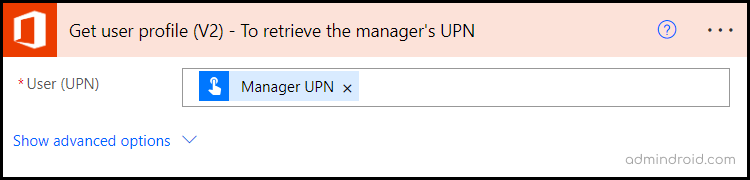
- Under this Connector, select the “Get user profile (V2)” action.
- Get the manager UPN from the manually provided details in the first step using dynamic content and enter it in the ‘User (UPN)’ field.
In Power Automate, the dynamic contents are the kind of values produced by triggers and actions that are used in the flow. It lets the user choose fields referred to in previous steps.
Note: Assigning a manager to the new user also helps in creating organization charts in Microsoft 365, which provide a clear understanding of the company structure. This shows who the new hire will work with, making it easier for them to integrate more effectively into their teams.
Step 4: Check If the User Already Exists
Before proceeding with the flow, it is important to validate whether the User Principal Name (UPN) provided the new user already exists or not. By verifying if the user UPN is already in use, this step ensures a smooth flow execution without any fail.
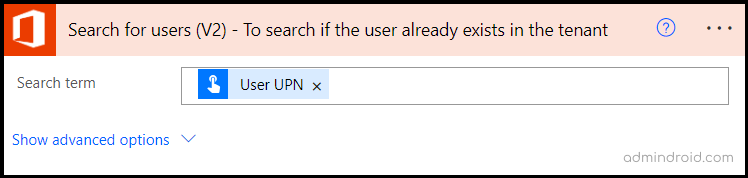
- First select “Search for users(V2)” action from “Office 365 users” connector.
- In search term field, enter “User UPN” from dynamic content.
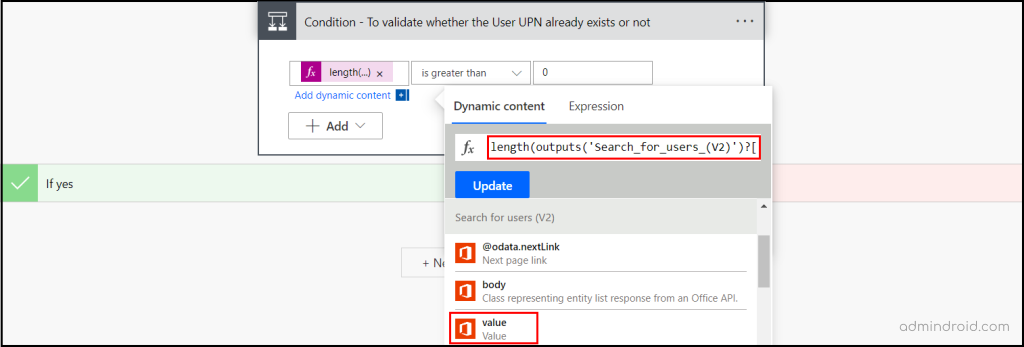
- To ensure that the flow proceeds only when the user UPN doesn’t exist in your tenant, we can introduce a conditional control step. This step will check if the user UPN already exists and allow the flow to continue only if the user UPN doesn’t exist.
- In condition action’s value field, we shall use an expression using length function, which helps to find out whether the given string or array has values or not.
- If the array has a value, it indicates that the user UPN already exists; otherwise, it signifies that the user UPN doesn’t exist. So, we can give the condition as, the expression’s value is greater than 0.
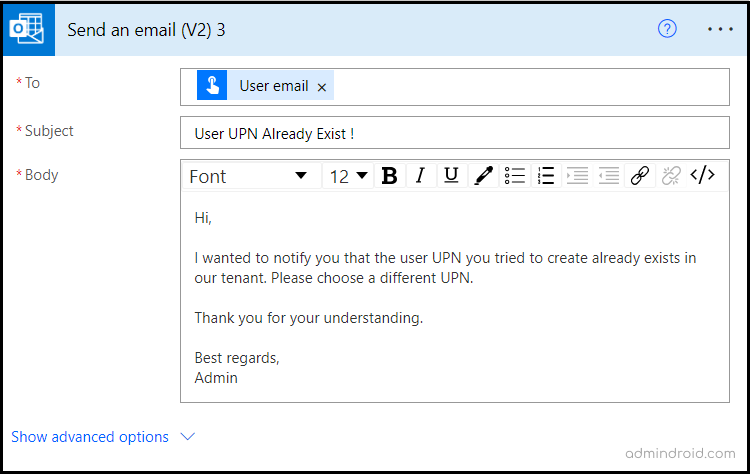
6. If the condition is true, then an email will be sent to the person who triggered the flow, notifying that the user UPN they entered already exists in the tenant.
7. If the condition is false, then the flow will proceed with next step of user onboarding process in ‘If no’.
Step 5: Getting Approval from the Manager for User Onboarding
Next, we need to set an approval request step where an approval for user creation is requested from the manager under whom the new user will be created.
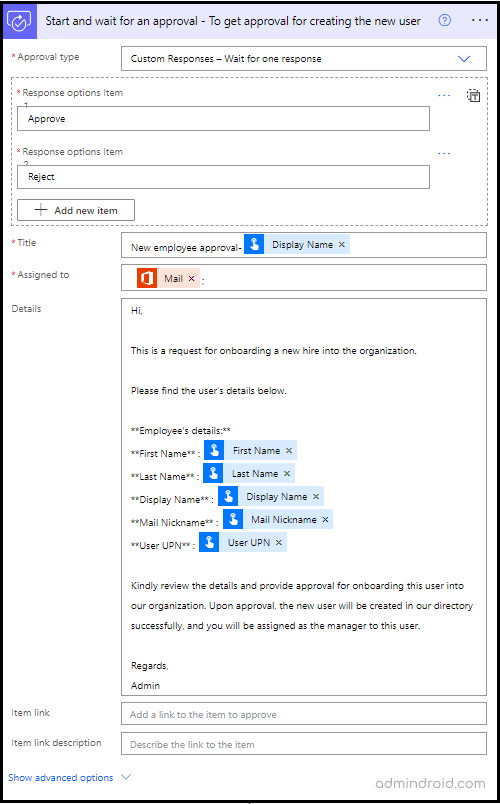
- Choose the “Start and wait for an approval” action under the ‘Approval’ operation.
- Here, select the ‘Approval type’ as “Custom Responses – Wait for one response”.
- Then, give response options as ‘Approve’ and ‘Reject’. We can give one or more options by clicking “+ Add new item”.
- Once done, you shall provide a title for the approval request and body content to be shown for the request approver. We can provide the user’s basic details which the manager can review and decide on approving the user creation. The user details can be provided with the help of the dynamic contents that can be taken from the initial steps.
- In the ‘Assigned to’ field, we shall give the manager’s ‘Mail’ which we obtained in third step.
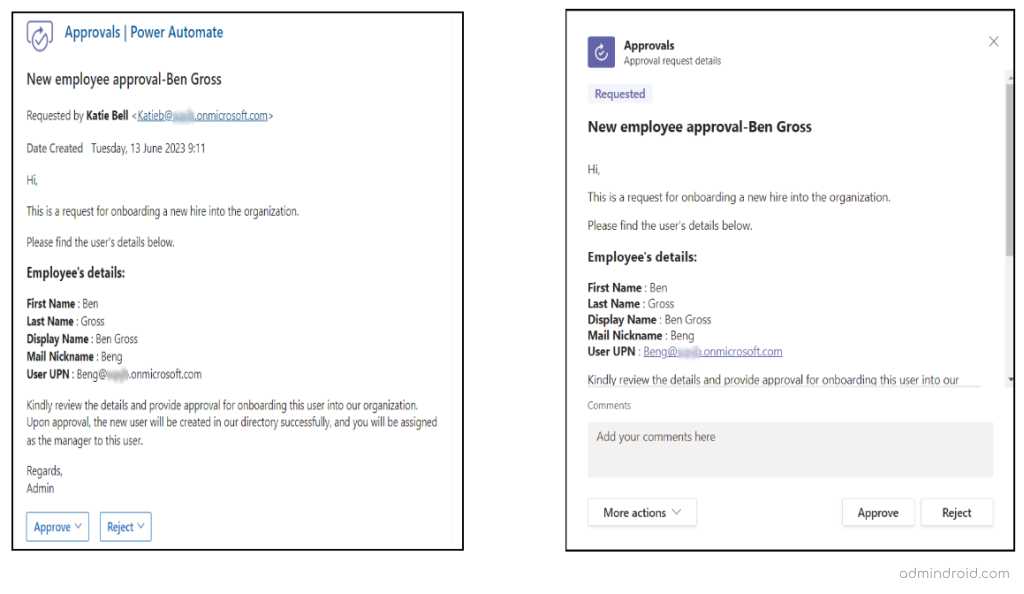
This operation initiates an email to the manager, prompting for approval. Upon receiving the manager’s response, the workflow progresses accordingly. Additionally, approval requests will be visible in Teams, enabling managers to approve them seamlessly within the Teams platform.
Step 6: Condition for Onboarding Flow
We’ll add conditions to configure the flow based on the manager’s approval response.
- Click on the new step, search for the ‘Control’ operation and select the ‘Condition’ action.
- Give the condition as ‘Outcome’ equal to ‘Approve’.
- If the manager approves, the flow will continue its run with the “If yes” flow. Else, the “If no” flow will run.

If Manager Approves the User Creation,
Once the manager approves the new user creation, the Azure AD user will be created, and the manager will be assigned to them. At the same time, the manager will be notified via email about this assignment. Here’s how it can be done.
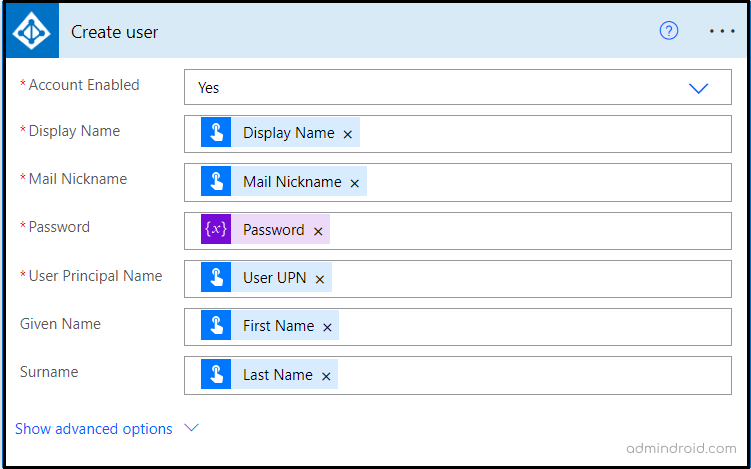
- In the “If yes” flow, choose the “Create user” action in the “Azure AD” Connector.
- Here, fill in the new user’s details from the list using dynamic content.
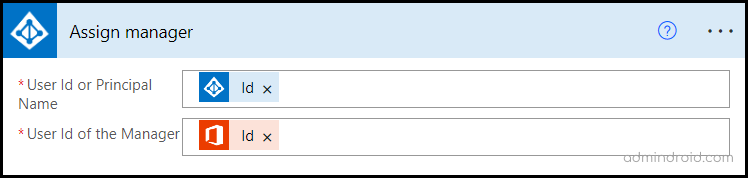
3. In the new step, for assigning a manager, select “Assign manager” action in the “Azure AD” Connection, and give ‘User ID’ and ‘Manager ID’ using dynamic content.
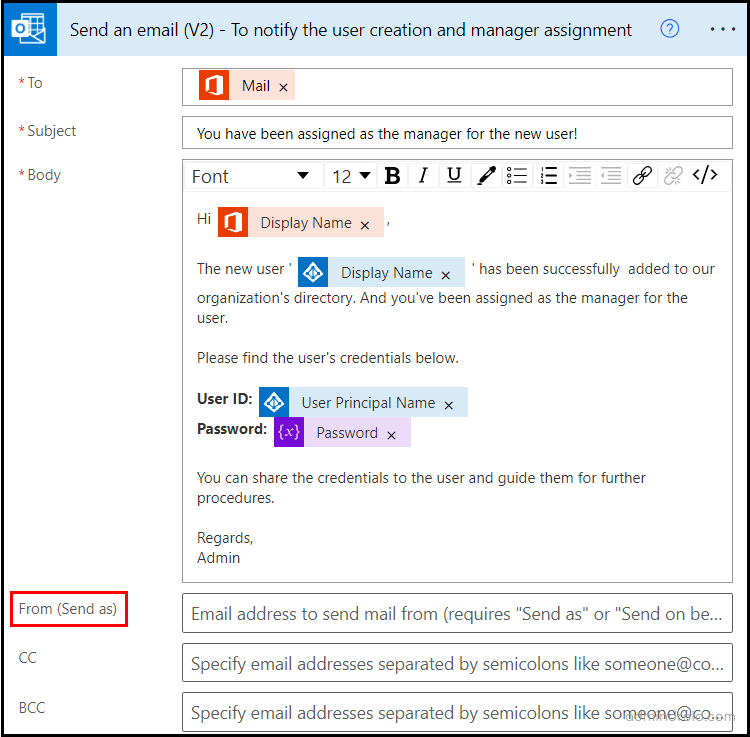
4. At the same time, the manager should be notified about this. So, in the parallel branch, add the “Send an email (V2)” action and customize the email. You can specify a specific email address or group as the sender of the email by entering the group email of the user onboarding in the ‘From (send as)‘ field.
If Manager Rejects the User Onboarding,
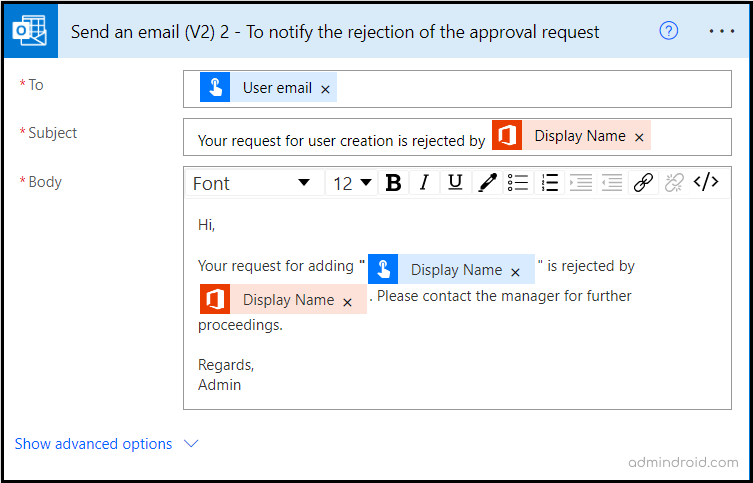
If the manager rejected the user creation, the person who runs the flow must know about it.
- Select the “Send an email (V2)” action under the “Office 365 Outlook” Connector.
- Customize the email as you want and in ‘to’ enter the user’s email who triggered the flow from dynamic content.
And now our flow is ready to run and will look like the screenshot below:
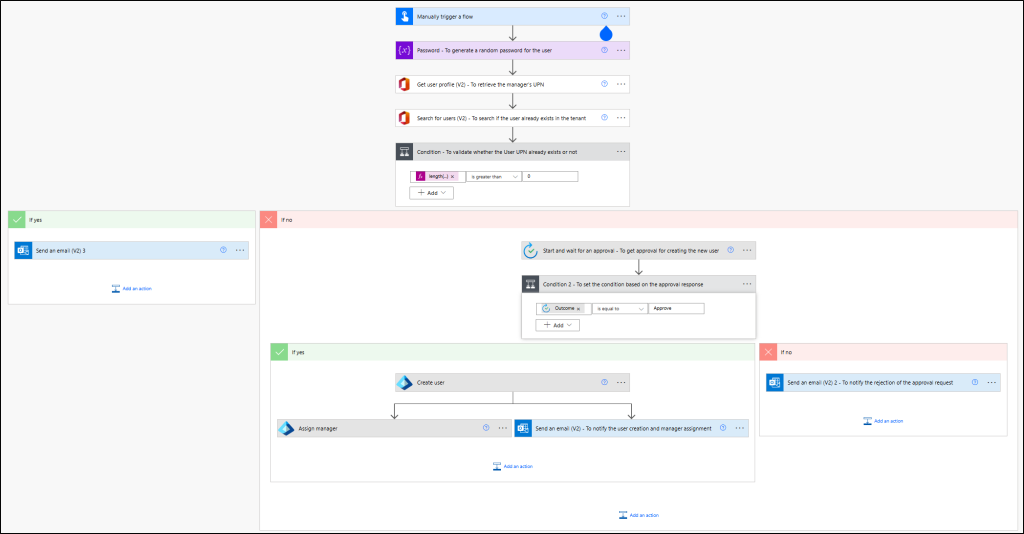
You can run the flow by clicking the ‘Run’ button on your ‘My flows’ page. You can also share this flow with the other people in your organization by adding them as an owner for this flow. So, they’ll be able to access the run history, and can run this flow upon onboarding needs.
Building a Power Automate flow is a great way to automate onboarding. You can set it up once and let it work for you forever. However, it still takes time to configure, maintain, and troubleshoot. What if you could skip all those setup steps and start onboarding users instantly with just a few clicks?
Sounds impossible? Not anymore. AdminDroid’s Microsoft 365 automation tool brings you smart flow agents that take care of the backend tasks for you, allowing you to focus on results.
Automate M365 User Onboarding with AdminDroid
AdminDroid’s Microsoft 365 onboarding agent helps you onboard a single user or a million users in just minutes. Simply click, provide the input, and you are done. From account creation and license assignment to group membership and more, everything happens automatically in a smooth and reliable process.
Once you provide input through a form or a CSV file, the Microsoft 365 user onboarding agent handles every step in the user provisioning checklist for you, exactly as outlined below.
- Create the user account with UPN and password.
- Enable the account by default.
- Force password change at first sign-in.
- Set additional attributes such as department, job title, and location.
- Assign the required Microsoft 365 license to the user.
- Add the user to groups in Microsoft 365.
- Configure Multi-Factor Authentication (MFA) status.
- Assign a manager to the user profile.
- Send the generated password to the user’s manager via email.

AdminDroid’s automation tool goes far beyond native workflows, bringing advanced features like Approval, Pause & Resume, Revert Actions, etc. These capabilities give you complete control over every step of your workflow.
Approval – Add an extra layer of governance with approval. Ensure that all sensitive actions only proceed after the right stakeholders sign off.
Pause & Resume – Accidentally assigned the wrong Microsoft 365 license to a batch of new hires? Instantly pause the agent mid-process, fix the assignment, and resume without restarting from scratch.
Revert – Added users to a privileged group by mistake? Quickly roll back just that specific action or undo the entire flow agent, restoring everything exactly as it was before.
Multi-Tenant Support – Onboarding users across multiple Microsoft 365 tenants can be tedious and time-consuming. Switching accounts and repeating all provisioning steps is exhausting. AdminDroid simplifies the process by onboarding across any number of tenants from a single, user-friendly console.
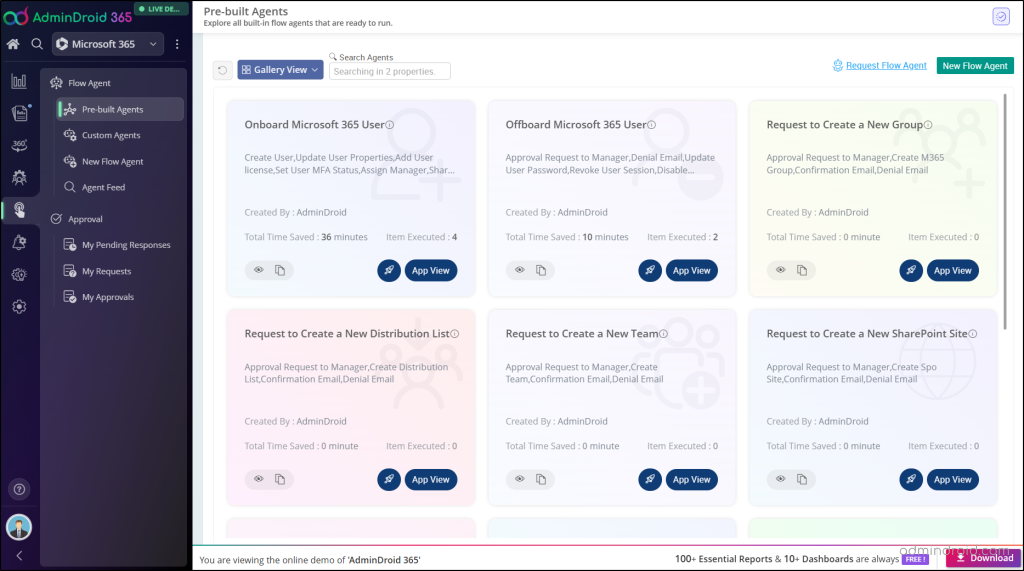
And it’s not just for onboarding. AdminDroid offers 10+ built-in flow agents and the flexibility to create custom workflows for any repetitive Microsoft 365 task. You can also clone an existing agent and tweak it to make it perfectly fit your organization’s requirements.
AdminDroid isn’t just about automation; it’s the all-in-one toolkit every Microsoft 365 admin has been waiting for. With 3,500+ detailed reports, 100+ insightful dashboards, 450+ management actions, etc, it brings SharePoint, Exchange Online, Entra ID, OneDrive, Teams, and more together in a single platform.
Download AdminDroid and start the free 15-day trial today to experience firsthand how it transforms Microsoft 365 administration into a seamless, efficient process.
We hope this blog brings you valuable insights on how to create a manager-approved employee onboarding flow with Power Automate. Also, there are other solutions like PowerShell and lifecycle workflows to create automated M365 onboarding. Similarly, you can also use Power Automate as a free tool to send password expiry emails to M365 users.
Do share with us your thoughts on using this power platform to automate your Microsoft 365 processes, in the comments section below.


