In SharePoint Online, storage can become a challenge over time not because of immediate user activity, but due to unnoticed data buildup across sites. Large volumes of content are often retained through version history, inactive site collections, and hidden components like the Preservation Hold Library (PHL). Rising storage usage adds technical & financial burden, increasing costs, limiting scalability, and requiring justification for expansion. This blog addresses these storage-related issues by outlining actionable ways to reduce SharePoint storage consumption.
What is the Storage Technical Limit in SharePoint and How is it Calculated?
The storage technical limit in SharePoint Online refers to the maximum amount of data that can be stored per site and across the tenant.
SharePoint Online storage is calculated as:
1 TB (base storage) + 10 GB (per user) × number of licensed usersFor example, with 100 licensed users:
1 TB + (100 × 10 GB) = 2 TB total storage
The total storage is pooled at the tenant level and shared across all SharePoint sites. This storage pool is automatically managed by Microsoft, meaning you don’t need to manually allocate space to each site. Each individual SharePoint site can grow up to 25 TB, but only if your tenant has that much available storage in the pool. So, the 25 TB per site is the storage technical limit in SharePoint, not a guaranteed allocation.
What Counts to SharePoint Storage?
Below are the key components that count toward SharePoint Online storage:
- Documents, images, videos, and files uploaded to document libraries.
- Files in the Recycle Bin (both first stage and second stage) continue to count toward storage until they are permanently deleted.
- List items and their attachments, site pages, and site assets.
- Version history of documents, each version of a file consumes space. For example, if versioning is enabled and a 5 MB file has 100 versions, then it uses 500 MB of storage.
- Preservation Hold Library (PHL) content – If a retention policy is applied, any deleted or modified items are preserved in the hidden PHL and continue to use storage.
Storage is calculated per site collection, and all the above elements contribute to the total SharePoint storage pool allocated to your Microsoft 365 tenant. It’s important for admins to monitor and manage storage quota in SharePoint Online to avoid reaching storage limits and incurring additional costs.
Methods to Optimize SharePoint Storage Size
Optimizing SharePoint storage isn’t just about saving space, it’s about improving performance and reducing unnecessary costs. Outlined below are several effective strategies to help reduce both storage usage and associated costs in SharePoint Online.
- Delete unused or stale content
- Clear SharePoint recycle bin
- Manage document version history in SharePoint
- Trim existing versions
- Archive inactive SharePoint sites
- Use Microsoft 365 retention policies
- Manage SharePoint Online Preservation Hold Library (PHL)
1. Delete Unused or Stale Content in SharePoint to Free Up Storage
Deleting unused or stale content is a key step in reducing SharePoint Online storage. To optimize your SharePoint storage and improve performance, it’s essential to regularly remove unused or outdated content. You can find unused content in SharePoint using the below methods.
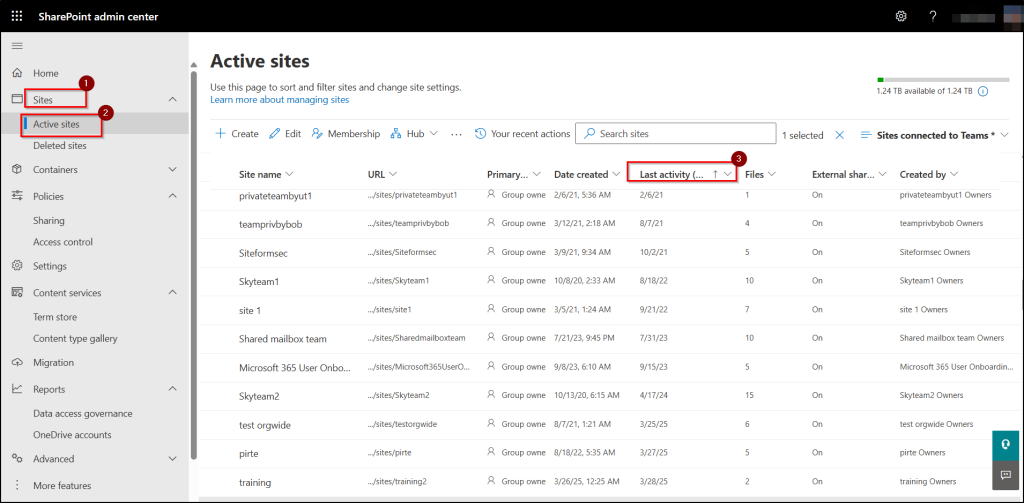
a. Find Inactive Sites Using SharePoint Admin Center
Log in to the SharePoint admin center and you can identify inactive sites by checking the “Last activity” column under “Active Sites”.
b. View SharePoint Site Usage Reports Using Microsoft 365 Admin Center
You can also export and review SharePoint site usage reports in the Microsoft 365 admin center. This report provides insights into total and active SharePoint sites, file activity, and storage trends. They help to identify underused or inactive sites that can be either archived or cleaned up to optimize storage usage.

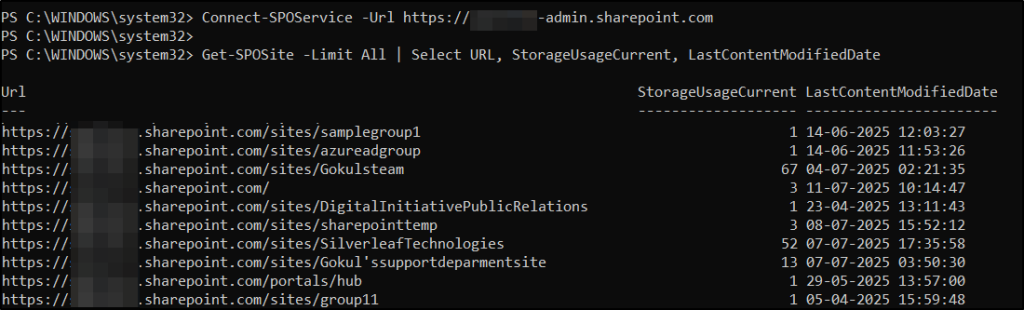
c. List All Inactive Sites Using PowerShell
You can use PowerShell to list sites by their last modified date and target the old or inactive content for cleanup. First, connect to the SharePoint Online PowerShell using the Connect-SPOService cmdlet and then run the following cmdlet.
|
1 |
Get-SPOSite -Limit All | Select URL, LastContentModifiedDate |
2. Clear SharePoint Recycle Bin to Reclaim Storage Space
Emptying the recycle bin is a simple yet effective way to free up storage in SharePoint Online. When files are deleted from a site, they are not permanently removed immediately. Firstly, they are moved to the first-stage recycle bin, and then if it is deleted again from the first stage recycle bin, they are moved to the second-stage recycle bin. Both stages of the recycle bin use up storage space until the files are permanently deleted. Deleted items stay in the Recycle Bin for a total of 93 days. This includes both the first stage and second stage recycle bin combined. After 93 days, the items are permanently removed.
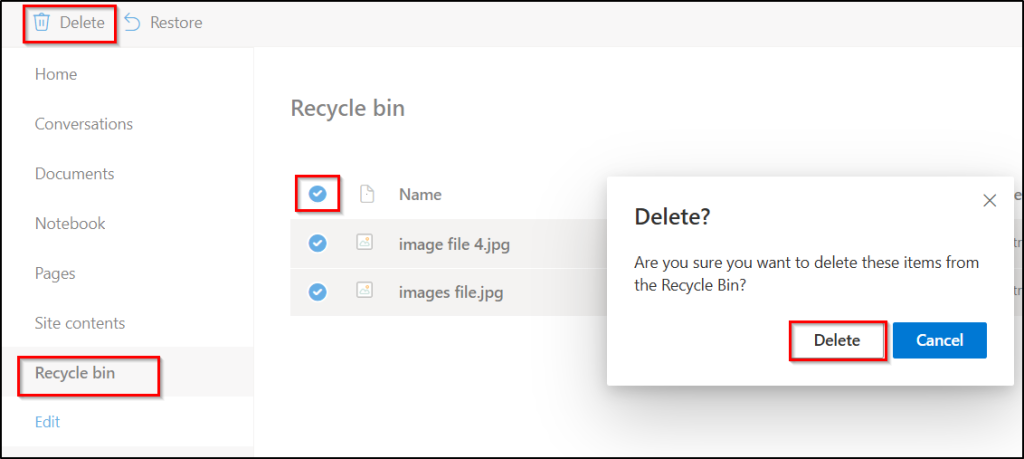
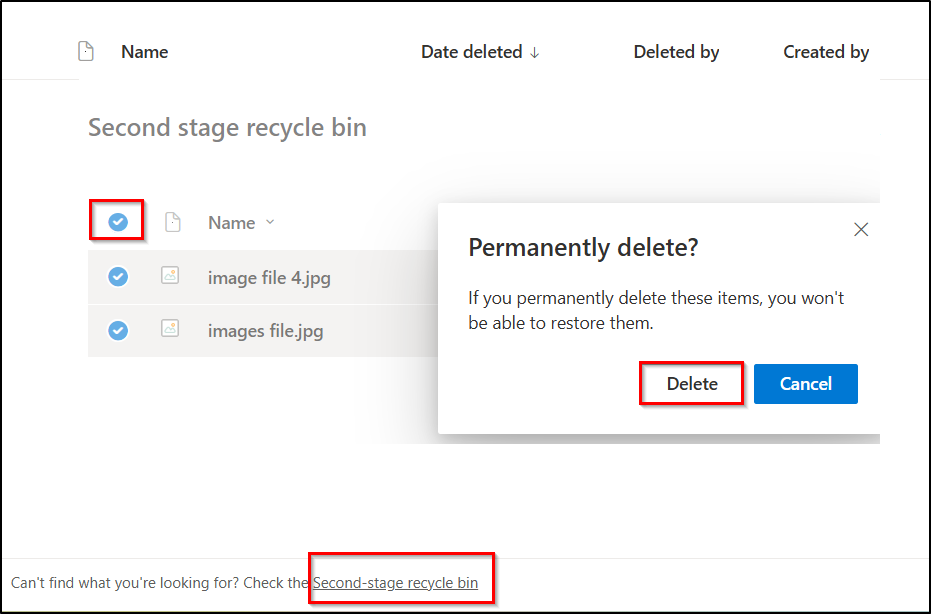
a. Empty Files from Second Stage Recycle Bin in SharePoint Online
- To empty it manually, go to the SharePoint site > Recycle Bin (from the left navigation) > select files and choose “Delete” to confirm the deletion.
- For second-stage cleanup, go to Site Content> Site Settings > Site Collection Administration. Click “Recycle Bin”. This opens the first stage recycle bin by default.
- At the bottom of the page, click “Second-stage recycle bin”. You can click on ‘Delete’ items permanently to free up storage.
b. Empty Recycle Bin Using PowerShell
You can connect to the PnP PowerShell module, using:
|
1 |
Connect-PnPOnline -Url https://<tenant>.sharepoint.com/sites/<site> -Interactive |
You can run the below PowerShell cmdlet to empty the recycle bin.
|
1 |
Clear-PnPRecycleBinItem |

Note: If you want to automate the action immediately without being asked for manual approval (confirmation prompt), add the -Force parameter.
3. Manage Document Version History in SharePoint Online
Controlling document version history is a practical approach to minimize unnecessary storage consumption in SharePoint Online. By default, SharePoint retains multiple versions of documents, which can quickly consume significant storage especially, for frequently edited or large files.
To solve this, SharePoint Online introduced intelligent versioning, which automatically limits the number of document versions retained to avoid unnecessary storage use. However, for more granular control like clearing versions by folder, user, or date range, you can use PowerShell scripts to delete versions selectively. This allows you to remove unnecessary versions beyond the default limits, further reducing storage usage and avoiding additional costs.
4. Reduce Storage Usage by Trimming Existing Versions
While intelligent versioning helps control how many new versions are saved going forward, it does not remove the large number of old file versions already stored. If your goal is to reclaim SharePoint storage immediately, you’ll need to trim existing versions from SharePoint sites, document libraries, or OneDrive accounts using PowerShell.
Note: Trimming file versions is a permanent action. Deleted versions do not go to the recycle bin and cannot be recovered.
5. Archive Inactive and Ownerless SharePoint Sites to Optimize Storage
Archiving inactive, low-activity, and ownerless SharePoint sites that are no longer needed is another strategic way to reduce storage usage in SharePoint Online without deleting valuable content. Microsoft 365 archive allows you to pause active storage consumption by archiving unused sites, which removes them from the active site list while retaining data securely. Archived sites are read-only and stored at a lower cost, making this ideal for long-term retention of project or department content.
- Archiving is fully in-place (no need to move data elsewhere) and preserves all metadata and permissions, ensuring smooth reactivation with no data loss.
- Microsoft 365 Archive stores inactive or old SharePoint data in low-cost cold storage tier, aligning with the data’s lifecycle stage.
- Microsoft 365 Archive can also be integrated with policies provided with SharePoint Advanced Management (SAM) to identify ownerless and inactive sites. The site ownership policies in SAM helps automate lifecycle decisions by assessing whether a site should remain active, have ownership reassigned, be archived, or be deleted.
- The primary benefit of moving sites to an archived state is that the storage they use no longer counts against the SharePoint storage quota.
6. Use Microsoft 365 Retention Policies to Automatically Manage SharePoint Storage
Using retention policies in SharePoint Online helps to reduce storage usage by ensuring outdated or unnecessary content is automatically deleted after a defined period, based on compliance rules.
How to Configure Retention Policies?
- Log in to the Microsoft Purview compliance portal.
- In the left pane, select Solutions> Data lifecycle management> Policies> Retention policies.
- Click on “New retention policy” and give the name and description of the policy.
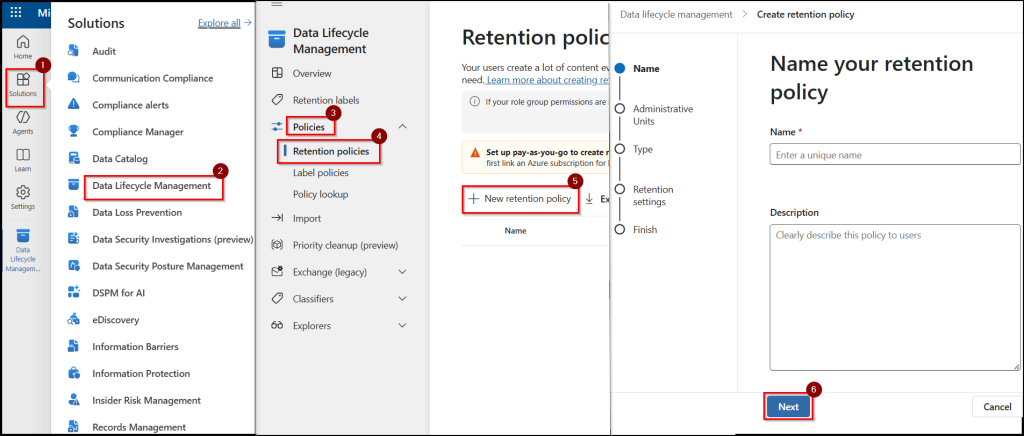
- Click next to choose a type of retention policy: “Adaptive or Static”.
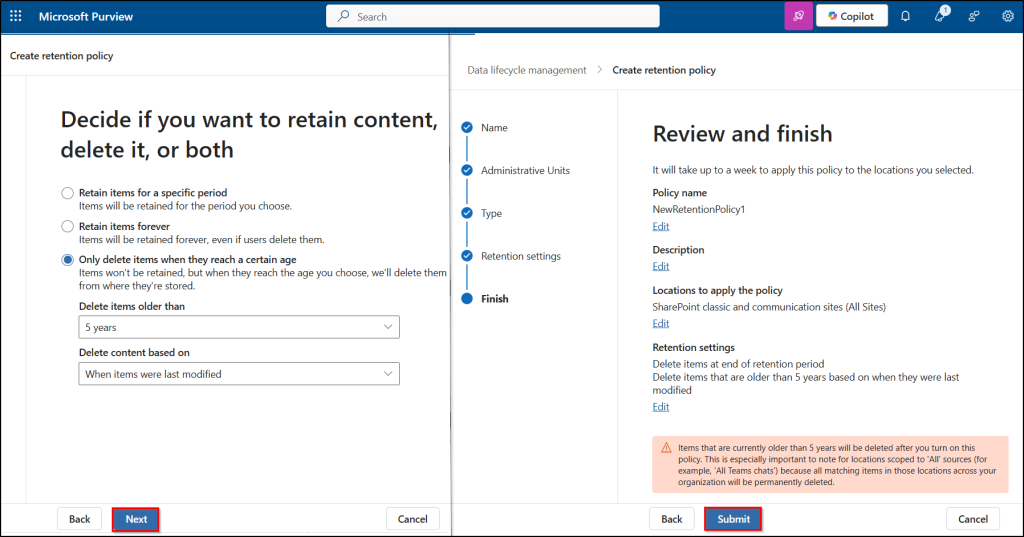
- Now choose ‘SharePoint classic and communication sites’ location to apply the policy.
- Define the retention settings, and choose whether to:
- Retain content for a specific period, then delete.
- Delete content after a specific period.
- Or retain content forever.
- For instance, a policy can be applied to delete documents in a SharePoint site 5 years after they were last modified. This ensures old project files or inactive content don’t accumulate over time.
- Review and click ‘Submit’ to create a policy.
Retention policies systematically clean up aged data, helping free up space and prevent long-term storage buildup thus, ultimately reducing costs.
Note: Enforcement of the retention policy can take up to a week. Once you turn it on, the policy will permanently delete items that are already older than 5 years.
7. Manage SharePoint Online Preservation Hold Library (PHL) to Prevent Hidden Storage Bloat
The Preservation Hold Library (PHL) in SharePoint Online is a hidden system library that stores deleted items protected by retention policies or legal holds. It preserves content for compliance, even if users try to delete it. Since content in the PHL still counts toward your SharePoint storage quota, it can significantly contribute to storage consumption if not managed properly. After creating any retention policies, admins can access the Preservation Hold Library folder by giving your domain credentials in the below URL.
https://<tenantname>.sharepoint.com/sites/sitename/PreservationHoldLibrary/Forms/AllItems.aspx
To reduce storage, it’s important to review existing retention policies, ensure they align with actual compliance needs, and remove or adjust unnecessary holds. This prevents outdated or deleted content from staying in the PHL indefinitely.
Therefore, by proactively cleaning up stale content, limiting version history, managing retention policies, managing PHL, and taking advantage of features like archiving, admins can significantly reduce unnecessary storage consumption. I hope this blog gives you clarity on managing SharePoint Online storage more efficiently. If you have questions or need further guidance, feel free to drop them in the comments below.


