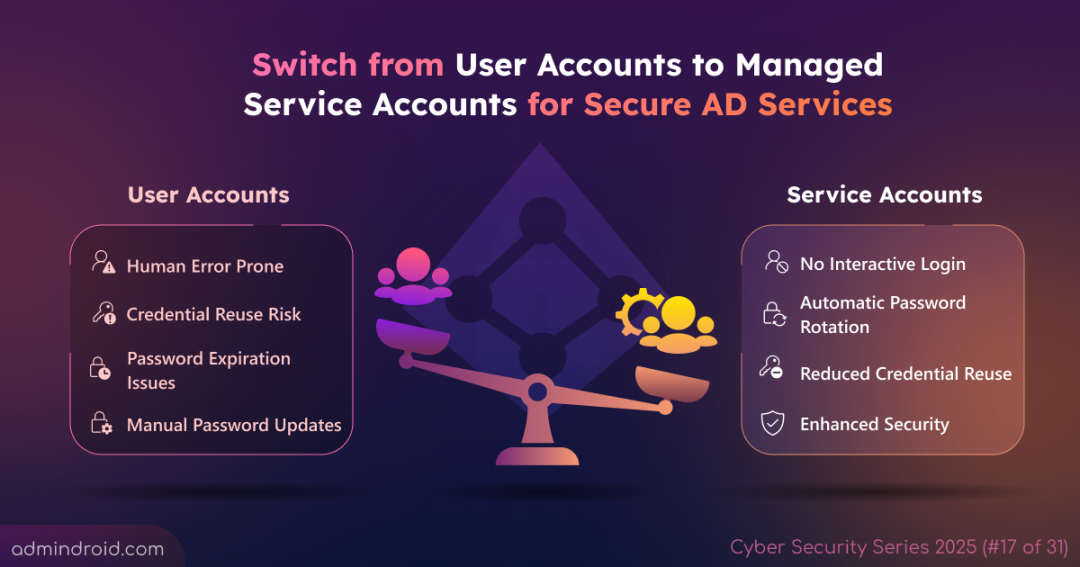
On Day 17 of Cybersecurity Awareness Month, learn how Managed Service Accounts (MSAs) in Active Directory replace regular user accounts to simplify credential management and improve security. Stay tuned for more blogs in our Cybersecurity blog series.
It was a quiet Monday morning in the Active Directory IT department. Backups were completed, reports scheduled, and the admin was enjoying a quick coffee. Then came an alert:
“Task Scheduler failed to run: Login failure as user account password expired.”
The scheduled job had stopped not because of code or network failure, but because the automation account password had expired. The admin soon realized this was a common issue linked to relying on regular user accounts to run critical services.
It’s easy to think that using a normal account and setting its password to never expire is a safe workaround. But the trade-offs are serious: no password rotation and a permanent credential stored in the system, making it a perfect target for attackers. This is where Managed Service Accounts (MSAs), a built-in Active Directory feature, become relevant.
The Discovery: Managed Service Account (MSA)
On exploring more about Managed Service Accounts (MSAs), he discovered that they could automate credential management for services. The idea caught his attention immediately: “An account that updates its own password?” Intrigued, he dug deeper and learned that these are special Active Directory accounts for running services, and scheduled tasks without manual password management. Active Directory automatically generates a strong 240-byte password for each MSA and rotates it every 30 days by default, removing the need for human intervention.
With automatic password handling, Kerberos support, and enhanced security controls, MSAs make managing critical services far simpler and more secure. Managed Service Accounts come in two types: Standalone Managed Service Accounts (sMSA) and Group Managed Service Accounts (gMSA). Both replace traditional user accounts, simplify service authentication, and automate password management, differing mainly in where and how organizations use them.
Standalone Managed Service Accounts (sMSA)
- An sMSA, introduced in Windows Server 2008 R2, is designed for a single computer. It automatically handles password management and simplifies service configuration on that specific machine.
- However, you can’t share it across multiple servers, which limits its use in environments like web farms or clustered applications. To address this limitation, Microsoft later introduced Group Managed Service Accounts (gMSA).
Group Managed Service Accounts (gMSA)
- A gMSA, introduced in Windows Server 2012, extends the concept of sMSA by allowing multiple computers to use the same service account. It securely distributes and manages credentials across authorized servers and workstations, making it ideal for load-balanced or clustered services.
- With gMSAs, you get the same benefits of automation and security, but with the flexibility needed in modern multi-server setups.
Prerequisites for Creating and Using Managed Service Account
Before creating Managed Service Accounts (MSAs), ensure your environment meets these basic requirements:
- Computers must be domain-joined, as MSAs don’t work on standalone or workgroup systems.
- The domain functional level must be at least Windows Server 2008 R2 for sMSA and Windows Server 2012 for gMSA.
- Target computers must run Windows Server 2008 R2 or later for sMSA, and Windows Server 2012 or later for gMSA.
- Install the Active Directory PowerShell module on all the target computers through RSAT.
- Domain Admin or Enterprise Admin privileges are required to create and assign Managed Service Accounts in Active Directory.
Configure Managed Service Account (sMSA) in Active Directory
Let’s look at how to create the two types of Managed Service Accounts in Active Directory. MSA creation cannot be done through the Active Directory UI; It must be done using PowerShell. The overall process is similar, but Group Managed Service Accounts (gMSAs) require a few additional steps.
- Configure Standalone Managed Service Account (sMSA)
- Configure Group Managed Service Account (gMSA)
- Run Scheduled Task with Managed Service Account
Configure Standalone Managed Service Account (sMSA)
Let’s start by creating our standalone MSA on a domain controller that already meets all the prerequisites.
Create Standalone Managed Service Account (sMSA)
1. Open PowerShell with administrative privileges on a domain controller computer and run the cmdlet below, replacing <sMSAName> with the desired account name.
|
1 |
New-ADServiceAccount -Name <sMSAName> -RestrictToSingleComputer |
2. Run the following cmdlet, replacing <TargetComputerName> with the desired computer name to link it to the sMSA.
|
1 |
Add-ADComputerServiceAccount -Identity (Get-ADComputer -Identity <TargetComputerName>$) -ServiceAccount <sMSAName> |
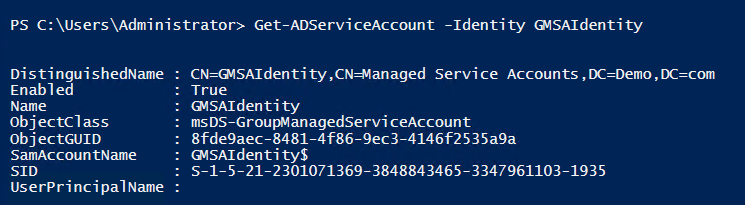
3. Finally, run the following cmdlet to verify that the sMSA has been successfully created.
|
1 |
Get-ADServiceAccount -Identity <sMSAName> |
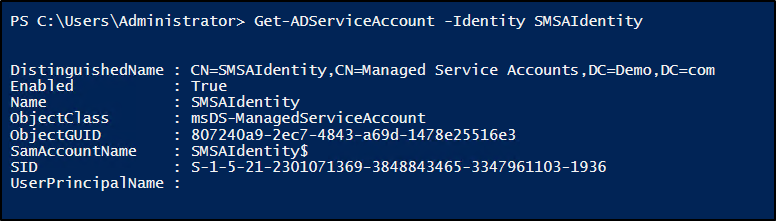
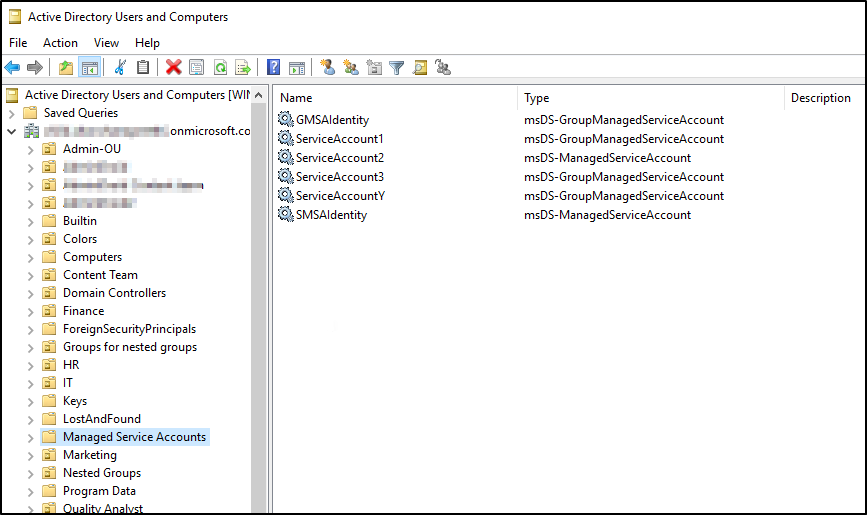
If this returns account details, the sMSA is created successfully. It can then be viewed in Active Directory Users and Computers (ADUC) under the Managed Service Accounts container.
Install Standalone Managed Service Account (sMSA) on the Target Computer
1. Log in to the target computer, the same system specified during sMSA creation. You cannot install it from a domain controller or another computer.
2. Run the following command to install the sMSA.
|
1 |
Install-ADServiceAccount -Identity <sMSAName> |
This installs the sMSA locally and allows the system to retrieve its managed password.
3. To verify that the installation on the target computer was successful, run the command below.
|
1 |
Test-ADServiceAccount -Identity <sMSAName> |
This should return True, confirming that the account is properly installed, and the computer can retrieve its password.
Configure Group Managed Service Account (gMSA)
Creating a gMSA requires additional steps, starting with a Key Distribution Service (KDS) Root Key. Domain Controllers use this key to securely generate and distribute gMSA passwords across the domain.
Create a Key Distribution Service Root Key
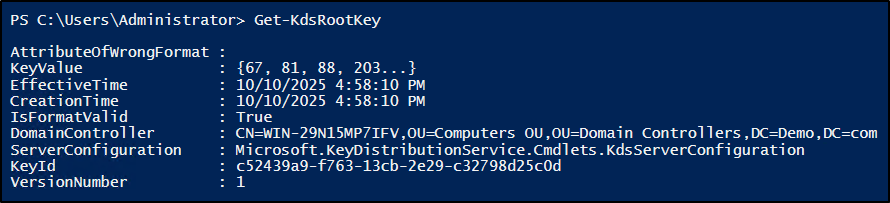
1. Check if a KDS Root Key already exists in the domain:
|
1 |
Get-KdsRootKey |
2. If it returns no key, run one of the following commands to create a new KDS Root Key, based on your need.
- To create a KDS root key with default activation
By default, the key becomes effective 10 hours after creation (replication delay).1Add-KdsRootKey
- To create a KDS root key immediately
This forces the root key to be available immediately on the current domain controller, though replication to other DCs can take up to 10 hours.1Add-KdsRootKey –EffectiveImmediately - To create KDS root key and bypass replication delay for testing
This sets the KDS root key 10 hours in the past, letting gMSAs be created immediately across DCs for testing.1Add-KdsRootKey -EffectiveTime ((Get-Date).AddHours(-10))
3. Then, use the following cmdlet to test the KDS root key. It must return the value of True.
|
1 |
Test-KdsRootKey -KeyId (Get-KdsRootKey).KeyId |
Error: New-ADServiceAccount : Key does not exist
This error will occur during gMSA creation when no KDS root key exists, or the existing key is not yet active due to AD replication delay. The above steps help ensure a valid and active key is available, preventing this error during gMSA creation.
Create Group Managed Service Account and Link It to the Group
1. Create a Security Group to define which computers can retrieve the gMSA password.
|
1 |
New-ADGroup -Name <SecurityGroupName> -GroupScope Global -GroupCategory Security |
2. Add the desired workstations or servers to the group so they can use the gMSA.
|
1 |
Add-ADGroupMember -Identity <SecurityGroupName> -Members <ComputerName1>$, <ComputerName2>$ |
3. Create the gMSA by specifying the name, domain, and the security group allowed to retrieve the managed password.
|
1 |
New-ADServiceAccount -Name <gMSAName> -DNSHostName <gMSAName>.<DomainName> -PrincipalsAllowedToRetrieveManagedPassword <SecurityGroupName> |
4. Verify that the newly created gMSA exists in Active Directory by running the below in the target machine.
|
1 |
Get-ADServiceAccount -Identity <gMSAName> |
Like the sMSA, Active Directory stores the gMSA in the Managed Service Accounts container by default.
Install Group Managed Service Account
1. Unlike sMSA, gMSAs do not require manual installation. Once you add a computer to the security group allowed to retrieve the password, the system handles it automatically via the Key Distribution Service (KDS).
2. Before assigning the gMSA to a service, verify that the target computer can access it by running the below in the target machine.
|
1 |
Test-ADServiceAccount -Identity <gMSAName> |
If the test returns True, the gMSA is properly configured and ready to be used by services (like IIS App Pools, SQL Server, or Scheduled Tasks).
Note: If the test doesn’t return True, the computer may not yet recognize the group membership. You can reboot the machine or run the following command to update Active Directory group membership without logging off.
|
1 |
klist.exe -lh 0 -li 0x3e7 purge |
Run Windows Scheduled Task with Managed Service Account
After creating and installing the Managed Service Account (sMSA or gMSA), the next step is to test it by running an automated task. The common usage of Managed Service Accounts is for running Task Scheduler scripts, Windows Services, and IIS App Pools.
Here’s an example of using a Group Managed Service Account (gMSA) to run a scheduled task.
Grant Logon as Batch Job Rights for MSA on Target Computers
- To allow the Managed Service Account to run scheduled tasks, it must have the “Log on as a batch job” right.
- Open Group Policy Management (
gpmc.msc) on a Domain Controller. - Locate the GPO that applies to the target computers and right-click it, then select Edit. If you want to create a new GPO, right-click the appropriate container and select Create a GPO in this domain, and Link it here, and then edit the new policy. You may also edit the Default Domain Policy if the Log on as a batch job right must be enabled for all computers in the domain.
- In the Group Policy Management Editor, navigate to: Computer Configuration → Policies → Windows Settings → Security Settings → Local Policies → User Rights Assignment → Log on as a batch job.
- Add user or group → Add the MSA.
- Select Add User or Group, then click Browse to search for and select the Managed Service Account from Active Directory. Once selected, click OK to add it to the policy.
- Open Group Policy Management (
Prepare the PowerShell Script for MSA Scheduled Task
2. Save the PowerShell script (e.g., a script to export all inactive users in Active Directory at regular intervals) in the desired folder.
3. Note the full path of the script as creating the scheduled task requires it.
Create the Scheduled Task Using MSA
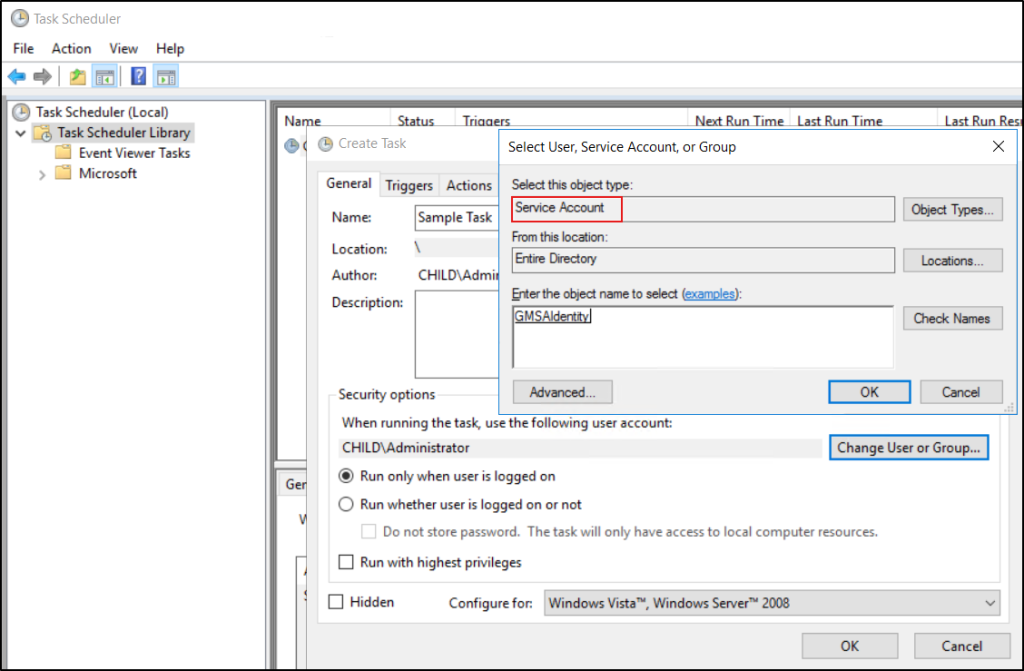
4. When creating a scheduled task via the GUI, the MSA may not appear in the default search for users. To select the account, open Task Scheduler → Actions → Create Task → Select the Change User or Group option.
5. In the dialog, click on Locations and choose Entire Directory.
6. Click Object Types and uncheck Users, Groups, and Built-in security principals, leaving only Service Accounts checked.
7. Then, search and select the MSA account.
Configure the Scheduled Task with MSA
8. Check ‘Run whether user is logged on or not’.
9. Choose ‘Run with highest privileges’ if required
10. Set the ‘Trigger’ based on your need (e.g., daily at 12:05 PM).
11. Set the ‘Action’ to run your desired script with proper parameters.
Test the Scheduled Task with MSA
12. Save the task and run it manually to ensure it executes correctly.
13. Verify the script output and ensure it automatically executes at regular intervals (If outputs are missing, a reboot may help).
14. Check Task Scheduler history for any errors.
Finally, confirm that the scheduled task can run reliably under the Managed Service Account without requiring manual intervention. Just like this, an MSA can effectively support numerous other important automation and service scenarios across Active Directory.
Things to Note
- In Windows Server 2025, Micrsoft introduced Delegated Managed Service Accounts (dMSAs) in addition to sMSAs and gMSAs. dMSAs are designed to counter Kerberoasting and credential theft by ensuring credentials never leave the domain controller. They provide stronger authentication through device-bound trust and eliminate local password storage.
- If the service you’re running uses Kerberos authentication, register a Service Principal Name (SPN) for the Managed Service Account. This allows Kerberos to correctly identify and authenticate the service.
- A gMSA test may fail if the target computer doesn’t support all Kerberos encryption types required by that gMSA. Ensure AES encryption types are enabled and remain consistent across domain controllers and servers.
- You can’t use RunAs with MSAs because they don’t have user-accessible passwords. Instead, use PsExec to verify that the MSA functions as expected.
Wrapping Up
Our frustrated admin, once battling expired passwords and failed tasks, found relief with Managed Service Accounts (MSAs). Tasks ran reliably, scripts executed on time, and security improved, all without manual password updates. MSAs are now a must-have feature in their environment for a secure Active Directory setup.
Stay tuned for more cybersecurity blog series on Active Directory and Microsoft 365 to elevate your IT security knowledge.


