Are you directly logging into a domain controller just to reset passwords or manage user accounts? 😬 It may feel convenient, but it’s one of the riskiest and least efficient practices in an Active Directory environment.
Domain controllers are highly privileged, security-critical systems that should not be accessed for routine tasks. Yet many admins still rely on them simply because the Active Directory Users and Computers (ADUC) console isn’t installed on their workstation.
Installing ADUC on a domain-joined workstation or member server allows you to manage users, groups, and computers safely without touching a domain controller.
In this blog, we’ll explore why installing ADUC on your workstation matters, what prerequisites you need, and the steps to set it up. Let’s get started! 🚀
What is ADUC in Active Directory?
Active Directory Users and Computers (ADUC) is one of the most widely used tools for managing an on-premises environment. It gives a simple MMC (Microsoft Management Console) to perform everyday administrative tasks such as creating user accounts, managing group membership, organizing OU, and more.
ADUC cannot be installed directly on workstation or member servers. Since it isn’t available as a standalone download, it can only be installed through the Remote Server Administration Tools (RSAT) package.
Reasons to Install ADUC MMC Snap-In
Installing ADUC on workstations isn’t just good practice—it improves security and reduces the risks associated with everyday administrative tasks. Here are the key reasons to install ADUC on a domain-joined workstation or member server.
- Tier-0 Restrictions: In a tiered administration model, DCs are considered Tier-0 systems. Therefore, logging in frequently or using them for routine tasks increases security risk. So, Installing ADUC on a workstation keeps daily operations away from DCs.
- Least-Privilege Access: With ADUC installed on workstations, admins can perform only the tasks relevant to their role. This allows least-privileged roles, such as account operators can carry out tasks like password resets or updating user details without requiring direct access to DCs.
- Delegated OU Management: Teams, such as HR, IT support, or department managers, are given control over only specific Organizational Units (OUs). Installing ADUC on their local machines lets them manage their assigned OUs directly, without needing broader directory access or involvement from central IT.
- Avoid RDP to Domain Controllers: In many environments, admins connect to a DC through RDP just to manage Active Directory objects. Installing ADUC on a workstation removes this need, reducing direct sign-ins to sensitive servers.
- DC Busy or Under Maintenance: When a domain controller is being patched or under maintenance, admins can still manage users, groups, and computers by using ADUC on their workstation. As long as additional domain controllers are available, changes are processed normally and replicated when targeted DC is online.
Pre-Requisites to Install ADUC Console
Before you can install and use the ADUC console on a domain-joined computer, make sure the following prerequisites are met:
- The computer must be domain-joined to use ADUC. While you can install ADUC on a non–domain-joined machine, the console cannot perform any directory operations.
- You must have at least the Domain Admin privilege in Active Directory or local administrative access on the computer to install RSAT.
- Your system must be running Windows Pro, Enterprise, or Education, as RSAT is not available on Windows Home.
- For servers, ensure the OS is Windows Server with Desktop Experience (GUI) because ADUC requires a graphical interface.
How to Install RSAT Tools for ADUC
To install the Active Directory Users and Computers (ADUC) console, choose the method that matches your domain-joined device.
1. Install ADUC on AD-Joined Workstations
The installation steps for workstations vary depending on their Windows version. So, you can choose an appropriate method that suits your workstation’s Windows version.
a. Install ADUC on Windows 10/11
The process of installing RSAT on Windows 10 and Windows 11 is almost identical. To enable RSAT and manage Active Directory from your workstation, follow the steps below.
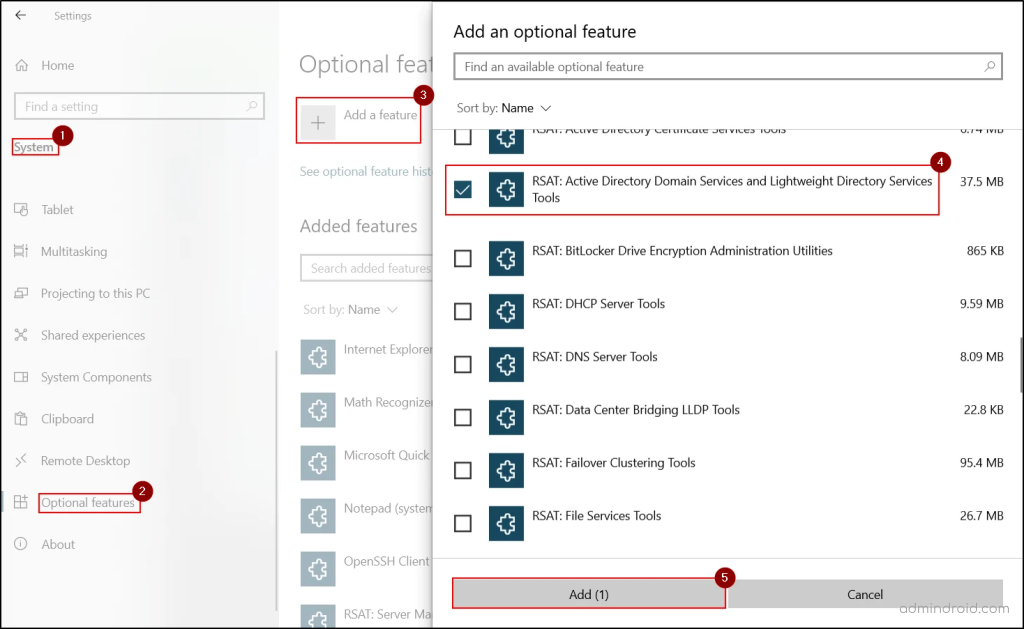
- Open the Settings app (Win + I) and navigate to System → Optional features.
- If you’re using Windows 10, click Add a feature. Then, search for “RSAT: Active Directory Domain Services and Lightweight Directory Services Tools”, check the box associated with it, and click Add.
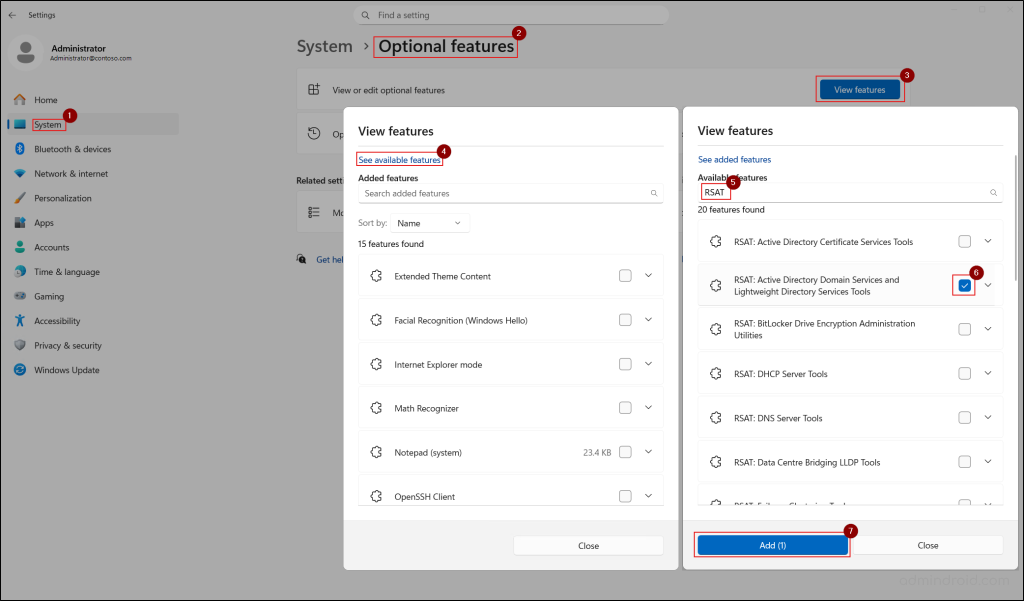
- If you’re using Windows 11, navigate to View or edit optional features → View features → See available features. Search for “RSAT: Active Directory Domain Services and Lightweight Directory Tools”, select the checkbox associated with it, and click Add.
- If you’re using Windows 10, click Add a feature. Then, search for “RSAT: Active Directory Domain Services and Lightweight Directory Services Tools”, check the box associated with it, and click Add.
- Once done, wait for the installation to finish. This will install the RSAT tools required for Active Directory administration, including:
- Active Directory Users and Computers (ADUC)
- Active Directory Administrative Center (ADAC)
- ADSI Edit
- Active Directory Sites and Services
- Active Directory Domains and Trusts
- Active Directory PowerShell module
Note: If your Windows 10 version is between 1809 and 22H2, go to the Apps section instead of the System section in the Settings app.
Alternatively, you can install the RSAT tools required for ADUC on Windows 11 or Windows 10 (version 1809 and later) using the PowerShell cmdlet below.
|
1 |
Add-WindowsCapability -Online -Name Rsat.ActiveDirectory.DS-LDS.Tools~~~~0.0.1.0 |
b. Install ADUC on Windows 10 Using RSAT Package
RSAT tools were included as Features on Demand only starting with the Windows 10 October 2018 update (version 1809). This means the earlier procedure won’t work if you’re using a Windows 10 version prior to 1809.
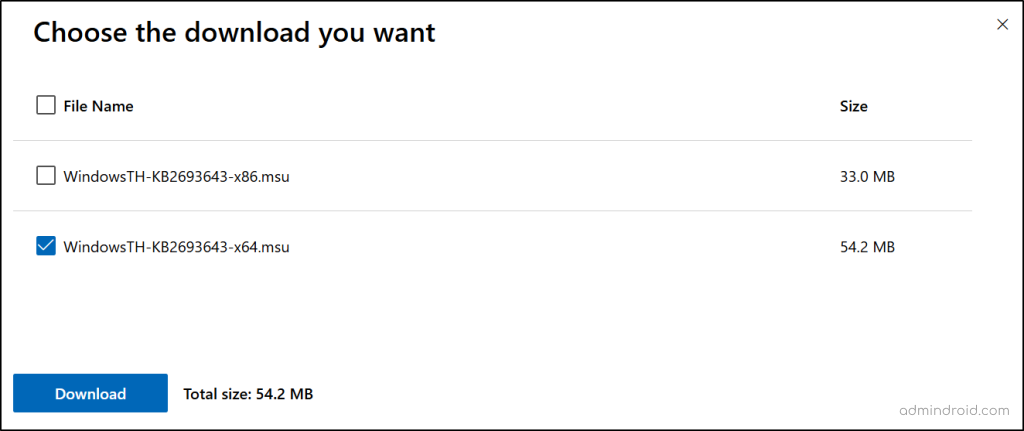
To install RSAT on Windows 10 versions earlier than 1809, you must manually download and install the RSAT package, as shown below.
- Visit the Microsoft Download Center to download Windows 10 RSAT package. Then, choose the language for your installation package and click Download.
- In the popup window, select the checkbox that corresponds to your operating system’s architecture: 32-bit (x86) or 64-bit (x64), and click Download.
- Once the package is downloaded, go to the saved location and double-click the package to start the installation.
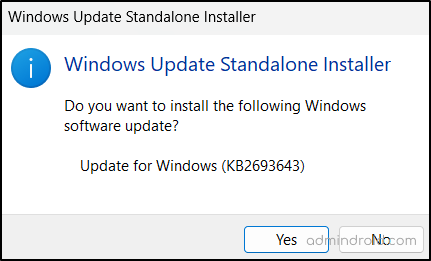
- Click Yes in the Windows Update Standalone Installer prompt to confirm the installation of the update required for RSAT.
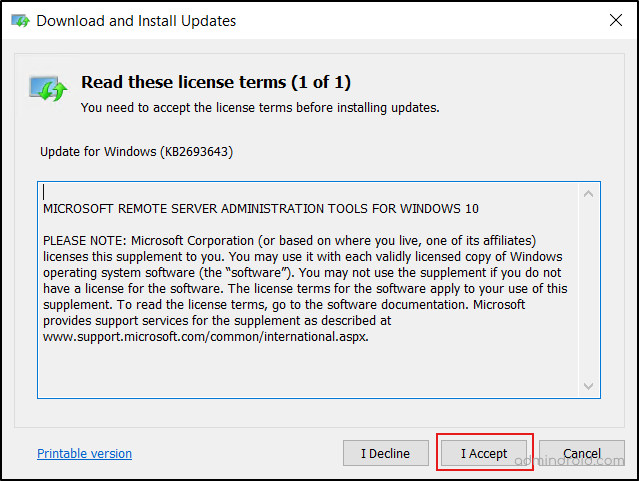
- Then choose I Accept in the license terms to begin the installation.
- Wait for the installation to complete and Close the installation wizard.
- After that, open Control Panel and navigate to Programs → Programs and Features → Turn Windows features on or off. You can also open this window by running ‘optionalfeatures.exe’ from the Run dialog (Win + R).
- Scroll down in the list of features and expand Remote Server Administration Tools → Role Administration Tools → AD DS and AD LDS Tools → AD DS Tools.
- Then check the box for ADDS Snap-ins and Command-line Tools and click OK.
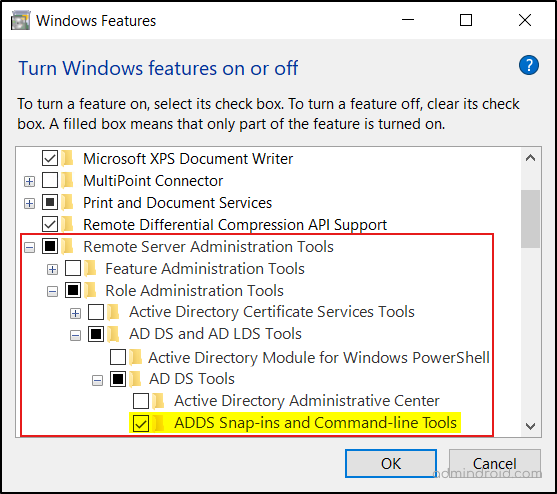
- Once the installation is finished, click Restart now.
This will install Active Directory Users and Computers, along with other RSAT tools such as:
- Active Directory Domains and Trusts
- Active Directory Sites and Services
- Additional snap-ins & command-line tools
2. Install ADUC Tools on Windows Servers
If you manage multiple Windows Servers in your Active Directory environment, you’ll often need tools to centrally administer users, groups, OUs, and domain settings. Installing ADUC on a member server gives you the same management capabilities—without needing to log in to a DC every time.
The steps below install the ADUC console along with the necessary tools, just like the Windows 10 RSAT package does.
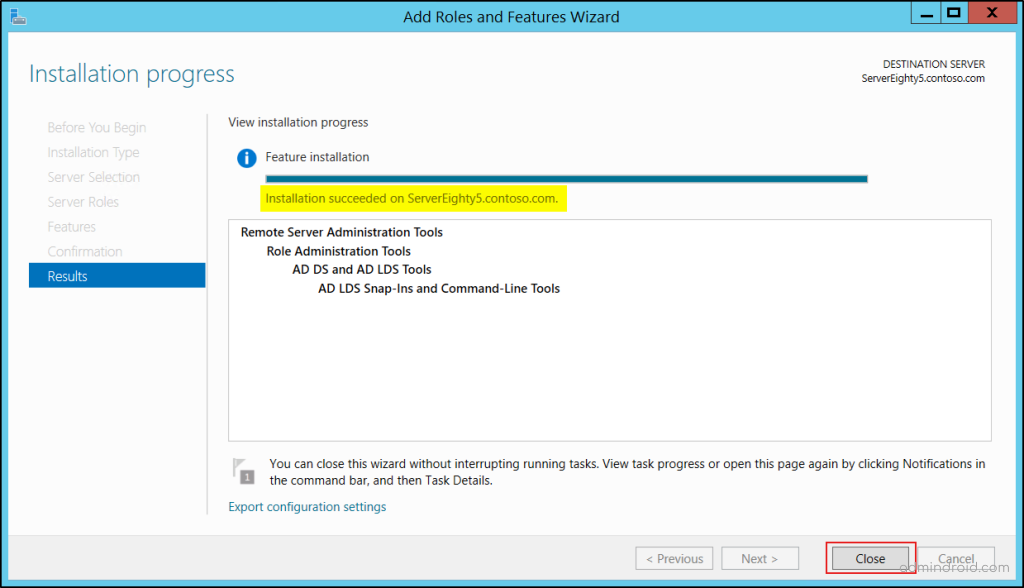
- Open Server Manager, click Manage in the top-right corner, and select Add Roles and Features.

- In the Add Roles and Features Wizard, click Next until you reach the Select features page.
- Then, scroll down the features list and expand Remote Server Administration Tools → Role Administration Tools → AD DS and AD LDS Tools → AD DS Tools.
- Next, choose the ADDS Snap-Ins and Command-Line Tools check box. Click Next and hit Install.
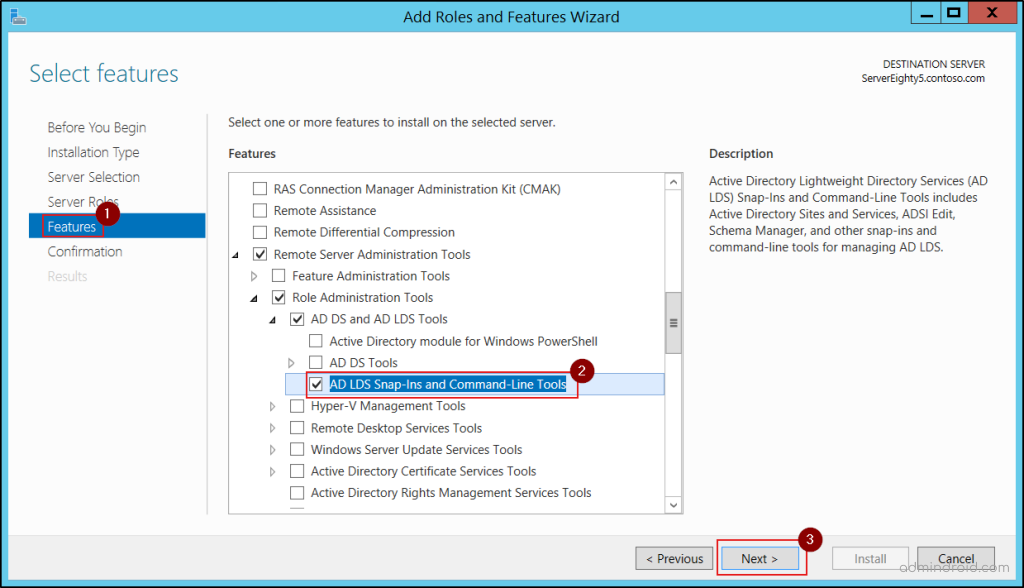
- Finally, wait for installation to finish and click Close.
If you prefer PowerShell, you can use the following cmdlet to install the features required for ADUC on the member servers.
|
1 |
Install-WindowsFeature RSAT-ADDS-Tools |
How to Use Active Directory Users and Computer Console
Once you’ve installed the ADUC console on a workstation or member server, you can open it using the dsa.msc command from the Run dialog (Win + R). Alternatively, you can use the following paths to open ADUC:
- Windows 11: Start → Windows Tools → Active Directory Users and Computers.
- Windows 10: Start → Windows Administrative Tools → Active Directory Users and Computers.
- In Windows Server: Start → Server Manager → Tools → Active Directory Users and Computers.
After opening the console, you can use ADUC’s key features to manage everyday Active Directory domain administrative tasks.
Manage Active Directory Objects
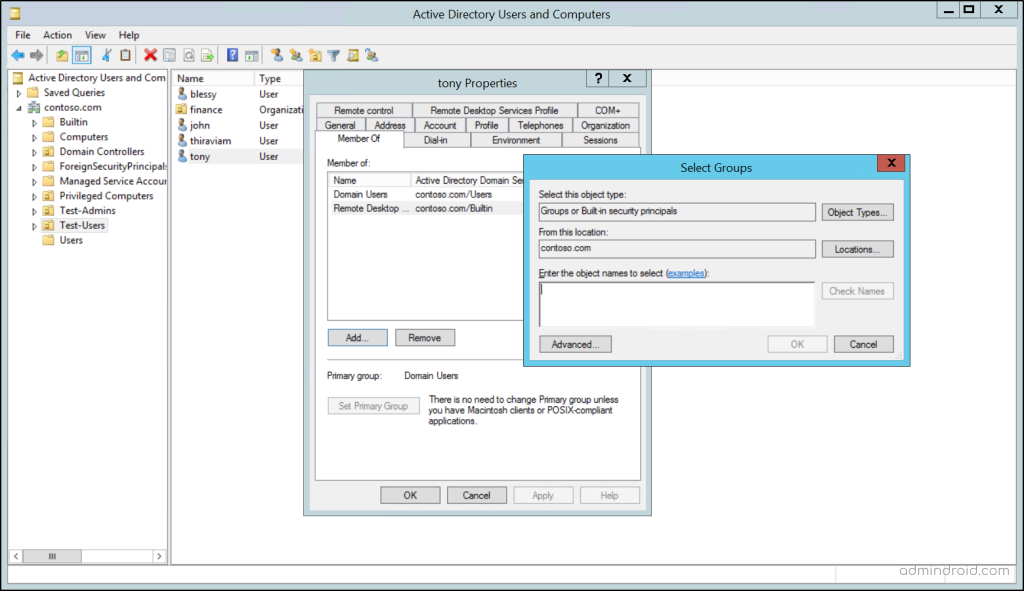
ADUC enables you to manage Active Directory objects such as users, groups, computers, shared folders, OU, etc. You can create new objects, modify existing ones, reset passwords, unlock accounts, update properties, adjust group memberships, and more.
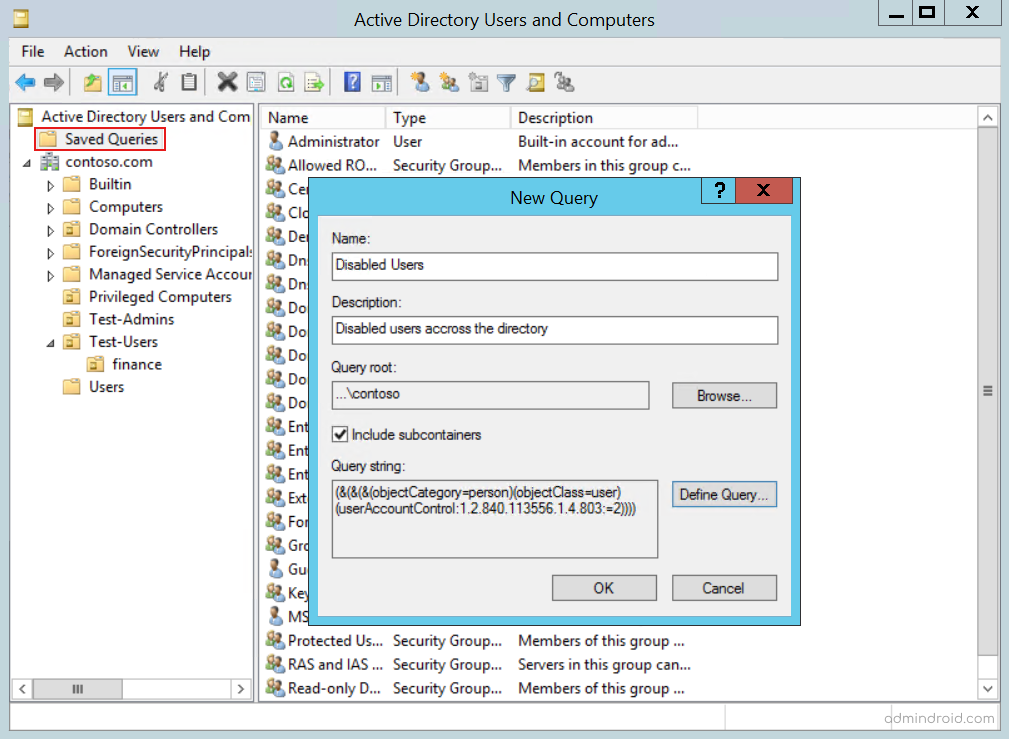
Saved Queries for Repeated Search
ADUC supports creating simple condition-based or LDAP-based saved queries to find locked-out users, inactive computers, disabled accounts, and more. This is extremely helpful for audits, troubleshooting, and periodic cleanup tasks.
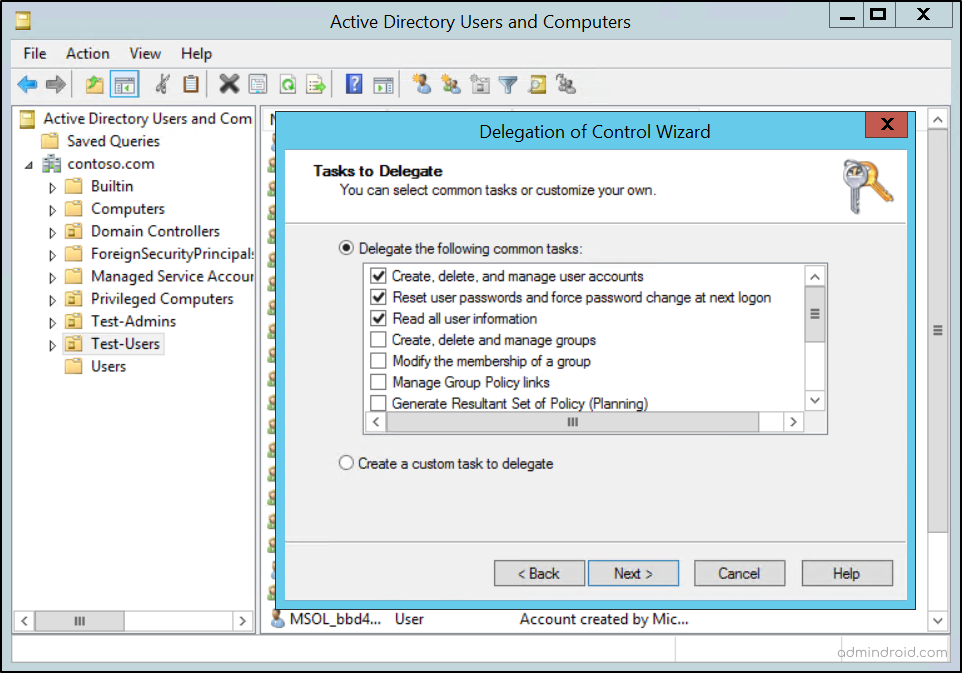
Delegate Control for Specific Identities
The delegation wizard in the ADUC enables assigning limited administrative rights to users for specific operations within designated OUs. This ensures least-privilege access by letting users perform only what they are permitted to manage.
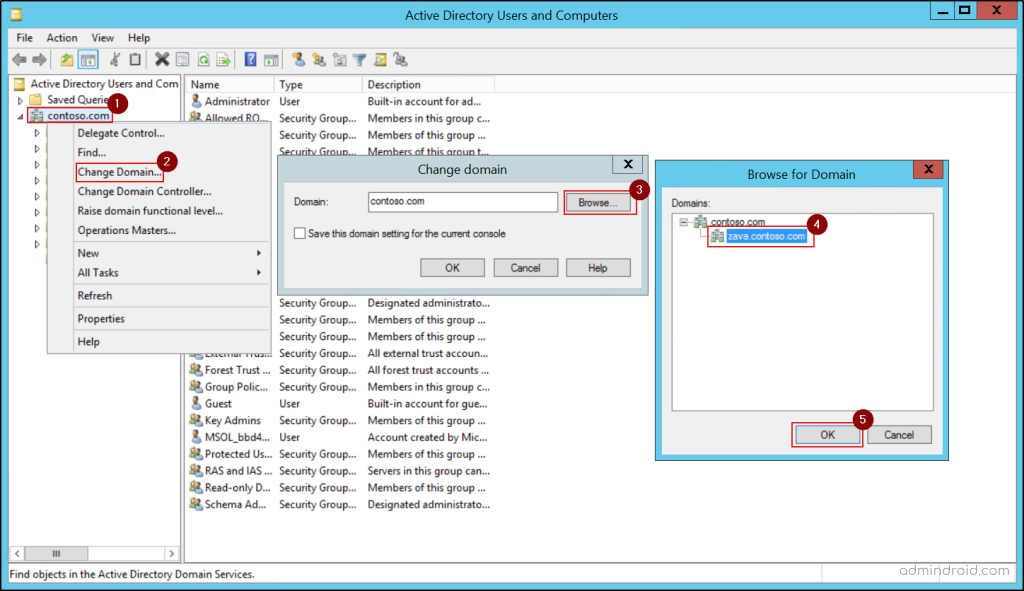
Connect to a Different Domain
ADUC provides the option to switch between domains within the forest or target a specific domain controller for real-time data. This is helpful in multi-domain environments or when troubleshooting replication issues.
Conclusion
We hope this blog provides you with clear steps to install ADUC on a domain-joined computer and use its key features effectively. By doing so, you can manage Active Directory without needing direct access to domain controllers, improving both security and convenience.
If you have any questions, feel free to reach out through the comments section. Stay tuned for more insights!


