In today’s cybersecurity world, glad that all moved to the safer side by configuring Multifactor authentications. However, there are some users who lurk in the shadow of less secure methods like SMS💬, and voice calls📞 for MFA, unaware of the vulnerabilities such as the risk of Sim swapping attacks, MitM attacks, and more! Moreover, users gravitate towards these methods due to their accessibility and ease of use. However, this convenience sometimes leads them to overlook the optimal MFA method “Microsoft Authenticator” app. Thus, it’s advisable to delete phone MFA and force your existing MFA registered users to adopt the Microsoft Authenticator app 💯.
But how will you achieve this🙄? Worry not! Microsoft has introduced a “registration campaign” in Microsoft Entra ID. With the registration campaign, users are nudged to make the switch to the Authenticator app, embracing unparalleled secure sign-ins!
Let’s explore the blog to set up the Azure AD “Nudge” feature in your Microsoft 365 environment.
Nudge Users to Use Microsoft Authenticator for MFA
Despite understanding the importance of Microsoft Authenticator, many users fail to set it up for their M365 account. Remember, security is not just an option; it’s a necessity! 💂. So, it’s admin responsibility to take the step forward and nudge them in the right direction and keep them safe from potential threats. For that, you can use the “registration campaign in Azure AD” in your organization.
The registration campaign in Microsoft Entra will prompt users to set up an authenticator app after their typical sign-ins, thereby guiding them towards a secure authentication method.
- Also, you can include/exclude users and groups from this prompt based on your requirement.
- Not only can you get to choose who receives the nudges, but also configure the snooze option, enabling users to postpone the app setup indefinitely or a for specific duration.
Note: Users on free and trial subscriptions have the option to postpone the app setup process up to three times.
Prerequisites to Configure Registration Campaign in Microsoft Entra
Before getting into the step on how to configure the registration campaign in Microsoft Entra, make sure to check the prerequisites mentioned below.
- You should enable multi-factor authentication for your Microsoft 365 environment.
- Users should not have already set up the Authenticator app to receive push notifications for authentication.
- You should allow users to use the Authenticator app using any of the policies given below.
- MFA Registration Policy: Enabling the ‘Notification through mobile app’ option in the policy will enable users to use the Microsoft Authenticator app.
- Authentication Methods Policy: You can allow users to use Authenticator app by configuring authentication methods policy by following the navigation below.
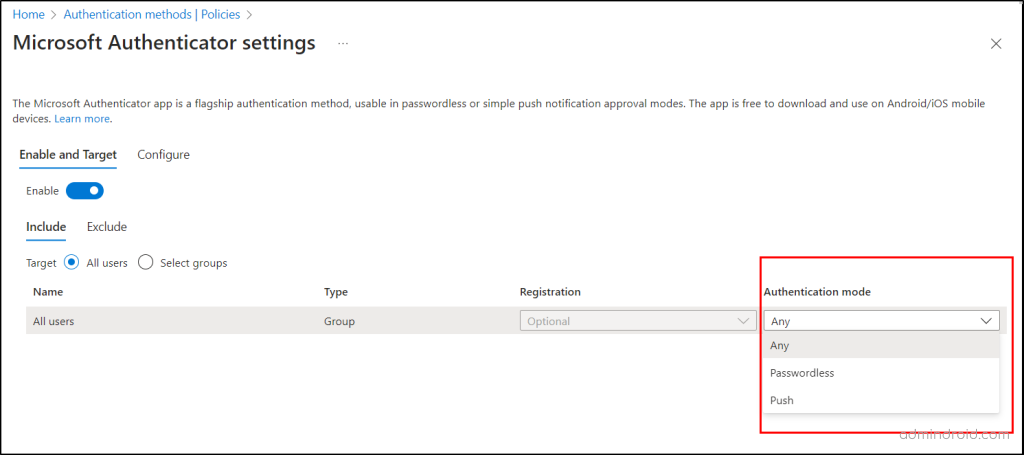
Microsoft Entra admin center→ Protection → Authentication methods → Policies → Microsoft Authenticator → Toggle the bar to “Enable” - Here, you are required to provide additional customization by specifying users or groups within the Policy.
- Furthermore, you must set the authentication mode as either “Any” or “Push” and proceed to save the configured policy.
Note: If you set the authentication mode to “Passwordless”, then users are not prompted for the authenticator app.
Tip: Consider enabling MFA number matching and geographical location setting as an extra layer of prevention to reduce MFA fatigue attacks resulting from authenticator app use.
Manage Registration Campaign in Azure AD
Once done with the prerequisites, let’s move to enable registration campaign in Microsoft Entra. Usually, you can enable this setup via two methods, and they are:
- Enable Registration Campaign Policy in Microsoft Entra Admin Center
- Set Up Registration Campaign Using Graph Explorer
Enable Registration Campaign in Microsoft Entra Admin Center
To enable registration campaign in the Azure portal, follow the steps below.
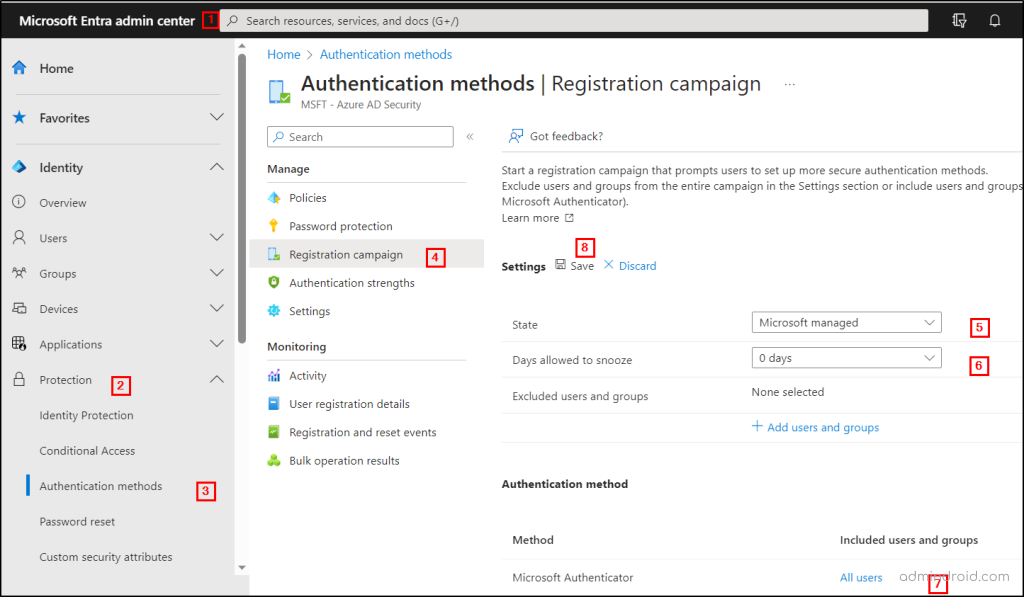
- First, navigate to Microsoft Entra admin center → Protection → Authentication methods → Registration Campaign.
- In the registration campaign settings, choose the state as either “Microsoft managed” or “enabled.” If you select “Microsoft managed,” Microsoft will determine the default values for the setting.
Note: According to the recent update from the message center MC650420 , the Microsoft managed value for registration campaign will be set to enable mode for text message and voice call users in all tenants, starting from September 25 to October 20, 2023.

- Next, in the “Days allowed to snooze,” configure the duration for users to postpone the prompt. But it is advised to set up the days as “0” which will continuously prompt the user, so that the user needs to undergo it one day!
- Also, admins have the ability to make users postpone the prompt for an indefinite number of times.
- Next, based on your preferences, include or exclude specific users and groups in the section.
- By default, the Registration campaign applies to all users. If you want to exclude specific users or groups, you can configure them using the “Excluded users and groups” option.
- If you want to apply the registration campaign to specific users or groups instead of “All users,” you can do so using the “Include users and groups” field under the “Authentication method” section.
Set up Registration Campaign Using Microsoft Graph Explorer
Suppose if you feel the above steps are difficult and time-consuming, then make use of Microsoft Graph Explorer. You can enable the registration campaign policy by using the Authentication methods policy via Graph APIs below.
| HTTP Method | API Endpoint | Description |
| GET | https://graph.microsoft.com/beta/policies/authenticationmethodspolicy | To retrieve the current registration campaign policy configuration in Azure AD. |
| PATCH | https://graph.microsoft.com/beta/policies/authenticationmethodspolicy | To manage/update registration campaign in Azure AD. |
Permission: To access these end points, you need to consent to Policy.ReadWrite.AuthenticationMethod permission in Microsoft Graph Explorer.
Required Roles: You should be a Global administrator or Authentication Method Policy administrator to update the policy.
After completing the permission configuration, let’s proceed to learn how to enable a registration campaign for specific users and groups using Graph Explorer.
Enable Registration Campaign for Specific M365 Users or Groups
Furthermore, while the majority of users have likely transitioned to utilizing secure methods like MS Authenticator & other secure MFA methods, there could still be some users who continue to use less secure methods like SMS or voice call MFA! To address this, admins can initiate a targeted registration campaign focusing on these specific sets of users/groups. By concentrating their efforts on specific users/groups within the Microsoft 365 environment, admins can establish a stronger security stance for the organization.
You can use the JSON format below with the same API to enable multifactor authenticator prompt for specific users/groups.
You need to replace the <Id> with the GUID of the respective user and groups. GUID is nothing but the “Object Id”, which can be taken from Azure AD.
JSON Format
|
1 2 3 4 5 6 7 8 9 10 11 12 13 14 15 16 17 18 19 20 |
{ "registrationEnforcement": { "authenticationMethodsRegistrationCampaign": { "snoozeDurationInDays": 0, "state": "enabled", "excludeTargets": [], "includeTargets": [ { "id": " <GUID of the Group>, "targetType": "group", "targetedAuthenticationMethod": "microsoftAuthenticator" }, { "id": " <GUID of the user> ", "targetType": "user", "targetedAuthenticationMethod": "microsoftAuthenticator" } ] } } |
End-User Experience After Enabling Registration Campaign in Microsoft Entra
Let’s see what will happen after you have finished configuring the registration campaign in Azure AD.
Firstly, the user commences to sign-in with their default registered MFA method. Once they’ve completed their initial sign-in with the default weaker auth method, they will be prompted to set up the Microsoft Authenticator app.
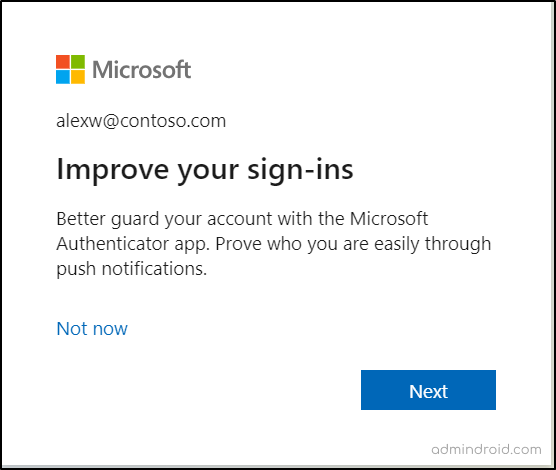
In this case, users are given two options “Next” and “Not now” in their hands to decide their account security.
Case 1: When a user opts to proceed by clicking “Next” in response to the nudge, they are immediately directed towards initiating the setup process for the Microsoft Authenticator app. This decision initiates the creation of a stronger security framework, guarding against security risks.
Case 2: Alternatively, if a user’s current situation doesn’t align with an immediate adoption of the Authenticator app, they can choose the “Not now” option. This choice grants them the ability to skip the app setup process, allowing them to address it at a later time.
Push Users to Setup Microsoft Authenticator App
Let’s explore how the prompt guides users through the process of setting up the Microsoft Authenticator app when they choose the “Next” option in the nudge.
- Upon choosing the “Next” option, users will be prompted to download the Microsoft Authenticator app from their device’s respective app store. After installing the Authenticator app, users will begin the setup process by tapping the “Next” option.
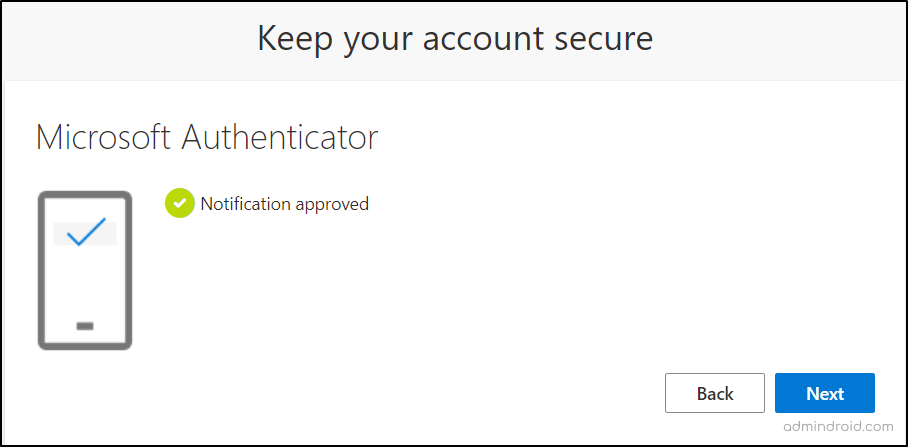
- After that, users will be guided to scan an Authenticator QR code that is displayed on their screen. Once the QR code is successfully scanned, an MFA number matching test notification is dispatched to the user’s Authenticator app.
- To proceed, they need to open the app and input the displayed number in the mobile. This step confirms that the app is successfully integrated with their account and capable of receiving authentication requests.
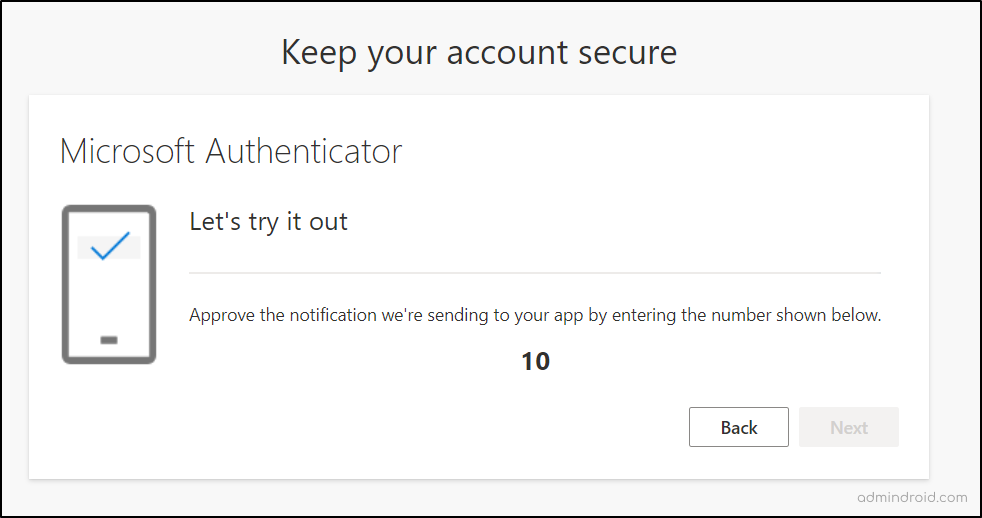
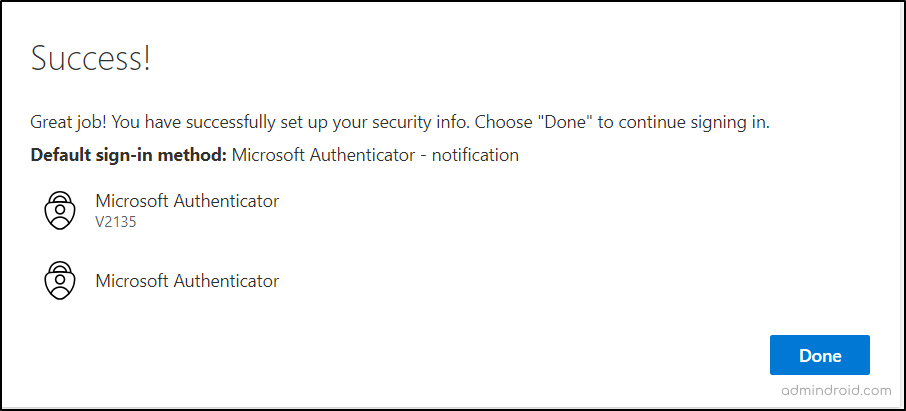
- With the successful approval of the test notification, the user’s Authenticator app is now fully set up as their default MFA method during sign-ins.
Hereafter, the Microsoft Authenticator app will generate one-time passcodes, display MFA push notifications whenever the user attempts to log in to their account.
Monitor Azure AD Authentication Method Registrations in Microsoft Entra
After configuring a registration campaign in your organization, it’s your responsibility to continuously monitor whether the Azure MFA registration is working as expected within your tenant. It helps you to check whether the users are coping with the campaign. To gain insights into authentication registration in Azure AD, follow the navigation below:
Microsoft Entra admin center → Protection → Authentication methods → Activity
The “Activity” page provides a comprehensive snapshot of a user’s MFA authentication registrations. This feature enables users to effectively track their various multi-factor authentication mechanisms and their usage within Microsoft 365.
- By examining this authentication registration data, admins can identify the preferred MFA methods that were previously favored and witness a noticeable increase in the adoption of the authenticator app after the nudge.
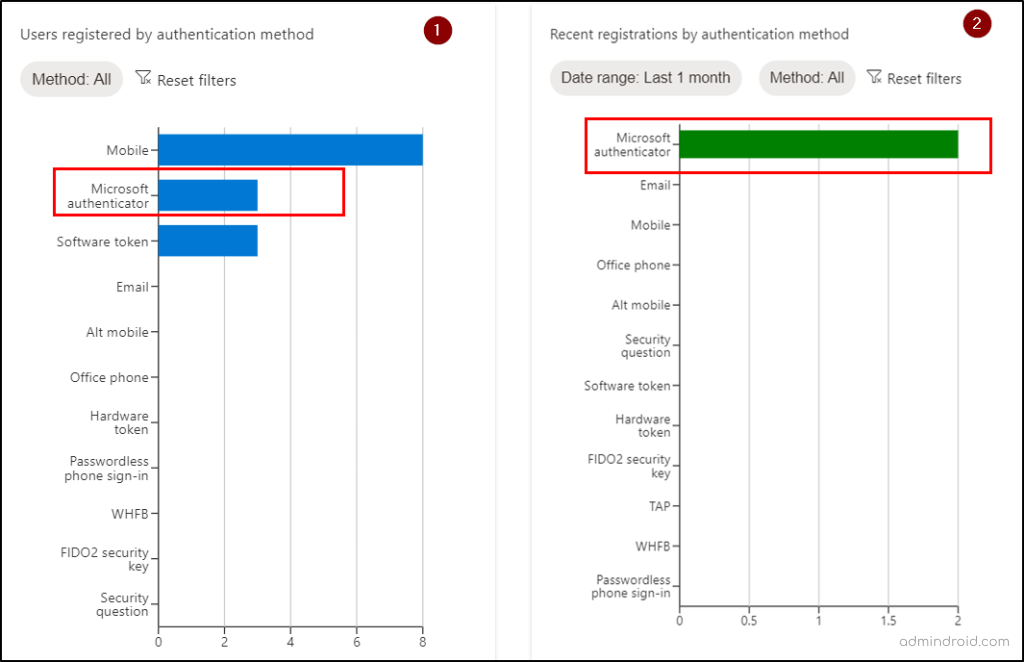
The Azure MFA registration report captures user authentication preferences and displays the user’s default MFA authentication method. So, once the campaign has been initiated, admins can check whether users have positively responded to the nudge and configured the Authenticator app for MFA.

Thus, make the hay while the sun shines! So, take advantage of the registration campaign to safeguard your organization by compelling your users to adopt the secure Authenticator app. This will be a steppingstone making your users to strong authentication method, instead of relying on less secure methods.
Don’t present security as a choice; make it a compulsion!
AdminDroid : A One-Stop Solution for Effective MFA Supervision
The report mentioned earlier helps you confirm the default method configuration. However, finding insights such as the MFA device used and contact details will be like searching for a needle in a haystack! Why do we say so? Because you need to juggle between different pages to gather it all. But with AdminDroid, it’s an easy peasy task! Because AdminDroid reduces the complexity by bringing in all the important MFA details as a single comprehensive report.
The “MFA Activated Users” report in AdminDroid offers comprehensive insights into user authentication methods.
- This report shows details of all MFA methods registered by users, default MFA method, authentication types on registered devices, sign-in status, and a lot more! With this comprehensive report, admins can track the adoption of the Multifactor authenticator app among users in your tenant.
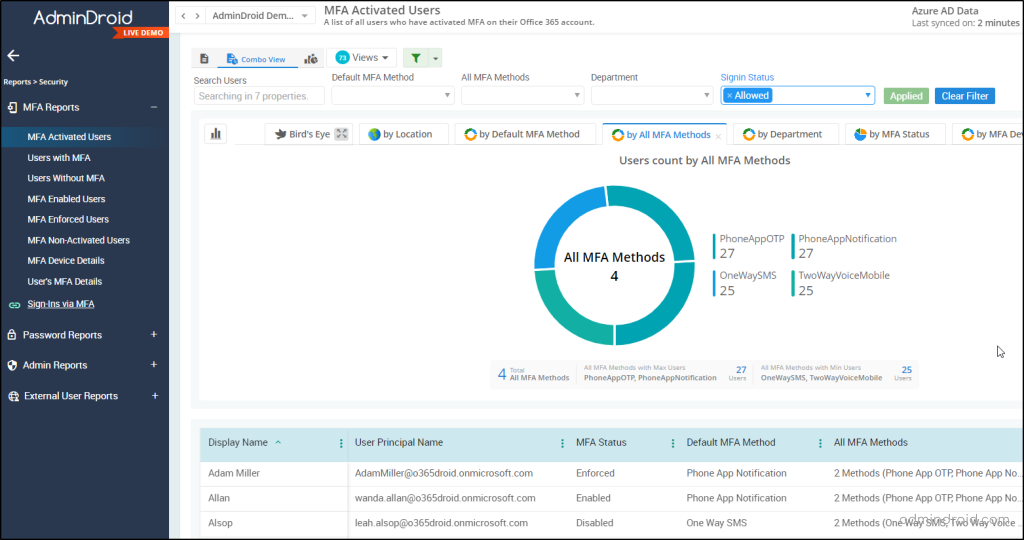
Don’t end up with the above-mentioned report alone! Because AdminDroid provides an extensive range of detailed MFA reports. These reports can be scheduled and effortlessly delivered to your preferred email addresses. Some of the MFA reports are,
- MFA enabled users
- MFA disabled users
- Users without MFA
- Device details of MFA enabled users
- Sign-ins failed to pass MFA requirement
- MFA configured CA policies
Furthermore, AdminDroid offers an exclusive MFA dashboard designed to focus on crucial information in your organization’s multi-factor authentication landscape. This dynamic dashboard serves as a one-stop hub for critical MFA details, like inactive MFA accounts, authentication methods, users without MFA, and a lot more! And this makes it easy to identify areas where you need to improve security and take proactive steps to protect your organization from cyber threats.
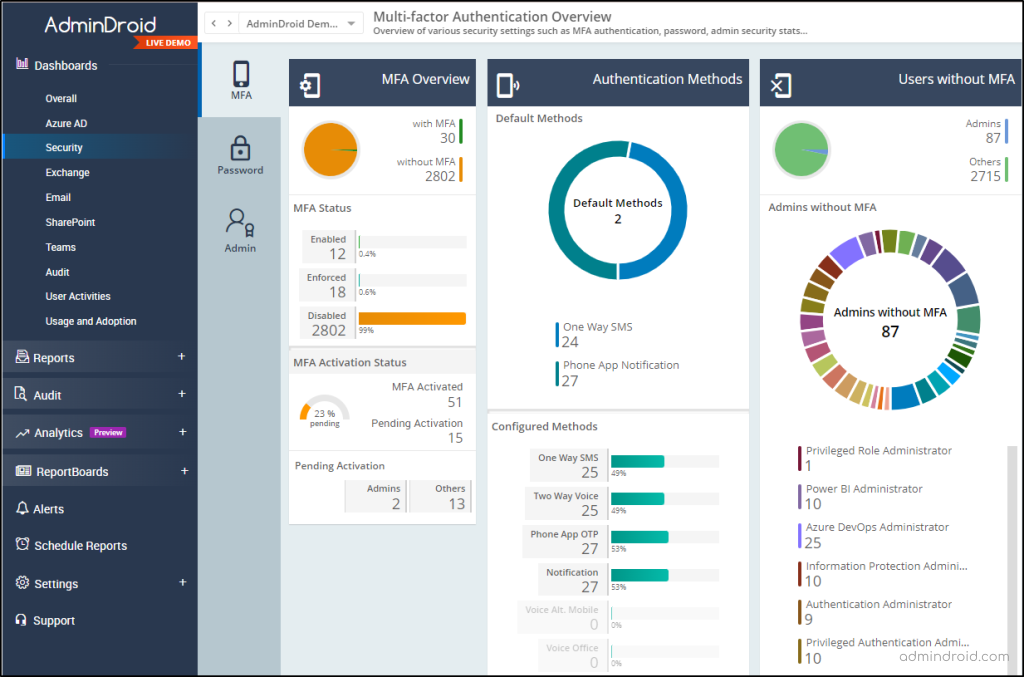
AdminDroid doesn’t stop with MFA security reports alone! You can gain over 1800+ reports on usage, security, and compliance across M365 resources such as Exchange Online, OneDrive, SharePoint Online, etc. Moreover, AdminDroid provides you with a range of Azure AD reports at no cost.
So, try out the 15-day trial of AdminDroid and we are sure its convenience will never let you stop using this!
Hope this blog finds you a way to safeguard your organization from security threats by nudging the Authenticator app for MFA. Furthermore, you can drop your queries and suggestions in the comment section. We are ready to clarify it!


