Dealing with the nuances of license management within Microsoft 365 has long been a challenge for administrators. The complex task of assigning and transferring licenses to each user individually can lead to inefficiencies and errors that hamper overall productivity. However, the solution lies in a game-changing approach called group-based licensing. By creating groups based on users’ roles, departments, or teams, this innovative feature provides a streamlined way to manage licenses. This task can be accomplished with Microsoft 365 admin center or PowerShell.
Let’s dive into the nitty-gritty of improved license management and 🔎 explore the possibilities of group-based licensing.
What is Group-based Licensing in Microsoft 365?
Group-based licensing allows you to assign one or more license subscriptions to a Microsoft 365 group. Licenses assigned to the group are added to everyone who is added to the group, and the licenses are removed when they are removed from the group.
Prerequisites for Group-based Licensing
Your organization must have Microsoft Entra ID P1 or higher licenses (paid or trial) for every user who benefits from group-based licensing. Alternatively, any of the following Microsoft 365 licenses is also acceptable, as they include Entra ID P1:
- Microsoft 365 Business Premium
- Office 365 Enterprise E3
- Office 365 A3
- Office 365 GCC G3
- Office 365 E3 for GCCH
- Office 365 E3 for DOD and higher
If a group is assigned a license, you must have a valid license for each unique user in that group. While you don’t need to assign licenses to users individually, your tenant must have enough total licenses to cover all users in licensed groups. For instance, if 1,000 unique users belong to licensed groups, your organization must have at least 1,000 applicable licenses to stay compliant with the licensing agreement.
Note: You must be a license administrator, user administrator, or global administrator to configure group-based licensing.
Set Up Group-based Licensing in Microsoft 365
Setting up group-based licensing in your Microsoft 365 environment is a straightforward process. Microsoft 365 Admins can set it up with any of the following methods.
- Create group-based licensing using the Microsoft 365 admin center
- Assign group-based licensing using PowerShell
Note: Admins must specify the usage location of the user, before assigning a group-based license. If not, the usage location will inherited from the location of the directory.
Create Group-Based Licensing Using the Microsoft 365 Admin Center
To assign group-based licensing via the Microsoft 365 admin center, follow these steps.
- Create a group in Microsoft Entra ID
- Assign licenses to the Entra ID group
- Verify group-based license assignment
Create a Group in Microsoft Entra ID
The first step for the creation of a group-based license is to create a group in the Microsoft Entra ID. To create a group using the Microsoft 365 admin center follow the steps below.
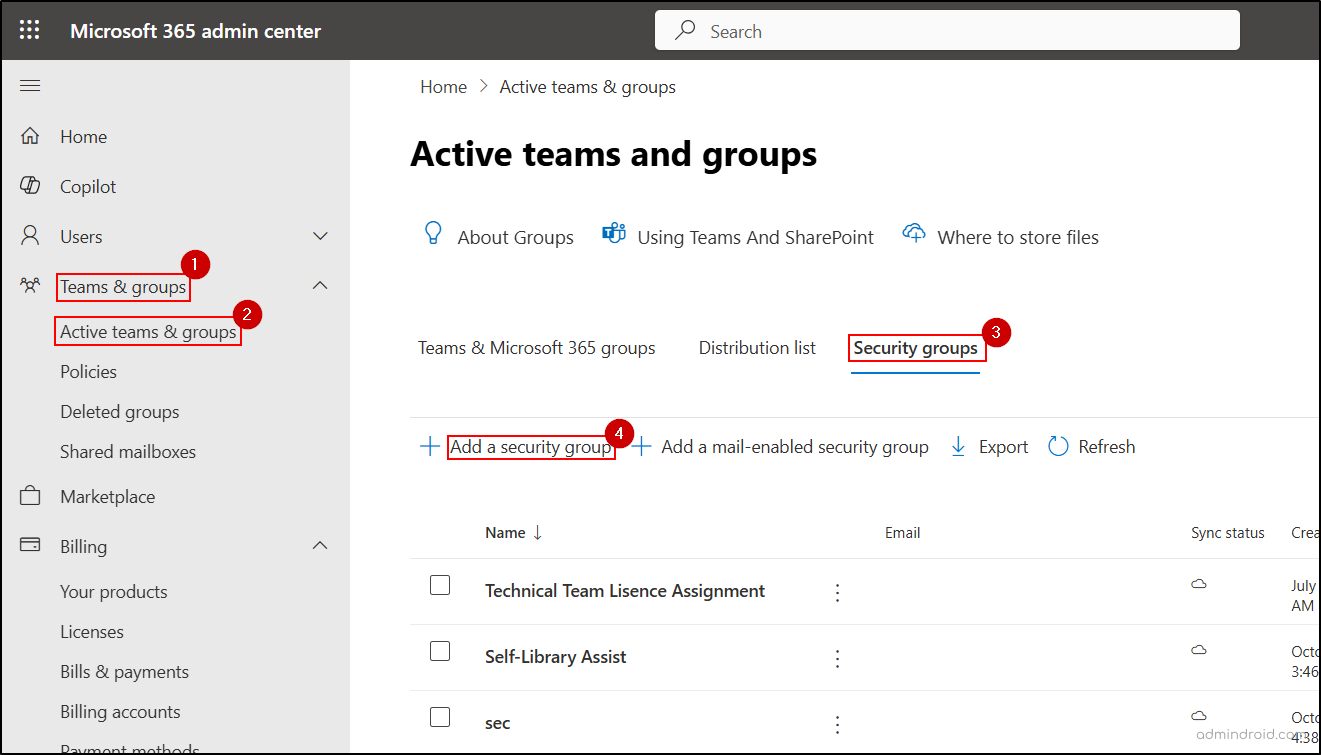
- Log in to the Microsoft 365 admin center and navigate to Teams & groups and select the Active teams & groups tab.
- Go to the Security groups page and select Add a security group.
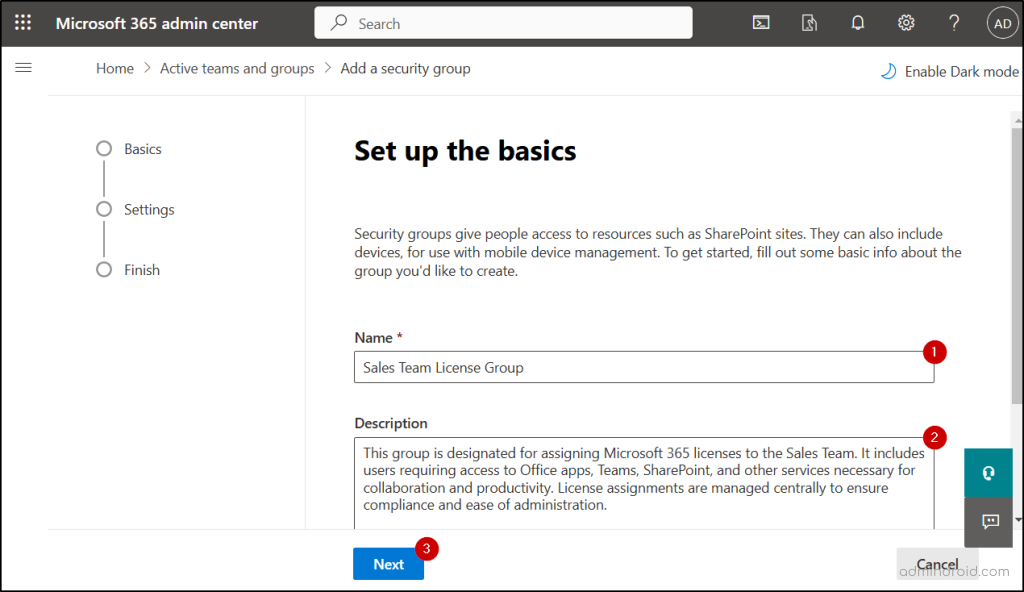
3. On the Set up the basics page, enter a group name and description, then click Next.
- On the Edit settings page, select the Azure AD roles can be assigned to the group checkbox to allow Microsoft Entra roles to be assigned to the group. Then click Next.
- Review the group configurations and click Create group, then select Close.
- After that, select the group you created in the Active teams and groups tab.
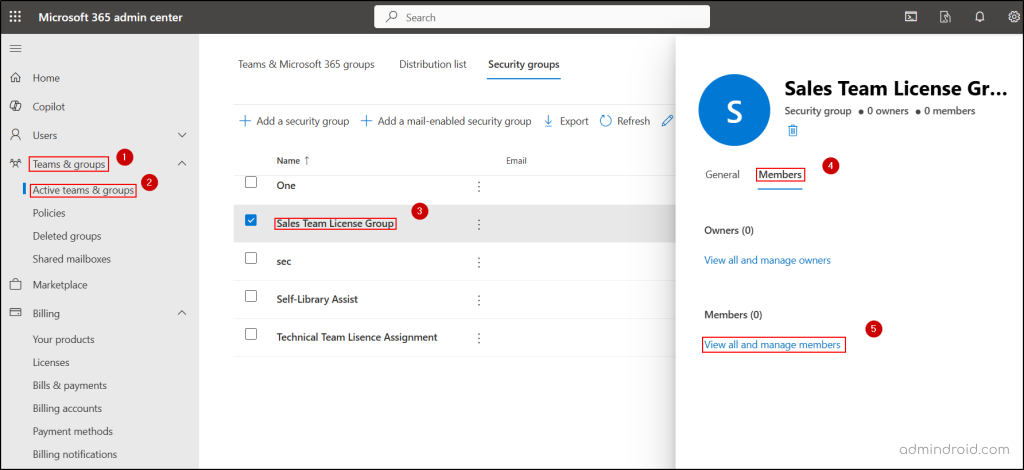
- Go to the Members tab and click View all and manage members.
- Click the Add members option and add the users to the group.
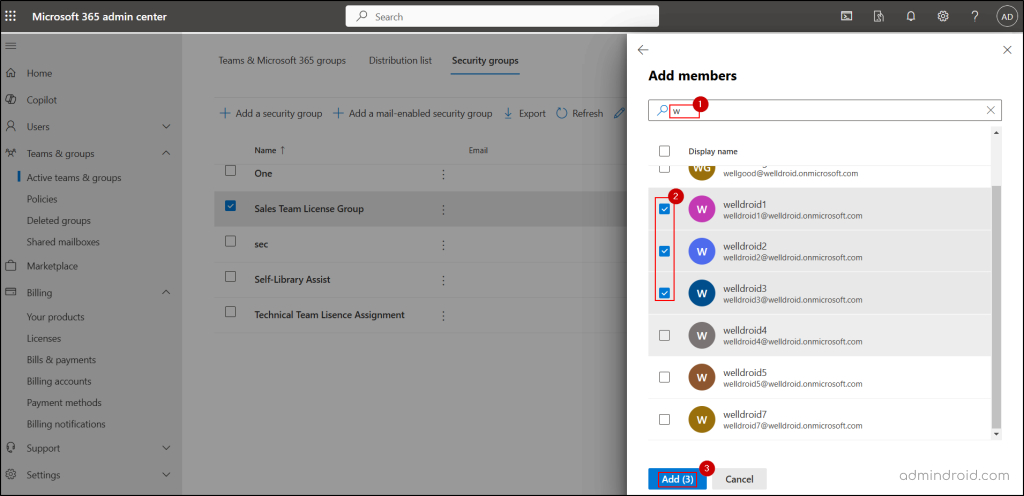
Note: For assigning group-based licenses, we recommend creating Security Groups, but you can create other group types like Microsoft 365 groups or Mail-enabled security groups based on your requirements.
Assign Licenses to Microsoft Entra Groups
After creating groups with users, you need to assign licenses. Follow the procedure below to assign licenses to your groups via the Microsoft 365 admin center.
- In the Microsoft 365 admin center, go to the Licenses tab under the Billing section.
- Choose the license you want to assign to the group.
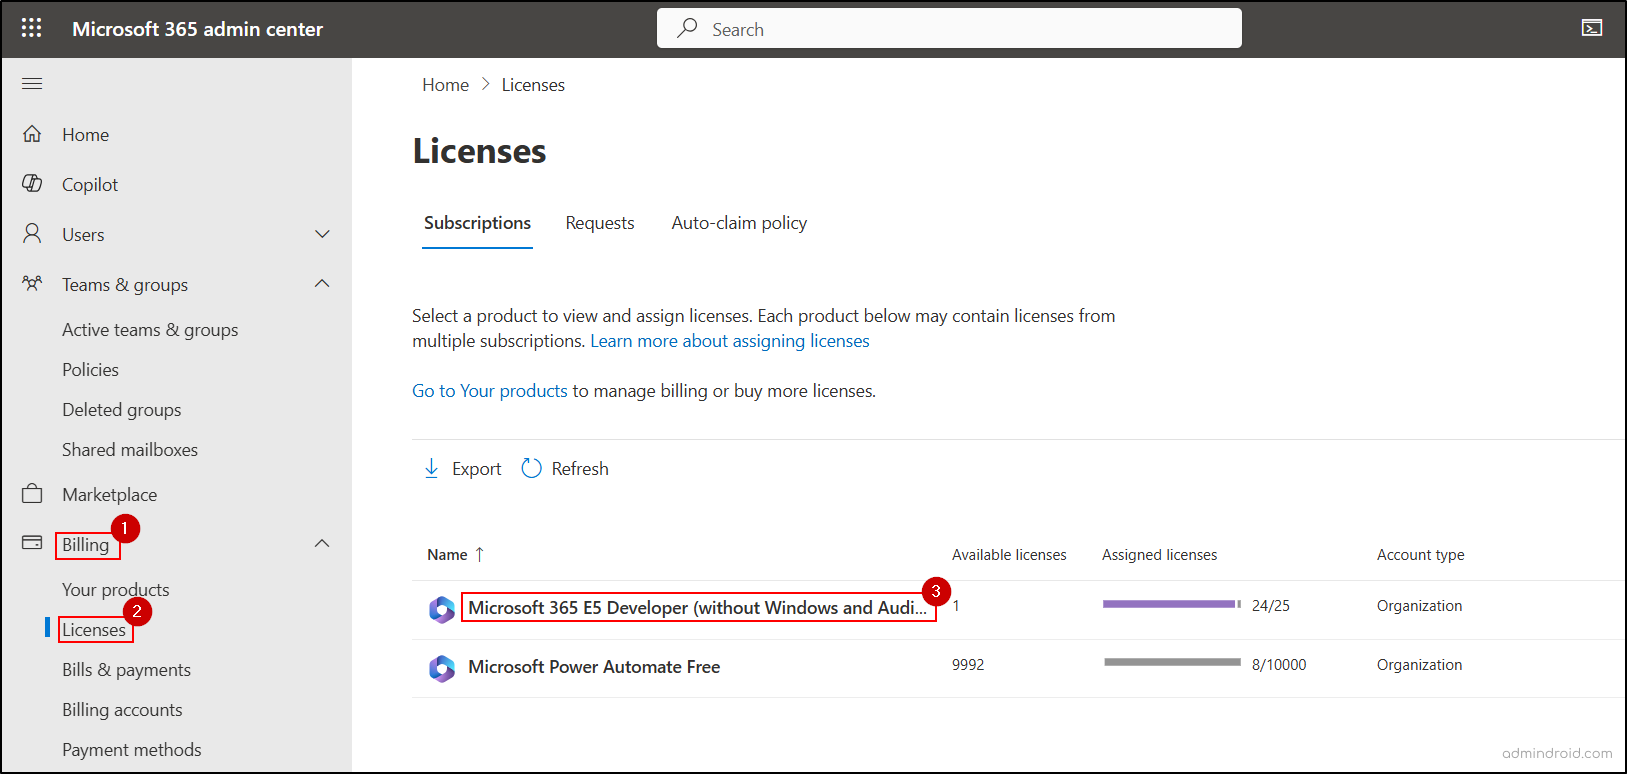
- Go to the Groups tab and select the Assign licenses option.
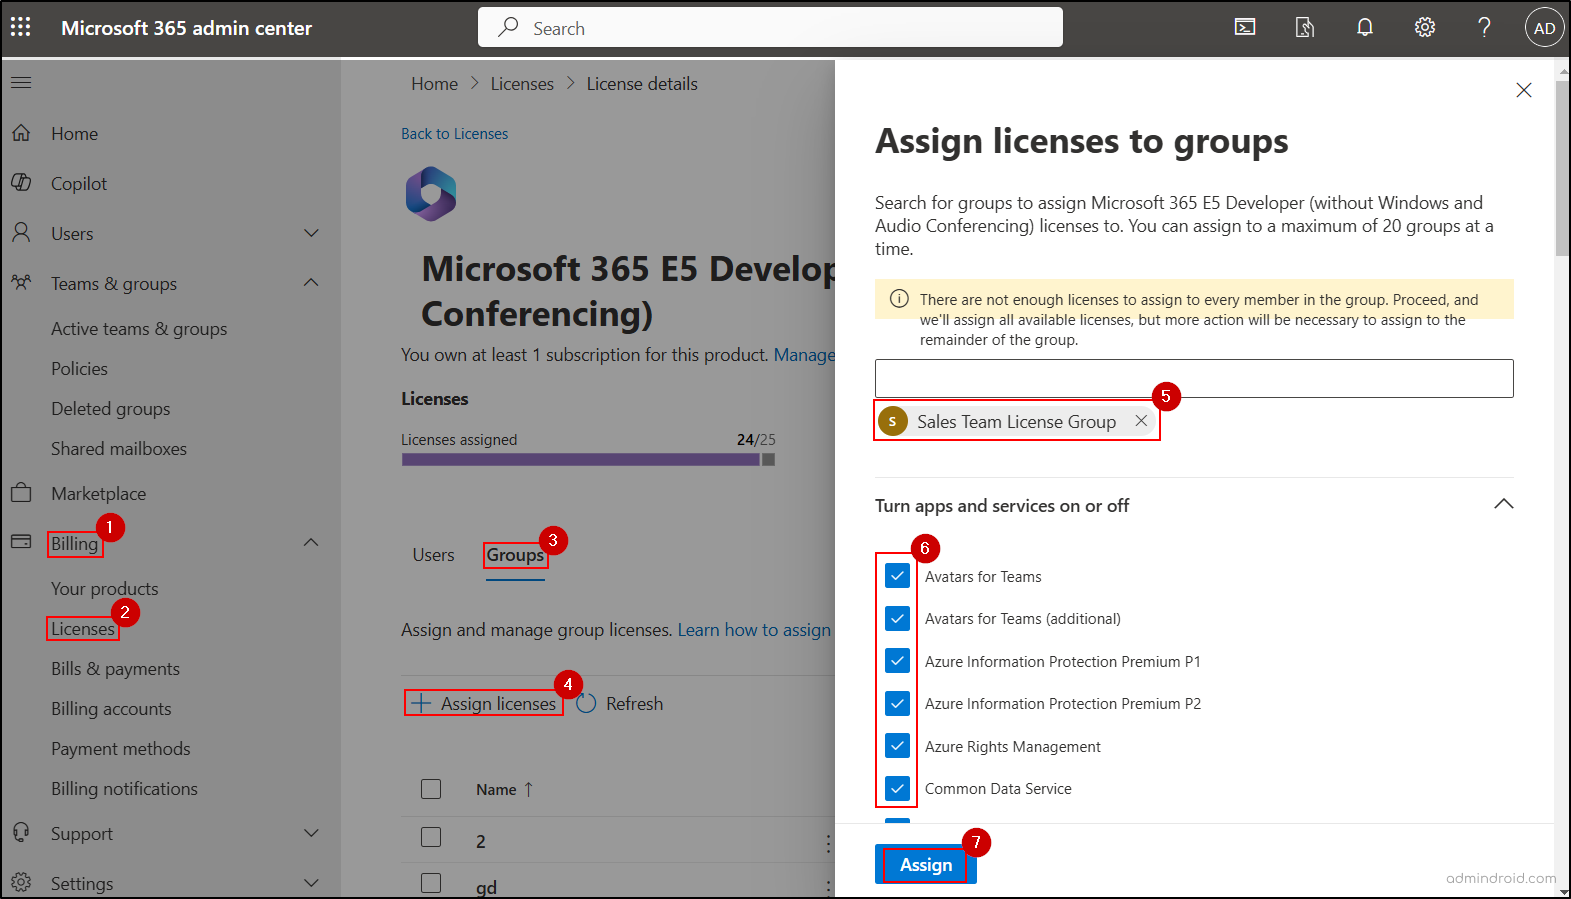
- Search for and select the group to which you want to assign group-based licensing.
- Use the Turn apps and services on or off accordion to filter the apps and services to be associated with the group through the license.
- Click the Assign option to assign the license to the selected group. After a certain amount of time, the users in the group will inherit the license assigned to the group.
Verify Group-based License Assignment
You can easily check the group-based license assignment status via the Microsoft 365 admin center to check if they are properly assigned to the group users.
- Navigate to Billing → Licenses → Groups.
- Here, you can view the list of groups assigned with the license and their assignment status.
- Click on the respective group and go to the Successfully assigned tab to see the successfully assigned licenses.
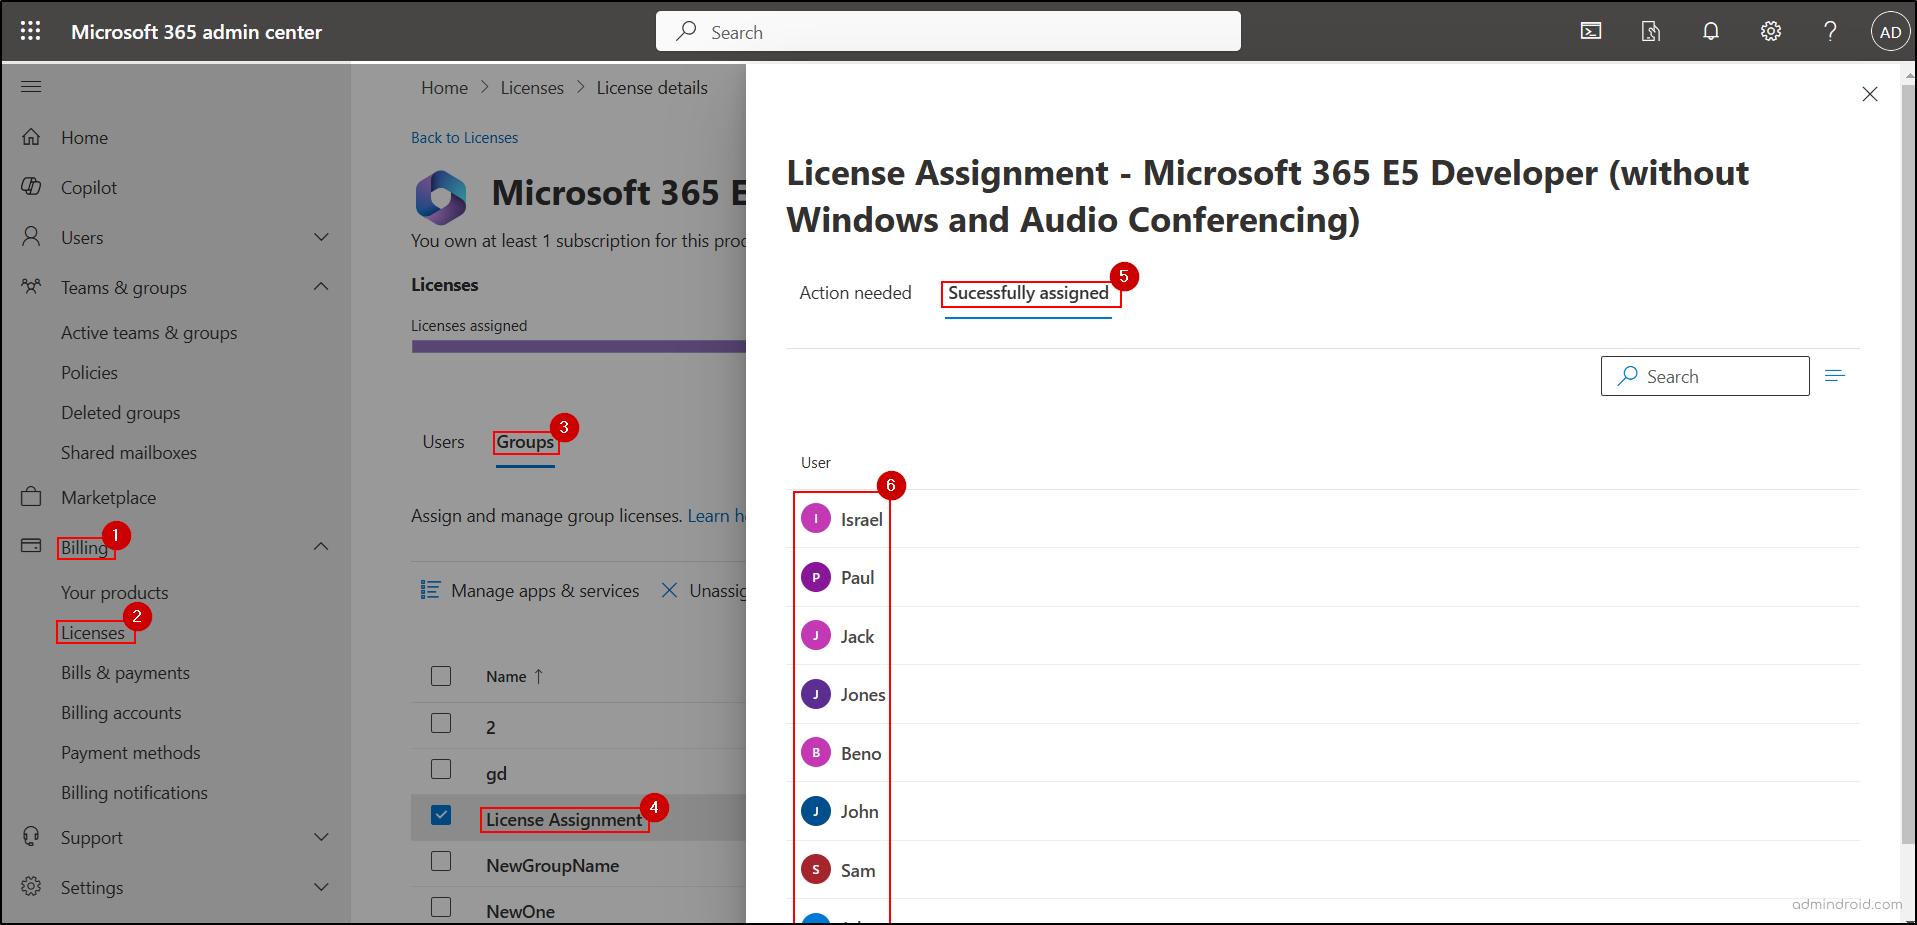
- You can also switch to the Action needed tab to find users with errors in license assignment and view the reasons for those errors.
Group-based Licensing Using PowerShell
Though the Entra ID helps admins to manage Microsoft 365 services, many admins rely on PowerShell for its time-saving capabilities and to perform bulk operations.
You can adhere to the following steps to configure group-based licenses using PowerShell. Before getting started, make sure to connect to the Microsoft Graph PowerShell module.
- Create group with Microsoft Graph PowerShell
- Add users to group using Graph PowerShell
- Apply license to the group using MS Graph
- Check whether the license is directly assigned or inherited
Create Group with Microsoft Graph PowerShell
To create a group using graph PowerShell, execute the cmdlet below after replacing the respective values.
|
1 2 3 4 5 6 7 |
New-MgGroup -BodyParameter @{ DisplayName = <DisplayName> GroupTypes = @("Unified") MailEnabled = <$falseOr$true> MailNickName = <MailNickName> SecurityEnabled = <$falseOr$true> } |
Substitute ‘true’ or ‘false’ based on your group needs. The ‘GroupTypes’ parameter with the value ‘Unified’ will create a Microsoft 365 group. To create a Security group, you can simply omit the ‘GroupTypes’ parameter.

Note: Please note the “Id” after the creation of the group for future reference. This value will be needed for the addition of users in the groups and the license assignment.
Add Users to Group Using Graph PowerShell
To add users to a group using the graph PowerShell, you must know the ”Id” of each user to be added to the group. To know the “Id” of all the users run the comment below.
|
1 |
Get-MgUser –All |
After the execution, take note of the “Id” for each respective user who will be added to the newly created group. Save these Ids in a CSV file following the format demonstrated below.

Once you create the CSV file, execute the following cmdlet with file location and group Id to add the users to the group.
|
1 |
Import-Csv <FileLocation> | Foreach {New-MgGroupMember -GroupId <GroupId> -DirectoryObjectId $_.Id} |
Here, replace the <GroupId> with the Id, which is noted during the creation of the group.
Apply License to the Group Using MS Graph
Before assigning a license to the group, it is essential to determine the “SkuId” of the specific license to be assigned. To know the “SkuId” of the particular license, execute the cmdlet below.
|
1 |
Get-MgSubscribedSku –All |
Once you have the “SkuId”, use the following cmdlet, replacing the <GroupId> and <SkuId> with the appropriate values, to assign the license to the group.
|
1 |
Set-MgGroupLicense -GroupId <GroupId> -AddLicenses @{SkuId= <SkuId>} -RemoveLicenses @() |
Note: The above method would be useful for existing users to get group-based licenses. If you want to add users to the license group in the user creation itself, create a CSV file like the below format and execute the script.

|
1 2 3 4 5 6 7 8 9 10 11 12 13 |
Import-CSV <FileLocation> | Foreach { $PasswordProfile = @{Password =$_.Password} $params = @{ DisplayName=$_.DisplayName PasswordProfile=$PasswordProfile AccountEnabled=$true MailNickName=$_.MailNickName UserPrincipalName=$_.EmailAddress } $NewUser = New-MgUser -BodyParameter $params $UserId = $NewUser.Id New-MgGroupMember -GroupId <GroupID> -DirectoryObjectId $UserId } |
Replace <FileLocation> with the actual CSV file location and <GroupId> with the corresponding group ID for the license group.
Check Whether the License is Directly Assigned or Inherited
After the assignment of licenses through groups, admins can easily check the license assignment path whether it is assigned directly or inherited from a group. The following script can help you to get the license assignment type. Here, replace the <SkuId> with the “SkuId” of the selective subscription.
|
1 2 3 4 5 6 7 8 9 10 11 12 |
$subscription = Get-MgSubscribedSku -All | Where SkuId -eq <SkuId> $users = Get-MgUser -Filter "assignedLicenses/any(x:x/skuId eq $($subscription.SkuId) )" foreach ($user in $users){ $licenseDetails = Get-MgUser -UserId $User.Id -Property "licenseAssignmentStates" | select -expandproperty "licenseassignmentstates" $userSkus=[PSCustomObject]@{ DisplayName = $user.DisplayName Subscription = $subscription.SkuPartNumber AssignedThroughGroups = ($licenseDetails | ? { $_.AssignedByGroup }).Count -gt 0 AssignedDirectly = ($licenseDetails.SkuId).Count -gt ($licenseDetails | ? { $_.AssignedByGroup }).Count } $userSkus } |

This script generates a Microsoft 365 user license report, detailing whether each license is assigned directly or inherited for the specified subscription.
Tip: To view all assignment paths across all license subscriptions in your M365 tenant, use the PowerShell script to export the Microsoft 365 user license assignment paths. This script provides details such as the group from which the license was assigned, assignment status, error details, and more.
Common License Assignment Errors in Group-based License
The following license assignment errors may occur when you are assigning licenses in a group-based manner.
Conflicting Service Plans: This error may arise if one of the products listed in the group includes a service plan that conflicts with another service plan already assigned to the user by another product. To resolve this, you need to remove the user from the group.
This error displays as “MutuallyExclusiveViolation” in PowerShell.
Not Enough Licenses: This error may occur if enough licenses are not available for the products that are specified in the group. You need to either purchase more or free up unused licenses from other users.
This error displays as “CountViolation” in PowerShell.
Limitations Of Group-based Licensing
Below is a list of some of the commonly known limitations regarding group-based licensing.
- Doesn’t Support Nested Groups: Group-based licensing currently does not include the ability to add groups that contain other groups.
- Only Suitable with Security Groups: This functionality is limited to security groups and Microsoft 365 groups with the attribute “SecurityEnabled” set to true.
- Affect the Performance with Directory Synchronization: Assigning or changing licenses to a large group of users (say 100,000 users) can have a negative impact on directory synchronization with Entra AD and on-premises systems.
- Problem with Dynamic Groups: It is vital to ensure that the user is a member of a dynamic group before proceeding with the license assignment. This is necessary to facilitate proper license assignment.
- Difficulty with High Loads: During high-load situations, there may be delays in processing license changes for groups or membership changes for groups with existing licenses. In such cases, you may need to contact Microsoft Support Services for any assistance.
Gain Enriched Microsoft 365 License Reports with AdminDroid for Completely Free!
In fact, this blog provides essential insights into group-based licensing within Microsoft 365. However, efficient management of assigned licenses in your Microsoft 365 environment is equally important. Proper license management and monitoring ensure optimal utilization of resources and adherence to license compliance. Don’t worry! Now, simplify the license management in your Microsoft 365 environment at zero cost with the assistance of AdminDroid Microsoft 365 reporting tool.
AdminDroid’s Microsoft 365 License Reporting gives unimaginable and free license reports, eliminating the need for complex PowerShell cmdlets. AdminDroid Microsoft 365 license usage reports allow admins to get reports in a few clicks. It also enables admins to get free license-related reports with three sections:
License Reports:
- All Licensed Users Report
- Licenses Assigned for Sign-in Disabled Users Report
- Users by Assigned Subscriptions Report
- Detailed License Provisioning Report
- Unlicensed Users Report
- Users With Free Subscriptions Report
- Users With Trial Subscriptions Report
License Expiry Reports:
- Users with Soon-to-Expire Purchased Subscriptions Report
- Purchased Subscription Expired Users Report
- Users with Soon-to-Expire Trial Subscriptions Report
- Trial Expired Users Report
- Users with Suspended Subscriptions Report
Subscription Report:
- Subscription Usage Report
- Expired Subscriptions Report
- Unused Subscriptions Report
- Purchased Subscriptions Report
- Trial Subscriptions Report
- Free Subscriptions Report
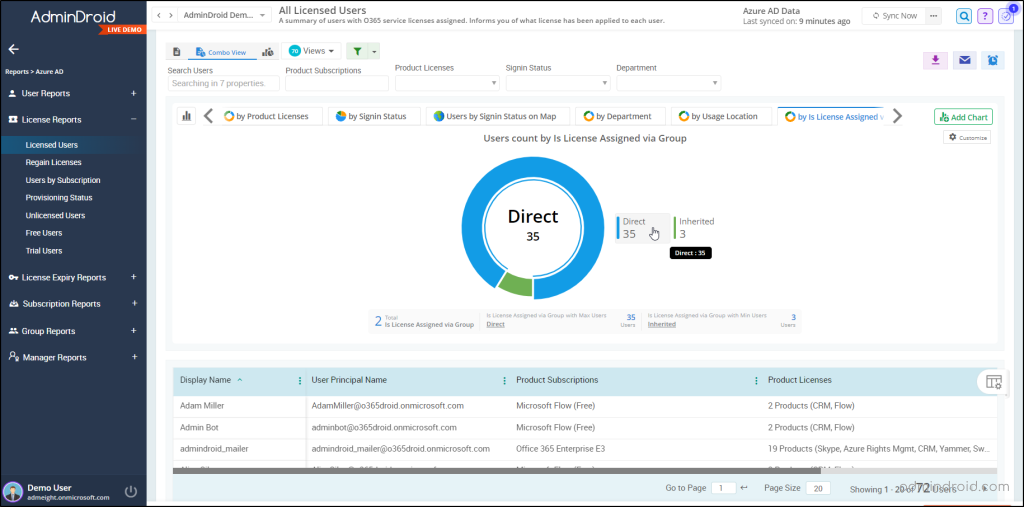
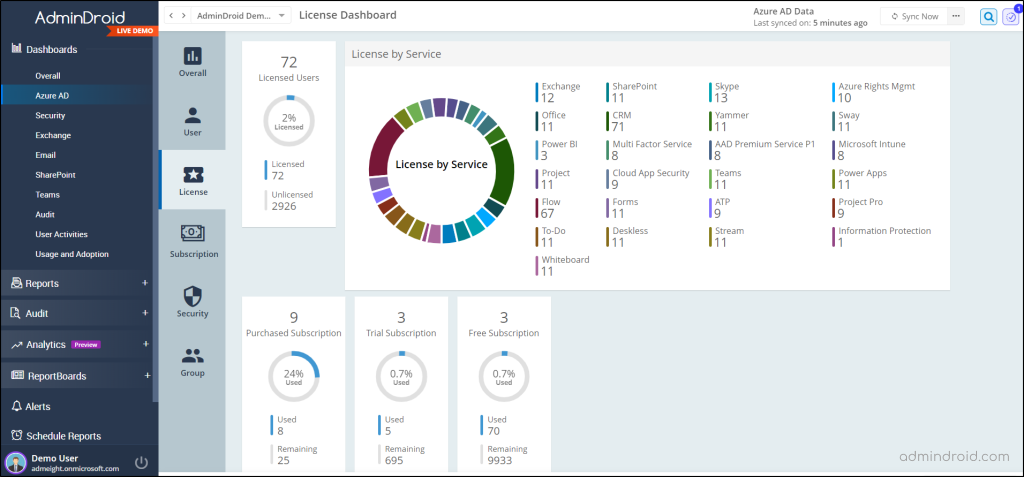
Moreover, AdminDroid’s free Entra ID reporting tool provides detailed reports of user-related information, giving administrators the ability to get Microsoft 365 user details. It generates extensive insights on Microsoft 365 user activities, user passwords, group activities, licenses, and subscriptions.
Also, admins can grab the entire visibility and track changes over Microsoft 365 accounts and groups activity through Entra ID management, which offers a robust suite of 190+ reports.
Additionally, AdminDroid offers 1800+ reports and 30+ dashboards for all Microsoft 365 services such as SharePoint, Exchange Online, MS Teams, Power BI, Yammer, etc. Admins can experience all these reports in their Microsoft 365 domain free for 15 days with the premium edition.
Discover the advantages of AdminDroid by downloading it today and enjoy the benefits of a 15-day free premium edition trial.
Wrapping Up
In conclusion, we hope that the blog has provided you with an overview of group-based licensing in Microsoft 365. Do not stop with this! Give a try to auto-claim policies, which goes beyond group-based licensing. If you have any comments or questions, please don’t hesitate to contact us. We value your feedback and welcome any inquiries you may have!


