
If you are part of a company and working on a specific project, dealing with multiple shared mailboxes is common to meet various organizational needs. High volume of emails and numerous attachments can lead to the risk of overlooking important files in these mailboxes. Indeed, digging through the Inbox to find and save email attachments is not an easy task.
Rather, we can utilize the power of Microsoft Power Automate’s flow to extract and save outlook email attachments from shared mailbox to SharePoint. In addition, we can slightly customize this flow to automatically save outlook email attachments from personal mailbox to OneDrive. By doing so, we save time and reduce the risk of missing important attachments. Furthermore, we’ll help keep your email clutter-free by removing attachments once they’re saved in SharePoint or OneDrive.
To get a visual demonstration of how this flow can be constructed and implemented, check out this video:
Save Email Attachments Using Power Automate – A Quick Overview
Here’s how the flow works:
- When an email arrives in a shared mailbox, the flow checks if it holds any attachment(s).
- If attachments are present, the flow will automatically save email attachments to the SharePoint document library specified in the flow.
- However, prior to saving, the flow checks if a file with the same name already exists in the specified path.
- If a file with a similar name is found, the attachment is saved with its delivery date-time appended to the name. This ensures that the file is preserved without overwriting existing files.
- Additionally, it will remove the attachments from the email once they are stored in SharePoint. This action will free up mail storage space.
You have two methods to integrate the flow into your environment. Choose the one that best suits your requirements.
- Deploy the save email attachments flow directly from a ZIP file
- Create the save email attachments flow from the scratch
I. Import Ready-Made Flow to Move Email Attachments
If you prefer not to build the flow from scratch, you can use the pre-built exported package provided in the GitHub link below. Simply import this workflow into your environment and follow the provided steps to automatically move email attachments to SharePoint folders.
Download from GitHub: AutomateSavingEmailAttachmentsToSharePoint
- Login to the Microsoft Power Automate portal and select ‘Import’ option under ‘My flows’ tab.
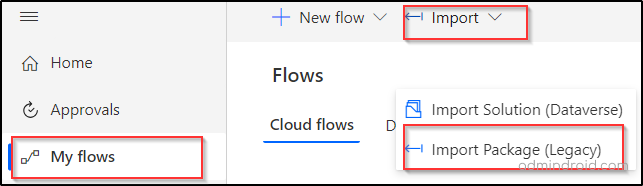
- Click the ‘Upload’ option and select the downloaded zip file package. Now you can see all the details regarding the package.
- Under ‘Related resources’, you can see all the resources that are used in this flow. Connect your M365 account with those resources, and then click ‘Import’.
Note: The flow requires access to the following connectors – SharePoint and Office 365 Outlook.

- Now the flow will be imported, and you can find it under the ‘My flows’ tab.
You’re all set! Now, all you need to do is:
- Turn on your flow.
- Fill in the mailbox address, SharePoint site address, and document library folder fields, and start using it right away.
II. Save Email Attachments by Building Your Own Flow
If you want to build the flow to save email attachments to SharePoint manually, follow the steps below:
- Create an automated cloud flow
- Retrieve the Inbox folder ID using an HTTP request
- Check for existing files with the same attachment name
- Create files without overwriting existing files
- Save email attachments with unique file names
- Automatically remove attachments from Outlook emails
- Terminate the flow with a success status
Step 1: Create an Automated Cloud Flow (Shared Mailbox Email Trigger)
- Open Microsoft Power Automate.
- Click ‘Create’ from the left pane and select ‘Automated cloud flow’.
- Give your flow a name.
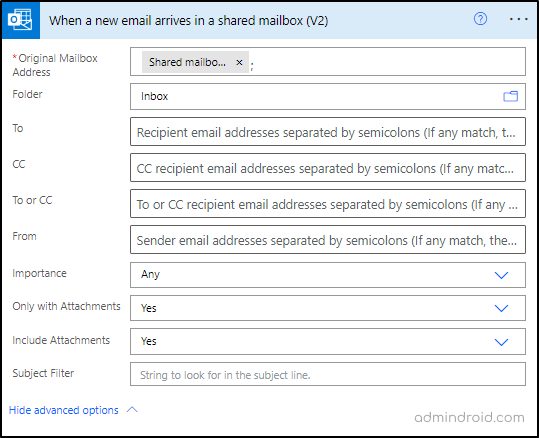
- Search and select the trigger, ‘When a new email arrives in a shared mailbox(V2)’.

- Enter the shared mailbox address in the ‘Original Mailbox Address’ field of the trigger.
- In the Folder field, select the Inbox folder of your shared mailbox where incoming emails with attachments are received.
- Set ‘Yes’ for the fields ‘Only with Attachments’ and ‘Include Attachments’. This ensures that the flow will trigger only when an email with attachments is received.
You can fill out the rest of the fields as per your specific needs, while I am just keeping it blank.
Step 2: Retrieve the Inbox Folder ID using an HTTP Request
To reduce mailbox storage, attachments can be removed from emails after they are saved to SharePoint. For this automation, we need to first retrieve and store the Inbox folder ID so it can be used later (Step 6) in the flow to remove attachments.
Below the trigger, click +, add the Office 365 Outlook – Send an HTTP request action, and configure it as follows:
- URI:
|
1 |
https://graph.microsoft.com/v1.0/users/<SharedMailboxAddress>/mailFolders?filter=displayName eq 'Inbox' |
Replace <SharedMailboxAddress> with the address of the shared mailbox used in the trigger.
We recommend trying out this Graph API query in Graph Explorer. This will help you to understand and obtain the necessary consent for permissions before using it.
- Method: ‘GET’
- Content-Type: ‘application/json’
- Leave the Body field unfilled, as it is not required for this action.

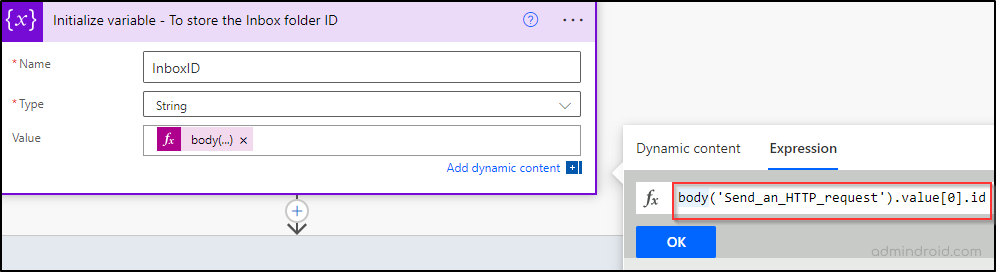
2.1 Store the Inbox Folder ID in a Variable
Click + below the HTTP action and add ‘Initialize variable’ action and configure as follows:
- Name: Give the variable a name. Let’s use ‘InboxID’ for this example.
- Type: Set the ‘Type’ field as ‘String’.
- Value: In the ‘Expression’ tab of value, enter the following expression and click ‘OK’.
|
1 |
body('Send_an_HTTP_request').value[0].id |
Here, the following expression is used, since we’ve renamed the action ‘Send an HTTP request’.body('Send_an_HTTP_request_-_To_get_the_Inbox_folder_ID').value[0].id
This expression will store the ‘Inbox folder’s Id’ value from the array of values obtained from the previous Send an HTTP request action.
Note: You can totally skip Step 2 if you prefer to retain the email attachments within the emails. However, checking the mailbox size would be beneficial in deciding whether to include this step or not.
Step 3: Check for Existing Files with the Same Attachment Name
Before proceeding further, it is significant to consider the complications involved while saving the Outlook email attachments.
- Duplicate file names: If an incoming attachment has the same name as an existing file in the SharePoint library, it could overwrite the original file.
- Different content, same name: Sometimes, files may have different content but share identical names. To prevent accidental overwrites, we’ll append the email’s received time to the attachment’s name.
To check if a file with the same name already exists:
- Add the Get file content using path action.
- Select the SharePoint site in the Site Address field where attachments will be saved. This action retrieves a single file from the specified path.
- In the File Path field, type the folder path where attachments will be saved (e.g.,
/Shared Documents/Mail attachments/). - Use Attachments Name from the dynamic content to check for a file with the same name.
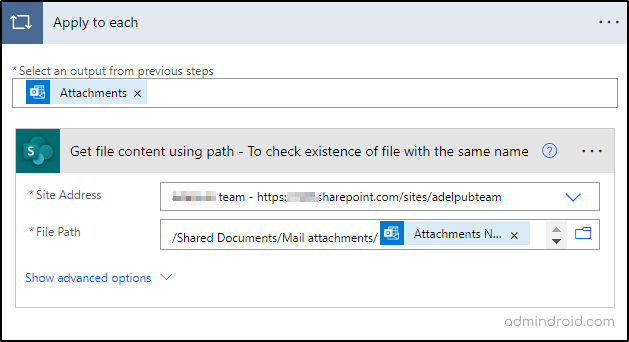
Since there could be multiple attachments in an email, the action Apply to each will get included automatically to iterate through them. Hence, we shall place the further actions within ‘Apply to each’.
Step 4: Create Files Without Overwriting Existing Files
If the Get file content using path action retrieves a file, it means a file with the same name already exists in SharePoint. Saving the attachment as-is could overwrite the existing file. To prevent this, we’ll modify the attachment’s name before creating the file.
4.1 Format the Email Received Time
- Add a Compose action to handle the file naming.
- Use the formatDateTime function to format the email’s received time into a readable format. This timestamp will be appended to the attachment name.
- Configure the action as follows:
- Select Received time from the dynamic content, copy it, and remove it from the field.
- Paste it into the formatDateTime function with this expression:
|
1 |
formatDateTime(triggerOutputs()?['body/receivedDateTime'],'dd/MM/yyyy hh:mm tt') |
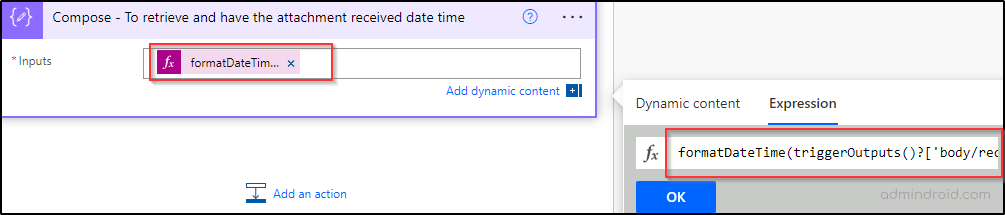
6. Click Ok.
Note: SharePoint library’s naming restrictions in saving a file don’t allow symbols like ‘/’ and ‘:’. Therefore, the symbols involved in date and time format (‘/’,’:’) will get replaced with underscores (_). For instance,10/07/2023 09:20 AM will become 10_07_2023 09_20 AM in the file name.
4.2 Save Email Attachments with the Formatted Date-Time
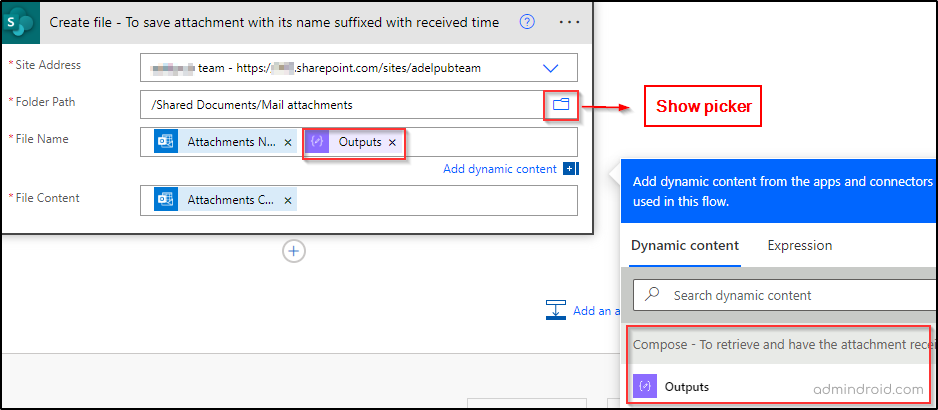
Once the received time of the email is formatted, we shall move towards saving the attachments in the Once the received time is formatted, proceed to save the attachments in SharePoint:
- Add the Create file action.
- Select the SharePoint site in the Site Address field.
- In Folder Path, choose the folder where attachments will be saved using the Show Picker.
- For File Name and File Content, select Attachments Name and Attachments Content from dynamic content.
- Append the output of the Compose action to the File Name field.
By appending the received time, each attachment is saved with a unique name, preventing overwrites of existing files.
Step 5: Save Email Attachments with Unique File Names
When an email attachment has a unique name that does not conflict with existing files in the SharePoint library, it can be saved without any modification.
To handle this scenario, follow the steps below:
- Add another Create file action from the ‘SharePoint’ connector parallel to the Compose action.
- Then, configure this action for the scenario where its previous action ‘Get file content using path’ fails. This failure may occur if a file with the same name as the attachment is not present in the specified folder.
- Hence, set the ‘Configure run after’ option of this ‘Create file’ action as ‘has failed’. So, it will run only if the previous action fails. Otherwise, it will be skipped.


- Fill in the fields accordingly as done in the previous Create file action.

Step 6: Automatically Remove Attachments from Outlook Emails
After the attachments are successfully saved to SharePoint, you can remove them from the original email. This completes the cleanup process that was prepared in Step 2.
To do this, add a Send an HTTP request action inside the Apply to each loop, immediately after each Create file action and configure it as follows:
- URI: Use the provided URI pattern.
|
1 |
https://graph.microsoft.com/v1.0/users/<SharedMailboxAddress>/mailFolders/InboxID/ messages/<MessageID>/attachments/<AttachmentID> |
Replace <SharedMailboxAddress> with the shared mailbox address used in previous actions within the flow. For <InboxID>, select the output of ‘Variables’ from the dynamic content. And for <MessageID> and <AttachmentID>, use the respective values available in the dynamic content.
- Method: Set the method as ‘DELETE’
- Content-Type: Use ‘application/json’
- Leave the Body field unfilled, as it is not required for this case.

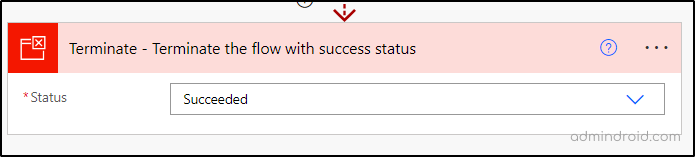
Step 7: Terminate the Flow with Success Status
Before concluding, let’s include one more step to ensure a successful flow run status.
In case the action Get file content using path fails within the Apply to each action, the entire ‘Apply to each’ action will be considered failed. Consequently, the flow run status will be marked as ‘Failed’. This applies even if the Create file action is successfully executed using ‘Configure run after’, since it comes after the failure of the Get file content using path action.
Therefore, use the Terminate action outside the ‘Apply to each’ action. Set its ‘Configure run after’ as ‘has failed’ which ensures the flow run status successful despite the failure of Apply to each action.
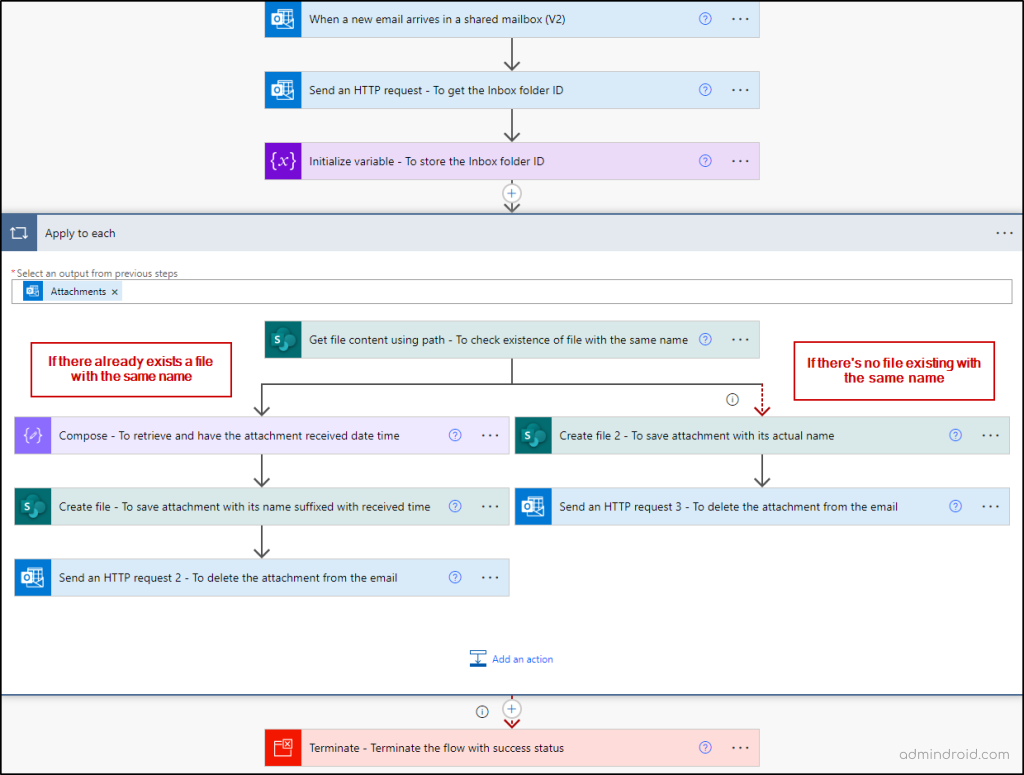
Final Flow: Save Email Attachments in SharePoint
That’s it! Our simple flow with significant impact on managing email attachments is finally ready and this is the overall visual.
How to Automatically Save Email Attachments in OneDrive?
Similarly, we can automate the process to move email attachments from a personal Outlook mailbox to OneDrive. This could be achieved by making a few customizations in our created workflow or use the pre-built exported package provided in the GitHub link below. Simply import this workflow into your environment and follow the provided steps to automatically move email attachments to OneDrive folders.
Download from GitHub: AutomateSavingEmailAttachmentsToOneDrive
All the actions that we’ve used from the SharePoint connector will be replaced by similar actions within OneDrive for Business connector.
- Firstly, use When a new email arrives(V3) as the trigger from the Office 365 Outlook connector.
- Secondly, replace the action Get file content using path with Get file content using path action from OneDrive for Business connector.
- Finally, replace Create file action with Create file action from OneDrive for Business connector.
- Meanwhile, keep the rest of the actions and configurations the same as we did for the Shared mailbox.
Below is the final visual representation of the flow to automate saving outlook attachments in OneDrive!
You can share a copy of this flow with your colleagues. Thus, let them have their personalized automation process to transfer Outlook email attachments to OneDrive.
Final Flow: Save Email Attachments in OneDrive

So, why worry about finding email attachments or losing track of them when there is a way to automate the process? Microsoft Power Automate has pre-built templates to move Outlook attachments to SharePoint or OneDrive. However, the flow we’ve created includes extra checks. This makes it more detailed and specific to our needs. So, create your workflow using these steps to automate saving outlook email attachments in SharePoint or in OneDrive, in a more granular way. You can also explore workflows in Microsoft Teams to automate team-specific tasks and boost collaboration.
We highly value your thoughts and comments. Feel free to share your insights on this automated saving of outlook attachment flow and engage with us by leaving a comment below. We look forward to hearing from you!
For more automation goodness, explore our other blog post linked below. It outlines a step-by-step flow to automate user onboarding with manager approval and password generation.
Microsoft 365 User Onboarding Workflow For Easy User Provisioning | AdminDroid Blog


