Assigning licenses in Microsoft 365 can be challenging, involving frequent reviews of available licenses, identifying users who need them, and more! To ease the burden, Microsoft brought below automatic license management features to your view:
- Group-based licensing in Microsoft Entra ID.
- Self-service purchase for Microsoft 365 products.
- Auto-claim policies in Microsoft 365.
However, the “Auto-claim policy in Microsoft 365” stands tall which eases up the license management process even better than the former ones. Yet, it’s a double-edged sword with both pros and cons.
Let’s look deeper into how the auto-claim policy will help in license assignment process and explore its impacts on Microsoft 365 security in detail.
What are Auto-claim Policies in Microsoft 365 Admin Center?
The auto-claim policy is a feature in the Microsoft 365 admin center that allows users to automatically claim the Microsoft 365 licenses they require when they first sign into an app.
This frees users from relying on Microsoft 365 admins or helpdesk to check for licenses manually. Through auto-claim policies, you can specify which services and apps are accessible with the license. Moreover, you can gain control over the SKUs these licenses originate from, giving you flexibility and management over the entire process.
You might wonder, is the auto-claim policy the same as the previous two? Well, it’s not just the same; it goes the extra mile.
While the others do similar tasks, this feature goes a step further with the facts of configuring backup products, no license requirements, and more. Ready to learn beyond the overview? Let’s explore the advantages of setting up an auto-claim policy for automatic assignment of licenses.
Benefits of Using Auto-claim Policies in Microsoft 365
Here are some of the benefits that make admins use auto-claim policy in their organizations.
1. Save Time and Reduce Manual Effort: You don’t have to manually handle the tedious task of ‘Microsoft 365 license assignment’ anymore. This feature automatically assigns the licenses, simplifying your work and freeing up time for more important tasks.
2. Streamlined User Access: By using the automatically claiming license policy, you can give users a smooth experience with no access issues and delays in license assignment. Overall, it balances both user satisfaction and productivity.
3. Efficient License Allocation: The auto-claim policy allocates licenses only when truly needed, ensuring optimal license usage and preventing unnecessary assignments to users.
Let’s move further to achieve these benefits by configuring an auto-claim policy in Microsoft 365 admin center.
Role: You should be a Global Administrator to create and manage auto-claim policy in Microsoft 365.
How to Create Auto-claim Policies in Microsoft 365 Admin Center?
Follow these two simple steps to activate and deploy the auto-claim policy in your organization:
- Turn on the auto-claim policy in Microsoft 365.
- Create an auto-claim policy in Microsoft 365 admin center.
1. Turn on the Auto-claim Policy Feature in Microsoft 365
By default, the auto-claim policy feature is disabled. To enable this feature, follow these steps in the Microsoft 365 admin center:
- Sign in to the Microsoft 365 admin center.
- Navigate to the Billing option from the navigation pane.
- Click on the “Licenses” option from the dropdown.
- Select “Auto-claim policy” tab appears at the top bar.
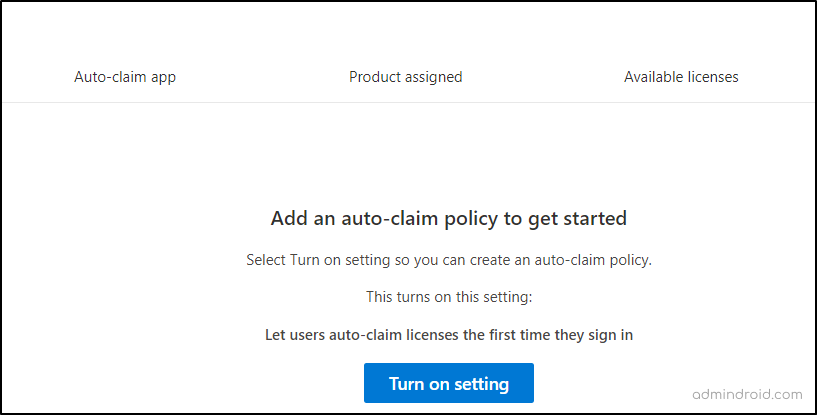
- Locate the “Turn on setting” option in the center of the page and activate it.
2. Create an Auto-claim Policy for Simplified License Assignment
To set up an auto-claim policy, proceed with the following steps:
- From the residing Licenses page, select “Auto-claim policy” at the top.
- Click on the “+ Add a policy” option.
- Provide a suitable name for the policy and click “Next“.
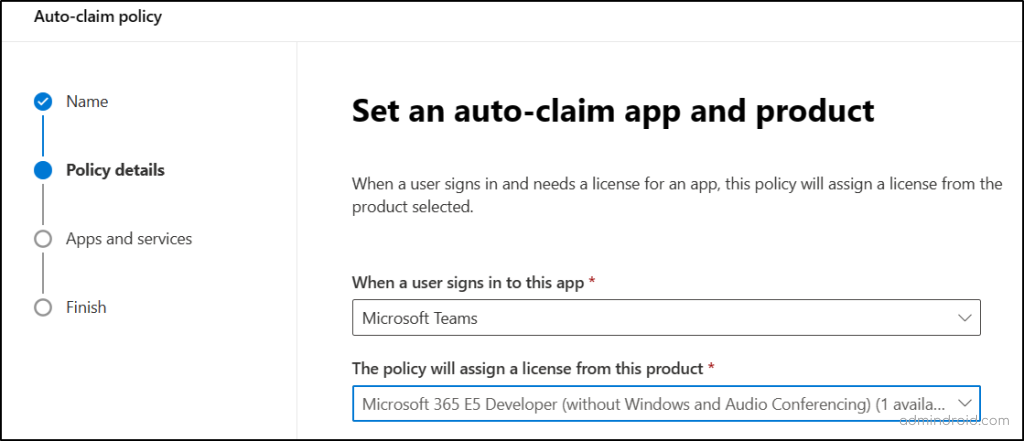
- On the Set an auto-claim app and product page, configure the below options respectively.
- When a user signs in to this app- Specify the corresponding Microsoft 365 app from the dropdown. Once users sign into the specified app, a license will be automatically allocated.
- The policy will assign a license from this product– Configure the respective Microsoft 365 subscription (SKU) from where the license should be assigned.
- If you have additional products, add them in the “Add a backup product to this policy” section. This ensures that if your specified product runs out of licenses, further users can be assigned licenses from the backup product. If you can’t find this link, it’s because your account is associated with only one product.
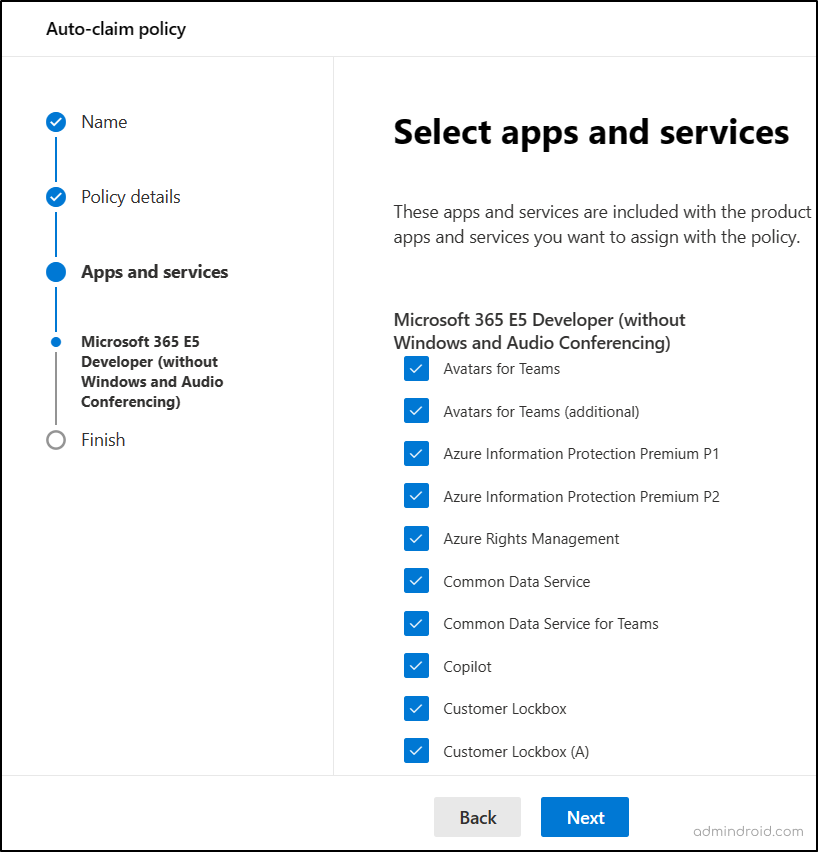
- On the Select apps page, choose whether to include or exclude Microsoft 365 apps & services with the specified license by checking or unchecking the respective option.
- Review the information on the Review and finish page, make any necessary changes, and then click “Create policy“.
That’s it! You’ve successfully activated and configured the auto-claim policy in Microsoft 365.
Important: Currently, you can create only one auto-claim policy. However, this allowance can be extended based on the products the feature supports in the future.
At times, you may encounter scenarios requiring adjustments in the created policy. For instance, you might need to reconfigure the services or applications linked to a license or make changes to the inclusion or exclusion of backup products. Let’s explore how to manage these situations.
How to Manage Auto-claim Policies for Microsoft 365 Products?
After creating a policy tailored to your needs, here are some additional tasks you can undertake:
- Turn off the auto-claim policy from Microsoft 365 admin center.
- Change included apps and services in the auto-claim policy.
- Modify the order of backup products in auto-claim policy.
1. Turn Off the Auto-claim Policies in Microsoft 365 Admin Center
You can make use of the steps below to turn off the auto-claim policy in Microsoft 365.
- From the Microsoft 365 admin center, go to Settings and click on “Org settings”.
- Scroll down and click on the “User owned apps and services” option.
- Uncheck the “Let users auto-claim licenses the first time they sign in” option.
- Once done, proceed to save the policy.
2. Edit Microsoft 365 Apps and Services in the Auto-claim Policy
If you missed adding or accidentally added some other apps/services during policy creation, you can easily reconfigure. To do it, follow the steps below.
- In the admin center, navigate to Billing > Licenses, then click the “Auto-claim policy” option.
- Click the respective policy you want to edit.
- In the details pane, under Apps and services, click “Edit”.
- Check or uncheck the apps and services according to your preferences.
- Save and close the details pane.
3. Modify the Order of Backup Products in Auto-claim Policy
If you have backup products assigned and need to change their order of precedence, follow these steps:
- In the admin center, go to Billing > Licenses, then click the “Auto-claim policy” option.
- Choose the policy you want to edit.
- Under the Product licenses section, select the respective box next to the product and choose “Move up” or “Move down“.
- Once done, proceed to save the changes made.
Auto-claim Policy for Power Apps Licenses
Power Apps is a widely used suite of low-code services for developing applications that cater to business needs. Building upon Microsoft’s previous initiative supporting self-service in Power Apps, a significant enhancement emerged in mid-September 2023.
Microsoft introduced robust support “auto-claim policy for Power Apps licensing”. These policies enable individual users to claim Power Apps per user (now rebranded as Power Apps Premium) licenses under specific conditions:
- If a user does not possess a standalone Power Apps license and initiates an app demanding a premium license, the system promptly allocates a Power Apps per user license to that user.
- Similarly, if a user lacks a standalone Power Apps license but launches an app within a Managed Environment, the system automatically bestows upon the user a Power Apps per user license.
Set Up Auto-claim Policies for Power Apps
To create auto-claim policies for Power Apps licensing, follow these steps:
- Sign in to the Microsoft 365 admin center.
- Navigate to the Billing option in the navigation pane.
- Click on “Licenses” to open the license page.
- From the residing license page, click the “Auto-claim policy” option at the top.
- Click on the “+ Add a policy” option at the top.
- Provide a suitable name for the policy on the Name this auto-claim policy page and click “Next“.
- On the Set an auto-claim app and product page, choose the following from the respective dropdowns:
- When a user signs into the app: Choose the Power Apps per user app for which the user signing into this app will be assigned a license.
- This policy will assign a license from this product: Select Power Apps Premium product from where the licenses can be assigned.
- On the Select apps page, check or uncheck Microsoft 365 apps & services based on your preferences for inclusion or exclusion with the specified license.
- On the Review and finish page, verify the configurations and proceed to create the policy.
Once done, the Power Apps Premium license will be allocated to the users under the specified conditions.
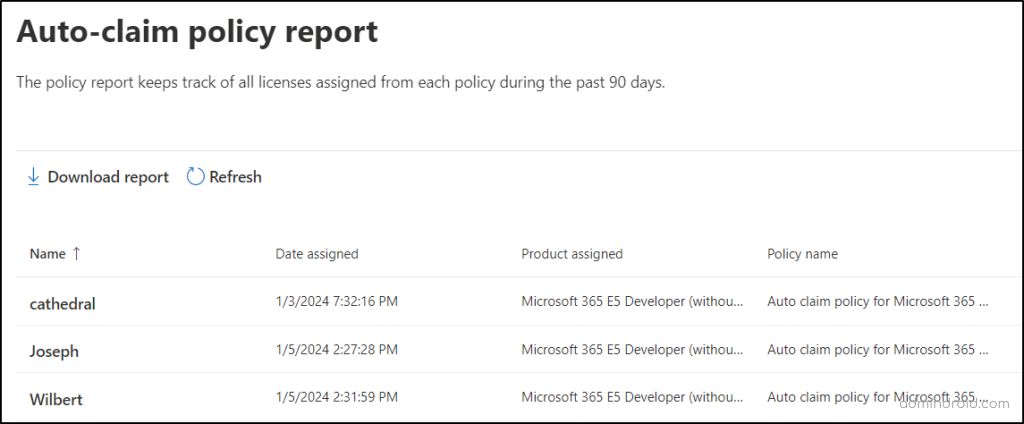
Monitor Microsoft 365 License Usage Using Auto-claim Policy Report
As an admin, effectively managing licenses requires keeping a close eye on the count of available licenses and users claimed the licenses. The go-to place for this task is the auto-claim policy report.
To view the auto-claim policy report for Microsoft 365 license consumption analysis, follow these steps:
- From the Microsoft 365 admin center, navigate to Licenses in the Billing section.
- In the Auto-claim policy tab, select the specific policy you want to review.
- Click on “View report” at the top.
👉This report provides detailed information such as the respective Microsoft 365 user, license claimed date, product name, and the applied policy name.
👉By default, it displays the license usage for the past 90 days, but you have the flexibility to change the time period to view data for the past 1, 7, or 30 days.
Points to Remember:
1. In December 2023, Microsoft initiated the automatic creation of an auto-claim policy for Power Apps in tenants with Managed environments. The auto-rolled out policy in your organization can be recognized by the name “Auto-Created Policy for PowerApps“.
- Under this policy, if a user lacking a Power Apps per user license launches an app in a Managed Environment, they automatically receive a Power Apps per user license if one is available in the tenant. However, administrators can now extend this policy to standard environments too.
2. Microsoft has also expanded its support to two other products, namely “Power Automate” and “Microsoft Project“. You can now leverage these products for auto-claim licensing. It’s important to note that this rollout commenced in December 2023 and is anticipated to reach all tenants by January 2024.
3. In the latest update, Microsoft revealed plans to incorporate support for the Microsoft Loop and Microsoft Clip champ apps in the auto-claim policy shortly.
Skip Auto-claim Policy & Use Group-based Licensing
If assigning licenses based on the user’s department, role, or team is your goal, then auto-claim policies are not the one you should think! So, skip the existing auto-claim policy and go for group-based licensing instead. You can follow these steps to achieve that.
- Identify the users assigned license via auto-claim policy.
- Unassign the licenses that were automatically assigned by the auto-claim policy.
- Reconfigure the users in the specific groups involved in the group-based licensing approach.
Is Auto-claim Policies in Microsoft 365 a Strategic Move or a Downfall?
Pause for a second before jumping on the auto-claim policy just because of its awesome benefits! Let’s not forget, there’s a checkpoint waiting for your attention! The auto-claim policy operates on a tenant-wide level, impacting all users once configured.
Granting these broad license-claiming privileges to all users can pose challenges, including unauthorized purchases, shadow IT, and compliance issues.
Therefore, the decision ultimately rests with you! If you’re part of a smaller organization with stringent security measures and remediation protocols, go for the auto-claim policy. However, for organizations with diverse security considerations, it’s crucial to strike a balance that aligns with Microsoft 365 security standards.
I hope this blog brings you more information about auto-claim policy in Microsoft 365. Furthermore, if you have queries, you can reach us through the comment section! Thanks for reading!


