Most Office 365 admins prefer PowerShell over Microsoft 365 portal to perform Office 365 configuration and management tasks. With the deprecation announcement of the MSOL and Azure AD PowerShell modules, it has become necessary to convert scripts to use MS Graph PowerShell. However, a major issue with MS Graph is that it does not support a Credential parameter, which can create difficulties when scheduling scripts to run periodically.
To overcome this, certificate-based authentication, also known as app-only access, can be used to run Microsoft Graph PowerShell scripts unattended. This method eliminates the need to enter credentials manually, making it a more convenient option for scheduling scripts and performing other management tasks.
Let’s see how to connect MS Graph PowerShell using a certificate to run scripts, in detail.
Connecting MS Graph using App-only Access:
To connect MS Graph PowerShell SDK using certificate, you must complete an app registration. The procedure involves the following configurations.
- Manual Method:
- Step1: Creating certificate
- Step2: Registering app in Azure AD
- Step3: Connect MS Graph using Certificate
- Automated Method:(Recommended)
- PowerShell script to register app, create certificate and connect MS Graph
Manual Method: Setup Everything by Yourself
The manual method may be useful for admins who want to understand the underlying processes involved in registering Azure AD app, or who need to customize the configuration to suit their specific requirements.
Step 1: Create Self-Signed Certificate using PowerShell:
To use certificate-based authentication in MS Graph, an X.509 certificate must be installed in the trusted store of the machine running the script.
You can use either a CA certificate or a self-signed certificate. For internal use, you can opt for a self-signed certificate, which is cost-effective. Let’s see how to create a self-signed certificate using PowerShell.
Run the below cmdlet in the elevated PowerShell prompt to create a self-signed certificate.
|
1 |
$Certificate=New-SelfSignedCertificate –Subject MSGraph -CertStoreLocation Cert:\CurrentUser\My |
This example creates the certificate named ‘MSGraph’ in the user’s certificate store with one-year expiry.
To gain a deeper understanding of certificate properties and create certificates with custom configurations, you can refer to the comprehensive blog post on creating self-signed certificates using PowerShell
To export the certificate, run the following cmdlet.
|
1 |
Export-Certificate -Cert $Certificate -FilePath "C:\Users\admin\Desktop\certname.cer" #<Use your preferred location and certificate name in 'FilePath’ > |
Now you can use this self-signed public certificate to authenticate your Azure AD application.
Step 2: Register an App with Azure AD:
Registering application in Azure AD provides access to MS Graph without interactive login. You can follow the below procedure to create an app in Azure AD.
- Login to Microsoft Entra admin center.
- Under Azure Active Directory, select ‘Applications’ –> ‘App registrations’. Click ‘New registrations.’

- On the ‘Register an application’ page, set the following values.
-Enter ‘Name’ for your application.
-Specify who can access the application through ‘supported account types.’ Set this value as ‘Accounts in this organizational directory only.’
– Leave ‘Redirect URI’ blank.
- Select ‘Register’ to complete the initial app registration.
When registration finishes, the Azure portal displays the app on the ‘App registrations’ page. You can see the Application (client) ID. The client id value uniquely identifies your application in the Azure AD. Save Client ID and Tenant ID for later use.
- Configure permissions for the app:
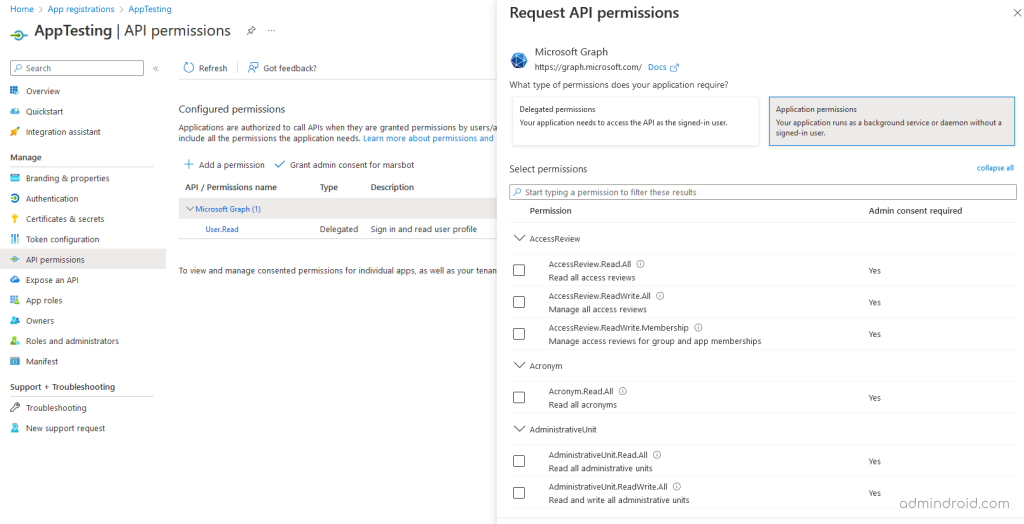
– Go to ‘API permission’ under ‘Manage’.
– Select ‘Microsoft Graph’, then ‘Application Permissions’. Add User.Read.All and Group.Read.All, then select ‘Add permissions.’ (You can add more permissions for your requirement)
– Remove the default permission User.Read (Delegated type), which is not needed.
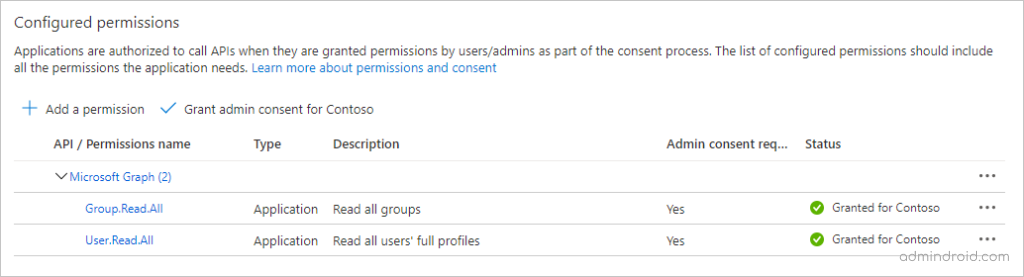
- Grant admin consent in app registration: Select the ‘Grant admin consent for…’ button, then select Yes to grant admin consent for the configured application permissions. The Status column in the Configured permissions table changes to Granted for …
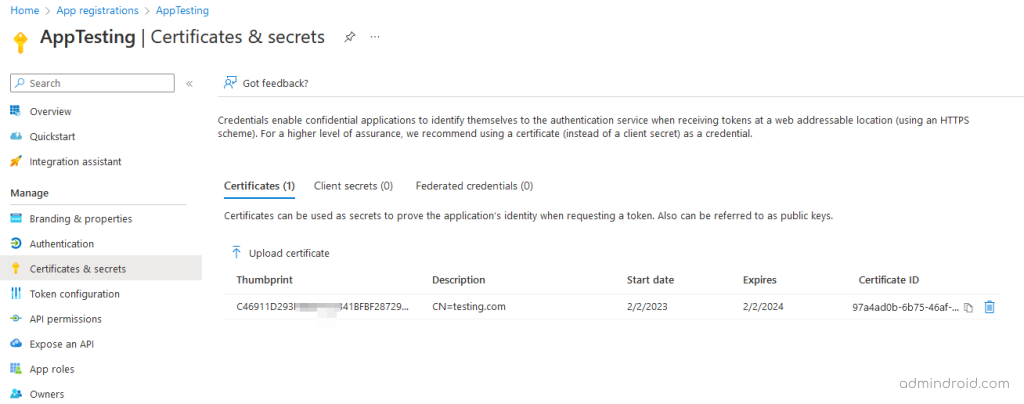
- Add certificate to Azure app registration: Select ‘Certificates & secrets’ under ‘Manage.’ Select the ‘Upload certificate button’. Browse to your certificate and select ‘Add.’
Copy and save the certificate thumbprint for later use.
Step 3: Connect MS Graph PowerShell using Certificate:
To use the Connect-MgGraph with certificate, you must install MS Graph PowerShell SDK and requires following data.
- Tenant ID
- App ID
- Certificate thumbprint
|
1 |
Connect-MgGraph -ClientID <Client ID> -TenantId <Tenant ID> -CertificateThumbprint <Thumbprint> #You can use -CertificateName <Certificate subject> instead of –CertificateThumbprint |

Now, you have successfully connected to MS Graph with certificate-based authentication. To check whether you have connected to the right tenant with required permission, you can run the Get-MgContext cmdlet.
Similarly, you can also connect to Exchange Online using certificate.
Automated Method: PowerShell Script to Register App and Connect MS Graph PowerShell
Creating certificate and registering app in Azure AD is a tedious manual task. Do you want to automate the process? We are working for you. With our script, you’ll be able to connect to MS Graph with ease, without having to perform manual and tedious certificate creation and application registration steps.
Script Download: ConnectMSGraphCertificate.ps1
Script Highlights:
- Automates Azure app registration and certificate creation.
- Registers Azure app with existing certificate
- Adds certificate to an existing app
- Allows to connect MS Graph PowerShell using certificate
- Helps to revoke certificate from the app
Script Execution Methods:
Method 1: To create an app or certificate and revoke certificate from the existing certificate, run the script as follows.
|
1 |
.\ConnectMSGraphCertificate.ps1 |
You can choose the option based on your requirement. The script itself will guide you further. If you would like to learn more about each option, we have provided additional details later in this blog.
Method 2: If you have already registered an app and certificate, you can explicitly pass the Client id, Tenant id, and Certificate thumbprint to connect MS Graph.
|
1 |
.\ConnectMSGraphCertificate.ps1 -ClientID <clientid> -TenantID <tenantid> -CertificateThumbprint <certthumbprint> |
You can also use option 4 from the main menu to connect to Microsoft Graph PowerShell.
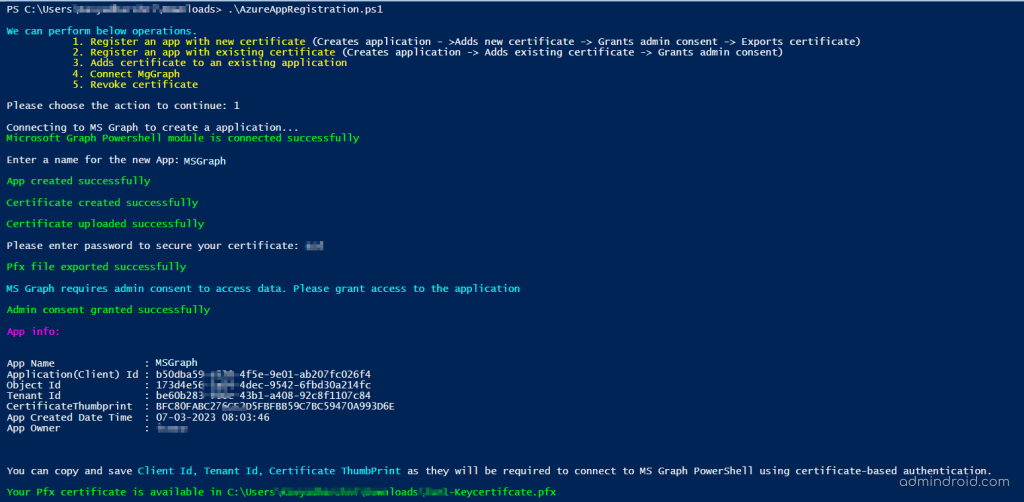
Script Execution – Sample Image:
Connect MS Graph PowerShell with Certificate – Script Use Cases in Detail
Use case 1: Register an App and Create Certificate:
You can choose this option if you want to perform the operations from scratch. This method involves the following processes:
- Creating a new Azure AD app,
- Creating a new certificate and adding it to the app,
- Granting admin consent,
- Exporting the certificate with a secure key.
After executing the script, it will list the app and certificate details that you can use further to connect to MS Graph using certificate authentication. Additionally, the exported certificate will be stored in the current working directory.
Use case 2: Register an Azure AD App with Existing Certificate:
If you already have a CA certificate or self-signed certificate, you can choose this option. This method involves the following process:
- Creating a new Azure AD app,
- Importing the certificate and adding it to the app,
- Granting admin consent.
During the script execution, you will be prompted to enter the certificate path, and the script will then add the certificate to the Azure AD app. Once complete, the necessary details like Client ID, Tenant ID, and Certificate Thumbprint will be displayed for connecting to MS Graph using app-only access.
Use case 3: Add Certificate to an Existing App:
When previously added certificate has expired, you can use this method to add a new certificate to an existing app. During execution, the script will ask for the Application (client) ID. Then it will ask whether you need to create a new certificate or import one from your certificate store. Based on your input, the script will proceed further.
Use case 4: Connect Microsoft Graph PowerShell using Certificate:
Once you are done with app registration, you can connect to MS Graph using the Connect-MgGraph cmdlet by passing app-related information, such as Client ID, Tenant ID, and Certificate Thumbprint.
Alternatively, you can directly pass the above-mentioned attributes while running the script instead of using option 4.
|
1 |
.\ConnectMSGraphCertificate.ps1 -ClientID <clientid> -TenantID <tenantid> -CertificateThumbprint <certthumbprint> |
This approach would be helpful for unattended scripts.
Use case 5: Revoke Certificate:
The certificate revocation process is a crucial security mechanism that allows administrators to revoke a previously added certificate that has become invalid, expired, or compromised, to prevent its use for future authentication.
When you choose this option, the script will ask for an Application Id from which you want to revoke a certificate. Then it will list all the certificate keys that are added to that application and ask for a Certificate Key to revoke the certificate. Once you enter the Certificate Key id, the script will remove the certificate from the Azure AD app.
If you encounter any difficulties or errors while connecting to MS Graph, please don’t hesitate to reach out to us via the comment section. Our team is here to assist you!


