Imagine your organization allows BYOD, where employees use their personal laptops to access work applications. In this setup, users sign in to Microsoft 365 apps for email, collaboration, or document access without intending to hand over control of their personal devices. However, simply adding a work or school account on Windows can unintentionally enroll the device into Microsoft Intune, giving the organization full administrative control over a personal machine.
This happens because, during sign in, users are prompted with “Allow my organization to manage my device,” and many continue without reviewing it — which enrolls the device into Microsoft Intune.
For years, admins had no control over this behavior. Microsoft has now introduced a setting that lets you decide whether adding a work/school account should trigger automatic device enrollment.
In this blog, you’ll learn what this newly introduced setting does and how to configure it.
What is MDM Automatic Enrollment in Intune?
Before jumping into the new setting, let’s first understand what automatic MDM enrollment in Intune is.
MDM (Mobile Device Management) in Microsoft Intune allows organizations to enroll and manage devices. Enrolling a device is important because it enables the organization to enforce compliance rules, deploy apps, and protect corporate data.
Earlier, devices had to be enrolled manually – which became difficult and time-consuming when handling many users and devices. To simplify this, Microsoft introduced automatic MDM enrollment. This allows Windows devices to automatically enroll into Intune when they join or register with Microsoft Entra ID.
This is especially helpful when managing devices in bulk, deploying corporate-owned devices, enabling zero-touch provisioning, or scaling device management across the organization.
Why Automatic Enrollment Becomes a Problem in BYOD
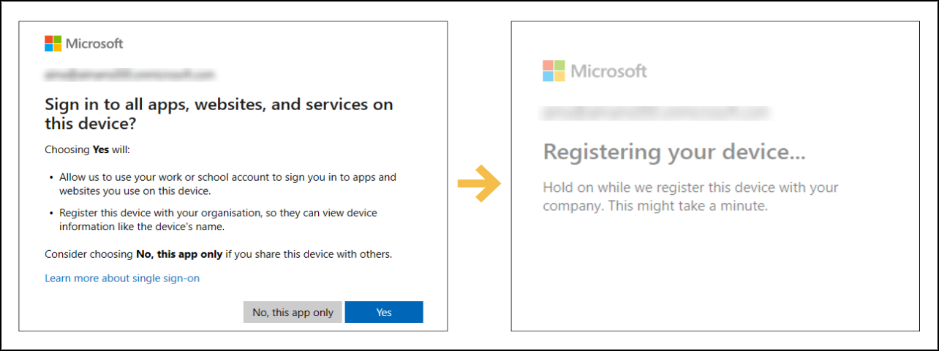
When automatic enrollment is enabled in Intune, users who add a work or school account on Windows are automatically prompted to enroll their device into MDM. For example, this occurs when signing in through any Microsoft 365 apps, such as Teams, Outlook, or other apps that require authentication. This process combines device registration and enrollment into a single prompt, as shown below:
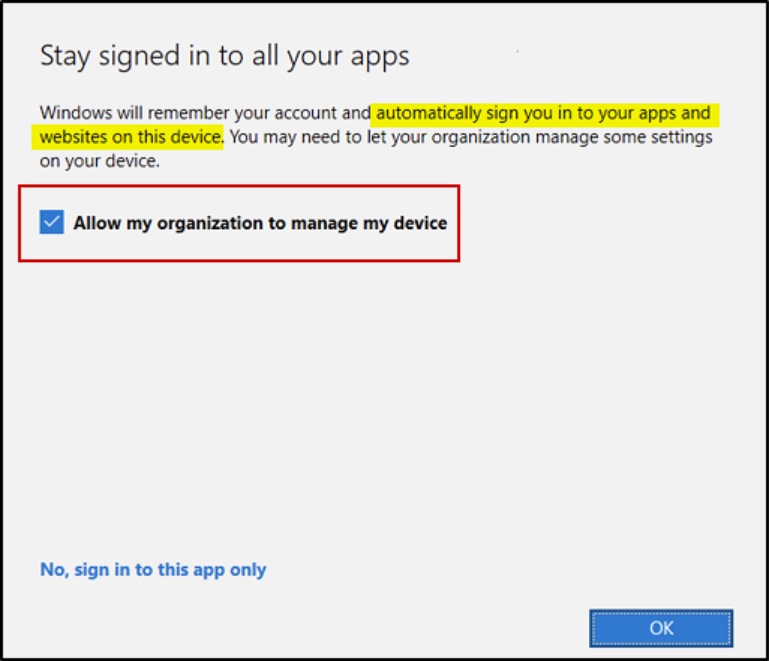
Without fully understanding the prompt, many users ended up enrolling their personal device under company management. This happens because the checkbox is enabled by default during sign-in.
Risks of Clicking ‘Allow My Organization to Manage My Device’ on Personal Devices
While automatic enrollment simplifies device management for organizations, it can create concerns for both admins and users when personal devices are involved.
Risks for Users
- Accidental full device wipe – Corporate actions like a wipe could affect personal data.
- Unwanted device management – Users may be placed under full device management even when only corporate apps need oversight.
- Privacy concerns – Users may be uncomfortable giving the organization full control over personal devices.
Challenges for Admins
- Cluttered device records – Personal devices appear in Intune, making device inventory harder to manage.
- Unintended enrollments – Devices get enrolled without the user fully understanding the impact, creating compliance gaps.
- Limited flexibility – Admins lose control over which devices should be truly managed.
- Overreach of policies – Compliance policies may block or restrict personal devices unnecessarily, complicating management.
New Setting to Control MDM Enrollment When Adding a Work or School Account
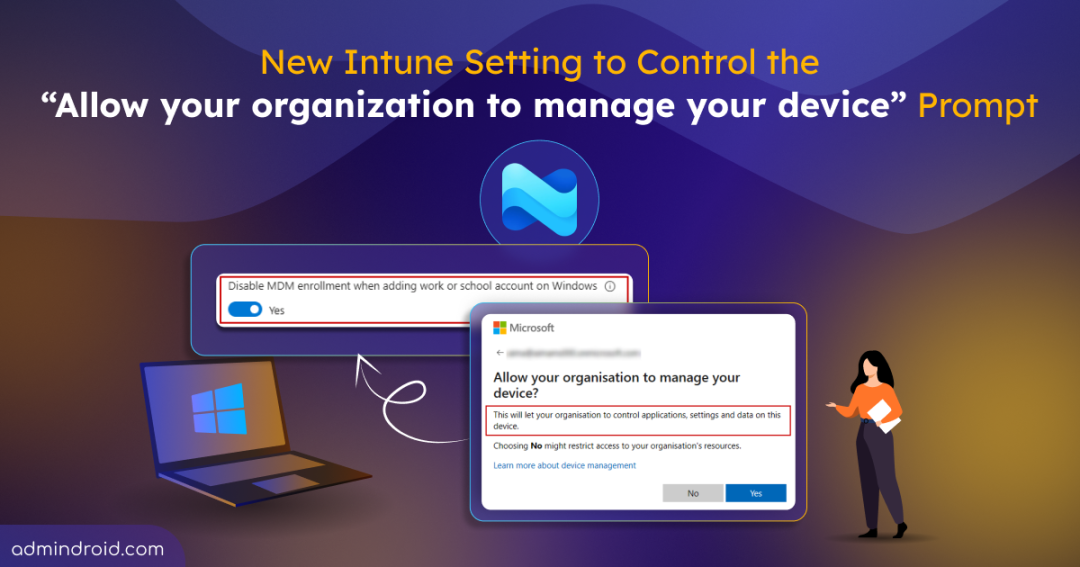
To address this long-standing challenge, Microsoft has finally introduced a new setting inside the Automatic Enrollment configuration in Intune: “Disable MDM enrollment when adding work or school account on Windows.” Currently in public preview and turned off by default, this setting prevents users from being prompted to enroll their device when signing in to their work or school account.
⚠️ Important: This setting does not apply when a user adds their work or school account through:
- Windows Settings flow
- Microsoft Intune Company portal
- Applications that explicitly require device enrollment as a prerequisite for access
It only affects the account registration flow when adding a work or school account via apps like Microsoft Edge or Office apps.
How to Disable MDM Enrollment When Adding a Work or School Account?
You can disable automatic MDM enrollment for personal devices in three ways:
Disable “MDM Enrollment When Adding Work or School Account” Setting in Intune Admin Center
✅ Prerequisites: To disable the MDM enrollment setting via the Intune admin center, you must have a Microsoft Entra ID P1 or P2 license and be assigned at least the Intune Administrator role.
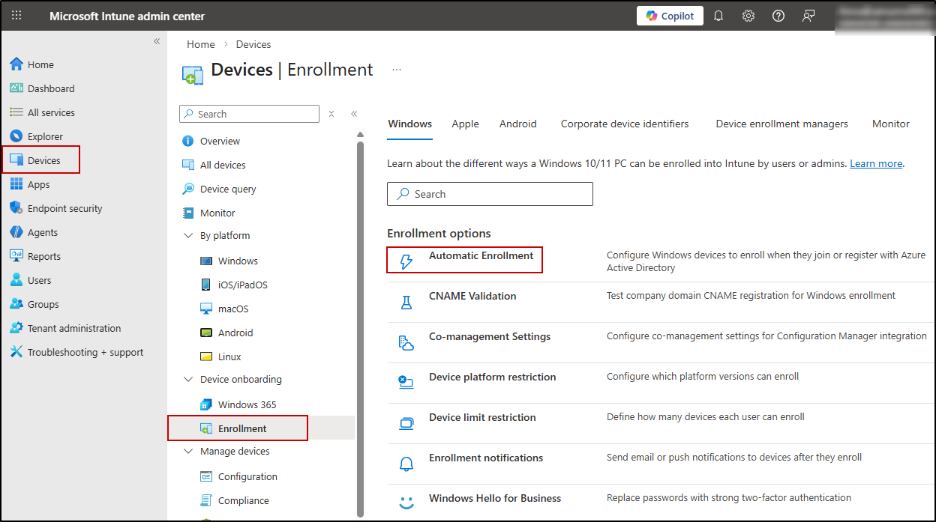
To configure the setting directly in the Intune admin center, follow the steps below:
- Sign in to the Microsoft Intune admin center.
- From the left navigation pane, select Devices.
- Under Device onboarding, select Enrollment → Windows → Automatic Enrollment.
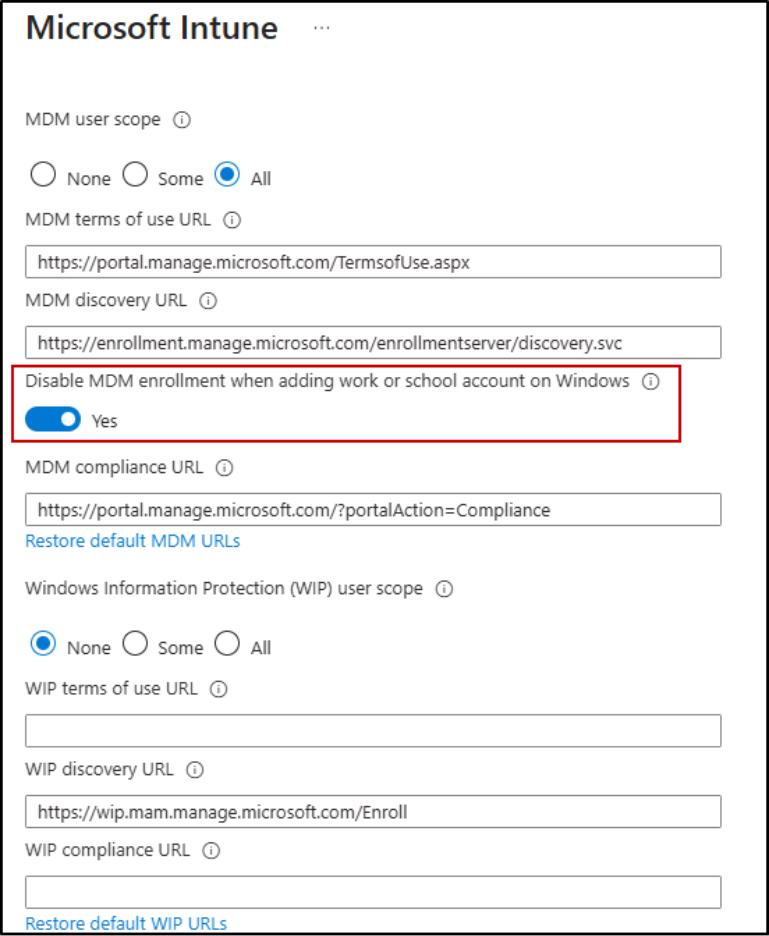
- In the Automatic Enrollment page:
- Ensure MDM user scope is configured (All or Some, based on your requirement).
- Enable the toggle: Disable MDM enrollment when adding work or school account on Windows.
- Click Save.
Disable MDM Enrollment When Adding Work or School Account Using PowerShell
You can also disable MDM enrollment during the Add work or school account flow using Microsoft Graph PowerShell.
First, connect to Microsoft Graph PowerShell with the required permission scope:
|
1 |
Connect-MgGraph -Scopes "Policy.ReadWrite.MobilityManagement" |
Since the Intune MDM service is stored as a unique object in Entra ID, the setting you see in the admin center is actually a property within that object. To disable the setting we need the ID of the Intune MDM service object, which has the well-known ID 0000000a-0000-0000-c000-000000000000. You can either use this ID directly or retrieve it using the Get-MgBetaPolicyMobileDeviceManagementPolicy cmdlet.
Now, to disable the enrollment setting, run:
|
1 |
Update-MgBetaPolicyMobileDeviceManagementPolicy -MobileDeviceManagementPolicyId "0000000a-0000-0000-c000-000000000000" -AdditionalProperties @{ isMdmEnrollmentDuringRegistrationDisabled = $true } |
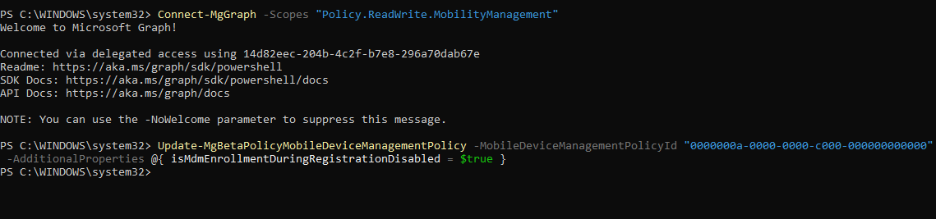
This disables the automatic MDM enrollment prompt during the Windows work or school account sign-in flow.
Disable MDM Enrollment When Adding Work or School Account Using Microsoft Graph Explorer
To disable the MDM enrollment setting using Microsoft Graph Explorer, follow the steps below:
- Open Microsoft Graph Explorer and sign in with an account that has the required permission, Policy.ReadWrite.MobilityManagement.
- Select PATCH as the HTTP method.
- In the request URL, enter: https://graph.microsoft.com/beta/policies/mobileDeviceManagementPolicies/0000000a-0000-0000-c000-000000000000
- In the Request Body, enter the following JSON payload:
{
“isMdmEnrollmentDuringRegistrationDisabled”: true
}
- Click Run Query.
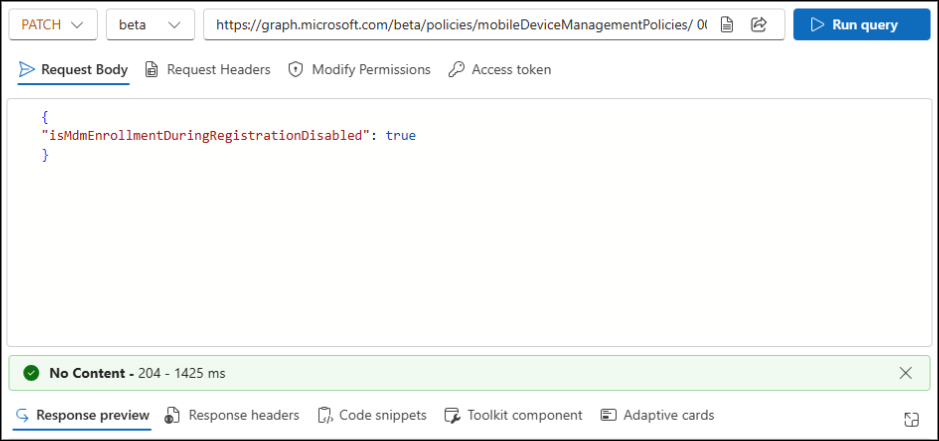
This updates the property and disables the MDM enrollment prompt for users adding a work or school account on Windows devices.
End-User Experience: Behavior Based on MDM Enrollment Configuration
The user experience differs depending on whether the MDM enrollment setting is enabled or not:
️With the setting enabled:
When the setting is ON and a user adds their work or school account through Office apps:
- Users will not be prompted for MDM enrollment.
- They go through the Microsoft Entra registration flow only.
- The device is registered for identity purposes but is not enrolled in Intune for management.
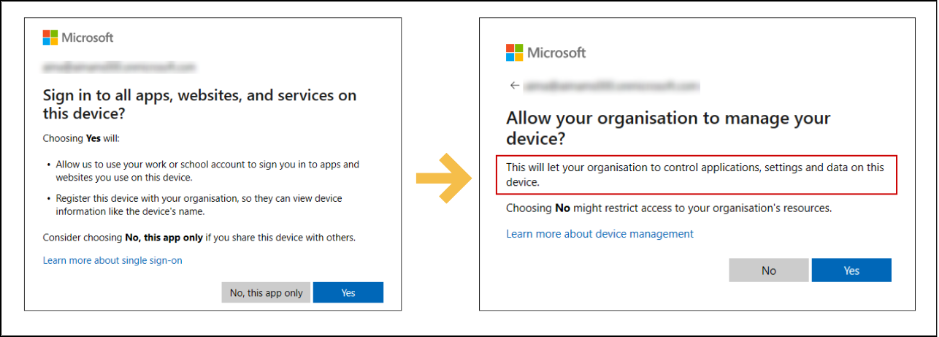
Without the setting enabled:
When this setting is off, users in the new Windows registration experience will see separate screens for device registration and MDM enrollment, instead of a single combined enrollment prompt:
If the user clicks Yes in both the prompts,
- The device is automatically enrolled in Intune.
- Any applicable management policies are applied.
Points to Remember:
- This setting does not affect existing devices; it only applies to devices added after the setting is enabled.
- To quickly check a Windows device’s registration and MDM enrollment state, open Command Prompt and run: dsregcmd /status.
- You can combine this setting with MAM (App Protection Policies) to protect corporate data on personal devices without full device management.
- For admins who need full control over all devices, including BYOD, this setting can be left off to continue automatic enrollment prompts.
- Conditional Access policies can be used to enforce compliance for unmanaged devices, even if the MDM enrollment setting is disabled.
Blocking Personal Windows Devices vs Disabling Automatic MDM Enrollment in Intune
You might wonder — instead of using this new setting, why not simply block personal Windows devices using enrollment restrictions in Microsoft Intune? This setting is available in the Intune admin center under Devices > Device onboarding > Enrollment > Device platform restriction.
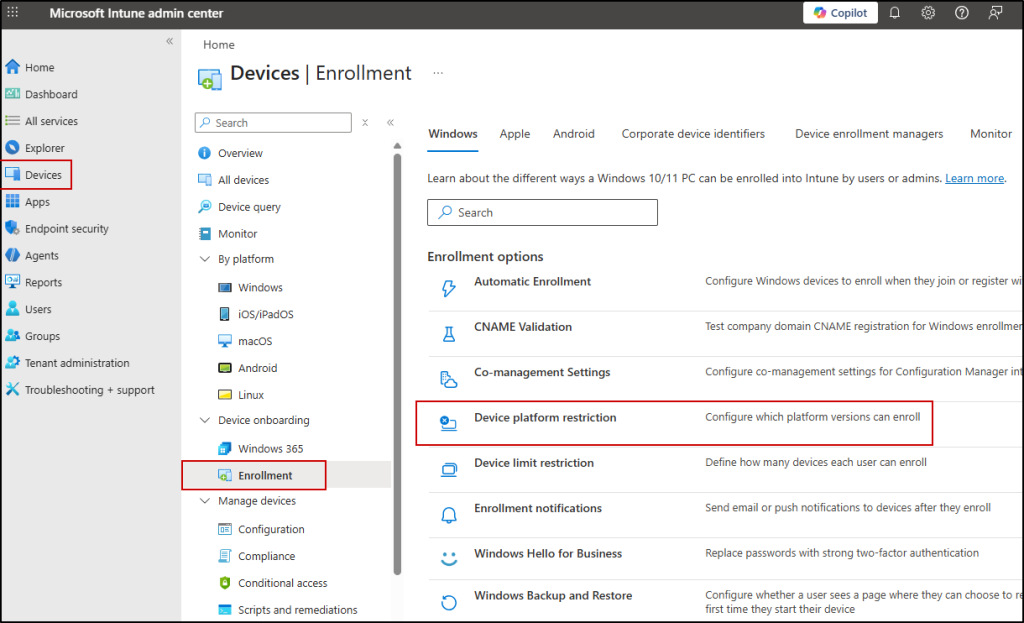
When this restriction is enabled, Intune only allows specific corporate enrollment methods such as Autopilot, GPO-based enrollment, bulk provisioning, or Device Enrollment Manager (DEM) accounts.
The enrollment prompt still appears during sign-in, but the device enrollment ultimately fails and results in an error. This may be suitable for organizations that want full enforcement and no BYOD enrollment at all.
The new setting, on the other hand, is more targeted. It does not block enrollment entirely. Instead, it removes the automatic enrollment prompt that appears when users add a work or school account through apps like Microsoft 365.
This means:
- Users won’t see the MDM enrollment prompt during app sign-in
- Devices won’t accidentally enroll during account registration
- Devices can still be intentionally enrolled when required
- Corporate enrollment methods such as Autopilot remain unaffected
In short:
➡️ Use enrollment restrictions if you want to block personal device enrollment completely.
➡️ Use the new setting if you want to prevent accidental enrollment while keeping flexibility for BYOD scenarios.
Both approaches solve different administrative needs — the choice depends on how strictly you want to control device enrollment.
We hope this blog helped you understand how to control MDM enrollment and keep personal devices protected. Thanks for reading. For further queries, reach out to us through the comments section.


