
As harmful threats increase, every organization must implement Microsoft 365 security best practices to prevent severe cyber-attacks. Admins should do their utmost to secure the organization’s resources from both insider and outsider threats. A key step in this process is following the principle of least privilege access. On the other hand, helpdesks often face challenges when onboarding bulk users, as they need to assign resources and roles based on department and ongoing tasks. To address both challenges, access packages in Microsoft Entra entitlement management are game-changers!
Access packages let users request access to the required resources and ensure they have access only to the desired resources. Let’s explore how Azure access packages work to simplify resource access and enhance security.
What is Access Packages in Microsoft Entra?
Access packages in entitlement management are a one-time setup used to assign users the resources and roles they need, such as groups, teams, applications, SharePoint sites, and Microsoft Entra roles. Multiple access packages can be created for various purposes and assigned to different sets of users. An access package must be included in a catalog, allowing the respective users to request an access package. Approvers then verify and either accept or reject the request. This ensures that users have access only to the necessary resources, simplifying administration and enhancing security.
For example, you can govern access for external users using access packages to grant them temporary access to specific resources while maintaining security and control.
Create an Access Package in Microsoft Entra
Access packages in entitlement management can be created using the Microsoft Entra admin center, Microsoft Graph API, or MS Graph PowerShell for Identity Governance.
Warning! Before creating an access package, you must create a catalog in the entitlement management and add the required resources along with the appropriate settings.
Imagine if you want to onboard multiple users for a marketing role. You want to give them access to marketing-related groups, teams, sites, and Entra roles. Instead of adding these resources individually to each user, you can create an access package to serve this purpose. Users can request access to this access package and once approved, they can access the configured resources.
Let’s see how to create a new access package in Azure AD for this case using the Entra admin center in Microsoft 365.
- Name your access package and assign a catalog
- Add resource roles to an access package
- Specify access package request and approval
- Provide requestor information in an access package
- Determine access package expiration in the lifecycle setting
- Add a custom extension to an access package
- Verify and create a new access package
1. Name Your Access Package and Assign a Catalog
- Sign in to the Microsoft Entra admin center as at least an Identity Governance administrator. Catalog owners and Access package managers can also create an access package.
- Navigate to Identity Governance –> Entitlement management –> Access packages. Click on ‘+New access package’.
- On the ‘Basics’ tab, name your access package (i.e., Marketing & Writers in this case) and provide a description.
- In the ‘Catalog’ dropdown, select the desired catalog (e.g., Marketing) in which you want to include the access package.
- Select the ‘Next: Resource roles’ button.

Note: By default, the ‘General’ catalog will be selected in the dropdown. If you don’t specify any catalog, the access package will be included in the ‘General’ catalog.
2. Add Resource Roles to an Access Package
In this step, you should add the roles to the required resources that you added in the ‘Marketing’ catalog. You can also add resource roles even after creating an access package.
- Click on ‘+ Groups and Teams’ and choose the desired groups and teams from the list. Then, click on ‘Select’.
- Additionally, you can also select the desired ‘Applications’, ‘SharePoint sites’, and assign ‘Microsoft Entra role (Preview)’ in access packages by following the above procedure.
- Then, you should specify the role for each added resource by clicking on the ‘Select role’ dropdown and choosing the desired role as per your requirements.
- Select the ‘Next: Requests’ button.
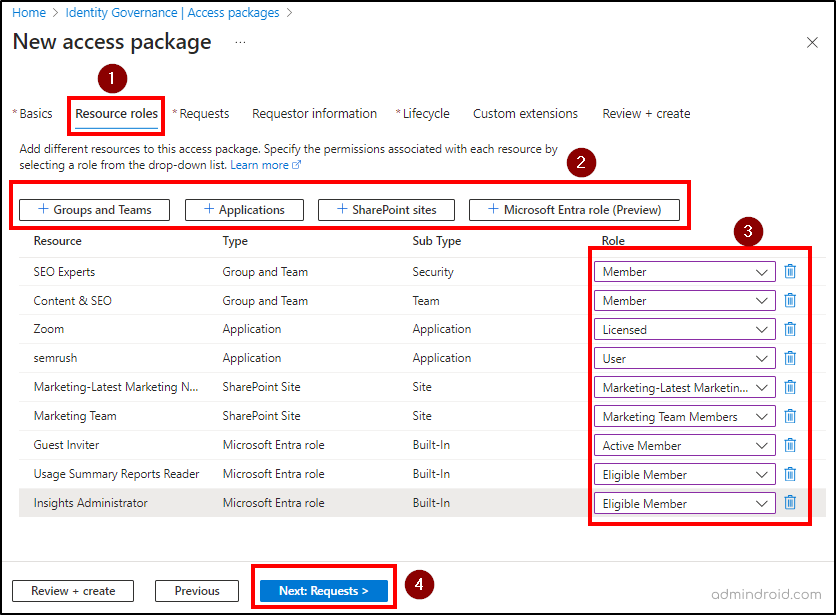
If you want to remove any resources from the above list, you can click on the delete icon available near the respective resource.
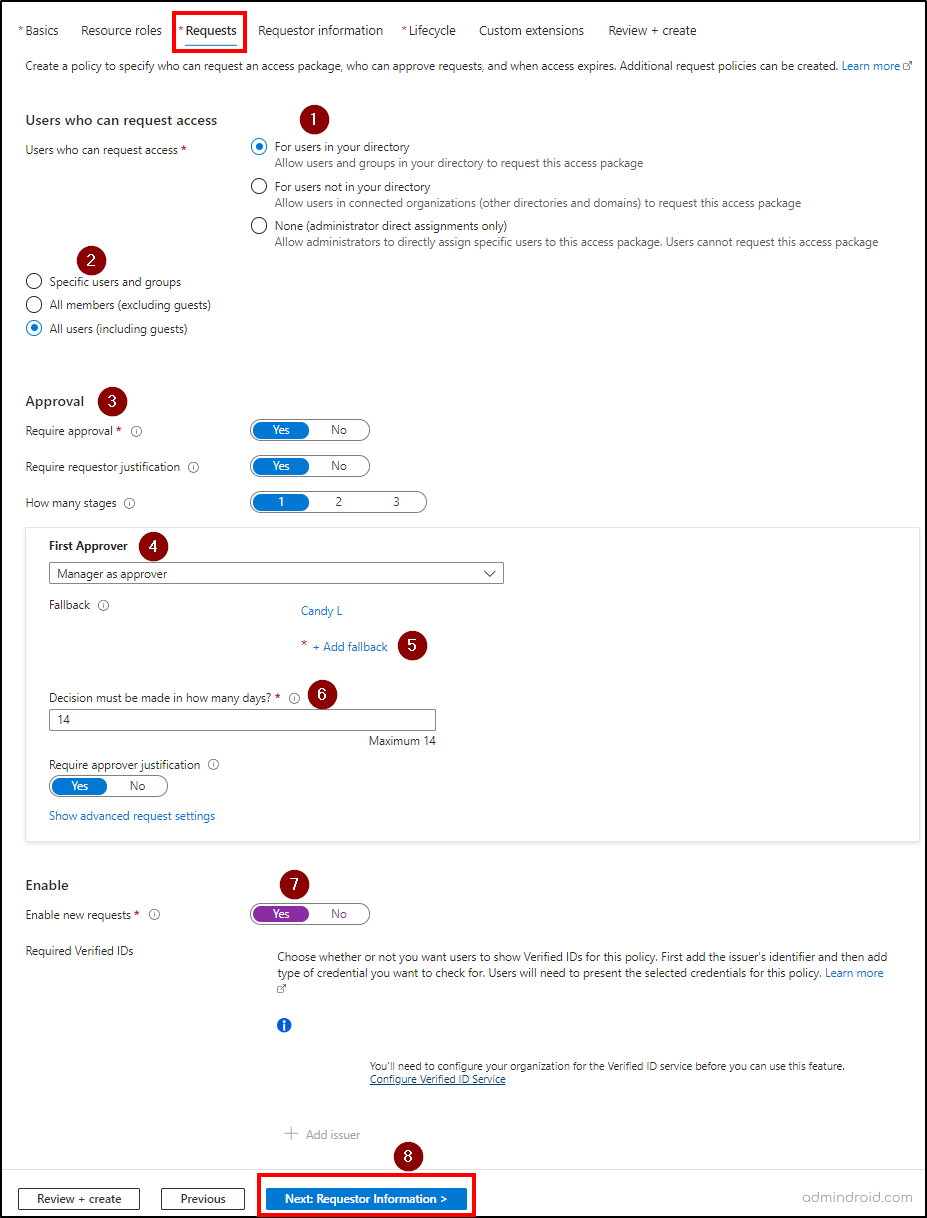
3. Specify Access Package Request and Approval
A policy will be created to determine the access package request and approval details. In this step, you need to specify who can request this access package, who can approve the requests, stages of approvals, etc.
Users Who can Request Access:
- On the ‘Requests’ tab, choose the desired option under the ‘Users who can request access’ section. In this case, ‘For users in your directory’ is selected, which allows your organization users to request this access package.
- Then, you will have the option to select specific users or all users excluding guests or including guests.
Approval:
- By default, ‘Require approval’ and ‘Require requestor justification’ are set to ‘Yes’ under the Approval section. If required, you can modify it accordingly.
Stages of Approvers:
- You can configure up to 3 stages of approvers and you can choose the number of stages. By default, it will be 1. For our use case, we proceed with the single stage review.
- Then, under the ‘First Approver’ section, you can choose either managers, specific users, or sponsors as approvers.
- Add a respective user or group as fallback approvers. If the system doesn’t find the first approvers, then the request will go to the fallback approvers.
- Specify the number of days (maximum of 14 days) within which the approver should act on the access package request. If no action is taken within that period, the request will be automatically rejected.
- The ‘Require approver justification’ will be set to ‘Yes’ by default. You can also choose ‘No’ if the approver justification is not required.
Requests:
- Then, select ‘Yes’ for the ‘Enable new requests’ setting to make the access package immediately available for users to make requests. Also, if you want users to show their verified IDs, add the respective issuer in the ‘Require Verified IDs’ option.
- Select the ‘Next: Requestor Information’ button.
4. Provide Requestor Information in an Access Package
In this step, you can collect information and attributes from the requestor by configuring questions and the answer format. The attributes must be configured in the catalogs for each resource, and it will be shown here. This information will be helpful for the approver to grant access to the right person.
After adding the required questions, select the ‘Next: Lifecycle’ button.
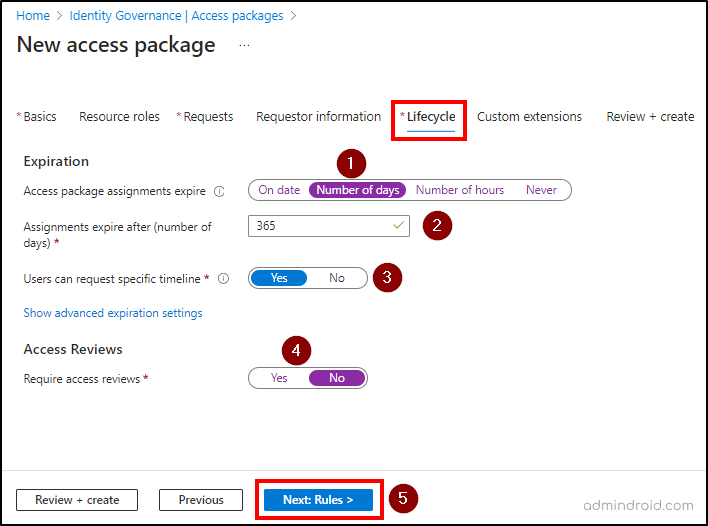
5. Determine Access Package Expiration in the Lifecycle Setting
This step specifies whether the access package assignments should expire, when they should expire, whether users can request access for specific timelines, etc.
Expiration:
- On the ‘Lifecycle’ tab, choose any of the options to determine whether the access package assignments should expire or not.
- If you configure expiration for the assignments, specify the date, days, or hours in the ‘Assignments expire after’ field based on your setting.
- By default, the ‘Users can request specific timeline’ is set to ‘Yes’. So, users can submit the start date and end date while requesting access.
Access Reviews:
To reduce stale access, you can create access reviews to periodically monitor the active assignments to access packages.
- Then, you can configure whether the access reviews are required or not under the ‘Access Reviews’ section. Choose ‘Yes’ or ‘No’ for access reviews as you wish.
- Select the ‘Next: Rules’ button.
6. Add a Custom Extension to an Access Package
The custom extension is used to link a custom Azure logic app to the entitlement management use case. Logic apps are used to create and trigger custom workflows. Admins use this custom extension to link existing logic apps or create a new logic app whenever a specific action happens in access packages. These controls are specified by configuring a rule in the ‘Custom extensions’ tab. Let’s explore the stages when a logic app can be triggered in the access packages below.
- When an access package request is created.
- When an access package request is approved.
- When an access package assignment is granted.
- When an access package assignment is removed.
- 14 days before an access package assignment auto expires.
- One day before an access package assignment auto expires.
After configuring the desired rules, select the ‘Next: Review + create’ button.
Note: The custom extensions must be configured in catalogs.
7. Verify and Create a New Access Package
In this step, verify all the settings are specified properly in the access package and click on ‘Create’ to create a new access package in Microsoft Entra entitlement management.

Similarly, you can also create an access package using Microsoft Graph API or Microsoft Graph PowerShell cmdlets.
Azure Access Packages License Requirements:
- For creating access packages in entitlement management, you should have Microsoft Entra ID P2, Microsoft Entra ID Governance, or Microsoft Entra Suite licenses.
- For adding Microsoft Entra roles (Preview), Verified IDs, custom extensions, and sponsors as approvers, you should have either Microsoft Entra ID Governance or Microsoft Entra Suite licenses.
I hope this blog helps you to easily understand access packages in entitlement management and how to create them using the Microsoft Entra admin center. Drop your queries in the comment section. Happy securing!


