On Day 28 of Cybersecurity awareness month, learn the best practices that will help you to retain former employees’ data and protect your company from data leakage. Stay tuned for more blogs in the Office 365 cybersecurity blog series.
As an Office 365 admin, you must have an efficient Office 365 offboarding to reduce risks associated with incorrect user deprovisioning. It is also essential to retain data and protect access when an employee leaves Office 365. This blog will guide you with Office 365 offboarding best practices to eliminate data-related risks.
Why Proper Microsoft 365 Offboarding is Important?
- To protect your company from data loss/leakage.
- It’s helpful to retain the former employee’s data.
- You can reuse the ex-employee’s license. It helps to reduce the license cost.
- It’s helpful to keep the data for legal requirements.
- To reduce the impact of business communication when an employee leaves the org (especially, the employee leaves a customer-facing team)
In this blog, we’ll walk you through the best practices to safeguard your organization’s information during the offboarding process. Plus, we’ll show you how to automate these steps using PowerShell to streamline the process and ensure no critical steps are missed. Here is the quick jump to links
Microsoft 365 Resigned Employee – Best Practices:
You can follow the below best practices for an effective offboarding process. It involves blocking ex-employees from accessing company files, preserving the documents they created, and performing several other admin tasks associated with removing a user.
- Logout user from all Office 365 sessions
- Reset password and block account sign-in
- Setup email forwarding
- Convert user mailbox to shared mailbox
- Preserve former employees’ mailbox data
- Transfer email alias
- Move leavers’ OneDrive data to other location
- Wipe and block the user’s mobile device
- Remove user from all groups
- Remove license
- Delete account
1. Logout User from All Microsoft 365 Sessions:
To remove users’ access immediately, you can force sign-out to log out of all Office 365 sessions across all devices.
How to Sign-out User from All Microsoft 365 Sessions:
- Log in to the Microsoft 365 admin center, select Users > Active Users > Click on the user’s Display name you want to sign out of apps and sessions.
- Under Accounts> Sign Out, select ‘Sign out of all sessions.’
- It can take up to 15 mins to complete the process. The person can immediately sign back in unless you have blocked their sign-in status.
2. Block Account Sign-in and Reset Password:
To prevent a user from signing in to Office 365, you can disable sign-in or reset the password.
How to Block Sign-in in Microsoft 365:
- In the admin center, select Users > Active Users > Click on the user’s Display name you want to block sign-in.
- Click ‘Block signin’ and select the ‘Block this user from signing in’ check box.
- ‘Save’ the changes.
Blocking or disabling an account can take up to 24 hours to take effect. If you want to block users from signing in immediately, you can reset their password.
How to Reset Password in Microsoft 365:
- In the admin center, select Users > Active Users > Click on the user’s Display name you want to block sign-in.
- Click ‘Reset password’ and provide a new password. (Don’t send it to them.)
3. Setup Email Configuration:
You can configure email forwarding from a former employee to the person who will be taking over the work. It helps to keep the old employee’s email address active, and clients can continue contacting your organization through the former employee’s email id.
Alternatively, you can configure ‘auto reply’ for departed employees. Set up out-of-office (OOF) message that the recipient is no longer employed by your organization and their emails will not be forwarded. You can provide a replacement email address if necessary. This will prevent any potential privacy issues or unauthorized access to confidential information.
How to Setup Email Forwarding in Microsoft 365:
- In the admin center, select Users > Active Users > Click on the former employee.
- Go to the ‘Mail’ tab. Under ‘Email Forwarding,’ select ‘Manage email forwarding.’
- Turn on ‘Forward all email sent to this mailbox.’ In the Forwarding address box, type the email address of the current employee who’s going to get the email.
- Select ‘Save.’
How to Configure Out-of-Office Reply in Microsoft 365:
- In the admin center, select Users > Active Users > Click on the former employee.
- Go to the ‘Mail’ tab. Select ‘Manage automatic replies’ and turn them on.
- You can write separate customized messages for internal and external recipients as you wish.
If you configure email forwarding or auto reply, you neither remove the license nor delete the former employee’s account.
4. Convert User Mailbox to Shared Mailbox:
Admins can convert a user mailbox to a shared mailbox to preserve data and connections for future use. After conversion, multiple persons can access a shared mailbox through delegation. Also, you can remove the license from a shared mailbox if it meets the following conditions.
- Mailbox size is less than 50GB
- Mailbox is not under litigation hold
- In-place archiving is disabled in the mailbox.
How to Convert User Mailbox to Shared Mailbox:
- Go to Exchange admin center –>Recipients –>Mailboxes.
- Select the mailbox which you want to convert.
- Under ‘More Actions,’ click ‘Convert to shared mailbox’ and ‘Confirm‘.
It will show progress like “Mailbox is being converted from regular type to shared type.”
5. Preserve Former Employee’s Mailbox Data:
Even when you don’t want to keep the email id active by converting it to a shared mailbox or configuring email forwarding, you can preserve ex-employees’ mailbox data for litigation purposes.
Alternatively, converting the ex-employee’s mailbox into an inactive mailbox by applying a retention policy hold, allows you to securely preserve the data indefinitely.
How to Preserve Former Employee’s Data:
- You can convert the mailbox to a .pst file.
- Place litigation hold or in-place hold.
- Convert a mailbox to an inactive mailbox.
6. Transfer an Email Alias:
Suppose you want to delete the former employee’s account and keep the email id active. In that case, you can remove the email alias from them and assign it to other users. You can use this method to preserve the left employee’s address.
How to Assign Email Alias:
- In the admin center, select Users > Active Users > Click on the user’s name to whom you want to assign the alias.
- Under Account>Aliases, click ‘Manage username and email.’
- Assign an alias.
A user can have multiple aliases.
7. Move Leavers’ OneDrive Data to Other Location:
If you delete the user account as part of the deprovisioning process, you will lose all the data associated with that account after 30 days. It includes OneDrive and Outlook data.
How to Move Former Employee’s OneDrive Data to SharePoint:
- In the admin center, select Users > Active Users > Click on the former employee.
- On the user properties page, select ‘OneDrive.’ Under ‘Get access to files,’ select ‘Create link to files.’
- Select the link to open the file location. Download the files to your computer, or select ‘Move to’ or ‘Copy to’ to move or copy them to your own OneDrive or a shared library.
- If you only remove the license without deleting the account, the former employee’s data will be accessible even after 30 days.
8. Wipe and Block Former Users’ Mobile Device:
If the former employee had an organization phone, you can remove all organization data and block them from accessing company data.
How to Wipe and Block Former Employee’s Mobile:
- Log in to the Exchange admin center. Navigate to Recipients > Mailboxes.
- Select the old user. Go to ‘Mobile Devices’ and select ‘View details.’
- Under the Mobile Device Details page, select the mobile device, select ‘Wipe Data,’ and then select ‘Block.’
- Click ’Save.’
9. Remove User from All Groups:
You can remove the former employees from all distribution lists, and it helps keep groups free of stale accounts.
How to Remove a User from All Groups:
- In the admin center, select Users > Active Users > Click on the former employee.
- On the user properties page, select Groups>Manage groups.
- Click all the groups and select ‘Remove.’
- Select ‘Yes’ in the confirmation pop-up.
10. Remove License from Former Employee:
After performing the required leaver processes, you can remove the licenses from the former employees. You can assign those licenses to another user. It helps to reduce the license cost.
How to Remove a license from Old Employee:
- In the admin center, select Users > Active Users > Click on the former employee.
- Under ‘License and apps,’ Untick the checkboxes near the licenses you want to remove, and then click ‘Save.’
- You can restore their data for up to 30 days after you delete them.
11. Delete Former Employees’ Account:
After saving and accessing all the former employee’s corporate data, you can delete the former employee’s accounts. Deleting users’ accounts will remove them from the admin center and keep things clean.
How to Delete a Former Employee’s Account:
- In the admin center, select Users > Active Users > Click on the former employee.
- Under the user’s name, select ‘Delete user.’
- Select the required option, and then click ‘Delete user.’
Note: If you’ve already given another user access to this user’s email and OneDrive, you don’t need to do it again here.
After deleting the user, the account will be inactive for 30 days before deleting the data permanently.
Streamline Microsoft 365 User Offboarding:
To simplify the offboarding process for an M365 user, we’ve developed a PowerShell script that makes it both quick and secure. This script automates 14 best practices for offboarding, ensuring that no critical steps are missed and your organization remains protected throughout the process.
Download Script: M365UserOffboarding.ps1
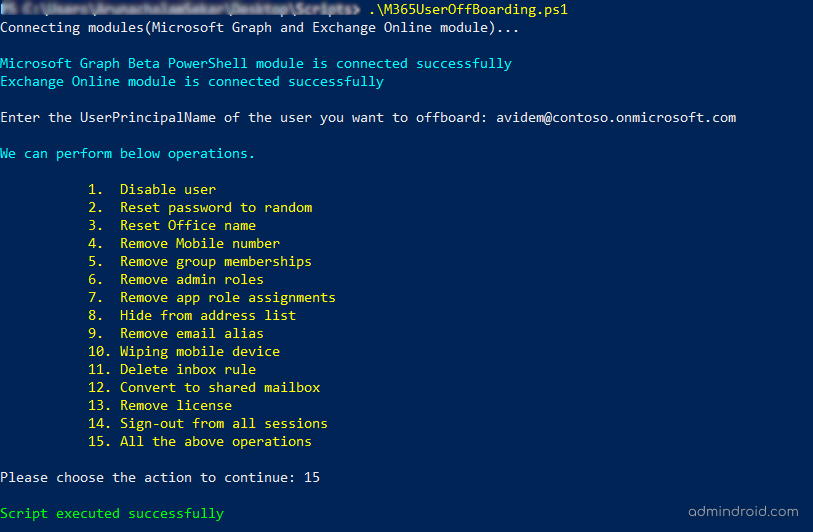
For detailed script execution, you can check our dedicated blog on automate Microsoft 365 user offboarding using PowerShell.
There’s no standard playbook for Microsoft 365 user offboarding. While PowerShell streamlines user deprovisioning tasks, handling exceptions, rolling back changes, or making quick adjustments is still a challenge.
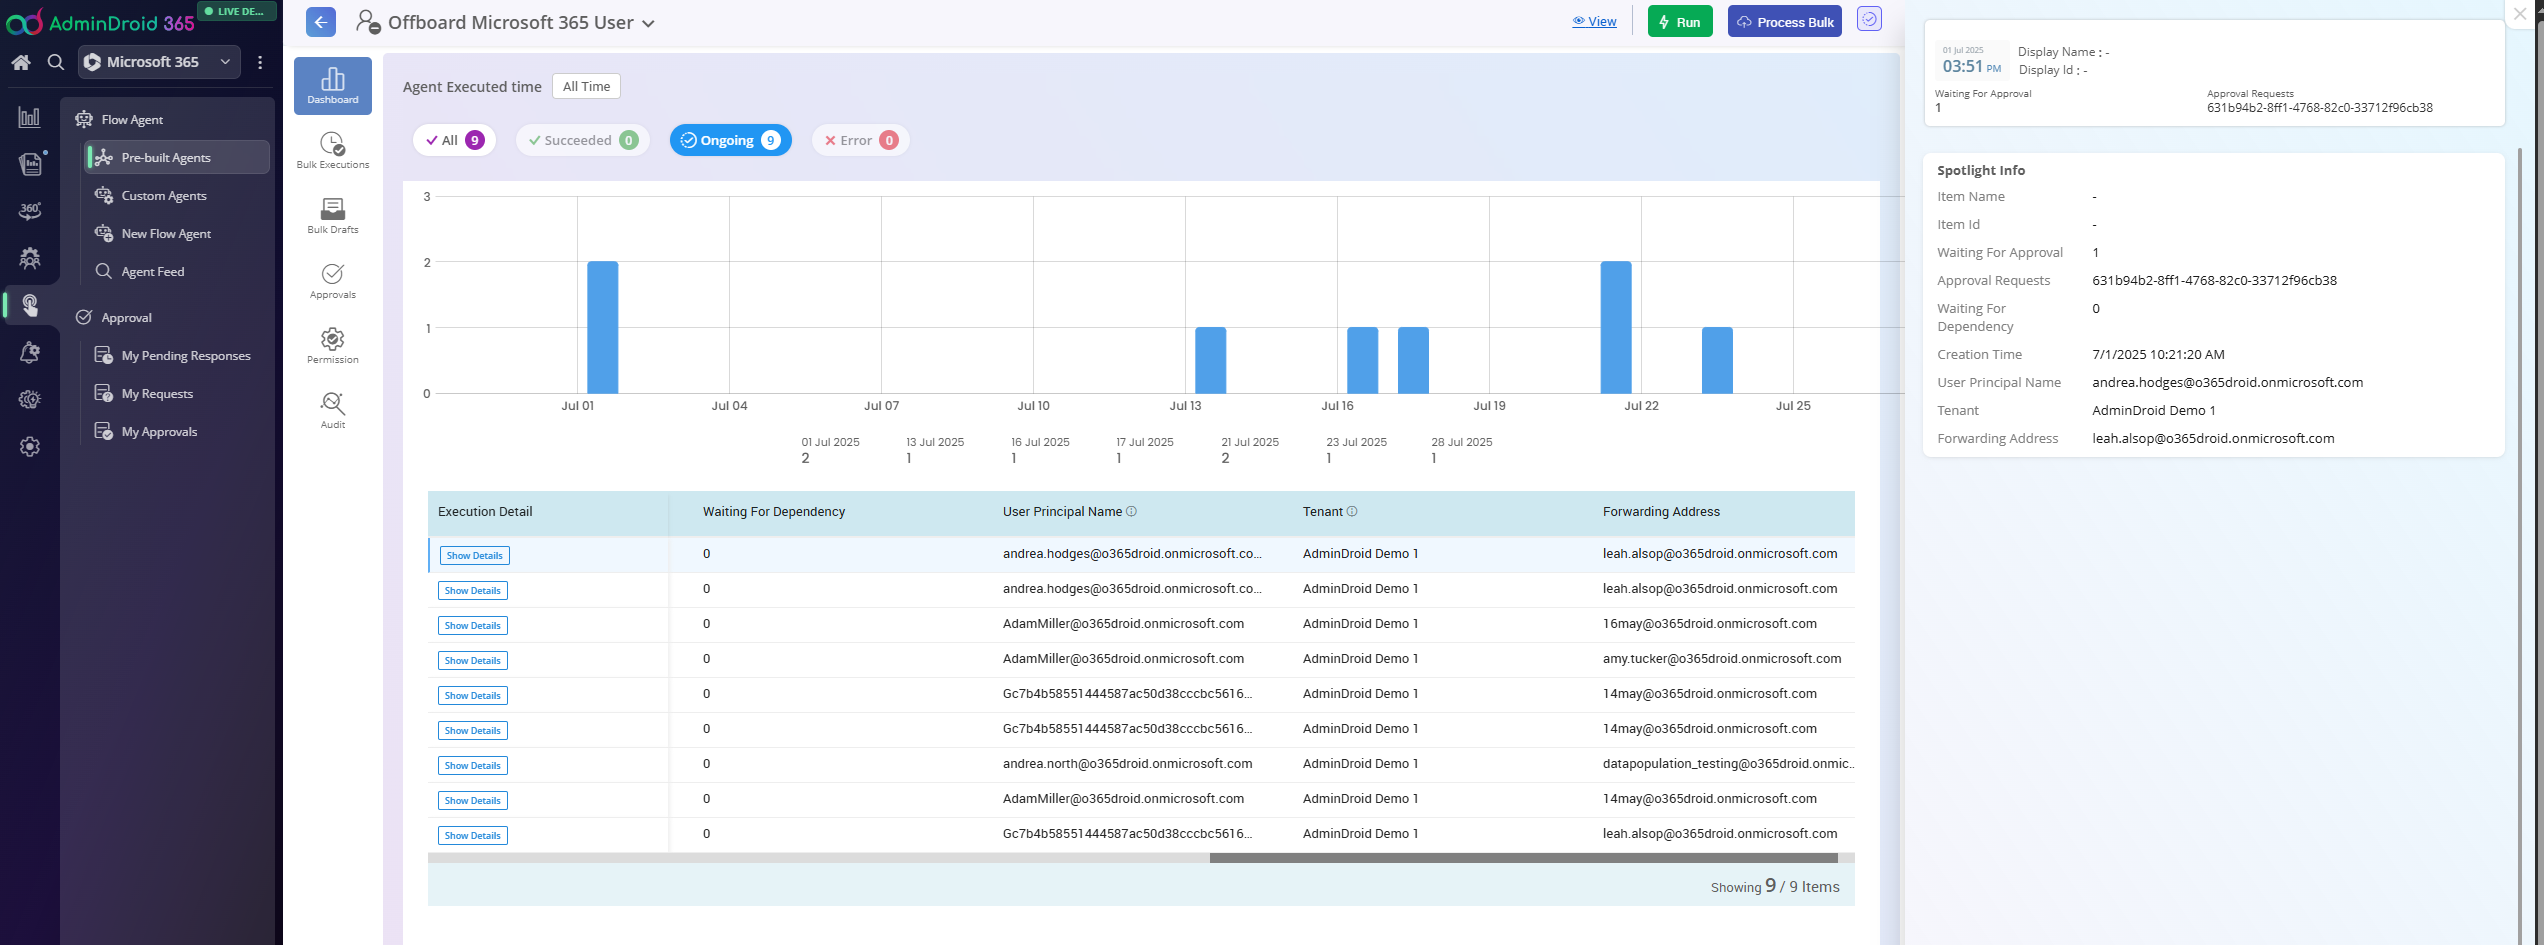
That’s exactly where AdminDroid 365 steps in. With built-in automation, actionable insights, and error-free execution, AdminDroid turns your Microsoft 365 offboarding process into a smooth, reliable, and efficient workflow.
Automate Microsoft 365 User Offboarding with AdminDroid
AdminDroid’s Microsoft 365 Automation tool makes user offboarding smooth and straightforward. With pre-built agents and a customizable checklist, it simplifies the entire user deprovisioning process.
The true measure of offboarding is ensuring complete access removal, leaving no traces or risks associated with that user. AdminDroid handles it with precision. From a single platform, AdminDroid seamlessly performs all essential offboarding actions, including:
- Updating the user’s password
- Revoking active user sessions
- Replacing ownership of the user’s files and resources
- Disabling the user account
- Removing the user’s office location
- Unassigning all directory roles
- Wiping or archiving user data securely
- Revoking shared links, mailbox permissions, app sign-ins, and much more – in one go
And the benefits don’t stop there. AdminDroid’s Automation agents add more control and flexibility with powerful capabilities like:
- Bulk User Offboarding: Offboarding a project team or seasonal staff? Select and deprovision multiple users at once to save time and ensure consistency.
- Pause & Resume Workflow: Worried if the right manager or license is assigned? Simply pause the workflow, double-check the changes for your users, and resume right where you left off.
- Undo with “Revert Action”: Accidentally disabled the wrong user? Instantly roll back specific actions to undo mistakes with zero stress.

Alongside powerful automation, AdminDroid offers advanced reporting, auditing, management, and deep insights that give admins a holistic view of your entire Microsoft 365 environment. AdminDroid goes beyond offboarding to give you complete control with:
📈 3,500+ comprehensive reports across Microsoft 365 services like Teams, Exchange Online, SharePoint Online, and more to audit, analyze, and act with precision.
✨AI-powered report customization to tailor reports to your needs and focus on the exact data that matters to you.
🛠️ 450+ built-in management actions to handle routine tasks such as creating users, assigning managers, adding members to Teams, and more, all without switching between portals.
📊 Intelligent dashboards for a centralized view of key areas such as user management, licenses, security, external sharing, mailbox storage, and more.
🔍 Deep insights into users, license usage, mail flow, sign-ins, permissions, and other critical areas of your Microsoft 365 setup.
🌐 360° visibility to visualize everything from user permissions and mailbox access to Teams calls and activity trends.
📢 Real-time alerts to keep you informed of critical changes, right down to property-level updates like user account status or license modifications.
⏰ Smart reminders agents to maintain compliance by prompting users to update passwords before expiry, notifying admins about MFA activations, along with other critical reminders.
Get ready to experience the mind-blowing capabilities of AdminDroid 365! Download now with a 15-day trial and explore the vast realm of Microsoft 365 reporting & auditing capabilities!
Experience smarter auditing, faster management, and stronger security for Microsoft 365 with AdminDroid!
I hope these Microsoft 365 Offboarding processes will help you meet your business and legal requirements.


