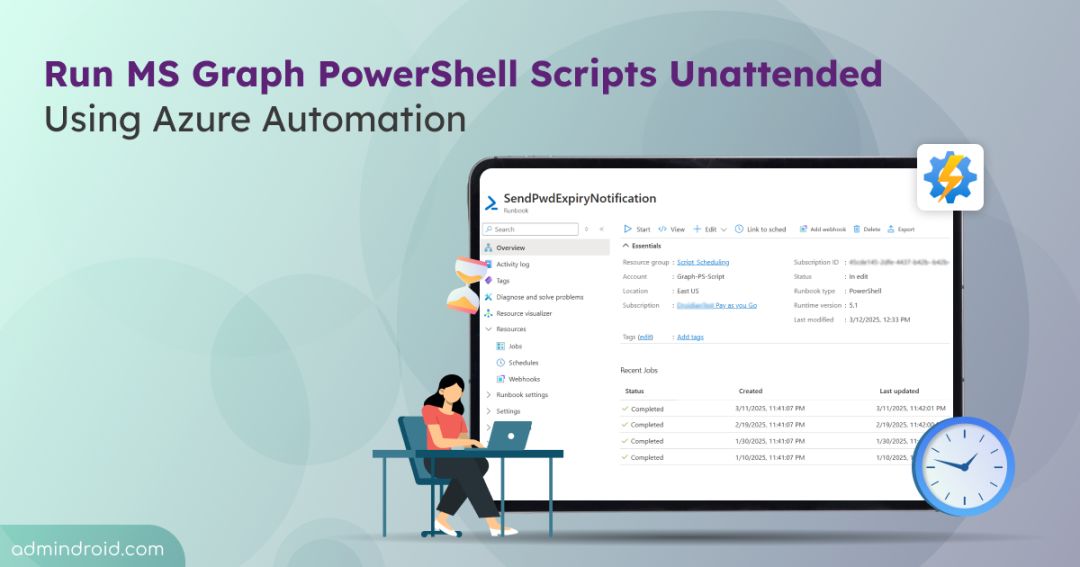
Hope you’ve migrated to Microsoft Graph PowerShell scripts! That’s a smart move for managing Microsoft 365 services like Entra ID, Exchange, SharePoint, and Teams. But is that enough? Not quite! Running these scripts periodically is crucial for tracking Microsoft 365 group memberships, auditing user management, and more. But doing it manually? That’s a hassle! 😩
That’s where automation swoops in like a game-changer! Running MS Graph scripts unattended minimizes manual effort and keeps your Microsoft 365 environment well-managed. 🚀
Why Should You Automate Microsoft Graph PowerShell Scripts?
Imagine this: you scheduled the MS Graph scripts to run unattended! That’s BOOM! You get a whole bouquet of benefits. They’re:
📌 Efficiency: Automating repetitive administrative tasks saves time.
📌 Consistency: Ensures accurate and reliable execution of scripts.
📌 Security: Reduces the risk of manual errors and enforces controlled access.
📌 Scalability: Manages large volumes of users, groups, etc., without manual intervention.
To unlock all these goodies, we’re turning towards Azure Automation! Ready to dive in? Let’s go! 🚀
Why Azure Automation to Schedule MS Scripts?
You might think, ‘Hey, Windows Task Scheduler’s got this!‘ And you’re right, it can… but what happens when your computer’s off 😴? Or you need to manage scripts across multiple machines? That’s where Azure Automation shines.
Think of it as your cloud-powered, always-on, centrally managed script executor. It’s possible with Azure Automation!
Azure Automation is Microsoft’s solution for repetitive cloud management tasks. It’s a powerful way to automate admin tasks and streamline your cloud operations. Think of it as a dedicated robot assistant in the cloud, handling everything from monitoring to maintaining Azure resources using runbooks (scripts).
How to Schedule a Microsoft Graph PowerShell Script Using Azure Automation?
Alright, to show you how it’s done, we’ll walk through a practical example. Imagine a PowerShell script that send password expiry notification in Microsoft 365, keeping your users informed about upcoming password expirations. By scheduling this script, you can automate those vital notifications, ensuring everyone stays secure without you lifting a finger. I’ll show you exactly how to set this up, so you can automate your MS scripts just as easily.
Here’s the step-by-step plan we’ll follow to schedule a Microsoft Graph PowerShell script with Azure Automation.
- Create Entra ID application and assign MS Graph permissions
- Upload certificate to Entra ID app for Microsoft Graph access
- Create Azure Automation account to run Microsoft Graph scripts
- Add certificate to Azure Automation for MS Graph authentication
- Add Microsoft Graph PowerShell modules to Azure Automation
- Import Microsoft Graph PowerShell script as a runbook
- Schedule MS Graph PowerShell script in Azure Automation
Note: To successfully walk through this process, ensure you have an account with Global Administrator access and the Azure subscription.
1. Create Entra ID Application and Assign Microsoft Graph Permissions
To allow our script to access Microsoft Graph without requiring interactive logins, we’ll register an application in Entra ID (formerly Azure Active Directory). Here’s how to do it:
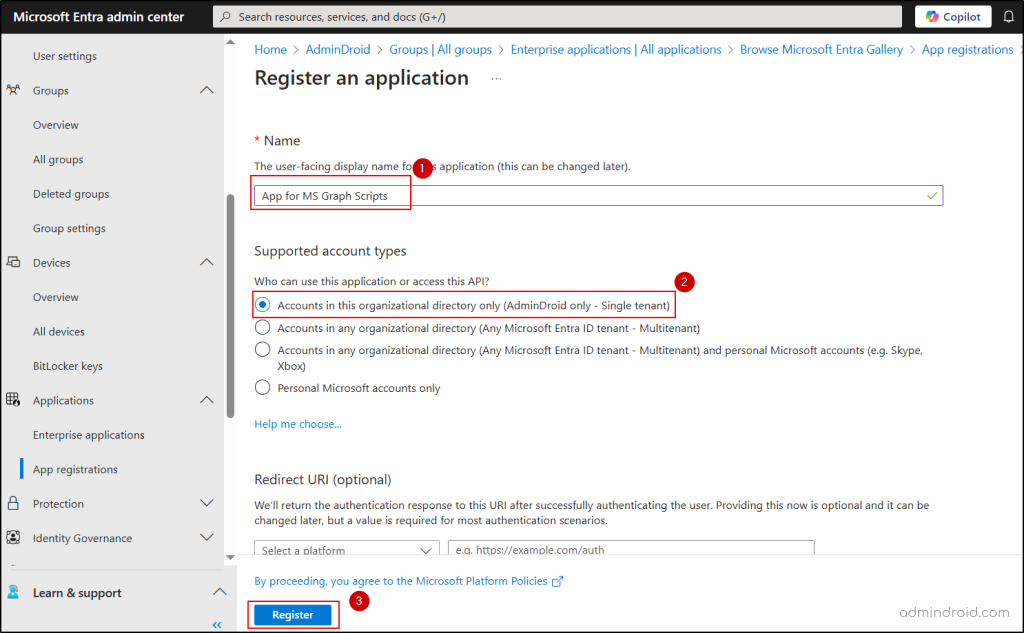
- Log in to the Microsoft Entra admin center and go to Applications » App registrations » New registration.
- Give your application a name, choose Accounts in this organizational directory only for Supported account types.
- Leave the Redirect URI as it is and click Register.
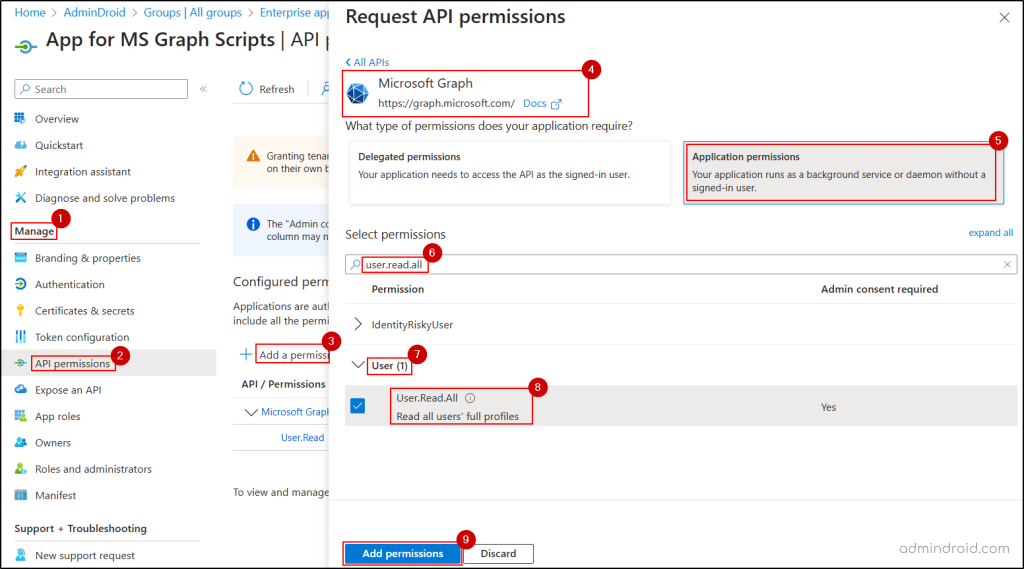
- After registration, in the respective Entra app’s page, navigate to Manage » API Permissions » Add a permission.
- Select Microsoft Graph, then Application Permissions.
- Choose the required Graph API permission your script needs. Here I’m choosing, “User.Read.All”, “Domain.Read.All”, and “Mail.Send” scope, as they are needed for the script to send password expiry notifications.
- Click Grant admin consent for <OrganizationName> at the top and confirm with “Yes”.
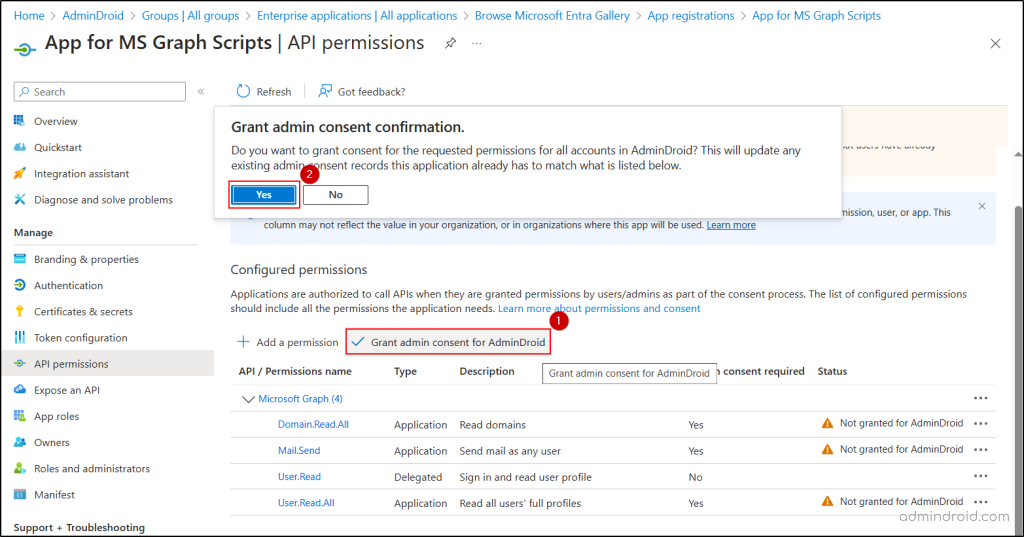
- Finally, switch to the Overview tab and note down the Client ID & Tenant ID for later use.
2. Upload Certificate to the Entra ID Application with Microsoft Graph Permissions
After creating the Entra ID app with necessary privileges, you need to add a certificate for authentication. Since we need to use app only authentication with the Microsoft graph PowerShell SDK, certificate credentials are invaluable. Using a CA-signed certificate from a trusted third party is highly secure. For testing, you can create a self-signed certificate using PowerShell.
Before proceeding, make sure you have both the .cer and .pfx versions of your certificate. Here’s how to upload the certificate to your Entra ID application.
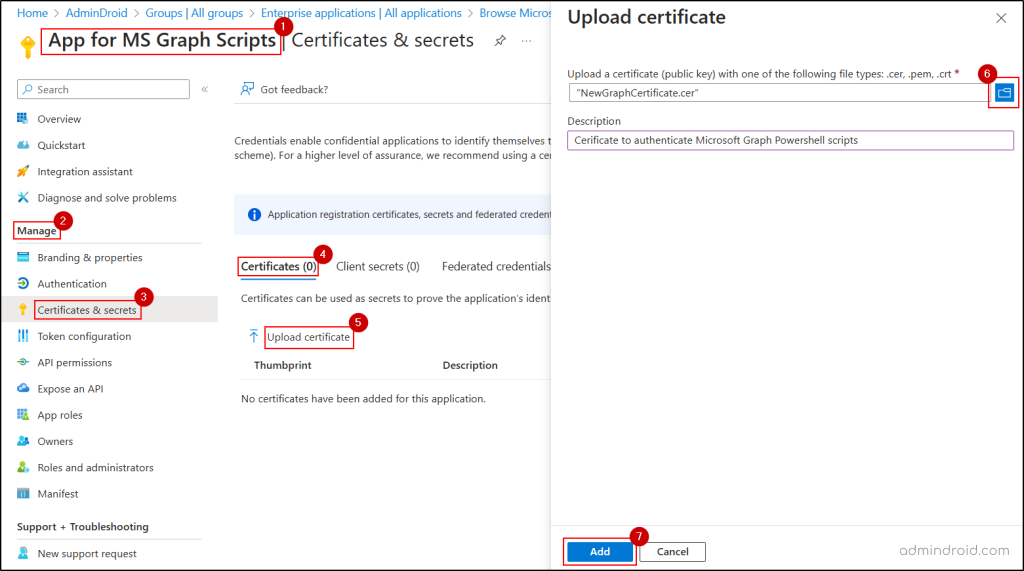
- In the Entra portal, navigate to the application you previously registered, and go to Manage » Certificates & secrets.
- Under the Certificates tab, click Upload certificate.
- In the Upload a Certificate field, browse to your .cer file of the certificate, select it. You can add a description if you wish.
- Click Add to finish adding it to your application and note down the Thumbprint of the certificate for future use.
Note: We’re using certificate-based credentials to enhance security, as they leverage public-private key pairs and significantly reduce the risk of credential leaks compared to client secrets. To further strengthen your environment, you can block the creation of client secrets in your organization, especially for applications that require long-term, unattended access.
3. Create an Azure Automation Account in Azure Portal to Run MS Graph Scripts
The next step in setting up unattended MS graph scripting is to set up an automation account. To do so, navigate to the Azure Portal and follow the steps described here. Now, let’s get your automation hub ready by setting it in the Azure portal.
- Sign in to the Azure Portal, search for Automation Accounts, and click Create.
- Choose your Azure Subscription from the respective drop-down menu.
- Select an existing Resource group (A container that holds related resources for an Azure solution). If you don’t have a resource group, create a fresh one.
- Enter the name for the new automation account, select the Region (the geographical area or data center where resources and runbooks are stored and executed), and click Review + Create.
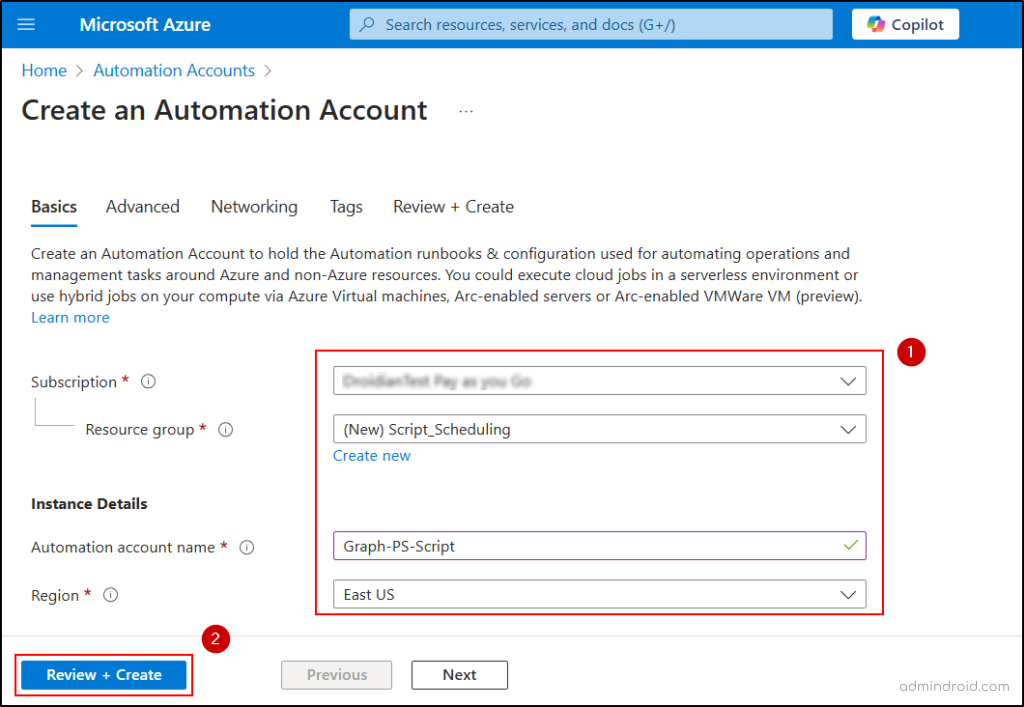
- After reviewing the details, click Create and wait until the deployment is complete.
- Then, click Go to resource to open the Overview page of the created automation account.
4. Add Certificate to the Azure Automation Account for MS Script Authentication
The next step you need is to upload the certificate to the Azure Automation account you’ve used in the Azure App for the certificate-based authentication. To upload the certificate to Azure Automation, follow the steps here.
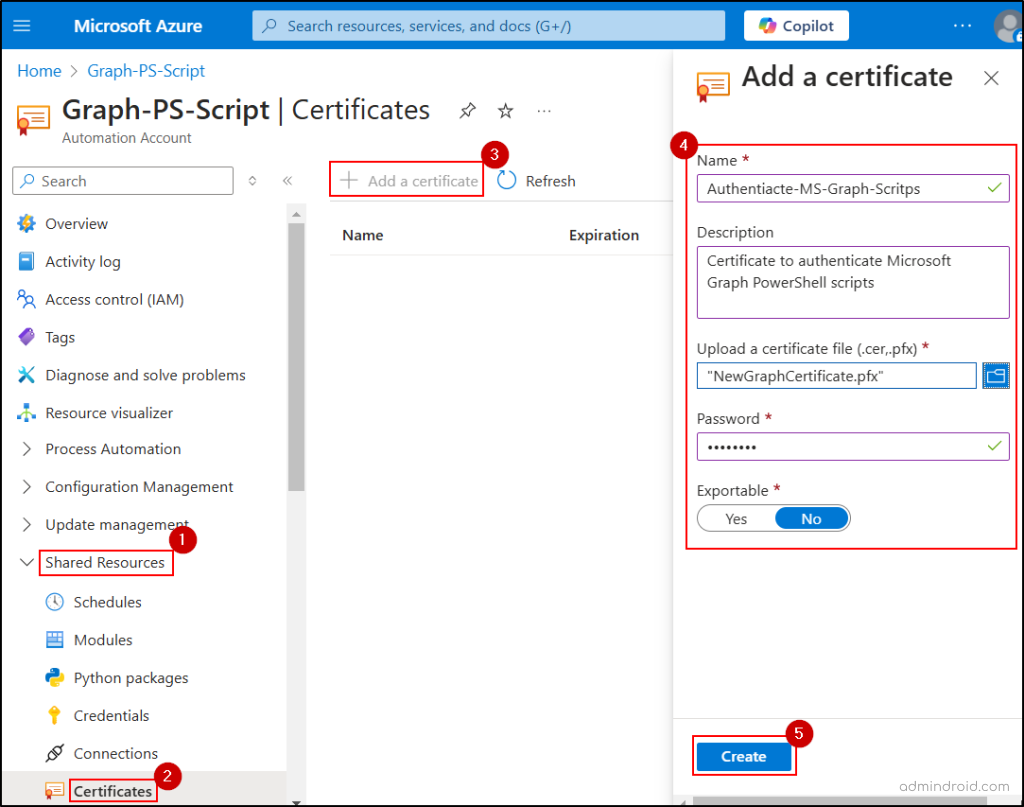
- From the Overview page of your Azure Automation account, navigate to Shared Resources » Certificates.
- Begin to upload the certificate to your Azure Automation account by clicking the Add a certificate button.
- Provide the name for the certificate, optional description and upload the certificate in the .pfx format.
- Enter the certificate’s password and toggle the Exportable to ‘Yes’ if you want to allow certificate export.
If your PFX file is not password protected (default policy doesn’t have password), you can’t use Azure portal to upload the certificate. The portal requires a password for the upload. To work around this, run the following PowerShell script, replacing the respective placeholders. Ensure you run this in PowerShell version 7 or later.
|
1 2 3 4 5 |
Install-Module -Name Az.Automation $certificateName = “<CertificateName>” $PfxCertPath = “<CertificatePath Eg:‘C:\MyCert.pfx’>” $ResourceGroup = “<ResourceGroupName>” New-AzAutomationCertificate -AutomationAccountName “<AutomationAccountName>” -Name $certificateName -Path $PfxCertPath -Exportable -ResourceGroupName $ResourceGroup |
Note: If you use client secret credentials instead of certificate authentication, configure them in the Azure Automation account instead of this step.
5. Add Microsoft Graph PowerShell Modules to the Azure Automation Account
The new Azure Automation account comes with a few preinstalled PowerShell modules for managing Microsoft Entra resources. However, essential modules like Microsoft Graph and Exchange Online must be added manually. To install the current version of the required Microsoft Graph PowerShell modules into your Azure Automation account, follow these steps.
- In your Azure Automation account, navigate to Shared Resources » Modules » Add a module.
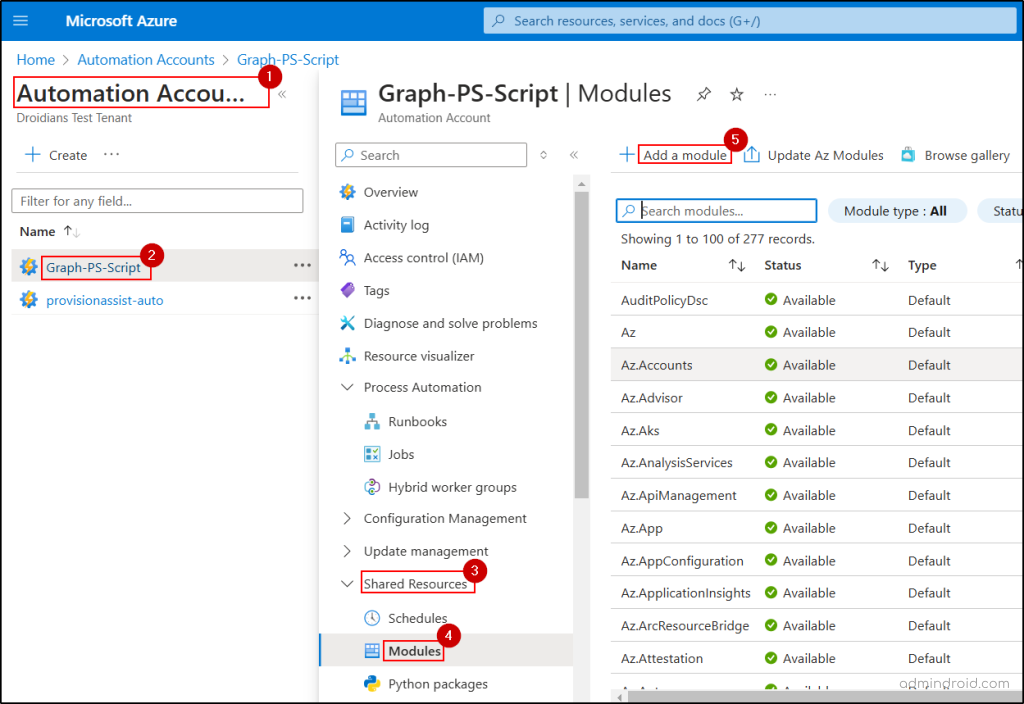
- Choose the Browse from gallery radio button in the Upload a module file field.
- Search for the name of the module you want to add. Then, pick the respective module.
- Verify the chosen module and hit the Select button.
- Choose the appropriate Runtime version (the environment’s software version that executes a script) and click on the Import option.
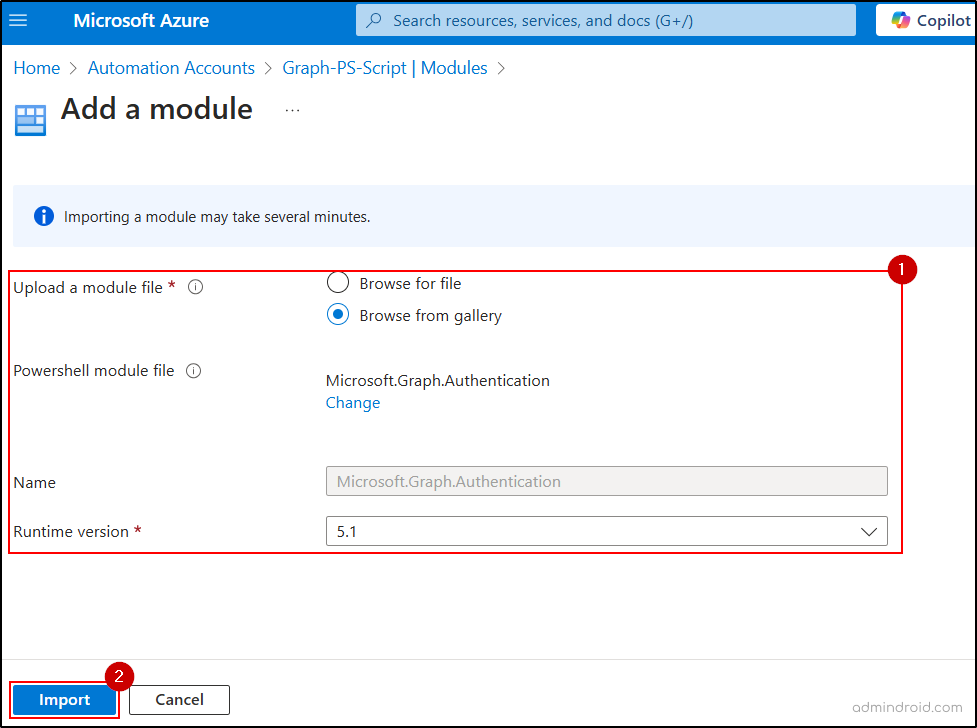
- Repeat the steps to import all modules required to run your Microsoft Graph PowerShell script.
For the password expiration notification script, I am importing the following Graph PowerShell modules in the Azure Automation account:
- Microsoft.Graph.Authentication – Required for the Connect-MgGraph cmdlet
- Microsoft.Graph.Users.Actions – Required for the Connect-MgGraph cmdlet
- Microsoft.Graph.Users – Required for the Get-MgUser cmdlet
- Microsoft.Graph.Identity.DirectoryManagement – Required for the Send-MgUserMail cmdlet
If your script is designed to check whether the entire module (i.e., Microsoft.Graph) is installed, update it to check only the required modules instead. I have modified the script to check only the necessary modules.
Note: The above steps install the latest version of the modules. To install an earlier version of Microsoft Graph modules in Azure Automation, follow these steps.
- Visit the Microsoft Graph page in the PowerShell Gallery and select the required version under Version History.
- In the Package Details section, choose the Dependencies you want to import.
- Under Installation Options, switch to the Azure Automation tab, click Deploy to Azure Automation, authenticate if needed, and choose your automation account.
- Click OK and wait for the deployment to complete.
6. Import Microsoft Graph PowerShell Script as Runbook in Azure Automation
A runbook is a script designed using Python or PowerShell that helps you manage and configure your cloud-based resources and services. In our case, the PowerShell script that sends notifications to the users regarding the password expiry is the runbook. To import Microsoft Graph PowerShell script as the runbook in Azure Automation, adhere to the following steps.
- Go to the respective Azure Automation account and navigate to Process Automation » Runbooks » Import a runbook.
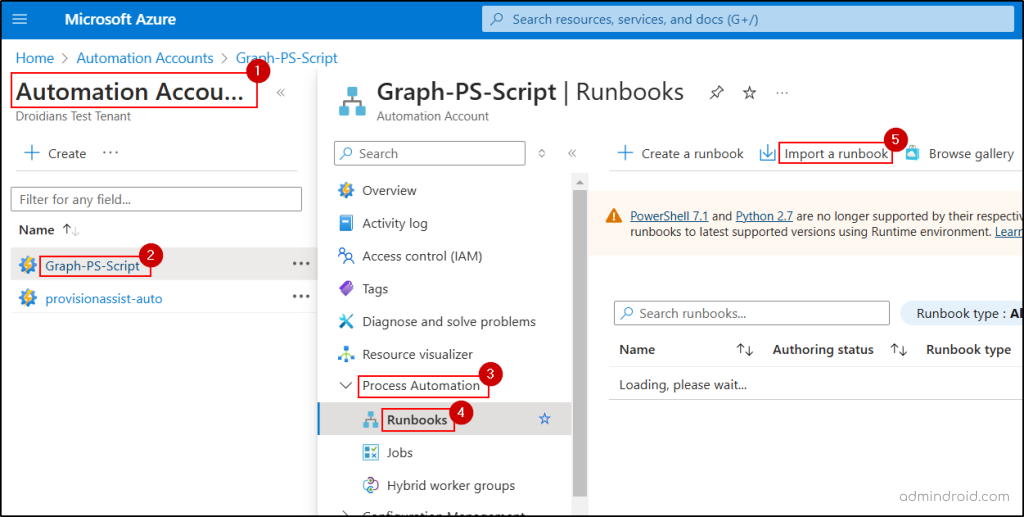
- Choose the Browse for file radio button in the Upload a runbook file option.
- Browse and select the MS Graph PowerShell script in the Runbook file option.
- After that, select the Runbook type and Runtime version. Also, provide the Description of the PowerShell script (optional).
- Finally, select Import to add the MS Graph PowerShell script to the Azure Automation.

- After that, choose the Publish button in the portal editor, and select ‘Yes’.
Note: Before scheduling the script, you can trigger the Azure Automation runbook by using the Start button to check whether it works as intended. This option is also useful when you need to manually run a PowerShell script before or after the scheduled time for any instant execution.
7. Schedule Microsoft Graph PowerShell Script Using Azure Automation
As a final step, you need to schedule the MS Graph PowerShell script in the Azure Automation to automatically run at specific intervals. To work around this, follow the steps below.
- Go to the respective runbook and click the Link to schedule option.
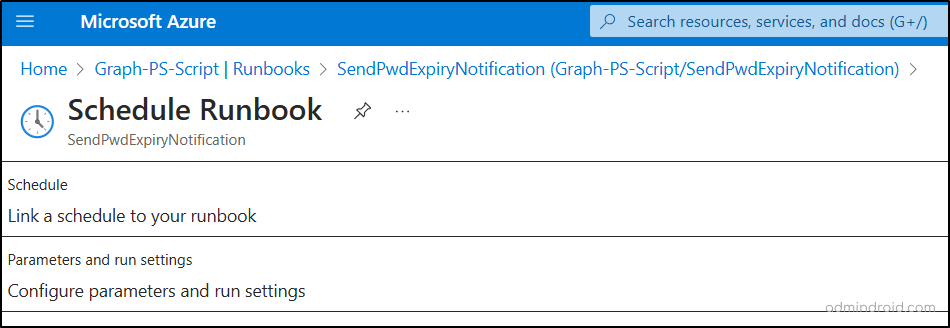
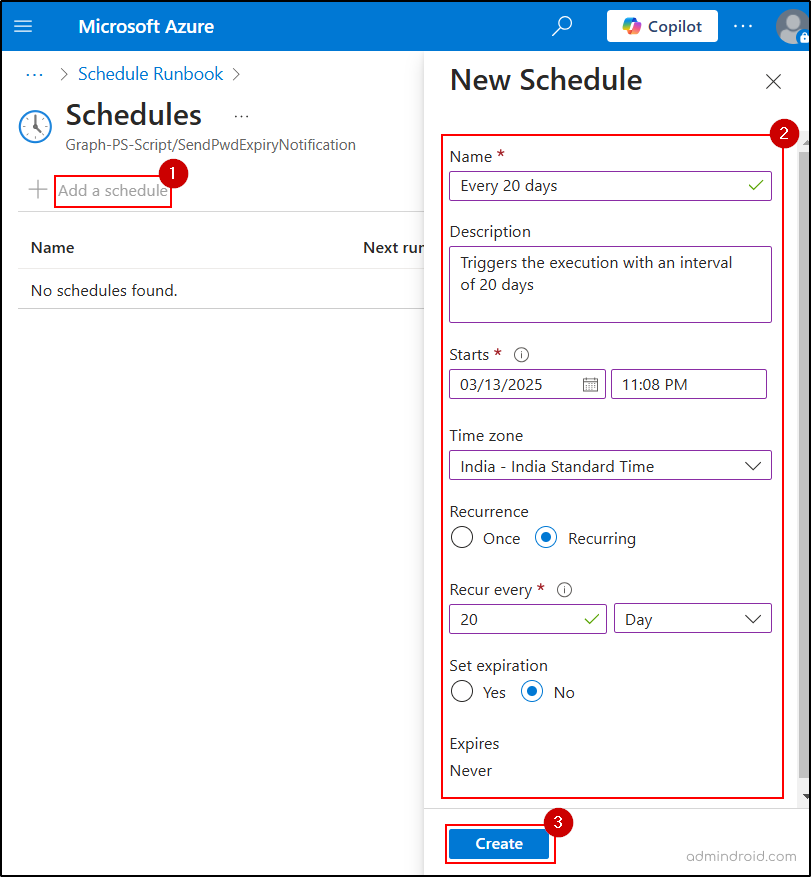
- Select the Link a schedule to your runbook option and choose the appropriate schedule. If you don’t previously have a schedule in your Azure Automation account or want to create a new one, follow these steps.
- Click the Add a Schedule option.
- Provide a name for the schedule, starting time, time zone, recurrence, and expiration state as needed.
- Finally, select Create.
- Then, to assign the values for the parameters in the script, choose the Configure parameters and run settings option, and provide values for the needed params. Click OK. (If you need to pass a switch parameter to the script execution, pass true as its value.)
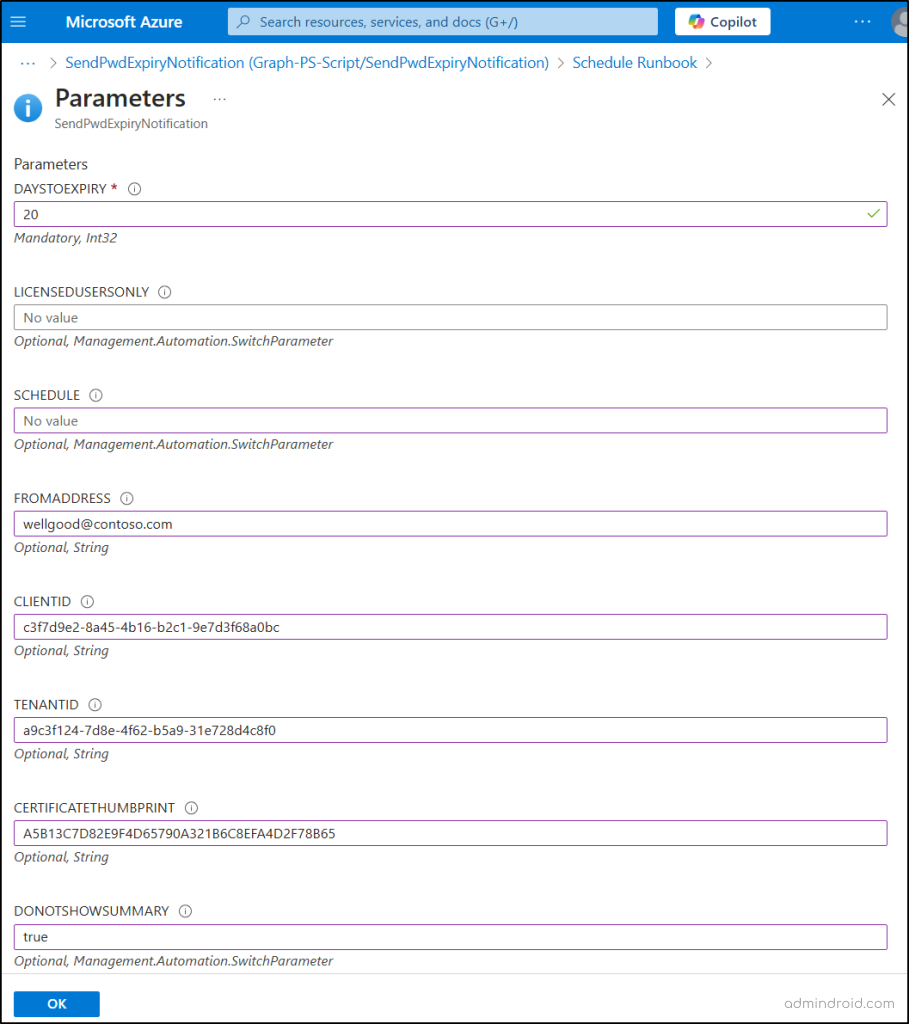
- Finally, select OK to complete the automation of the Microsoft Graph PowerShell scripts.
Note: I have passed the certificate credentials and app details as parameters, as the script is designed to accept them. You can also store them as variables in the Azure Automation account for use within scripts. This is also useful when managing multiple runbooks in a single Azure Automation account.
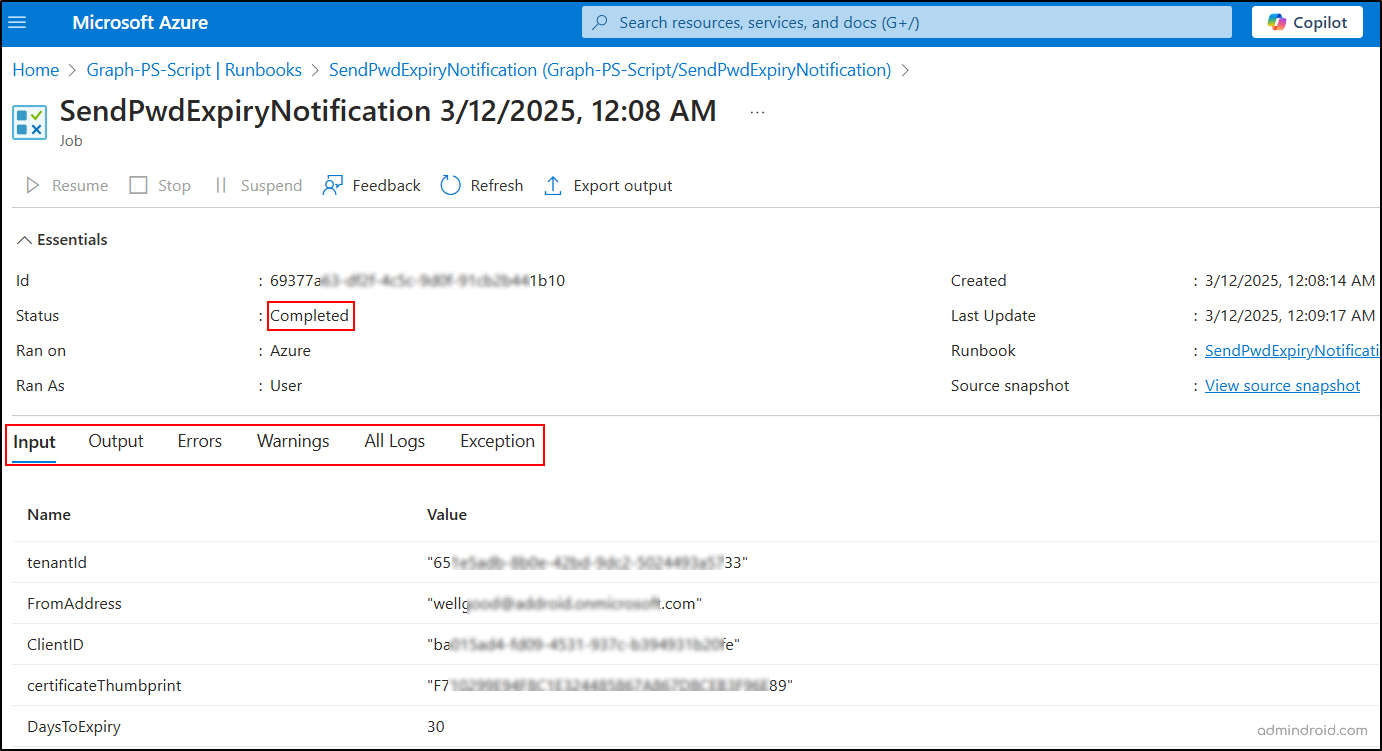
Furthermore, you can use the Jobs tab under the Resources section associated with the corresponding runbook to access the scheduled and manual executions. For each job, you can view the status, input, output, errors, warnings, logs, and exceptions.
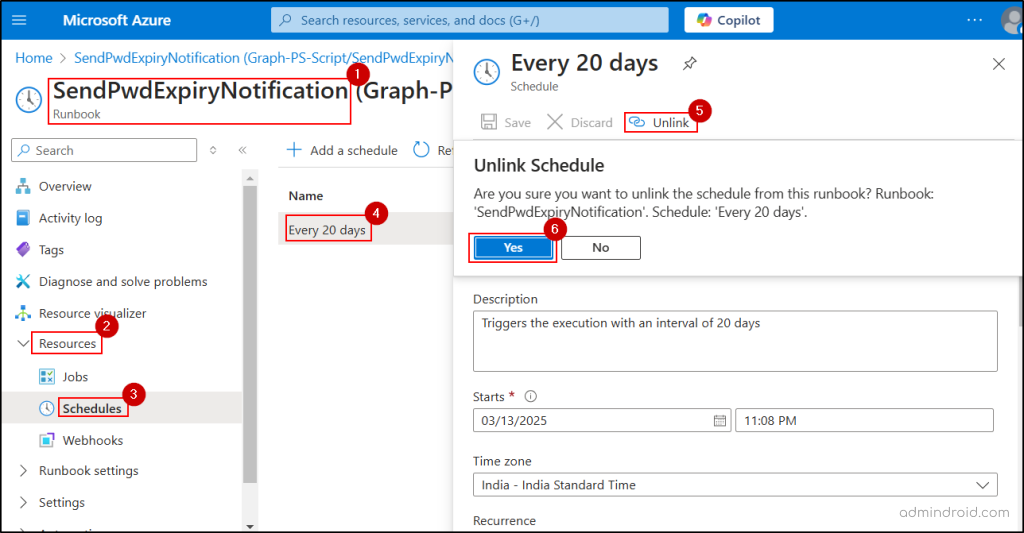
To remove the schedule for a script in Azure Automation, first, go to the respective runbook. Then, navigate to the Schedules tab and choose the appropriate schedule. Click on the Unlink option and select ‘Yes’.
Key Considerations for Unattended MS Script Execution in Azure Automation
- To temporarily stop a scheduled script execution, you can disable the schedule instead of unlinking the schedule or deleting the runbook. Navigate to the Schedules tab, select the schedule, click Unlink, and confirm with ‘Yes’.
- If you have multiple Microsoft 365 tenants, you don’t need an Azure subscription for each one. You can automate scripts across tenants with the proper authentication.
- Azure Automation is designed for unattended execution, meaning it does not support user prompts, interactive logins, or real-time input during execution.
- The 400 MB memory limit per sandbox in Azure Automation can cause job failures when handling large datasets, complex calculations, or resource-heavy PowerShell modules. Moreover, there are several other Azure Automation limits and quotas related to job runs, module size, the number of accounts per subscription, and more.
- Scripts exporting files to local storage will fail in Azure Automation. Instead, use PowerShell cmdlets like ‘Set-AzStorageBlobContent’ to upload files to Azure Storage, or modify the script to export files to OneDrive or Outlook.
- Always store passwords securely for automation scripts to ensure your credentials aren’t exposed in plain text or embedded in code.
Final Thoughts
Overall, using app only authentication with the Microsoft graph PowerShell SDK and Azure Automation, enhances efficiency and security. And as we’ve seen, when it comes to managing those powerful MS Graph scripts’ unattended execution, Azure Automation truly unleashes their potential! While Task Scheduler also provides a simple on-premises solution, choosing the right option depends on your specific needs. Keep automating! 🥳


