
On Day 25 of cybersecurity awareness month, discover why it’s crucial to protect the mailbox data of former employees. Stay tuned for more in our M365 cybersecurity blog series.
When employees leave an organization, their accumulated data often remains an afterthought. A common practice among administrators is to convert former employees’ mailboxes into shared mailboxes. While this may seem like a convenient solution, it can lead to significant issues that might put your organization’s security and compliance efforts at risk.
To effectively manage this data, it’s essential to understand the process and select the best method for handling departing employee mailbox data.
❌ The Risks of Using Shared Mailboxes for Departing Employees
Converting a former employee’s account into a shared mailbox can seem like a quick solution, but it comes with important security concerns:
- Delegated users can access sensitive information, which may include personally identifiable details like bank account numbers. Without careful delegation and oversight, this could lead to privacy risks.
- Shared mailboxes can still receive new emails, complicating the process of data management and potentially leading to irrelevant or unnecessary information being added.
- A shared mailbox requires an Exchange license if it exceeds 50 GB and every user accessing it must have a Microsoft 365 license.
- Since multiple users can access shared mailboxes, there’s a risk that data can be changed or deleted by anyone with access, leading to compliance issues.
- It cannot fulfill compliance standards, particularly those established by the GDPR and the CCPA.
Shared mailboxes lack the data protection and retention capabilities of inactive mailboxes, making inactive mailboxes the more secure and compliant option for managing data.
✅ Why Inactive Mailboxes Are the Better Choice for Retaining Ex-Employee Data?
Inactive mailboxes are designed for retaining ex-employee mailboxes to meet legal and regulatory compliance. Using Inactive mailboxes in M365 as the archiving/backup process for off boarding accounts offers several advantages:
- You don’t need a license for inactive mailboxes, so you can save licenses while still keeping important data.
- Inactive mailboxes won’t receive new emails and don’t show up in your organization’s address book.
- Inactive mailboxes help organizations comply with legal requirements, including data retention policies, by ensuring that critical information is safely archived.
- They preserve all mailbox contents indefinitely, protecting the data from changes/deletion.
- If access to the mailbox is needed, it can be recovered by creating a new mailbox or merged into an existing one.
- Compliance administrators can run a content search against the inactive mailbox to find and export the required information.
- Shared mailboxes do not provide the same level of data protection and retention as inactive mailboxes.
- Instead of keeping former employees’ data indefinitely, organizations can have retention policies to retain and then delete the data after a set period, in line with their internal policies.
Based on the comparison above, it’s clear that inactive mailboxes are the superior option for managing the email data of departed employees, especially when it comes to compliance and long-term data retention. Let’s now explore the process for implementing inactive mailboxes.
Don’t lose it! Secure leaver mailbox data for future legal needs.💯
How to Make a Former Employee’s Mailbox Inactive?
To make a mailbox inactive, you need to apply a hold on it before deleting the associated Microsoft 365 account. Once the hold is in place, the mailbox will automatically convert into an inactive mailbox upon account deletion.
You can use various types of holds for this purpose, including Microsoft 365 retention policies, retention labels, eDiscovery holds, or litigation holds. It’s important to note that In-Place Holds in the Exchange admin center is now retired, and litigation holds are considered outdated.
Microsoft recommends utilizing the Microsoft 365 retention policy or retention labels for the best results. To ensure that you properly manage the email data of former employees, follow these steps to create an inactive mailbox:
- Apply retention to the inactive mailbox
- Confirm if the hold is applied to the mailbox
- Delete the account
1. Use Microsoft 365 Retention to Create an Inactive Mailbox
To create an inactive mailbox, you’ll need to use Microsoft 365 retention policies, which require an active license. However, once the mailbox is inactive, it no longer requires a license to retain the email data.
License Requirement for Microsoft 365 Retention Policies:
- Microsoft 365 E5/A5/G5/E3/A3/G3, Business Premium
- Microsoft 365 E5/A5/G5/F5 Compliance and F5 Security & Compliance
- Microsoft 365 E5/A5/F5/G5 Information Protection and Governance
- Office 365 E5/A5/G5/E3/A3/G3
Additional License for Exchange Mailboxes:
- Exchange Online Plan 2 includes advanced mailbox retention and hold capabilities, making it suitable for creating inactive mailboxes with retention holds.
- Exchange Online Archiving is an add-on that provides additional storage and archiving features, which also support retention holds but only when combined with certain plans like Exchange Online Plan 1 or Office 365 E1.
You can find more details about the licensing requirements here.
The mailbox will remain in Microsoft 365 as an inactive mailbox until the retention policy or retention labels are removed. Exchange Online will check for any retention holds on the mailbox, which may come from an eDiscovery case, a retention policy, or retention labels. As long as a hold is present, the mailbox cannot be removed until the retention period expires. If multiple holds are applied, the mailbox will be retained until the last hold lapses, ensuring data protection throughout the process.
How to Use M365 Retention Policy to Create an Inactive Mailbox?
To create an inactive mailbox using a retention policy, follow these steps:
- Go to the Microsoft Purview compliance portal.
- Select Data lifecycle management and then Policies -> “Retention Policies”.
Note: If you need to place a retention hold on specific mail items, consider configuring retention labels instead.
- Click on “+ New retention policy” and give it a name.
- Choose whether to specify the locations dynamically or statically. For this guide, we’ll select “Static”.
- Under “Choose where to apply this policy”, ensure ‘Exchange mailboxes’ is enabled. Then, under Included, select “Edit” and add the specific mailbox.

- On the next page, decide whether to retain items for a specific period or indefinitely based on your requirements.
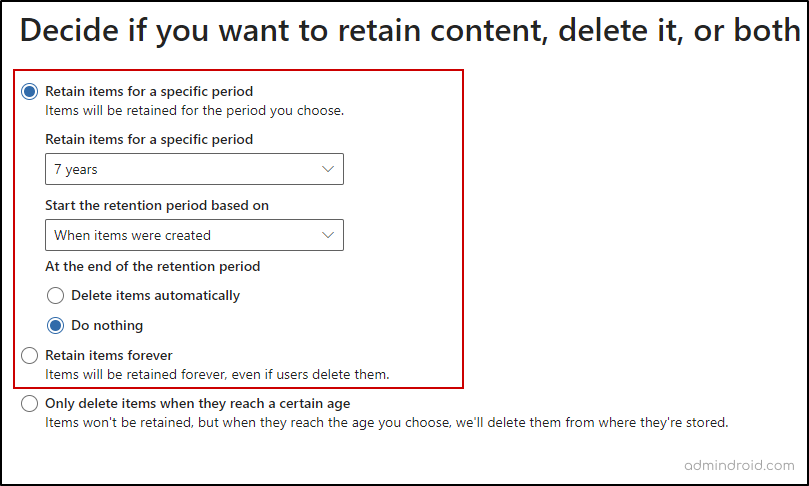
⚠️ Important: Avoid selecting the option “Only delete items when they reach a certain age“, as this will prevent the mailbox from becoming inactive after the account is deleted.
- Review your settings and click “Finish” to apply the policy.
Note: When there are multiple holds, the retention policy applies for the longest duration.
2. Confirm If the Hold Is Applied to the Mailbox
Before deleting the user account, make sure to identify the type of hold placed on the Exchange Online mailbox. Without the hold, the mailbox won’t be converted into an inactive mailbox.
To check if a hold is in place for the mailbox, execute the following PowerShell command:
|
1 |
Get-Mailbox <username> | FL LitigationHoldEnabled,InPlaceHolds |
This command retrieves information about the mailbox, including the InPlaceHolds property, which lists the GUIDs of any retention policies applied. You can identify retention policies by looking for GUIDs that begin with specific prefixes:
- mbx: Indicates a retention policy applied to the mailbox.
- skp: Indicates a retention policy applied to Skype for Business conversations within the user’s mailbox.

We can see that the first three letters of the InPlaceHold value are mbx, it confirms that the retention hold is successfully applied to the mailbox.
Once you’ve verified that the hold is in place, you can confidently proceed with deleting the user account.
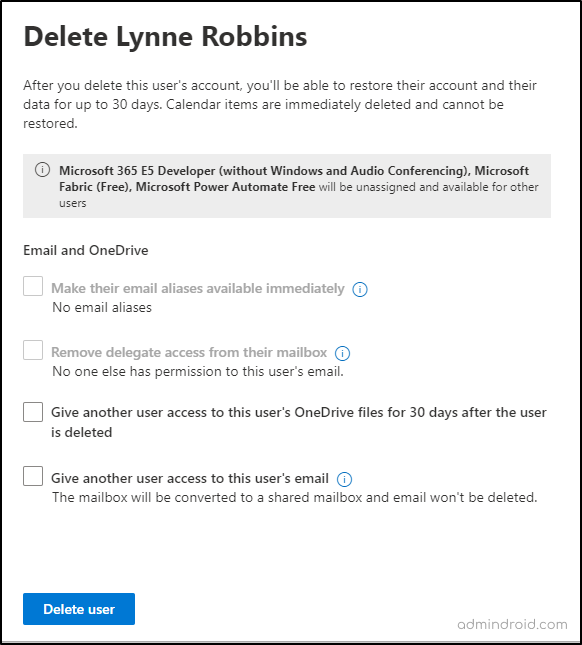
3. Delete the Account
Once you confirm that the hold is in place, you can proceed to delete the user account. To do this,
- Navigate to the “Active users” page in the Microsoft 365 admin center.
- Select the user you wish to delete.
- On the “Delete user” page, choose how you want to handle the user’s license, email, and OneDrive accounts.
- Finally, click “Delete user” to complete the process.
💡 Tip: Consider automating the offboarding process using PowerShell or lifecycle workflows to streamline mailbox management and ensure data retention compliance.
What to Do After Creating an Inactive Mailbox?
Once you’ve set up an inactive mailbox, here are some key things you can do:
1. Get a List of all Inactive Mailboxes
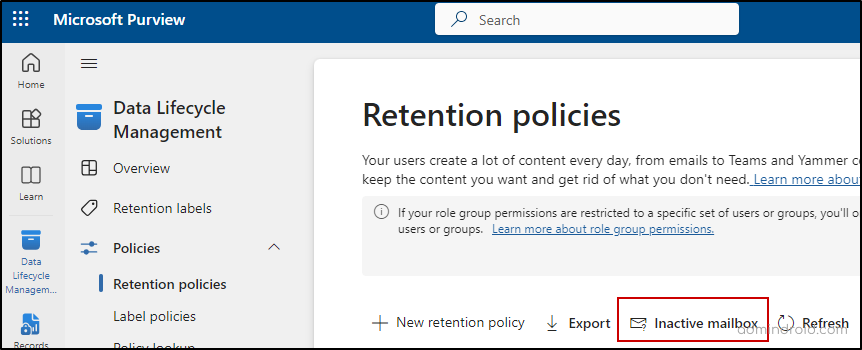
To view the list of all inactive mailboxes in the Microsoft Purview compliance portal, navigate to,
Data lifecycle management -> Policies -> Retention policies -> Inactive mailbox.
Alternatively, you can also get a list of all inactive mailboxes using PowerShell. Run the following cmdlet after connecting to the Exchange Online PowerShell module:
|
1 |
Get-Mailbox -InactiveMailboxOnly -ResultSize Unlimited | FT DisplayName,PrimarySMTPAddress,WhenSoftDeleted |
2. Extract Data from Inactive Mailboxes using Content Search
If you need to retrieve emails or documents from an inactive mailbox, you can perform a content search using PowerShell. This allows for quick and efficient access to the necessary information without reactivating the mailbox.
3. Adjust Retention Hold Policies
If retention needs change, you can modify the hold duration for inactive mailboxes. This requires identifying the specific retention policy applied and then making the changes.
4. Recover an Inactive Mailbox
When a former employee returns, you can recover their inactive mailbox. This process converts the mailbox back to active status while retaining all previous emails and folder structures, ensuring a smooth transition for the returning employee.
5. Restore Content from an Inactive Mailbox
For cases where access to emails is needed without recovering the mailbox, you can restore the inactive mailbox by copying the data from the inactive mailbox to another active mailbox. This method provides quick access to the information while keeping the original mailbox inactive.
6. Permanently Delete an Inactive Mailbox
When you’re sure the data in an inactive mailbox is no longer needed, you can delete it permanently. To do this, you first need to clear any holds or retention policies applied to it. Once that’s done, the mailbox will automatically be deleted after a certain period.
Closing Lines
Managing former employee data is crucial for compliance and data retention. By creating inactive mailboxes instead of shared mailboxes, you can ensure that sensitive information remains protected and accessible for audits or legal inquiries.
Next time you create a checklist for managing employee departures, remember to include these steps along with other M365 user offboarding practices. Thanks for reading! Reach us through the comments section for queries.


