On Day 10 of Cybersecurity Awareness Month, empower yourself with the knowledge to differentiate standard and digital signatures in Microsoft Outlook. Discover why implementing a digital signature is essential to fortify your Microsoft 365 environment. Stay tuned for more blogs in our M365 Cybersecurity blog series.
As the traditional ink-on-paper signature has made its way into the digital realm, Microsoft has also incorporated the use of digital signatures in email messages to confirm an individual’s identity. Although when you hear ‘digital signature,’ the first thing that likely comes to mind is the standard electronic signature in Outlook, right? But here’s the intriguing part: these two terms, digital and standard signatures, often used interchangeably, don’t share the same meaning!
Cybersecurity is not a game of chance; it’s a battle of digital signatures
– Fahad Sulehria
As the saying goes, in today’s digital landscape, cybersecurity isn’t left to chance but instead is a relentless battle. Digital signatures in Microsoft 365 stand as our frontline guardians, safeguarding the integrity and security of the digital world. Let’s delve into this blog to uncover the vital distinctions between standard and digital signatures and why digital signatures are paramount in securing Microsoft 365!
The blog delves into,
- What is the standard signature in Microsoft Outlook?
- What is the digital signature in Microsoft Outlook?
- Difference between standard and digital signatures in Microsoft 365
- How do digital signatures secure messages in Cybersecurity?
What is Standard Signature in Microsoft Outlook?
A standard signature in Microsoft Outlook is a customized email sign-off that you can attach to your outgoing messages. It serves as a digital representation of your identity and can contain various elements such as text, hyperlinks, images, and even your handwritten signature or company logo. Thus, let’s explore how to add email signatures in Microsoft Outlook.
How to Add Email Signature in Outlook for Web?
In Microsoft Outlook, you have two choices when it comes to using your email signature. You can either manually add it to each email you write or configure Outlook to automatically include it in every message you send through the Outlook email client.
1. Automatically add standard signature in Outlook
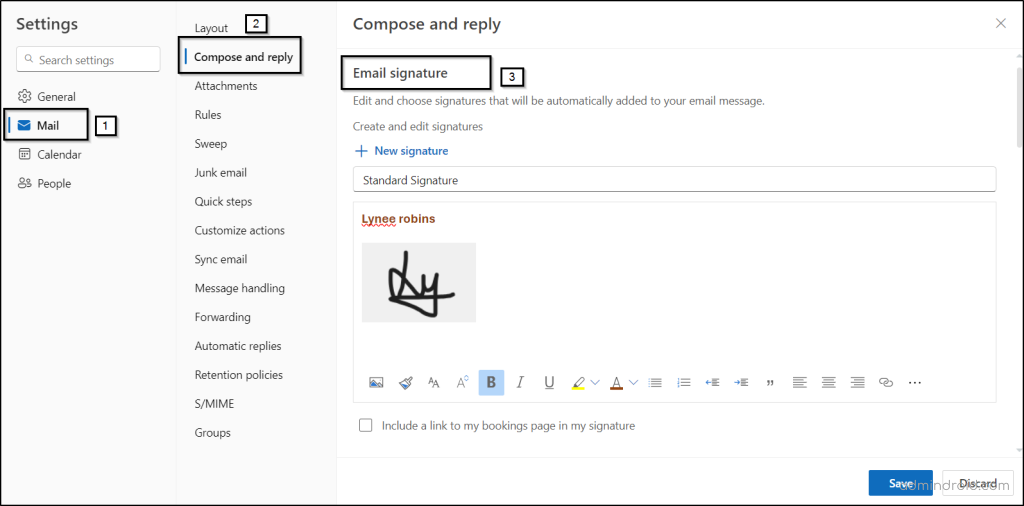
- Navigate through the path below to add a standard email signature to your message.
Outlook on web 🡢 Settings (gear icon) 🡢 Mail 🡢 Compose and reply 🡢 Email signature
- Now, type your signature and format it the way you desire with available options.
- Select the Save option to save your signature.
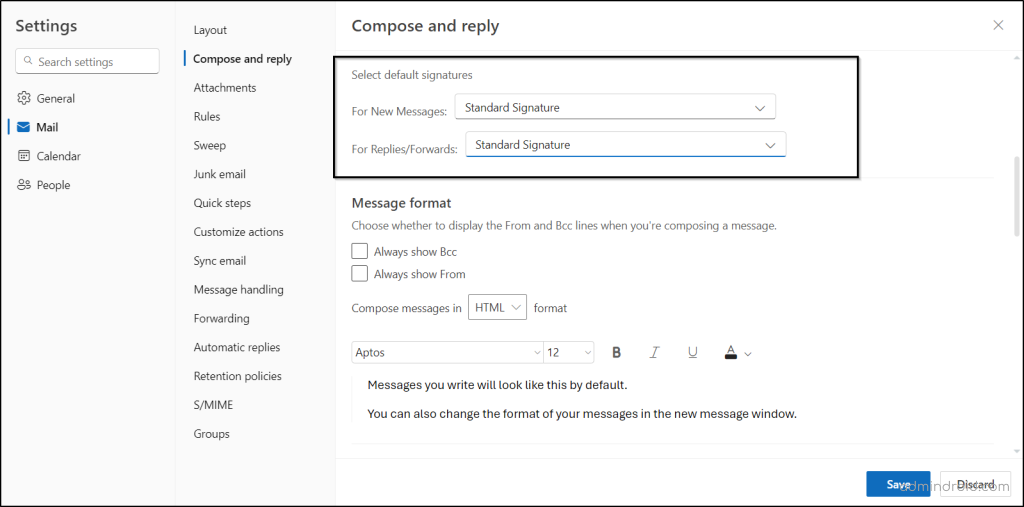
- Next, on the email signature page, you have the option to choose default signatures for your messages. Simply click on “Select default signatures” for both new messages and replies/forwards. This convenient feature automates the inclusion of your email signature in your messages, saving you from the hassle of adding it manually every time.
- Hit the Save button again to automate the email signature inclusion in your Microsoft 365.
2. Manually add email signature in Microsoft Outlook
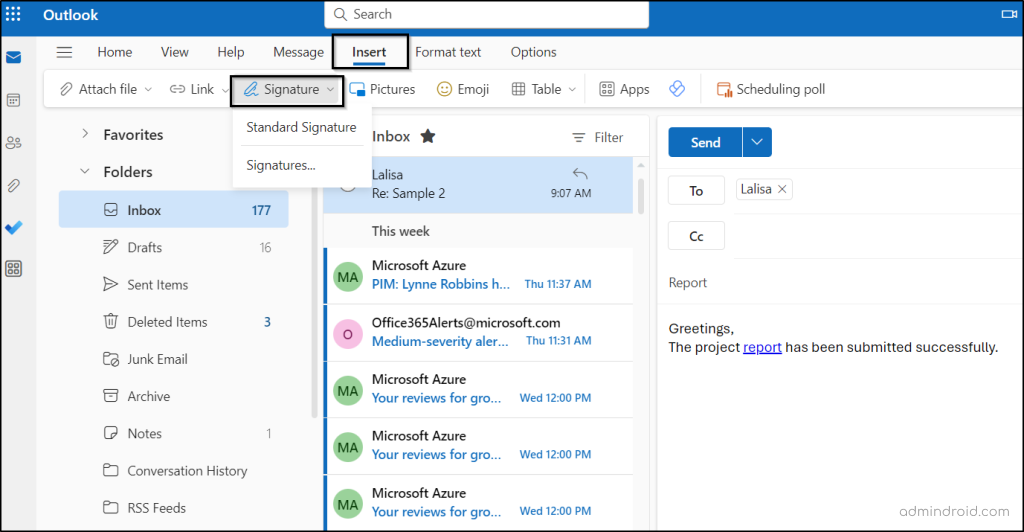
- Choose the New Email option and compose the email you wish to send.
- Next, select Insert > Signatures to add an email signature manually for a specific email message in Outlook for Windows.
How to Add Email Signatures in Outlook for Desktop?
- To manually add an email signature for each message in Outlook for Desktop, go to:
New Email 🡢 Message 🡢 Signatures icon (Pen signing document).
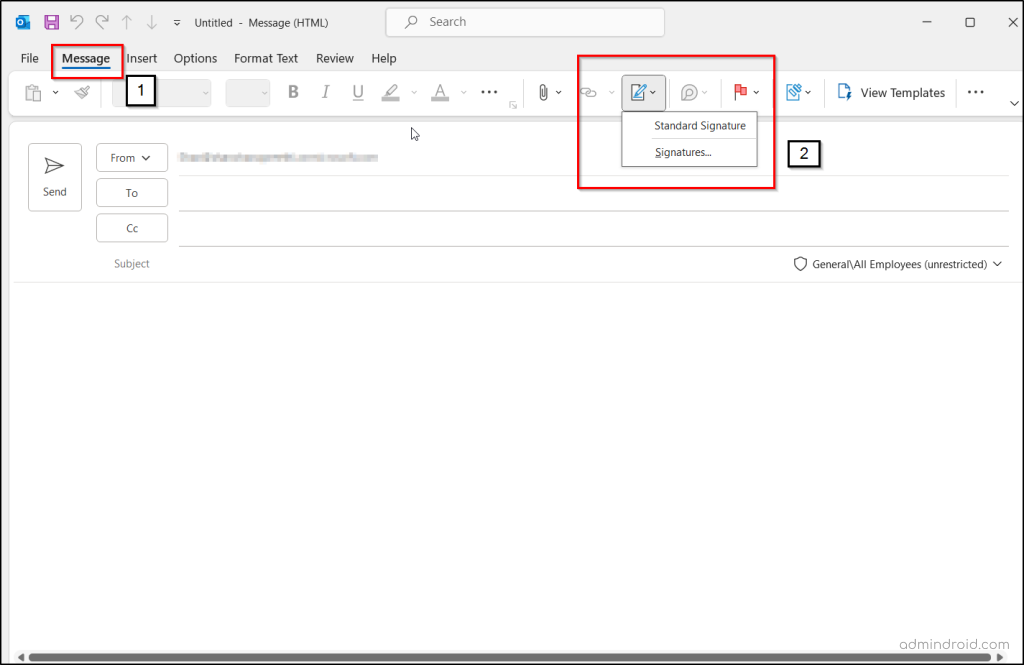
- For automated signature addition in Outlook for Windows:
Outlook for Desktop 🡢 File 🡢 Options 🡢 Mail 🡢 Compose messages 🡢 Create or modify signatures for messages (Signatures).
- Include your signature as you did in Outlook for the web, and select the default signature for new messages, replies, and forwards under the “Choose default signature” option.

Email signatures serve as a means to confirm your identity to the recipient of your message but do not inherently enhance its security. Due to the ease of copying email signatures, malicious actors can manipulate messages for cyberattacks. Then, here comes the digital signature adding an extra layer of security to your messages.
What is Digital Signature in Microsoft Outlook?
A digital signature not only assures recipients of your genuine identity but also fosters trust in the communication. It relies on certificates and a public key derived from your digital ID, effectively functioning as your distinct digital imprint. Importantly, it signifies to the recipient that the message content has remained unchanged in transit. So, let’s see how to create a digital signature in Microsoft Outlook.
Prerequisites to Add Digital Signatures in Outlook for Web
Before we delve into the process of digitally signing messages, it’s important to understand the prerequisites for adding digital signatures in Microsoft Outlook.
- Outlook on the web requires a Windows desktop device to support S/MIME extensions for digital message signing.
- Microsoft Edge is the recommended browser for utilizing S/MIME features.
- If you wish to use S/MIME on Chrome, your computer needs to be connected to a Microsoft Active Directory domain and have a Chrome policy that includes the S/MIME extension.
- It’s advisable to check with your IT administrator or helpdesk to ensure your computer meets these requirements. Please note that S/MIME functionality is not available in Outlook on the web for Mac, iOS, Android, or other non-Windows devices.
How to Add Digital Signature for Messages in Outlook for Web?
Let’s now see how to add a digital signature to email messages under this section.
- To digitally sign a message, you should follow the path below.
New Mail 🡢 Messages tab 🡢 More options (three dots) 🡢 More options
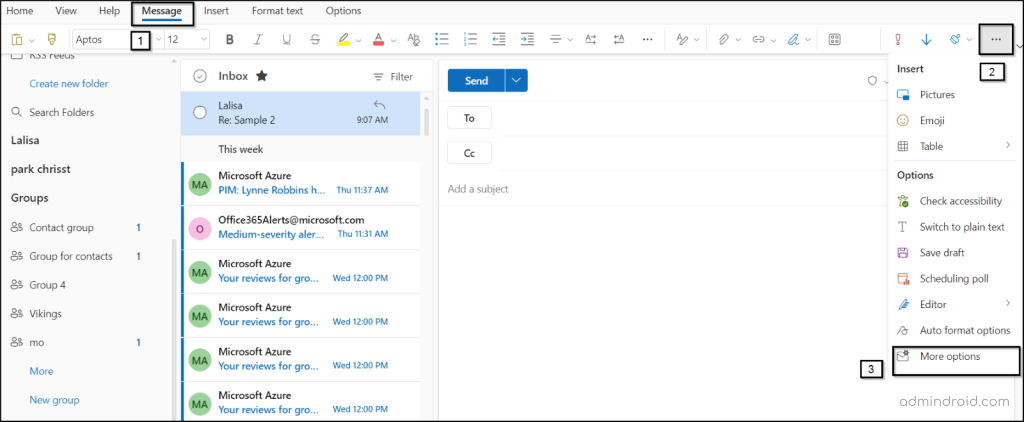
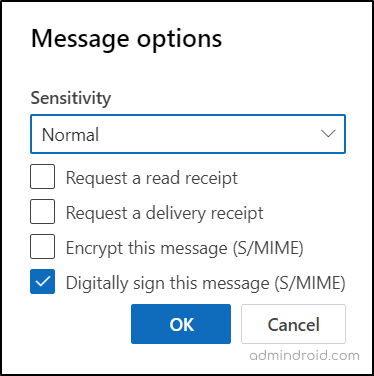
- Next, under the Message options select “Digitally sign this message (S/MIME)” under the sensitivity option. Crucially, to digitally sign messages in Outlook, it’s essential to have the S/MIME extension installed.
When your digital certificate is saved on a smartcard, you’ll receive a prompt to insert the smartcard in order to digitally sign your outgoing email. Additionally, your smartcard might necessitate the input of a PIN to access the certificate.
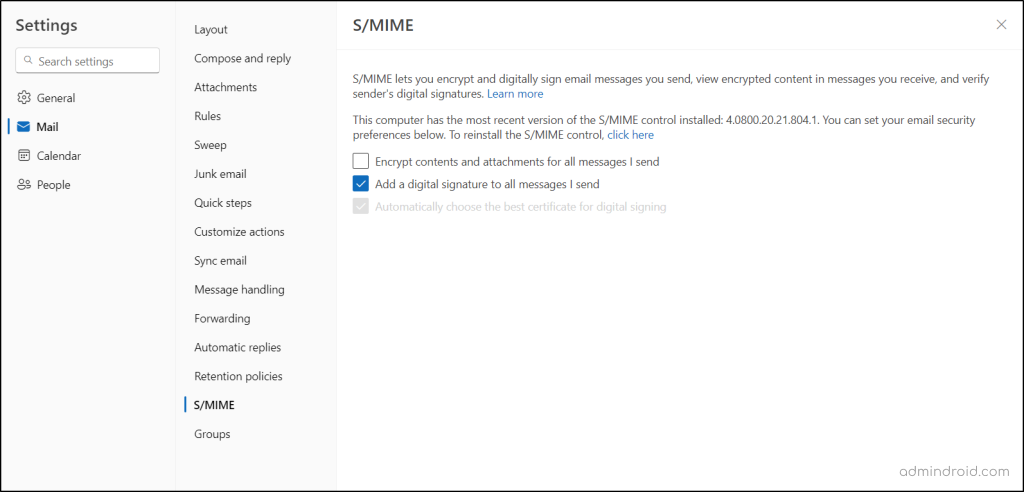
3. To digitally sign all email messages in Outlook, follow the path below to access the S/MIME page
Settings (gear icon) 🡢 Mail 🡢 S/MIME
4. Once the S/MIME control is installed, you’ll find the “Add a digital signature to all messages I send” option available for signing all your messages. Furthermore, you have the capability to enhance security by encrypting your messages for added protection.
NOTE: Outgoing messages encompass all new messages, as well as replies and forwards.
How to Add Digital Signatures for Outlook for Desktop?
- To add digital signatures to all outgoing messages after installing the S/MIME certificate:
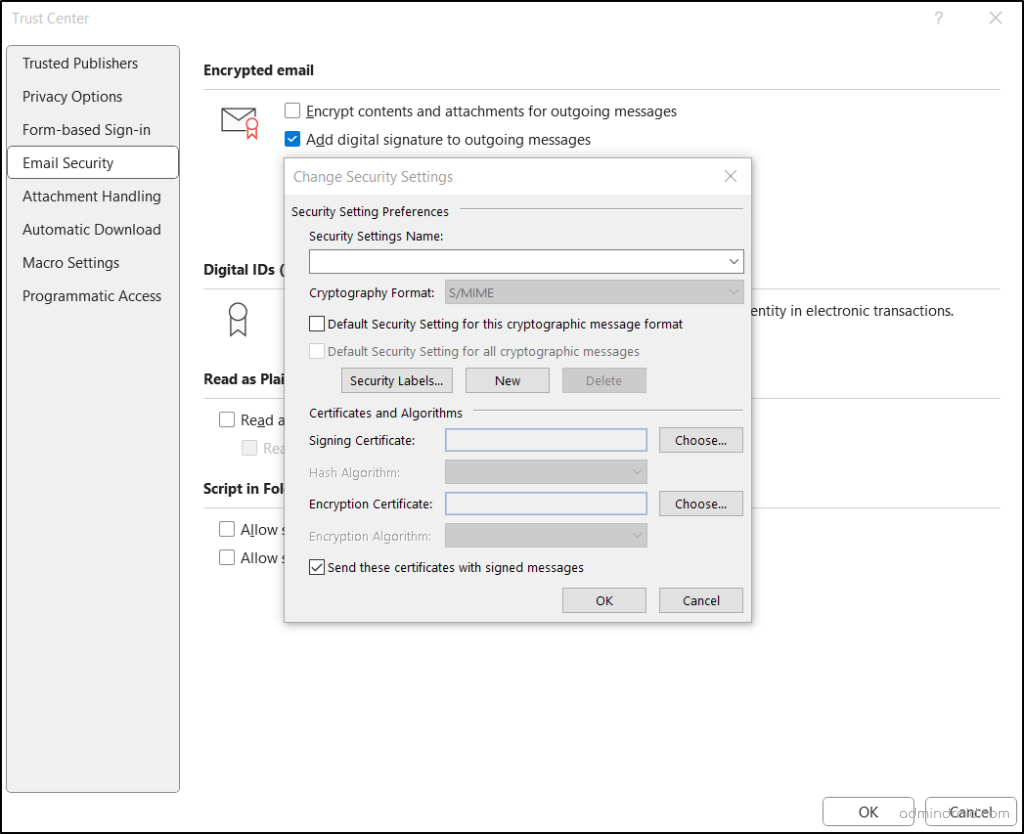
Go to File 🡢 Outlook Options 🡢 Trust Center 🡢 Trust Center Settings 🡢 Email Security 🡢 Encrypted email 🡢 Settings.
- In the security settings, provide a name for your settings and select the “Signing certificate” and “Encryption certificate” using the “Choose” option. Click “OK.”
- Enable digital signatures for all outgoing messages by checking “Add digital signature to outgoing messages” in the encrypted email options.
4. To add digital signatures manually for individual messages and customize their associated settings in Outlook for Windows, follow the path below:
New Mail 🡢 Options tab 🡢 More options (three dots) 🡢 Message options 🡢Security 🡢 Security Settings… 🡢Security Properties 🡢 Add digital signature to this message.

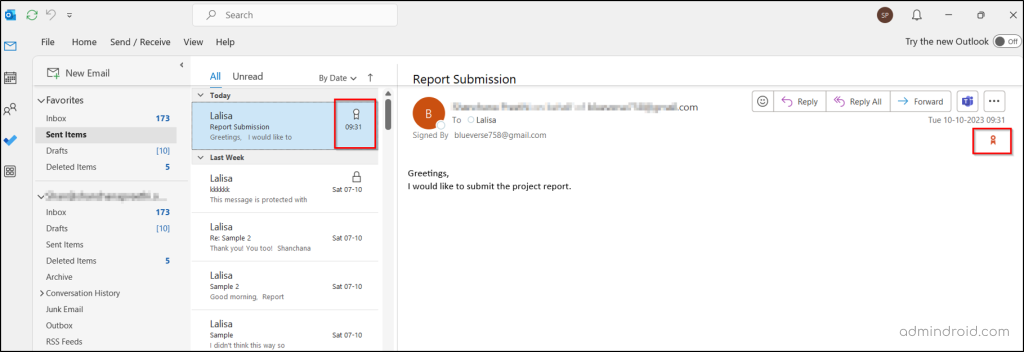
5. Once certificates are added, a digitally signed email will be indicated by a small ribbon icon in Microsoft Outlook.
How to Verify the Signature of a Digitally Signed Message?
When you receive a digitally signed message in Microsoft Outlook, it’s crucial to ensure that the sender’s identity is verified accurately. Here’s a step-by-step guide:
- Open the digitally signed message in Microsoft Outlook.
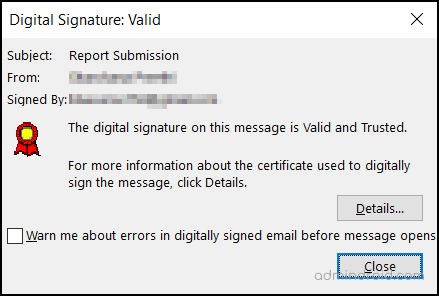
- Pay attention to the “Signed By” status line, not just the “From” line, to verify the actual signer’s email. If there’s a difference, trust the “Signed By” status line for authenticity.
- Finally, assess the validity of the signature by looking at the yellow and red ribbon symbol (refer below image) on the “Signed By” status line. If the signature is valid, this icon will provide assurance. To access more detailed information about the digital signature, click on the “Details” option.
By following these steps, you can accurately verify the digital signature in Microsoft Outlook. Moreover, encountering an invalid digital signature can result from various underlying causes:
- The sender’s certificate may have expired or been revoked by the certificate authority (CA), or there might be problems due to the unavailability of the server responsible for certificate verification.
- Additionally, it’s important to understand that when one person sends a message in place of someone else, the sender’s name will show up as the delegate in the message details.
- In such situations, it is advisable to promptly inform the individual who sent the message about the issue for further resolution.
Difference Between Standard and Digital Signatures in Microsoft 365
Standard Email Signatures in Microsoft Outlook
- A standard signature serves as the electronic counterpart to a handwritten signature.
- Unlike digital signatures, standard signatures do not undergo validation by certification authorities (CAs).
- The primary function of a standard signature is to verify the email message.
- A standard signature comprises text, images, or files used to signify consent or authorization.
- Standard signatures are susceptible to tampering and can be easily altered.
Digital Signatures in Microsoft Outlook
- Digital signatures rely on a public key infrastructure (PKI) to authenticate electronic signatures.
- These signatures are underpinned by digital certificates issued by a trusted third party known as a certification authority (CA).
- The fundamental purpose of a digital signature is to enhance the security of your email messages.
- Digital signatures are generated through the utilization of cryptographic algorithms.
- These signatures are highly secure and resistant to easy tampering.
How Do Digital Signatures Secure Messages in Cybersecurity?
Without a second thought, digital signatures in Microsoft 365 add a multi-layered security for the messages. Let’s explore the array of authentication measures that make digitally signed messages user-friendly and chaos-free.
- Guaranteed Authenticity:
Digital signatures provide certainty that the signer’s identity matches their claim, preventing any attempts by others to impersonate the document’s originator—a modern defense against online forgery.
- Ensuring Data Integrity:
Digital signatures not only protect the document’s content but also ensure the integrity of any attachments or embedded files. Any unauthorized changes to the document or its associated files can be detected, guaranteeing the overall integrity of the communication.
- Unquestionable Origin:
Digital signatures offer undeniable proof of the content’s origin, putting an end to any disputes. Non-repudiation means that the document’s true originator is unmistakably identified, leaving no room for denial. Signers can’t disown the signature on that document without disowning their digital key, and consequently, all other documents bearing that key’s signature.
POINT TO REMEMBER: Digitally signed messages are versatile, suitable for recipients both within and outside the organization. However, it’s essential for recipients to utilize an email application that supports S/MIME control and has it installed to properly verify the digital signature. Notably, both Outlook and Outlook Web App offer support for S/MIME.
Last Impressions:
In signing off this blog, I hope you now have a clearer grasp of signatures in Microsoft 365. You’ve also unlocked the critical role of digital signatures in shielding your messages from tampering.
As administrators, consider guiding your users to embrace the practice of digitally signing documents to elevate the confidentiality of transmitted data via Outlook. Additionally, empower your users to swiftly report any suspicious messages that land in their Exchange Online mailboxes. But why stop there? Continue to explore and implement the best email security practices to maintain a robust security posture.
Thank you for reading! We eagerly await your thoughts and experiences in the comments section.


