At first glance, SharePoint permissions seem straightforward — you just give people access levels like ‘Read’, ‘Edit’, or ‘Full Control’. Simple. But once you start working with them, they become unexpectedly complex and difficult to manage. What starts as a straightforward access structure quickly evolves into a tangled mess of broken inheritance, custom permission levels, and mysterious ‘Limited Access’ entries that SharePoint quietly adds in the background.🥲
The difference between a well-managed SharePoint environment and permission chaos often comes down to following a few critical best practices from the start.
In this blog, we’ll break down fundamental best practices that you can follow, so managing permissions won’t feel like a constant juggling act.
How SharePoint Permissions Work – Behind the Scenes
Before diving into best practices, let’s quickly understand SharePoint’s permission foundation:
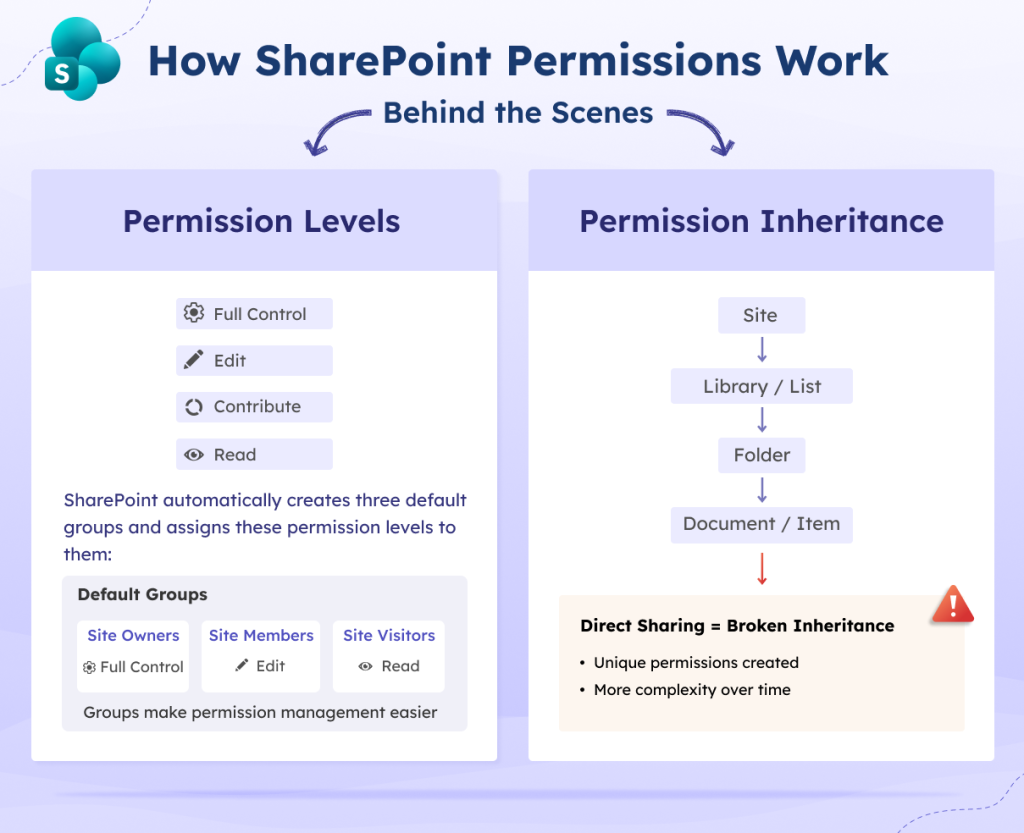
Permission Levels in SharePoint
At the core, SharePoint manages access through permission levels. A permission level is simply a predefined set of individual permissions bundled together. These bundles define exactly what actions a user can perform across a site. By default, SharePoint comes with various built-in permission levels such as Full Control, Edit, Contribute, Read, etc. When you create a new SharePoint site, SharePoint automatically creates three default groups and assigns these permission levels to them:
- Site Owners → Full Control
- Site Members → Edit
- Site Visitors → Read
Additionally, SharePoint allows you to create custom permission levels by combining individual permissions to meet specific business requirements. While this offers flexibility, it also adds complexity, as managing and tracking these custom levels can become challenging, especially in large environments.
Permission Inheritance in SharePoint
Permissions applied at the site level automatically flow down through the hierarchy: Site → Library/List → Folder → Document/Item. This behavior is called permission inheritance.
However, when you share a specific folder or document directly with a user, rather than adding them to one of the default groups – inheritance is broken at that level. SharePoint then creates unique permission entries for that item. Each of these actions adds complexity. Over time, as they accumulate, managing permission inheritance becomes increasingly difficult.
The Risks of Poor SharePoint Permission Management
Most permission issues happen not because SharePoint is complicated, but because access is given in unstructured ways such as:
- Data exposure due to oversharing: Users end up with access to sensitive files they don’t actually need for their work.
- Internal access risks: Poorly configured permissions make it easier for insiders to accidentally or intentionally access restricted data.
- External data leakage: Misused sharing links (like “Anyone” links) expose internal documents to unauthorized people.
- Untracked and hidden permissions: Broken inheritance creates unique permissions that are hard to track, making it easy for sensitive data to go unnoticed.
- Easy data theft from compromised accounts: If an account is breached, excessive permissions allow attackers to access far more data than necessary.
- Admins and site owners struggle to maintain access: When permissions are broken or customized in many places, it’s hard to keep track of who can access what, which leads to outdated or incorrect access over time.
SharePoint Permissions Best Practices
To avoid the issues listed above, it’s important to follow a structured approach for managing SharePoint permissions.
We’ve compiled these best practices to help you manage SharePoint permissions effectively. Rather than just listing tips, we’ve organized them around the permission lifecycle. It covers what to do when creating a site, setting up permissions, and managing them once the site is live. This approach ensures every step is clear, actionable, and keeps your permissions simple, secure, and easy to manage.
SharePoint Permission Assignment
- Assign permissions at the site level
- Give new users permissions only at the group level
- Limit full control to a small set of trusted admins
- Apply the principle of least privilege
SharePoint Permission Levels
- Avoid creating custom permission levels unless necessary
- Choose the right permission level: Edit vs Contribute
- Understand how limited access works in SharePoint
SharePoint Permission Inheritance Management
External Sharing and Access
- Define who can share content within the site
- Utilize external sharing settings in the SharePoint admin center
- Restrict default “Anyone” sharing links in SharePoint
- Use “People you choose” for sharing files
- Stop sharing when access is no longer needed
Audit SharePoint Permission Changes
Now, let’s explore each SharePoint permission best practice in detail:
SharePoint Permission Assignment
1. Assign Permissions at the Site Level
Suppose you add a user to the Site Members group. That user can automatically edit content in all libraries and folders without you having to configure access for each one. Similarly, a user in the Site Visitors group can view everything on the site without needing separate permissions for individual documents.
If permissions were assigned at each library or document level, there would be different levels of access for each user which makes it difficult to manage and track who can do what.
✅ Best practice: The easiest and most effective way to manage SharePoint permissions is to grant access at the site level and let it inherit down to libraries, folders, and documents. This approach keeps your permission structure simple, consistent, and easy to manage, reducing the risk of mistakes.
2. Give New Users Permissions Only at the Group Level
Sometimes, admins assign permissions directly to individual users because it seems quick and convenient. However, this approach quickly becomes difficult to manage. Each user ends up with directly assigned permissions, and if someone changes roles or leaves, you must track down every library, folder, and document where they were granted access. In a large environment, this quickly becomes almost impossible to manage and can lead to security gaps or accidental data exposure.
✅ Best practice: Add users to groups with clear, descriptive names like “Marketing Team,” “Finance Readers,” or “Project Alpha Contributors.”
When a user’s role changes or they leave, you can remove them from the group once, and all their permissions across the site, libraries, and documents are automatically updated.
3. Limit “Full Control” to a Small Set of Trusted Admins
“Full Control” is the most powerful permission level in SharePoint. Users with “Full Control” can delete entire sites, change anyone’s permissions, modify site settings, and access all content.
✅️ Best practice: Because of this level of power, it should be granted only to a small group of trusted administrators who genuinely need it to manage the site. Users are added to the Site Owners group to grant them “Full Control”.
Limiting “Full Control” helps reduce the risk of accidental changes or security issues and ensures that site management remains safe and accountable.
4. Apply the Principle of Least Privilege
It’s tempting to give users higher permissions “just in case” or to avoid future access requests. For example, adding someone to ‘Site Owners’ might seem easier than figuring out what they actually need. However, this approach creates security risks – users with “Full Control” can change permissions across the site, potentially giving themselves or others access they shouldn’t give.
✅ Best practice – start restrictive:
- Grant only the minimum permissions needed for someone to complete their tasks.
- You can always add more access later if required.
- When a user requests access, assign the lowest permission level that enables those tasks.
This method keeps your SharePoint environment secure, manageable, and easy to audit.
SharePoint Permission Levels
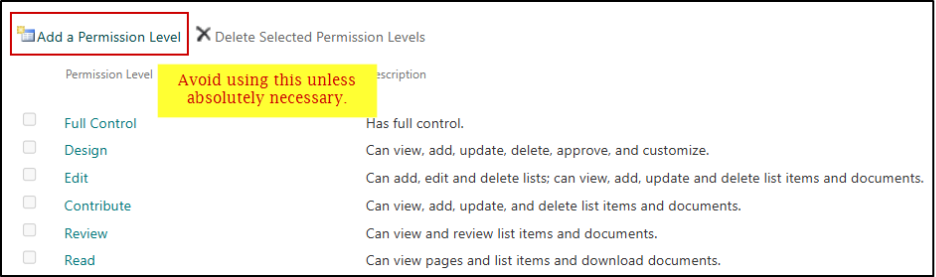
5. Avoid Creating Custom Permission Levels Unless Necessary
SharePoint’s default permission levels — Read, Contribute, Edit, and Full Control are designed to cover the vast majority of scenarios. They are well-documented, widely understood, and easy to manage. This makes it easy for admins to maintain consistent access across sites.
✅ Best practice: Stick to the default permission levels whenever possible, and only create custom permission levels when absolutely necessary, documenting their purpose clearly.
6. Choose the Right Permission Level: “Edit” vs “Contribute”
“Edit” and “Contribute” can be easily confused, since both allow users to add and modify content. However, the distinction is important: giving users the wrong level of access can lead to accidental changes or security issues. ⚠️
| Permission Level | Capabilities |
| Edit | Users can add, edit, and delete lists and libraries, as well as view, add, update, and delete items and documents. |
| Contribute | Users can view, add, update, and delete items and documents, but cannot add, edit, or delete lists themselves. |
✅ Best practice: Understanding this difference ensures you grant just the right level of access, while letting users work efficiently.
7. Understand How Limited Access Works in SharePoint
Limited Access is one of the most misunderstood aspects of SharePoint permissions and often causes confusion for both admins and users.
What it actually is: Limited Access isn’t something you assign manually — SharePoint adds it automatically behind the scenes.
Suppose you share a single document that’s buried five folders deep with someone who otherwise has no access to the site. For that person to open the document, they need to “pass through” the site, the library, and all the folders leading to it. SharePoint automatically gives them Limited Access to everything along that path just enough permission to navigate through, but not enough to view or open anything else.
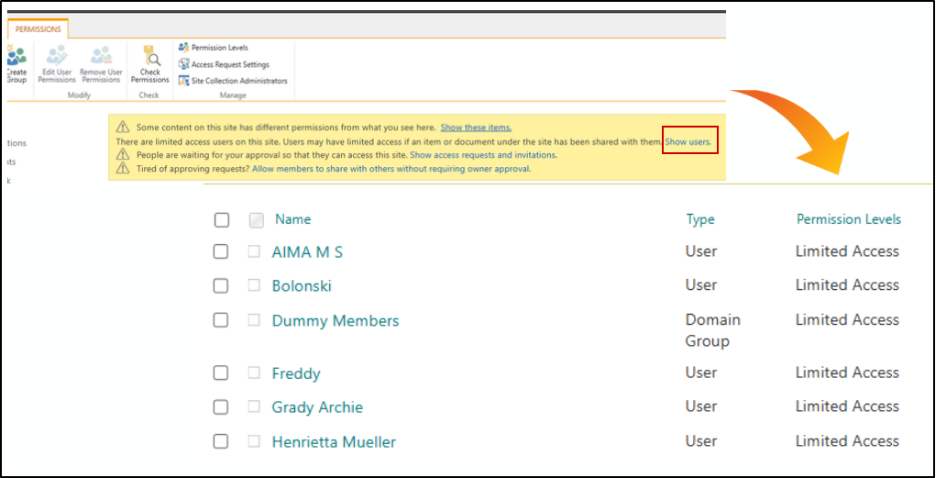
✅ Best practice: Find users with Limited Access in SharePoint:
- Go to the site → Settings → Site Permissions → Advanced permissions settings.
- If there are limited access users, you’ll see a banner like:
- “There are limited access users on this site. Users may have limited access if an item or document under the site has been shared with them. Show users.”
- Click the Show users link to view users with Limited Access.
SharePoint Permission Inheritance Management
8. Break Inheritance Only When Required
Breaking inheritance means creating a unique permission structure that no longer follows the site’s default permissions. While this can be necessary in some cases, each break adds complexity and must be managed independently.
✅ Best practice: If you must break inheritance, do so at the highest level possible — ideally at the library or list level, rather than on folders or individual items. A library with unique permissions is visible, manageable, and easy to audit.
8.1 Avoid Breaking Inheritance at Item Level
Continuing from the previous best practice, breaking inheritance at the item level creates unique permissions—access that applies only to that specific document or item.
These unique permissions are hard to track, manage, or audit. Over time, repeatedly sharing individual documents can lead to hundreds of scattered items with unique permissions and no clear record of who has access.
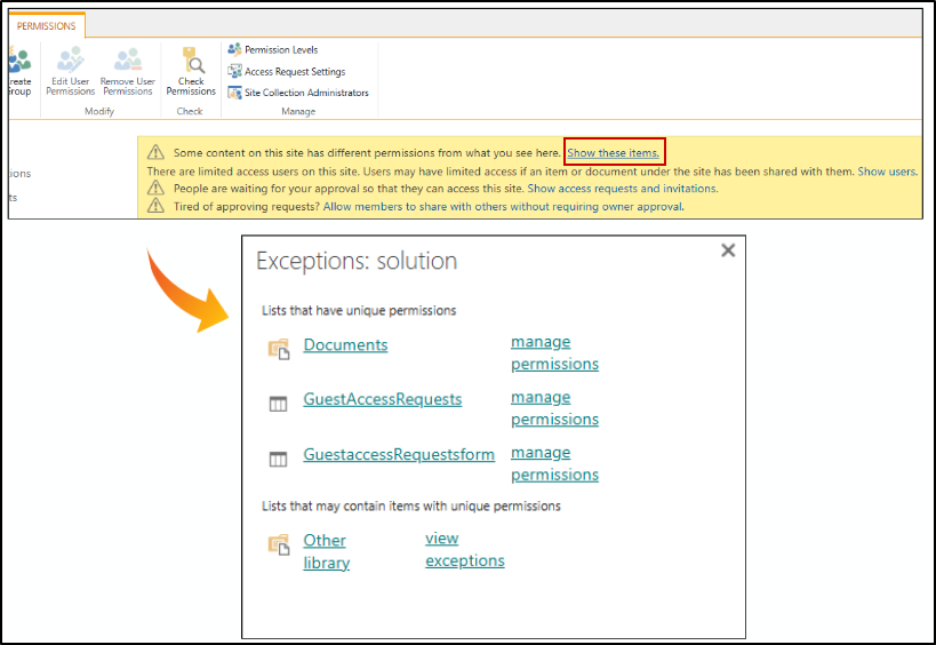
✅Best practice: Find items with unique permissions in SharePoint:
- Go to Site Permissions → Advanced permissions settings.
- Look for the banner: “Some content on this site has different permissions from what you see here. Show these items.”
- Click Show these items to view all individually permissioned content.
Whenever you break inheritance, it’s also a good idea to document the reason. You don’t need a complex system – even a simple SharePoint list works.
External Sharing & Access
9. Define Who Can Share Content Within the Site
Sharing is just another way of granting permission. Controlling who can share is just as important as controlling who has access in the first place.
✅ Best practice: SharePoint lets you decide who can share content at each site. You can find this setting by clicking the settings gear → Site Permissions → Site Sharing.
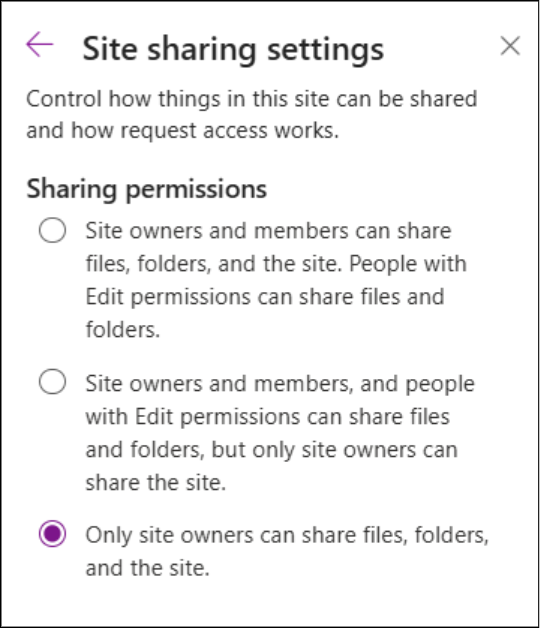
Choose the option that matches your site’s needs and review these settings whenever your site’s purpose changes.
10. Utilize External Sharing Settings in the SharePoint Admin Center
External sharing gives people outside your organization access to your SharePoint content. Since these users are beyond your direct control, careful governance is essential. External sharing controls can be configured at the tenant level in the SharePoint admin center, with site-level settings applied to enforce stricter restrictions when needed.
✅ Best practices:
- Limit sharing for highly sensitive sites: Allow access only to users who truly need it.
- Restrict external access to trusted domains: Only permit users from approved organizations.
- Use group-based sharing: Allow only users in specific groups to share content externally.
- Set link expiration: Configure expiration dates for external links to reduce long-term exposure.
SharePoint provides four levels of external sharing, which you should configure based on the sensitivity of each site’s content:
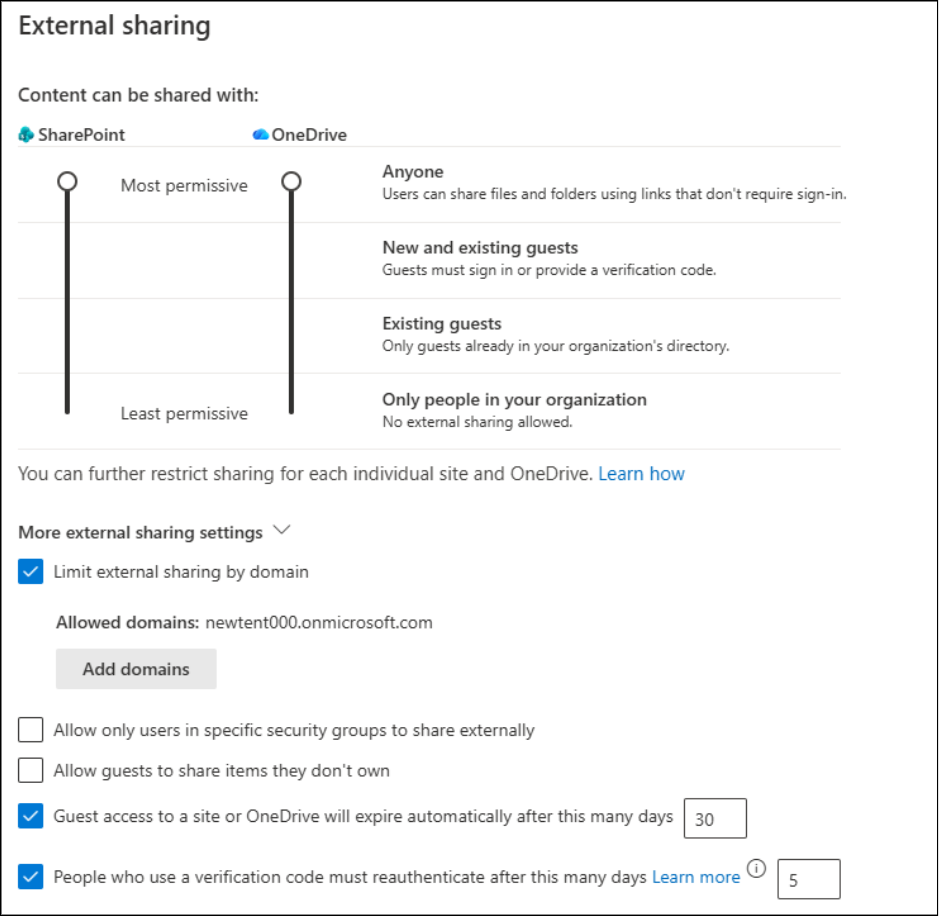
These settings are configured at the tenant level in the SharePoint admin center. You can also manage external sharing at the site level, where they can be more restrictive than the tenant settings.
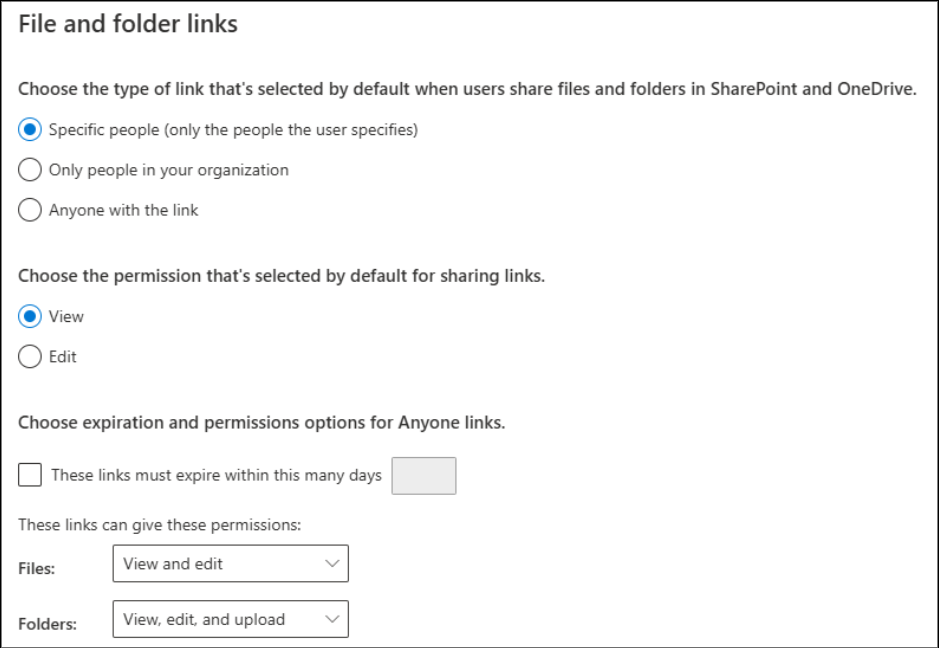
11. Restrict Default “Anyone” Sharing Links in SharePoint
By default, when someone shares files in SharePoint, the selected link type is set to be “Anyone”. That means with just one click, a file could be shared with anyone outside your organization, even unintentionally! Company-wide links can also expose sensitive data broadly.
✅ Best practice: To prevent accidental exposure, you must change the default to something more restrictive, like “Specific people.”
You can do this in the SharePoint Admin Center under Policies → Sharing → File and folder links.
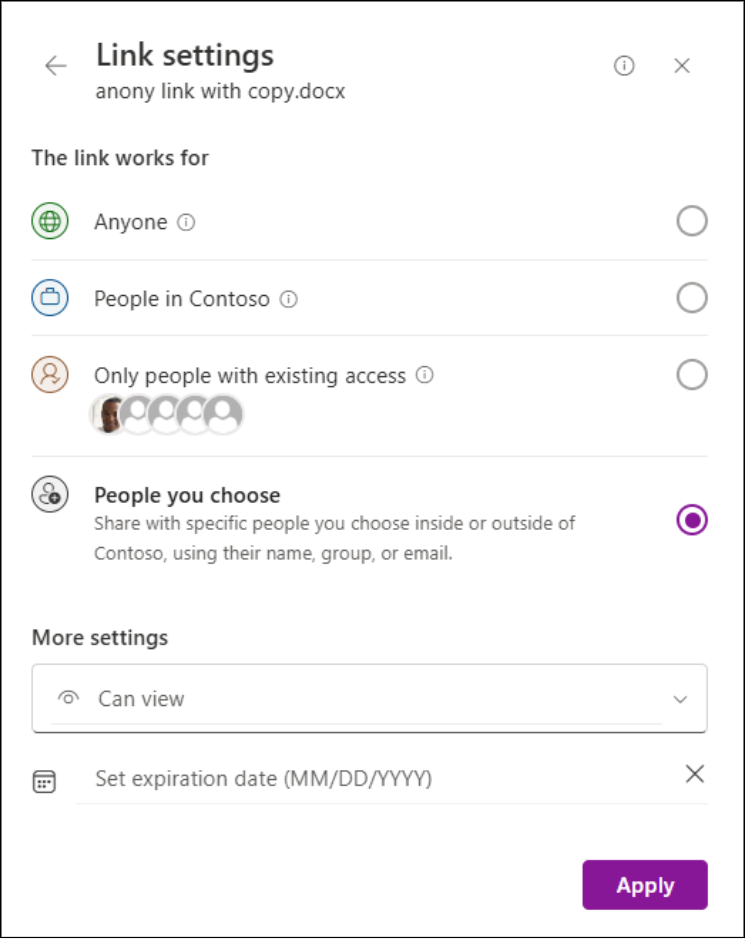
12. Use “People You Choose” for Sharing Links
When sharing files in SharePoint, always try to share with the “People you choose” option. This ensures that only the recipients you select can access the content. They must sign in to authenticate, and the link cannot be used by anyone else.
Even if someone tries to forward it, the link won’t work for anyone except the original recipients.
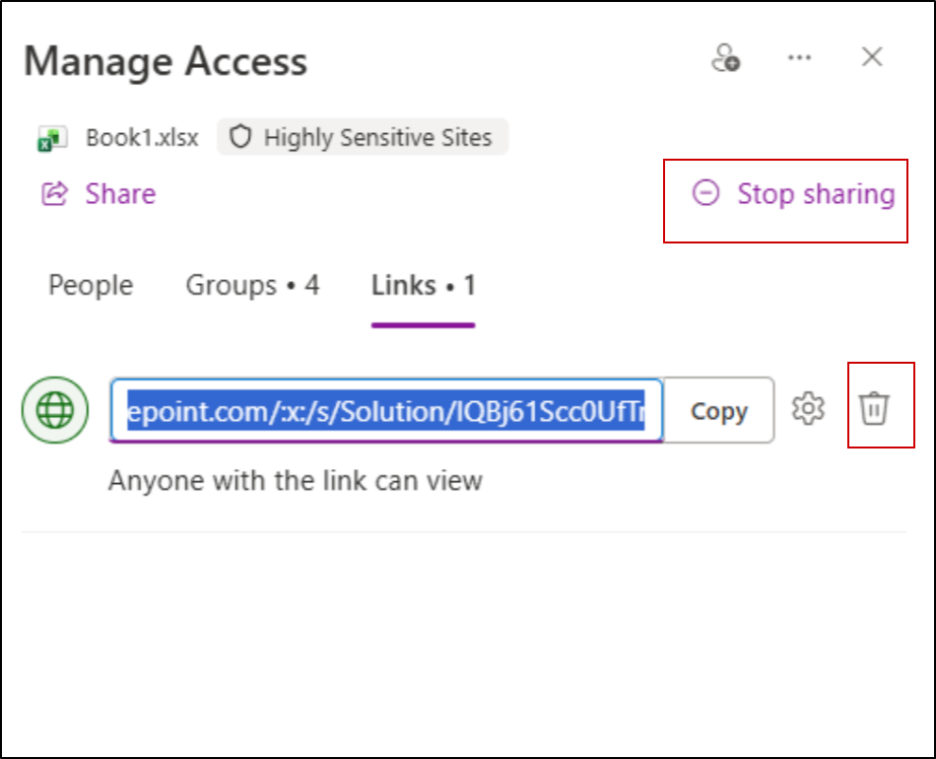
13. Stop Sharing When Access is No Longer Needed
In reality, most permissions never get removed. People share documents for a project, the project ends, and those sharing permissions remain forever. This permission creep creates security risks.
✅ Best practice: To avoid this, use the ‘Manage Access’ feature to check who has access and remove anyone who shouldn’t have it.
- Select a file, folder, or library, then click ‘Manage Access’.
- You’ll see everyone who can access it, both through groups and direct sharing.
- You can then stop sharing with people who no longer need access or delete the sharing link entirely.
Doing this regularly keeps your content secure, organized, and easy to manage.
Audit SharePoint Permission Changes
14. Use the Built-in “Check Permissions” Feature
SharePoint’s Check Permissions feature is a simple way to see exactly what permissions a user has. It answers the question: “What can this person actually do on this site?”
To use it, go to Settings → Site Permissions → Advanced Permission settings → Check Permissions, and enter a user’s name. SharePoint will show their effective permissions, including:
- Permissions given directly (like Limited Access)
- Permissions granted through group membership (for example, Full Control via “solution Owners” or Edit via “solution Members”)
- Additional factors that affect access, such as Deny settings
However, this feature is basic and outdated, offering only limited insights into user permissions without any advanced analysis.

15. Audit Permission Changes Using Microsoft Purview
Microsoft Purview audit logs help you keep track of all permission-related changes in SharePoint. You can monitor things like:
- AddedToSiteCollectionGroup
- AnonymousLinkCreated/Used
- External users and their access
Regularly reviewing these logs helps you spot security issues early, stay compliant, and troubleshoot problems before they escalate.
Audit logs often fall short when it comes to SharePoint permissions. They provide only raw, fragmented data and require manual filtering to determine who has access to what. In large environments, this process is time-consuming, error-prone, and leaves gaps in visibility.
AdminDroid SharePoint permission explorer 360° goes beyond these limitations. It gives you complete, actionable insights into every permission—how it was granted, who has access, and the full permission story.
In addition, it provides detailed reports and deep insights. It also offers auditing and management actions on permissions, giving you full control and clarity that basic audit logs simply can’t deliver.
That’s it for this blog! We hope these tips make managing SharePoint permissions a bit easier. Thanks for reading. Got questions or feedback? Drop them in the comments – we’d love to hear from you.


