As your organization grows, manually adding new users can become tedious and error-prone. Microsoft 365 user templates simplify this process by allowing you to preconfigure common settings and details. This way, you can quickly onboard groups of users with similar requirements, saving time and reducing mistakes. In this blog, we’ll guide you through creating templates for adding users in Microsoft 365, helping you streamline your workflow and boost efficiency.
What are User Templates in Microsoft 365?
User templates in Microsoft 365 allow admins to save and apply common settings for multiple users. With templates, you can easily set up similar users by reusing stored settings instead of configuring each account from scratch. Templates are perfect for setting up employees in bulk—like adding team members with the same job role, office location, department, or license needs, helping ensure secure admin accounts.
How to Create a User Template in Microsoft 365?
You can create user templates in two ways:
- Create a template after adding a new user from the Active Users page
- Create a template first, then add users to it
Let’s look at each method:
1. Create a Template After Adding a User
To set up a template after adding a Microsoft 365 user, start by creating a user by following these steps:
- Sign in to the Microsoft 365 admin center.
- Navigate to Users > Active Users > Add a user.
- Configure the new user’s basic information, assign product licenses, and configure any optional settings.
- Click ‘Finish adding’.
After the user is created, you’ll see an option labeled ‘Save these user settings as a template’ on the following page. Provide a template name and description, then select ‘Save as template’. Once saved, your new template will be listed under User templates, ready for use with future users.
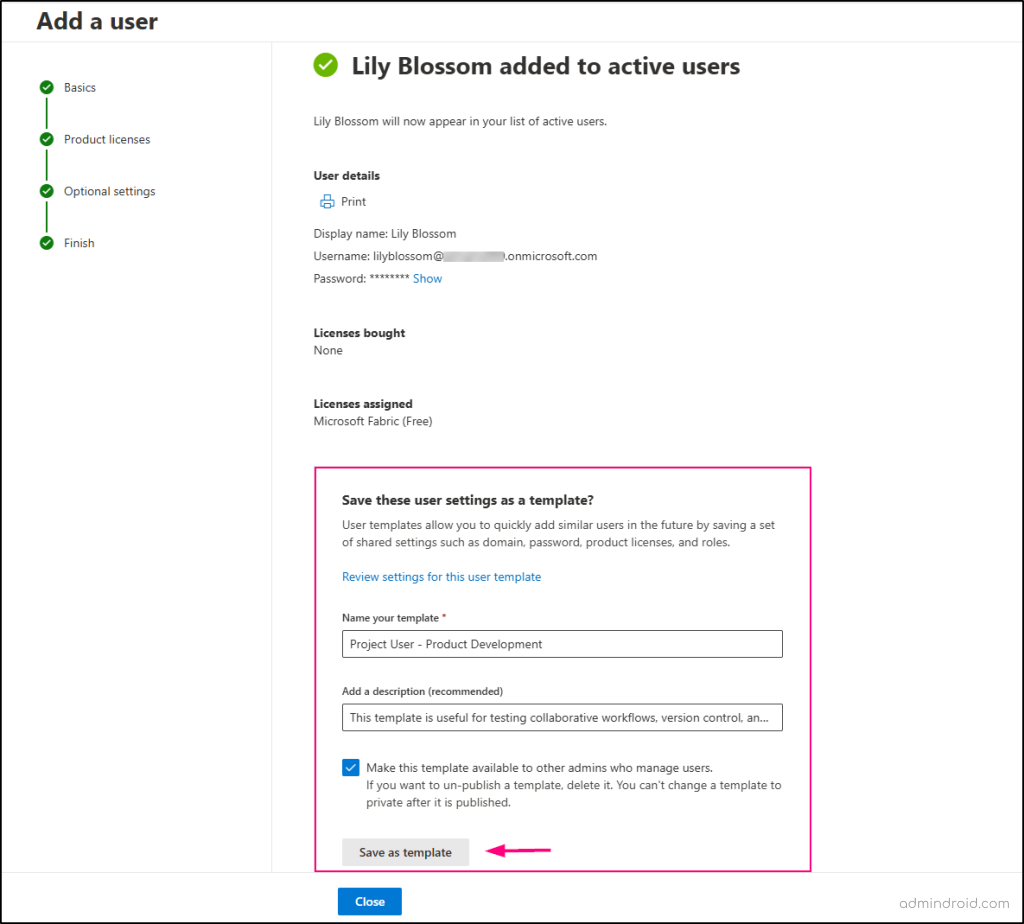
When you create a template after adding a user, the following settings are automatically saved in the template:
- Domain
- Password Type (Auto-generated or custom password)
- One-Time Password Option (Require the user to change the password at first sign-in)
- License Location (Select the country)
- License Selection (Choose licenses like Microsoft 365 E5 or any other available options)
- Application Selection (Assign applications based on the chosen license)
- Role Assignment (User or admin access)
- Profile Information (Includes job profile, department, office location, office phone, and street address)
However, certain user-specific details are excluded from the template, including:
- First and Last name
- Display Name
- Username
- Password
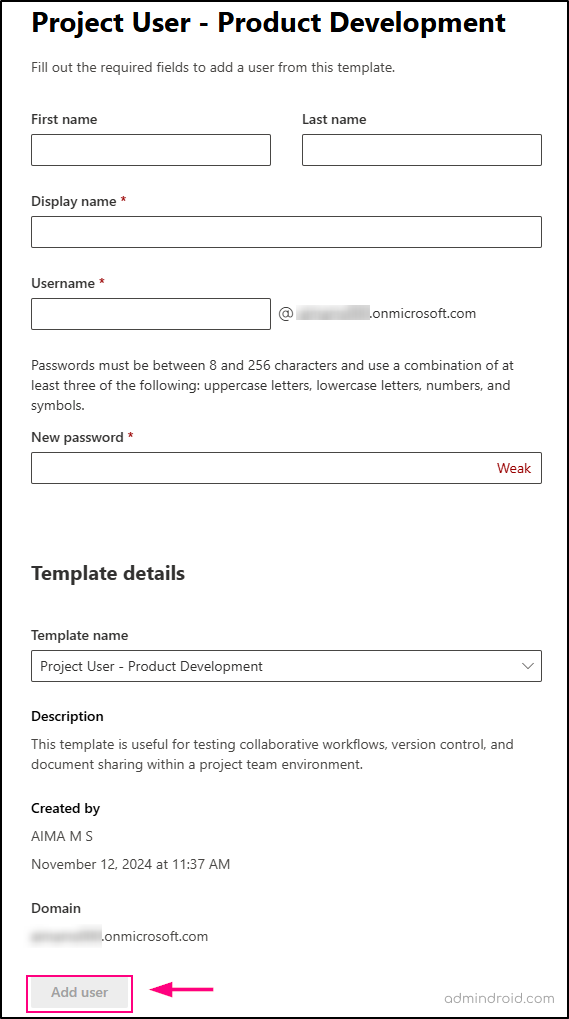
After saving the template, you can also add another user directly from the same page by selecting the Add another user with this template link. This opens a flyout page where you simply need to enter the new user’s name and password details. For your convenience, the template details are also displayed on this page. Finally, click Add user to complete the setup.
2. Create a User Template and Then Add a User
Alternatively, to create Microsoft 365 user accounts using templates, follow the steps below:
- Navigate to Users -> Active users in the Microsoft 365 admin center.
- Then, select User templates-> Add template.
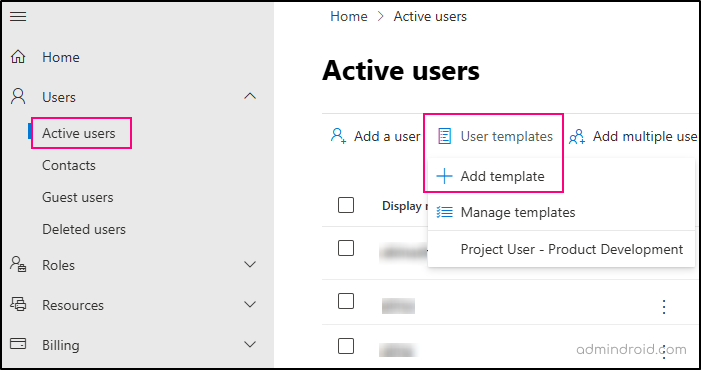
- Name your template and add a description.
- The ‘Publish this template’ option is enabled by default. To prevent the template from being accessible to other admins managing users, disable this option.
- Set up the basics, like the domain and password requirements.
- Assign licenses, roles, and additional settings for the template.
- Review & click Finish adding to save the template.
Once the template is created, you can add users to it by clicking the “Add a user using this template” link on the next page.
The templates you create will also be listed on the ‘User templates’ page. When you’re ready to use a template, simply select it from the list. You’ll only need to enter user-specific details, such as the user’s first and last name, and then click Add user. This template will apply all preset configurations, allowing you to create bulk users with the same settings and reducing the time spent on individual setups.
💡 Tip: After creating users, you can use the built-in reports to spot user activities, helping you monitor and maintain security.
Manage User Templates in the Microsoft 365 Admin Center
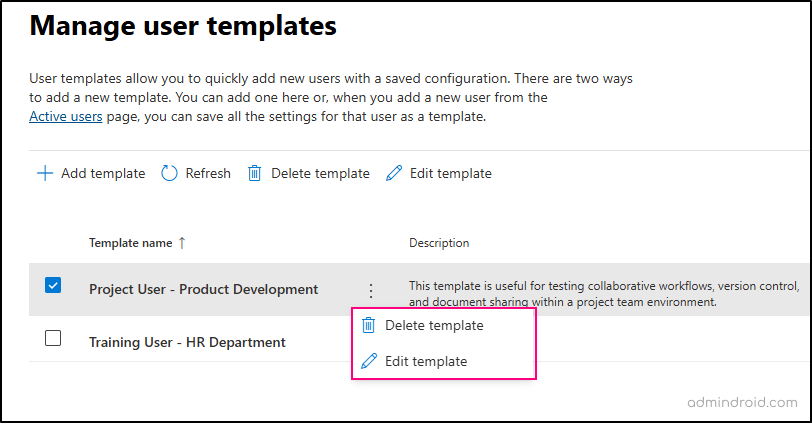
You can manage your templates from the Manage user templates section in the admin center, where you’ll see a list of all templates you’ve created. From here, you can add new templates, edit existing ones, or delete templates that are no longer useful.
You can also use a template to add a user by selecting the desired template from the Manage user templates page and then clicking Use template.
Points to Remember:
- Once the template is published, it will be visible to other admins, and it cannot be made private.
- If any fields are left blank, they will be marked as None provided in the template.
- You cannot create a user template directly from the settings of an existing user account.
- If there are not enough available licenses for a user, an attempt will be made to purchase one using the existing payment information. If payment details are unavailable, the user will be created as unlicensed.
- After creating, you can bulk update users in Microsoft Entra to modify properties, assign managers, sponsors, and more.
User templates are a powerful feature for Microsoft 365 admins, simplifying the user setup process and maintaining consistency across accounts. However, don’t stop at just adding users—make sure to monitor user sign-ins & follow Microsoft 365 security best practices to ensure secure access management.
We hope this guide has clarified how to add users in Office 365 using user templates in Microsoft 365. Thanks for reading. For any further questions, feel free to reach out in the comments section below.
