
In SharePoint Online, the instinctive approach to organize project files or legal contracts is often creating folders 📁. Traditional SPO folders may seem like the obvious choice, but they fall short when tagging and categorizing documents. Additionally, searching and sorting within nested folders is a difficult challenge.
This is where Document Sets in SharePoint Online step in! Unlike regular folders, they allow you to group related files while inheriting metadata (labels that describe your data – just like a book has a title and author, or a song has a genre and artist). In SPO Document Sets, metadata helps tag, search, and filter documents effortlessly, so you don’t have to dig through folders to find what you need.
In this blog, we’ll explore what Document Sets are, why they are a smarter alternative, and how to create them to enhance document management in SharePoint Online. Let’s dive in!
What are Document Sets in SharePoint Online?
SharePoint Online Document Sets are an advanced type of folder that groups related documents together and allows them to be managed as a single entity. What sets them apart is that they allow users to assign metadata tags, something not possible with regular folders!
The problem with folders is that they do not inherit metadata (i.e., column values) for the files inside them, and similarly, the metadata of individual files is not visible at the folder level. Additionally, when you search in a document library, results are always displayed grouped by folders, which can make finding specific documents less efficient. This limitation makes Document Sets a better choice for structured document management.
More importantly, Document Sets function as a special SharePoint Content Type. A Content Type is essentially a structured framework that defines your data. For example, a contract document could have site columns like Contract Number, Client Name, Start Date, Expiration Date, and Approval Status. Typically, these columns are added manually each time they are needed in a document library.
By creating a Content Type as an empty container and adding site columns to structure it, you can reuse it across multiple libraries. This eliminates the need to add fields in each library manually and ensures consistency in document management.
Key Features of SPO Document Sets:
- Metadata Inheritance – With SharePoint Document Sets, you can automatically apply metadata from the document set (folder level) to all files within it. Additionally, you can assign unique metadata to individual files inside the document set as needed.
- Versioning – You can track and maintain version history for the entire Document Set. Furthermore, you can use intelligent versioning in SharePoint Online to manage version limits and optimize storage for specific document libraries.
- Approval Workflows – Apply content approval processes at the Document Set level to streamline document reviews.
- Granular Permissions – Assign unique permissions to a Document Set, independent of the library or folder settings.
- Centralized Management – Manage multiple related documents—such as PowerPoint presentations, Word documents, Excel sheets, and more—as a single unit, with all the above-discussed features for better structure and efficiency.
Create a Document Set in SharePoint Online
Consider an HR team wants to efficiently manage employee onboarding documents, such as offer letters, NDAs, policies, and more. Instead of handling them separately, Document Sets provide a structured way to group and manage these files seamlessly within a single container.
Now, let’s see how to configure and create Document Sets in SharePoint Online. Ensure you have Site Collection Administrator or Site Owner permissions before getting started.
- Enable Document Set in SharePoint Online
- Create file level Content Type in SharePoint Online
- Configure SPO Document Set Content Type
- Create and add site columns to the Content Types
- Configure SharePoint Document Set settings
- Add a Document Set Content Type to the document library
- Create a new Document Set in SharePoint Online
1. Enable Document Set in SharePoint Online
Before creating a Document Set, you must first enable the Document Set feature on each SharePoint Online site where you want to use it. This allows you to create and configure Document Sets within your document libraries. Here’s how to enable Document Sets in SharePoint Online.
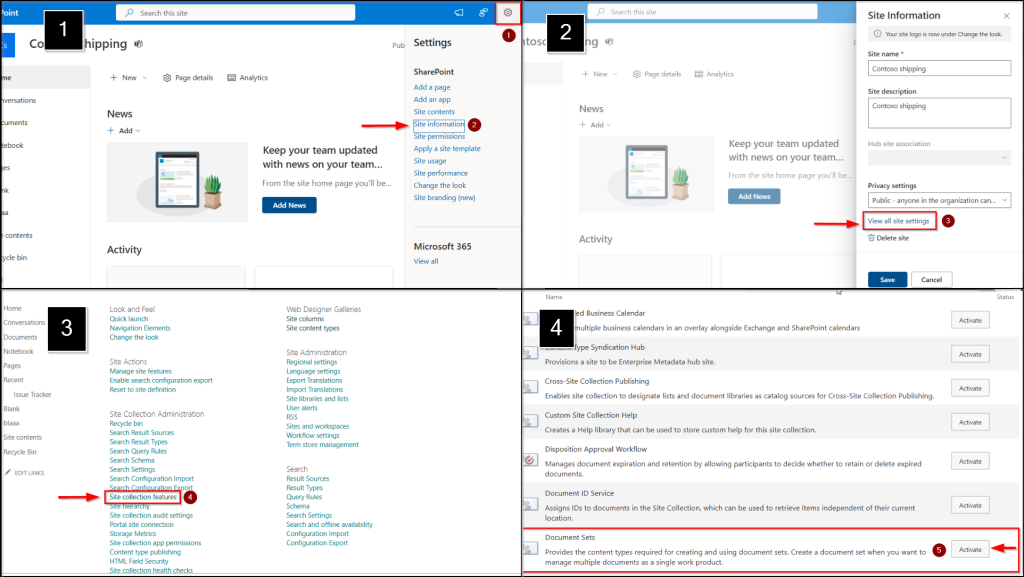
- Open the site settings page of the desired SharePoint Online site using the path below.
SharePoint Online site → Settings (⚙️) → Site information → View all site settings - Under the Site Collection Administration section, select Site collection features.
- Locate Document Sets and click Activate to enable them in SharePoint Online.
Note: You must be at least a Site Collection Administrator to activate the SPO Document Sets feature.
2. Create File Level Content Type in SharePoint Online
Once the Document Set feature is enabled, the next step is to create a file-level content type. As seen earlier, a content type allows you to add custom fields effortlessly. For example, you can create a file-level content type called “Offer Letter” with fields such as Signed Date, Publish Date, Validity, etc. Additionally, you can associate a document template with the content type for reuse whenever needed.
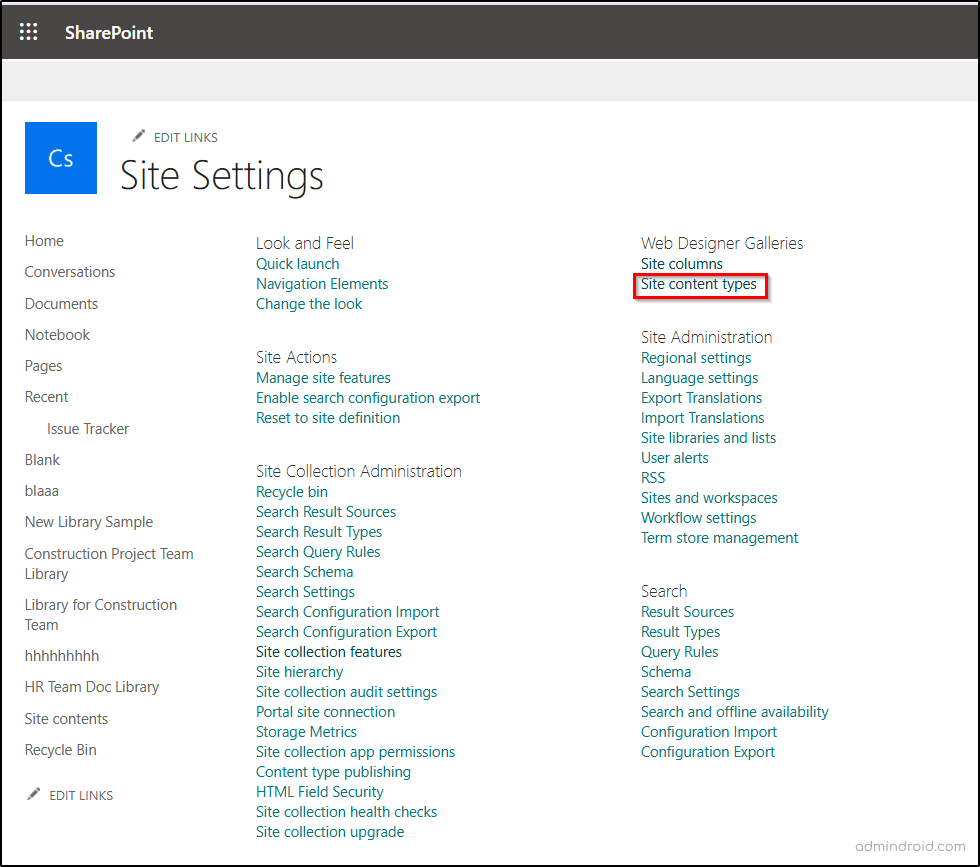
- Navigate to the desired SharePoint Online Site settings page using the path below.
SharePoint Online site → Settings (⚙️) → Site information → View all site settings - Select Site content types under the Web Designer Galleries section.
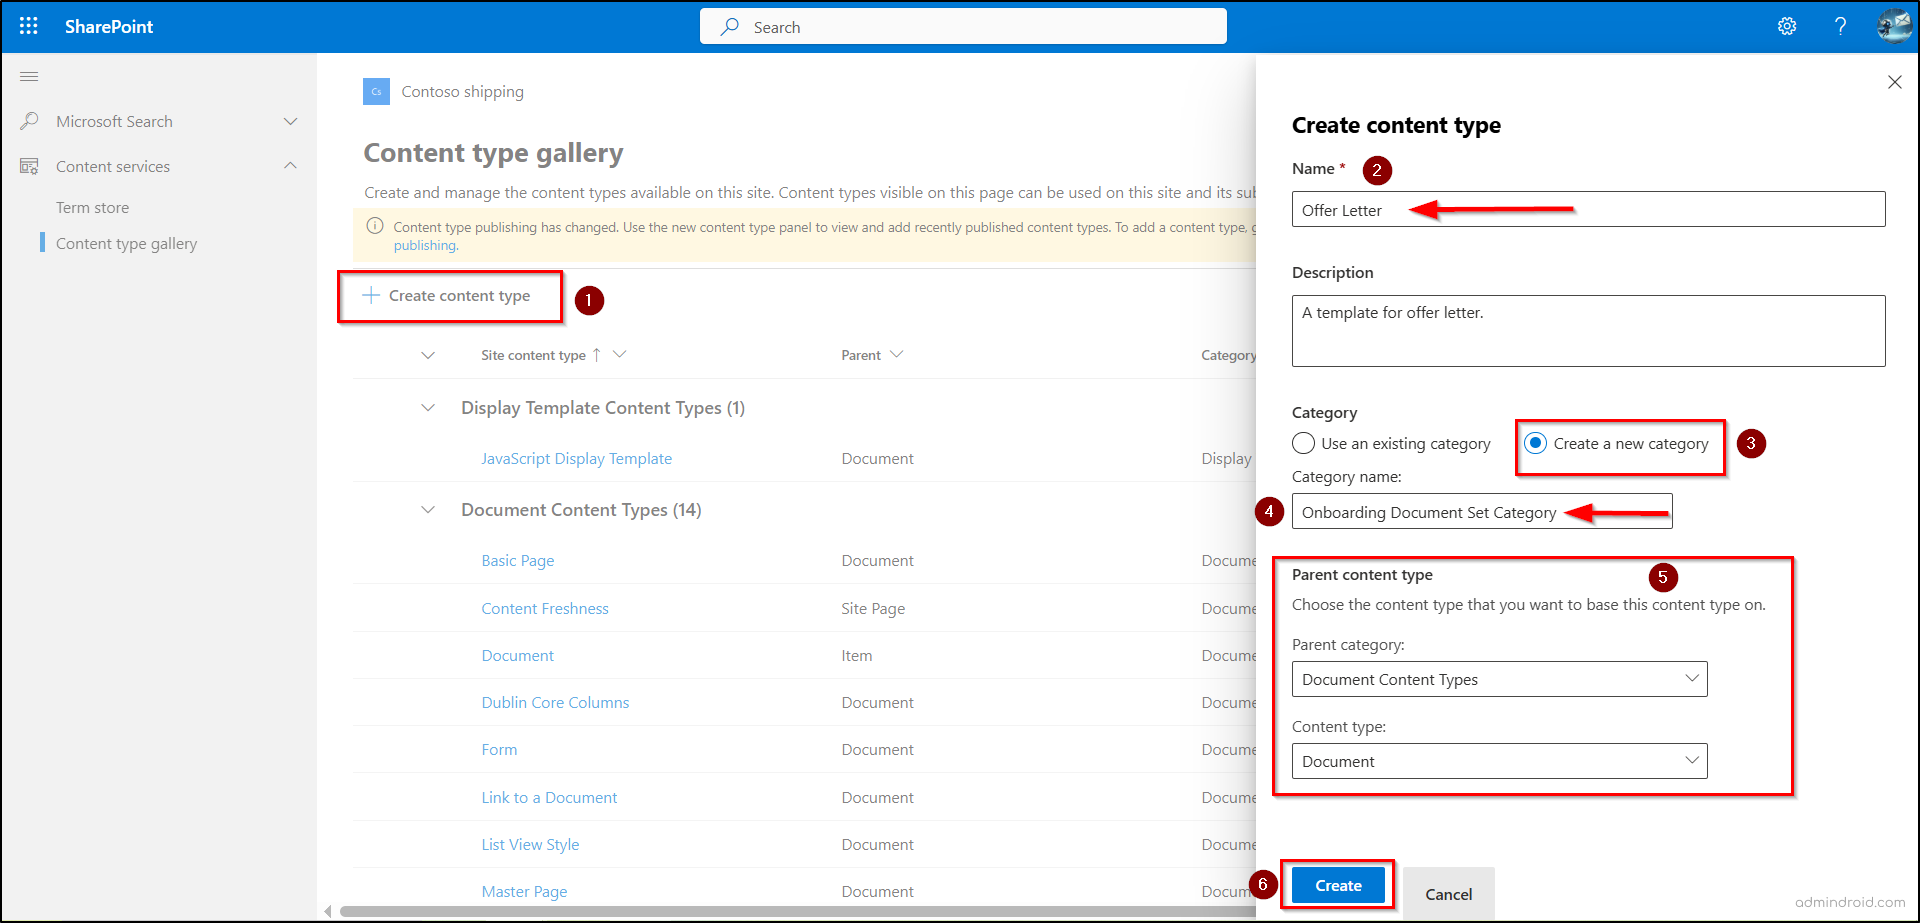
- Next, click Create content type and add a suitable name & description to the content type.
- Under Category, select Create a new category and name your category as of your choice.
- Categories help classify content types, making them easier to organize and manage. For example, default categories include Folder Content Types, Group Work Content Types, List Content Types, and more.
- By creating a custom category, you can tailor content classifications to align with your organization’s requirements and apply them across a site and its subsites for consistent use.
- Then, under the Parent Content type section, choose Document Content Types in the Parent category drop-down.
- On the Content type drop-down, select Document and hit the Create button.
An HR team member can create an Offer Letter using this custom Content Type at any time. It comes with a predefined document template, site columns, retention and audit policies, workflows, and any custom features configured for it.
3. Configure SPO Document Set Content Type
With the file-level content type in place, the next step is to configure a Document Set Content Type in SharePoint Online tailored to your document management needs. In this case, HR wants to create Document Sets for each employee to manage user-specific documents.
So, we’ll create a Document Set Content Type called ‘Employee Onboarding,’ which will appear under the ‘New+’ option and include the necessary metadata and structure once after adding site columns.
- Navigate to the Content Types page using the following path:
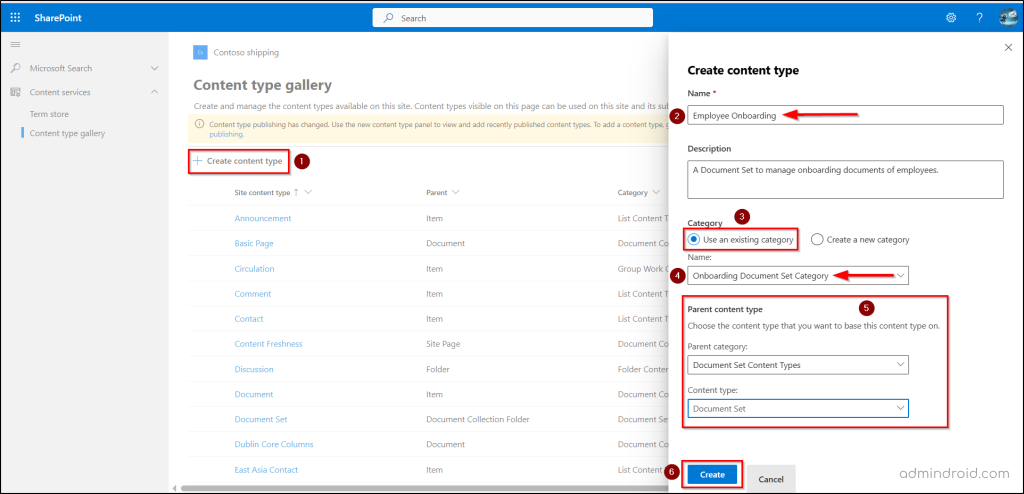
SharePoint Online site → Settings (⚙️) → Site information → View all site settings → Web Designer Galleries → Site Content Types - Click Create Content Type, then enter a suitable name and description.
- Since we already created a custom category while setting up the file-level Content Type, we can now select ‘Use an existing category’ to organize them under one classification.
- In the Parent Content Type section, select Document Set Content Types from the Parent Category drop-down.
- From the Content Type drop-down, choose Document Set, then click Create.
4. Create and Add Site Columns to the Content Types
Now, we’ve arrived at one of the essential aspects of Document Sets—creating site-level columns or metadata columns. These columns play a crucial role in assigning metadata tags, filtering, searching, and much more!
By default, folders have a limited set of columns. Creating custom site columns allows you to use them across sites for various purposes like locating and organizing. Additionally, columns are created at the site level because they are mapped to Content Types, which are also defined at the site level. This ensures consistency and reusability across multiple libraries and Document Sets.
You can add metadata fields to the Document Set (Employee Onboarding), such as Department, Joining Date, Designation, and HR Representative. Additionally, for the file-level content type (Offer Letter), you can include metadata fields like Date Created and End Date.
Create Desired Site Columns in SPO:
- Follow the below path to create site columns in SharePoint Online.
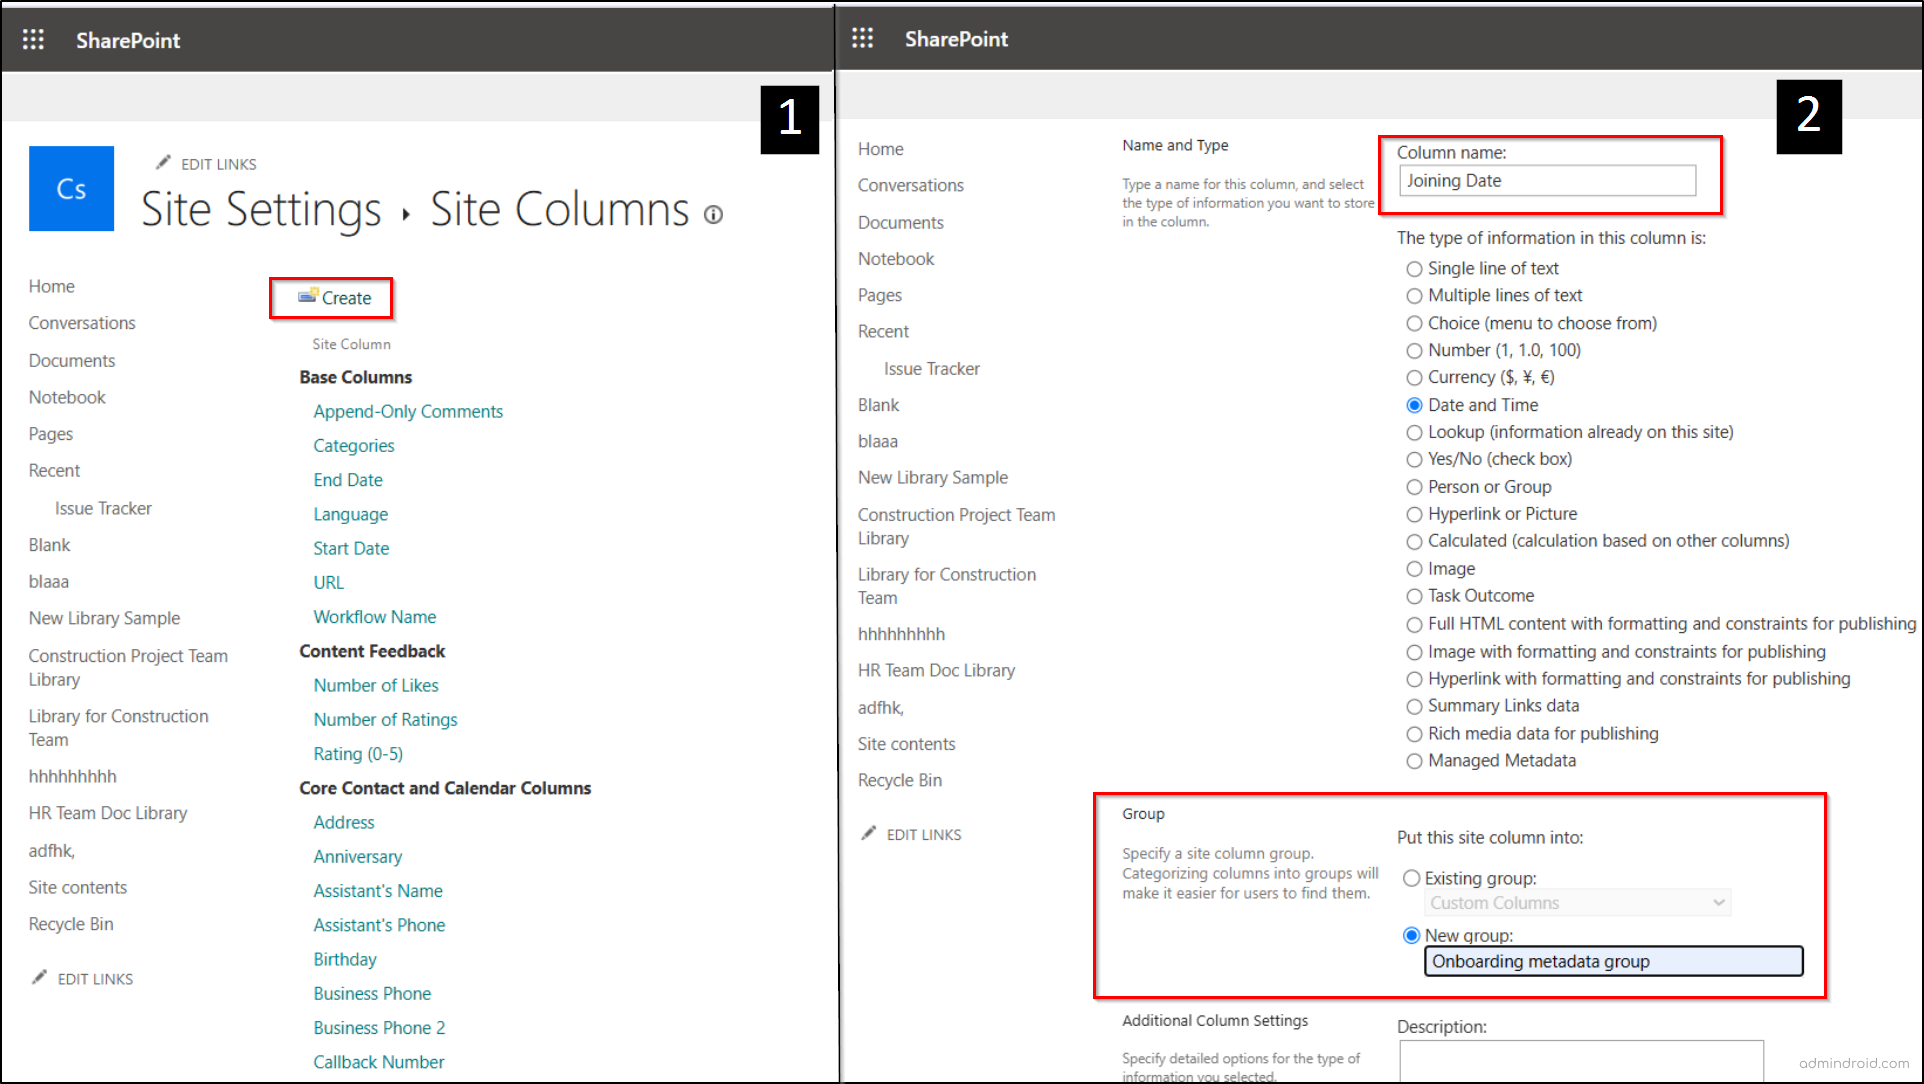
SharePoint Online site → Settings (⚙️) → Site information → View all site settings → Web Designer Galleries → Site Columns - Do not modify any of the default site columns that appear in SharePoint Online. To create a new site column, click Create.
- For example, create a site column named “Joining Date” and select the type of information.
- Creating a custom group helps manage columns efficiently. In this case, create a group called “Onboarding metadata group”. You can also configure other settings as needed to align with your organization’s requirements.
- Click Ok to finalize the column creation. Repeat this process for all remaining Document Set-level columns (Employee Department and Joining Date) and file-level columns (Date Created and End Date).
Note: You only need to create a new group once (when adding the first column). For all future columns, select Existing group and choose the previously created group.
Add Site Columns to the Content Types:
Now that you have created different site columns as you require, it’s time to link the created site columns into the document set or file-level content type as needed. Here’s how to do it efficiently:
- Open the site content type gallery page in the respective SharePoint Online site using the following path:
Settings (⚙️) → Site information → View all site settings → Web Designer Galleries → Site content types - Click on the respective file or document set content type you created.
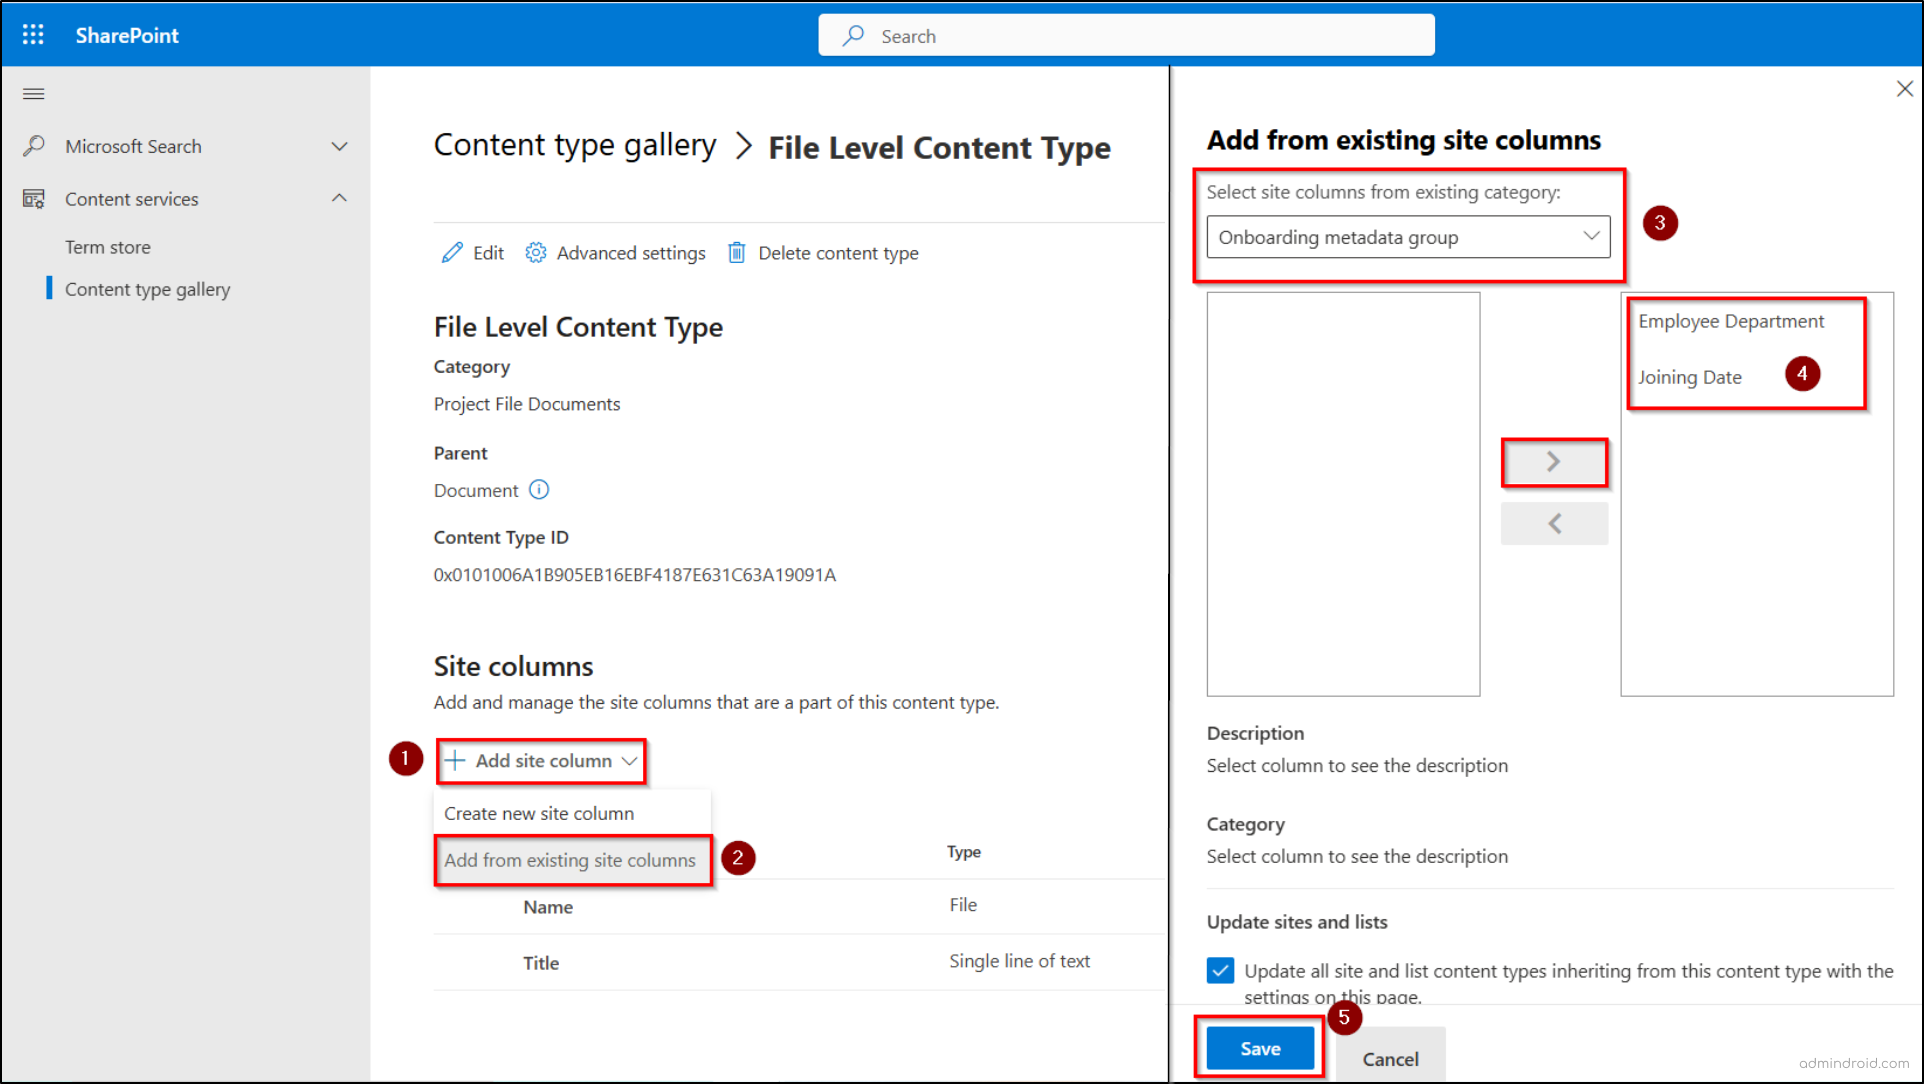
- Under Site Columns, click the Add site column dropdown and select ‘Add from existing site columns’, as these were created in the previous step.
- The group created during site column creation becomes useful here for properly mapping the columns. In the ‘All Categories’ dropdown, select the ‘Onboarding Metadata’ group you created, which contains all onboarding-related metadata columns.
- Use the arrow buttons to move the required columns and click Save to apply the configurations.
The Update sites and lists checkbox is selected by default and should not be changed. It ensures that all site and list Content Types inheriting from this Content Type are updated with the settings on this Document Set settings page.
5. Configure SharePoint Document Set Settings
Once the site columns are added, the next step is to configure the Document Set settings. Here, you can define default templates, map the file-level content type to the Document Set, and configure settings to automatically propagate metadata from the Document Set to its files.
- Navigate to Settings (⚙) > Site information > View all site settings > Web Designer Galleries > Site content types > Click the respective Document Set Content Type.
- In the Document Set content type, click Document Set Settings.
- You can configure and manage the following four settings under this panel.
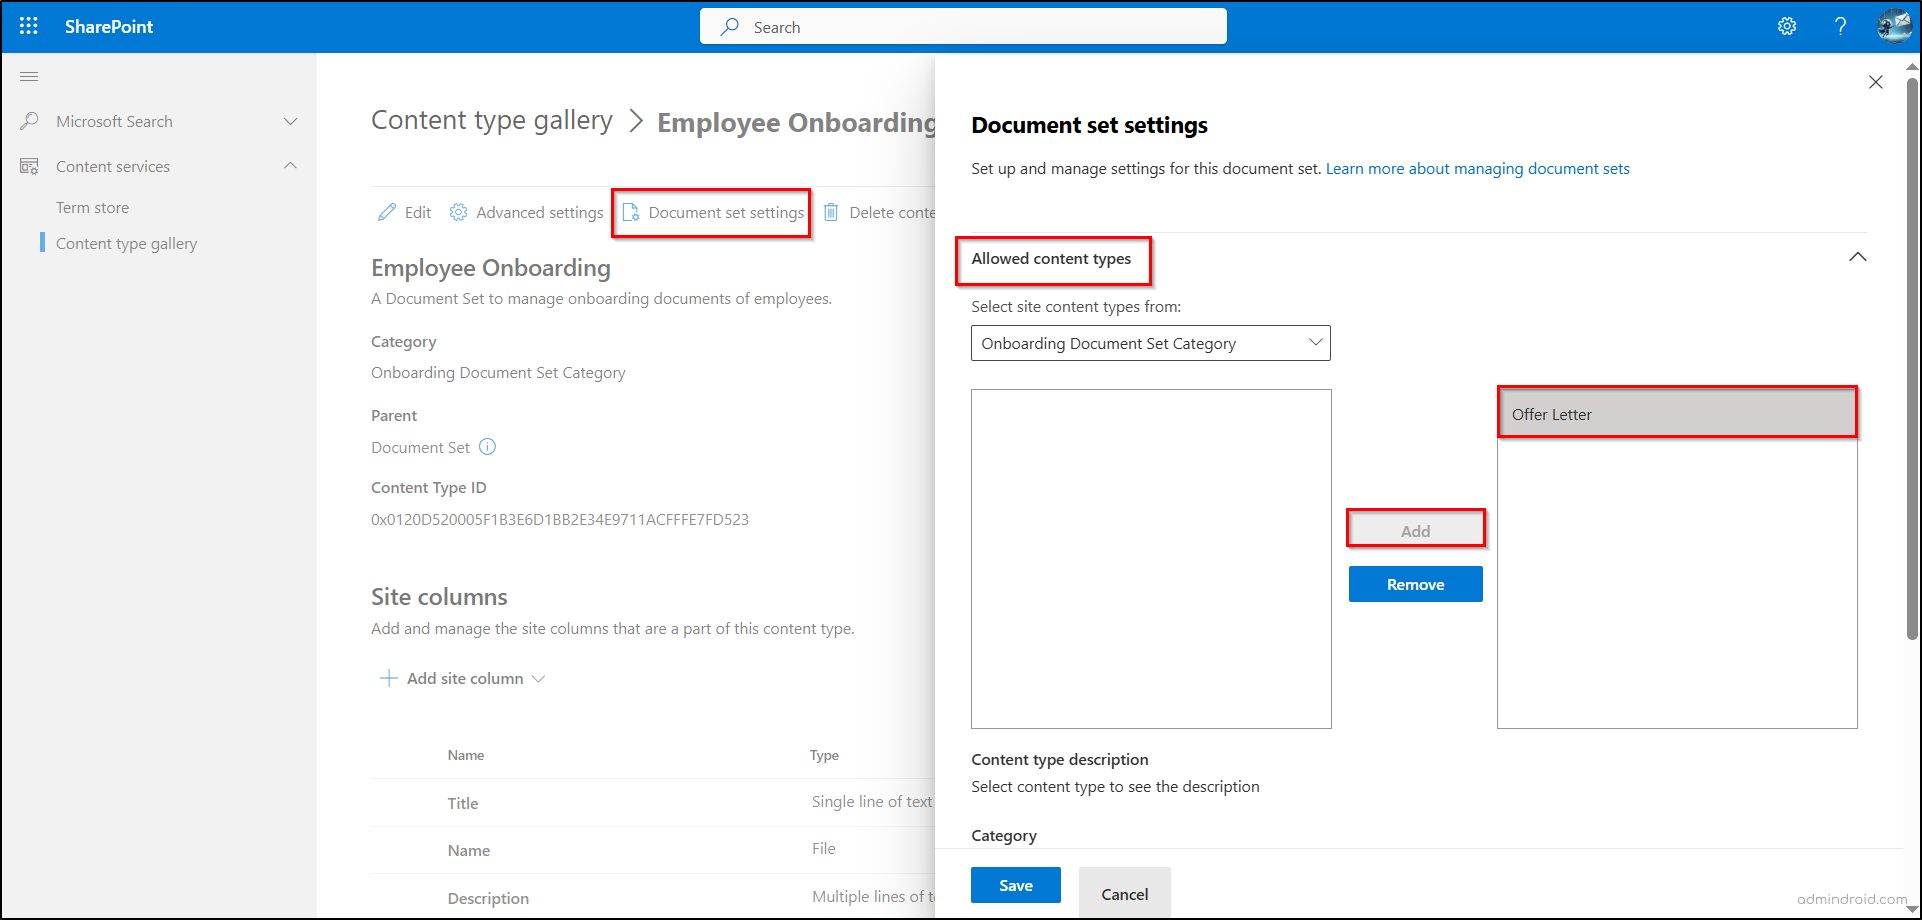
Allowed Content Types:
The ‘Allowed Content Types’ section in Document Set settings lets you link default or custom content types to a Document Set. Only the defined content types will appear under the ‘New’ menu within the Document Set.
- From the Select site content types from drop-down, choose the custom category created while setting up Content Type. Then, use the arrows to select the file-level Content Type (Offer Letter) you created in Step 2.
- By default, the ‘Document’ file-level Content Type is added. If you don’t have a specific file-level Content Type, you can leave it unchanged. However, since we have a file-level Content Type called Offer Letter, we can remove the default one using the arrows.
- Click Add to move it to the SharePoint Content Types allowed in the Document Set box.
- Repeat this step for each content type you want to include.
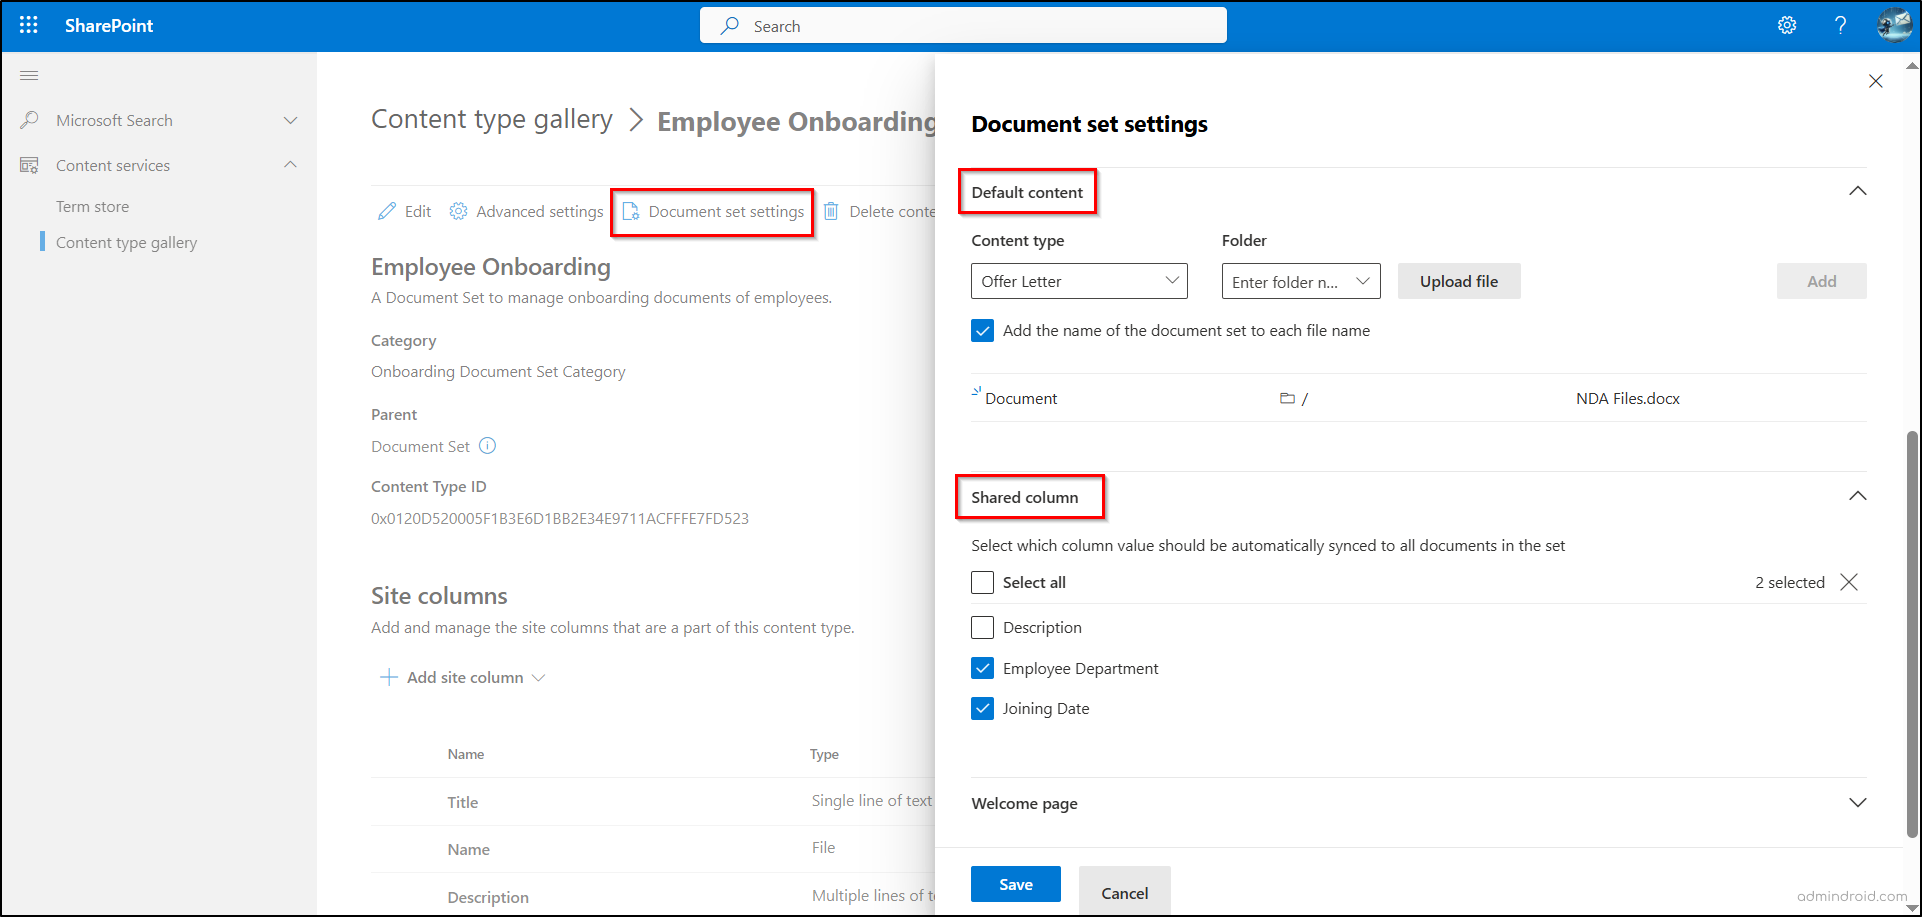
Default Content (Optional):
For example, if every Employee Onboarding Document Set requires an Employment Contract or NDA file, you can add them here to ensure consistency across all new hires.
- This section allows you to specify files that will be automatically included when new Document Sets are created, similar to templates.
- Select the content type from the dropdown, then click Upload file to add the template.
- Additionally, you can also select the ‘Add the name of the document set to each file name’ checkbox to automatically prepend the Document Set name to all included files for clear identification and organization.
Shared Columns:
You must configure the Shared Columns section in the Document Set settings to enable metadata inheritance, as metadata isn’t shared between Document Sets (folders) and files by default. To enable metadata propagation, select the desired columns under this section. This ensures that any updates made to metadata columns at the Document Set level are automatically applied to all documents within it.
- In the Shared Columns section, select the columns to be shared across all content types in the Document Set.
Welcome Page:
In Classic SharePoint Online, each Document Set had a Welcome Page that displayed metadata and documents in a structured view. However, in Modern SharePoint Online, the Document Sets Welcome Page is no longer available.
- Click Save at the bottom of the page to confirm and apply your changes to the Document Set Settings.
6. Add a Document Set Content Type to the SPO Document Library
Finally, once the Document Set Content Type is configured, it must be added to a document library. This step enables HR team users to create and manage Document Sets directly within the library, applying all predefined configurations effortlessly.
Open a document library and follow these steps to add the Document Set content type:
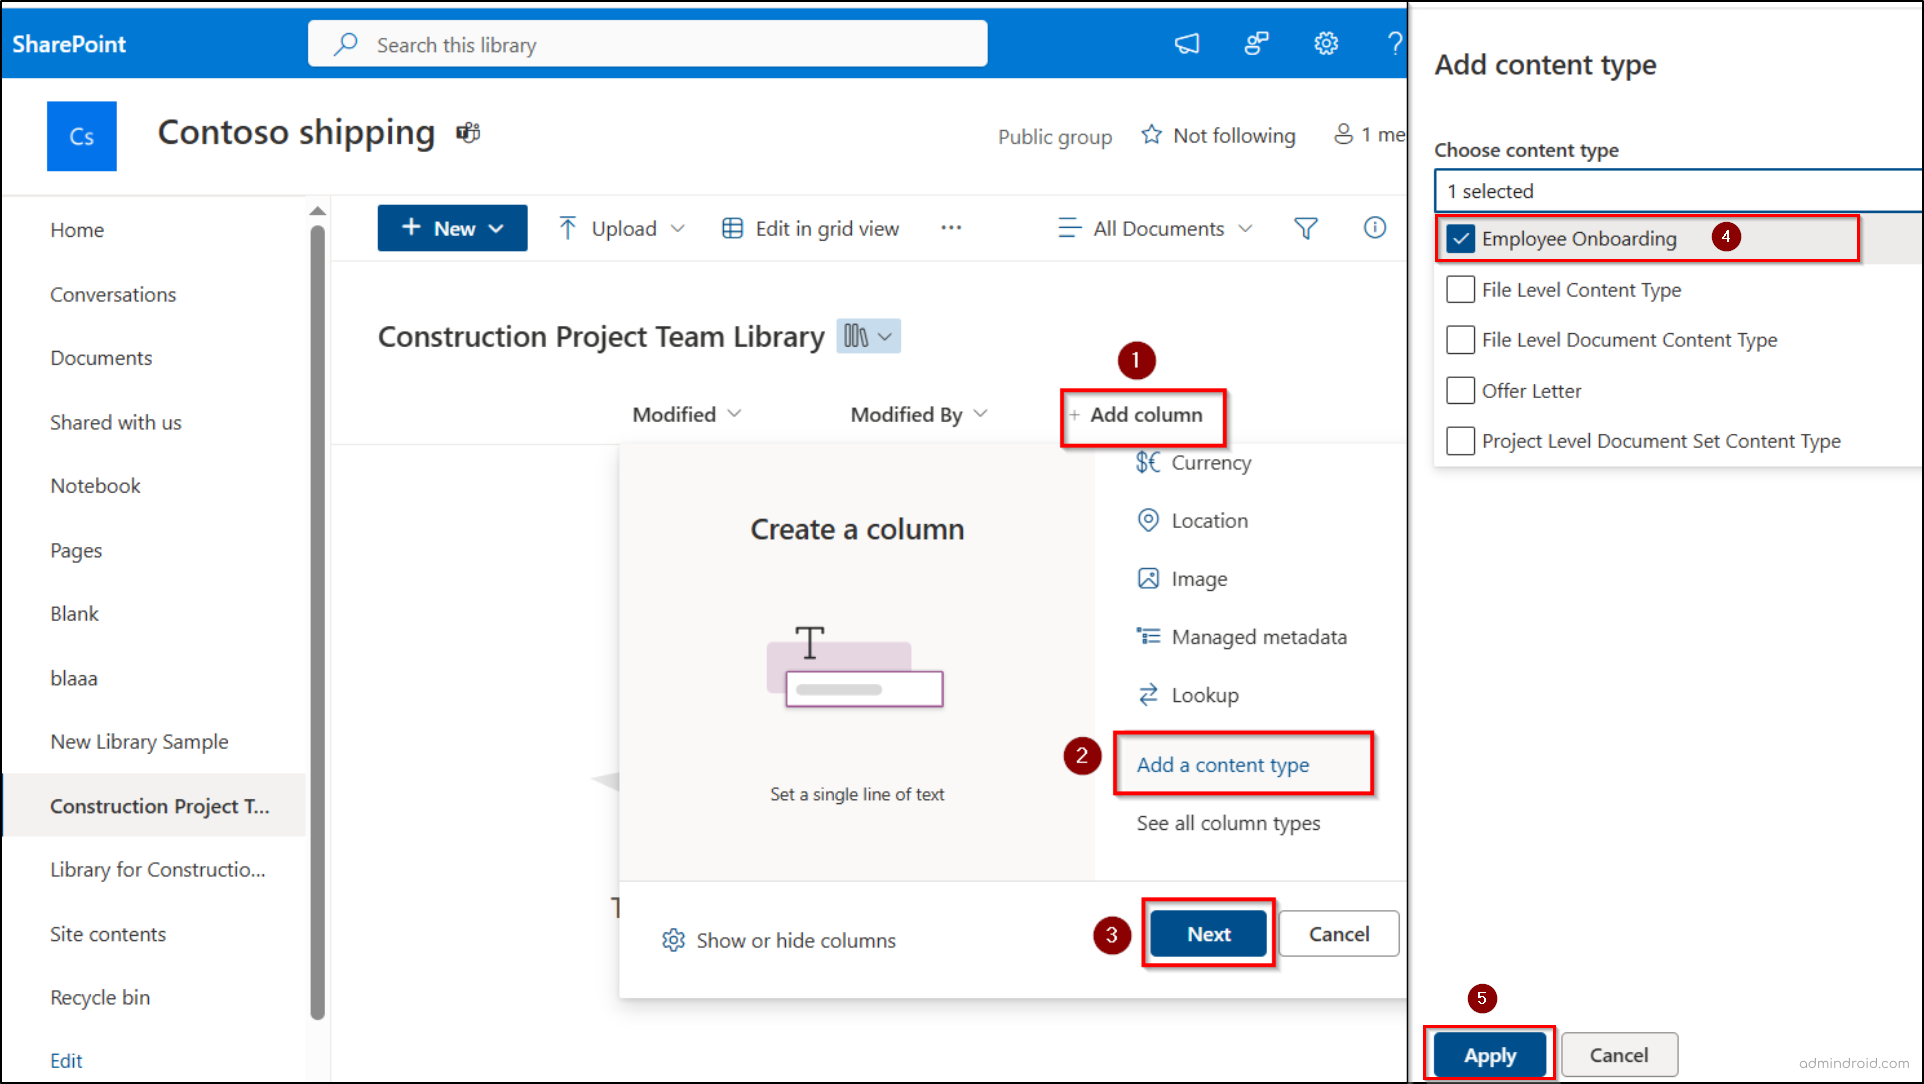
- In the document library, select the Add column, choose Add a content type, and click Next.
- From the list of available content types, select the Document Set Content Type (Employee Onboarding) that was previously created.
- Note: Both the file-level Content Type and the Document Set Content Type will be displayed, but only the Document Set Content Type should be added to the library, as it inherently includes the file-level Content Type.
- Click Apply to save your changes.
Delete Default Content Type:
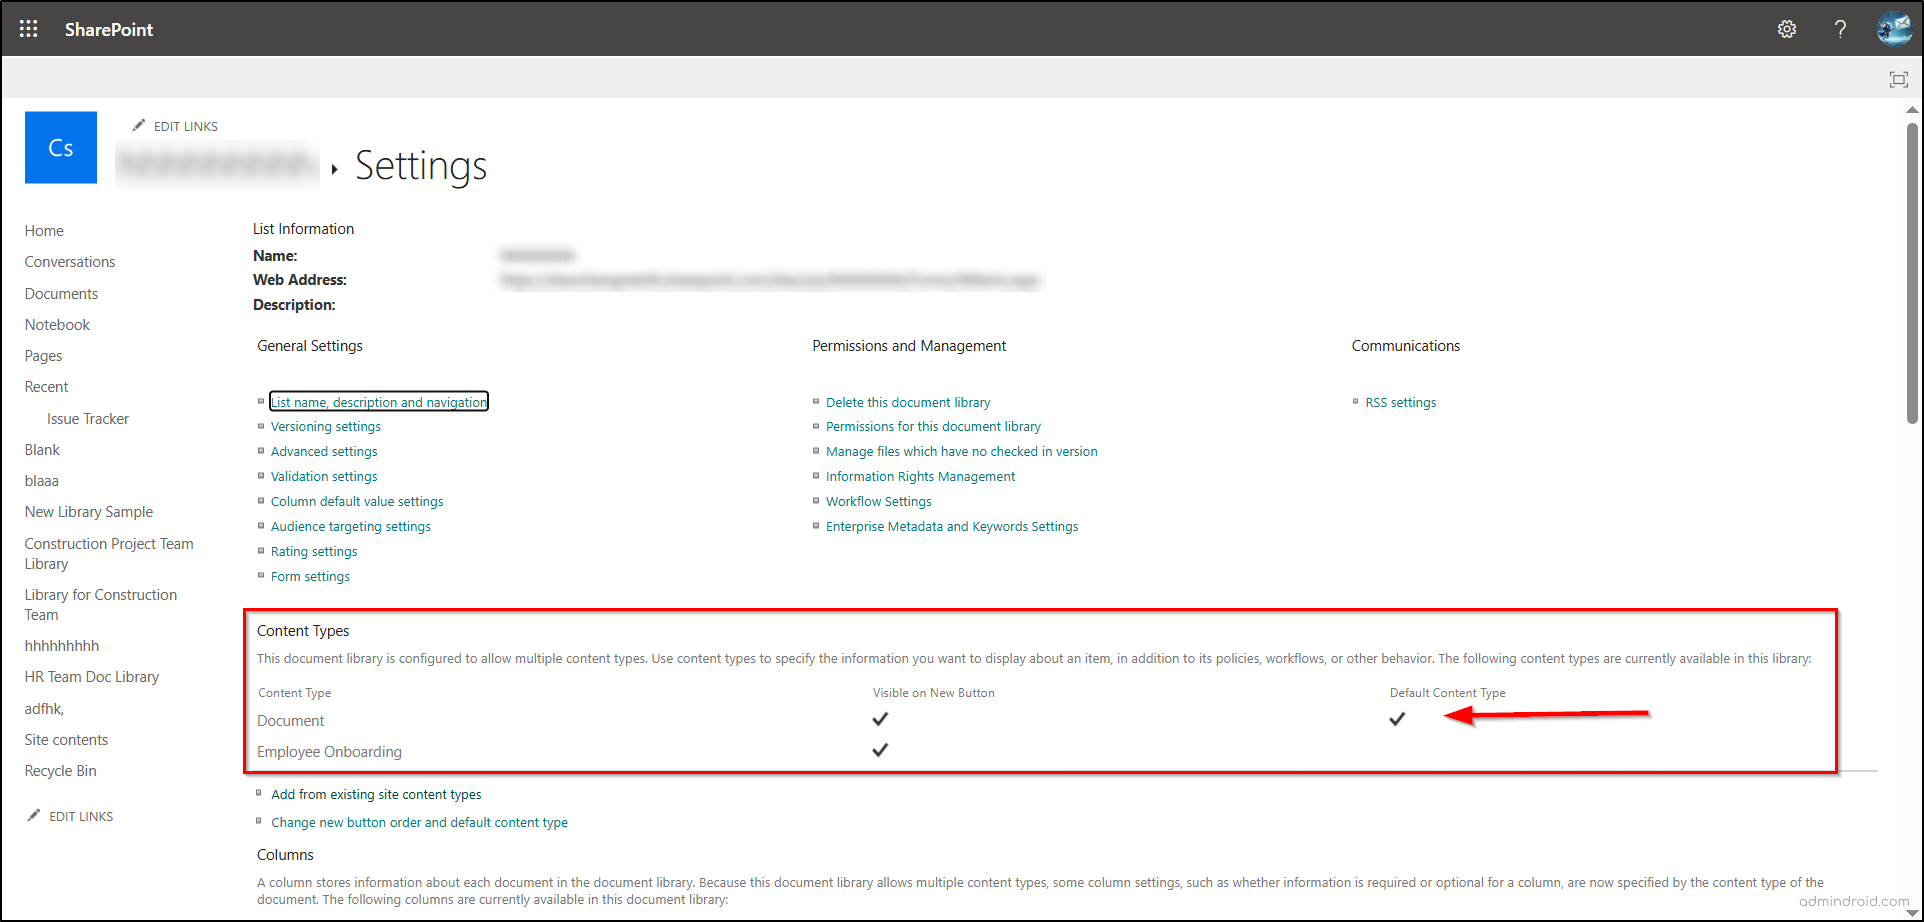
When files are uploaded, they map to the default Document content type, even if custom content types have been added to the document library. To ensure only the required content types are used, delete the default Document content type.
- Go to Settings (⚙) > Library Settings > More Library Settings > Content Types.
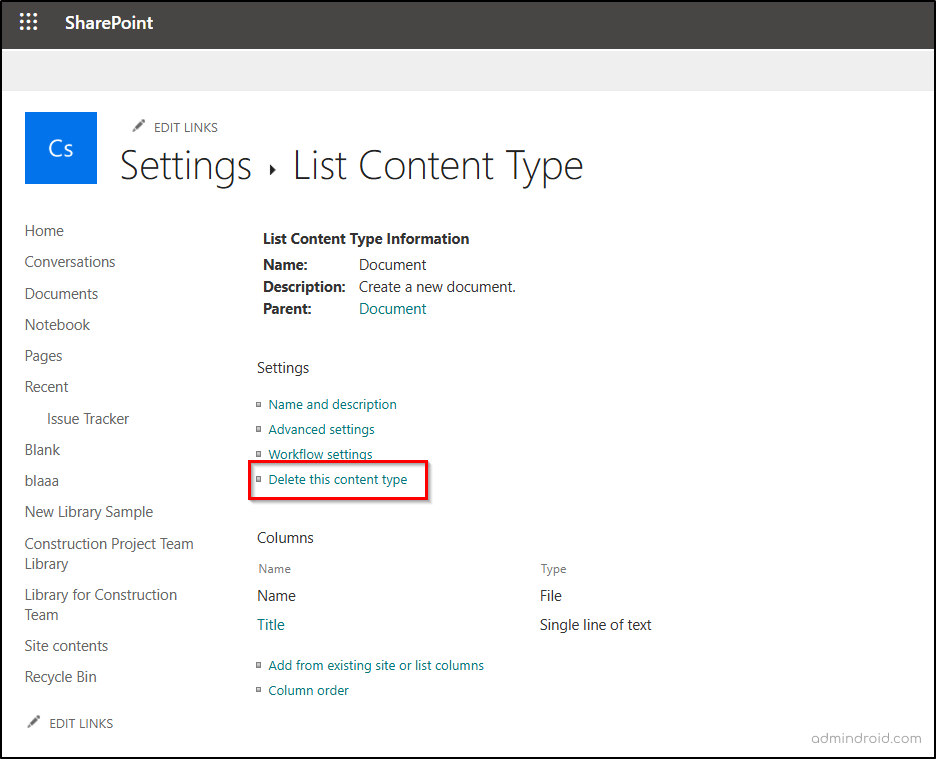
- Select the Document content type, then under Settings, click Delete this content type.
3. In the confirmation dialog box, click OK.
End-user Experience: Create a New SharePoint Online Document Set
Finally, with everything set up, you can create a new Document Set within the document library. This allows users to start adding relevant files, leveraging the structured approach provided by Document Sets to improve document management and accessibility.
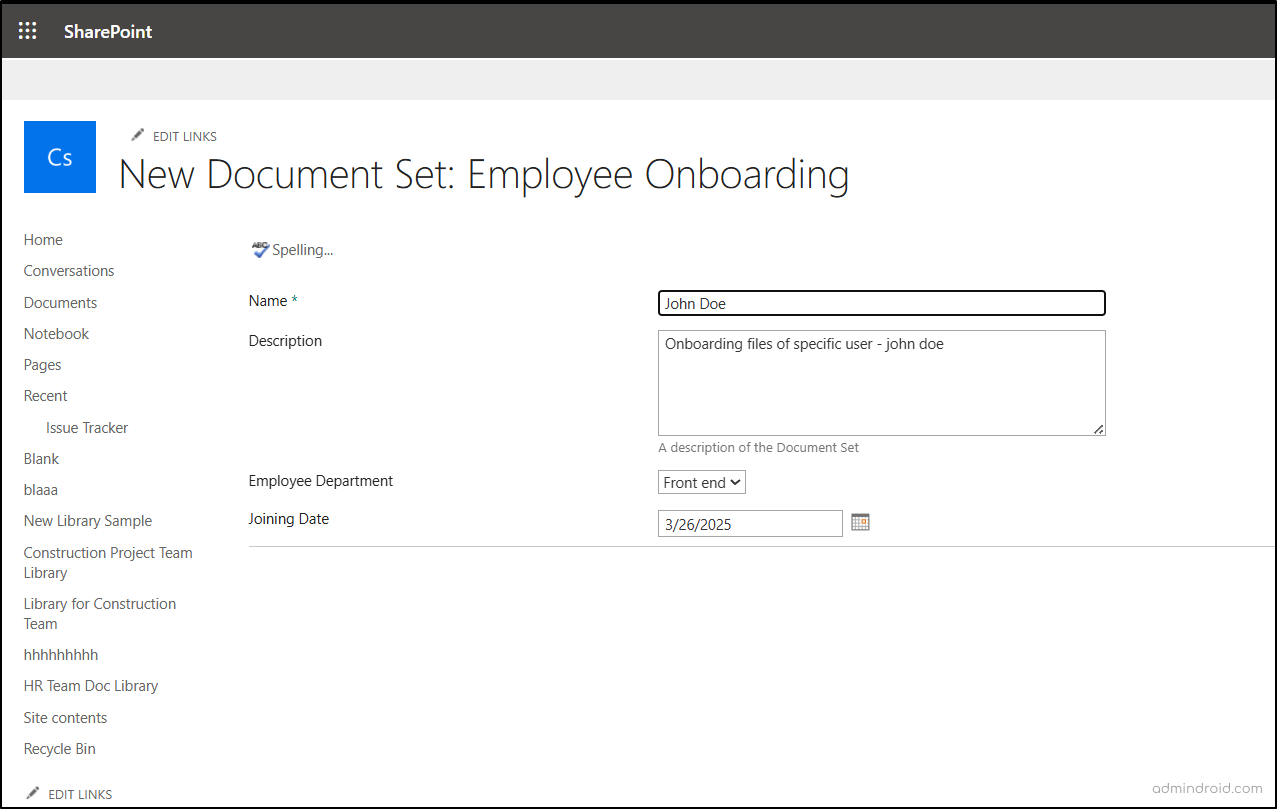
- Click New and select the Document Set you created (Employee Onboarding).
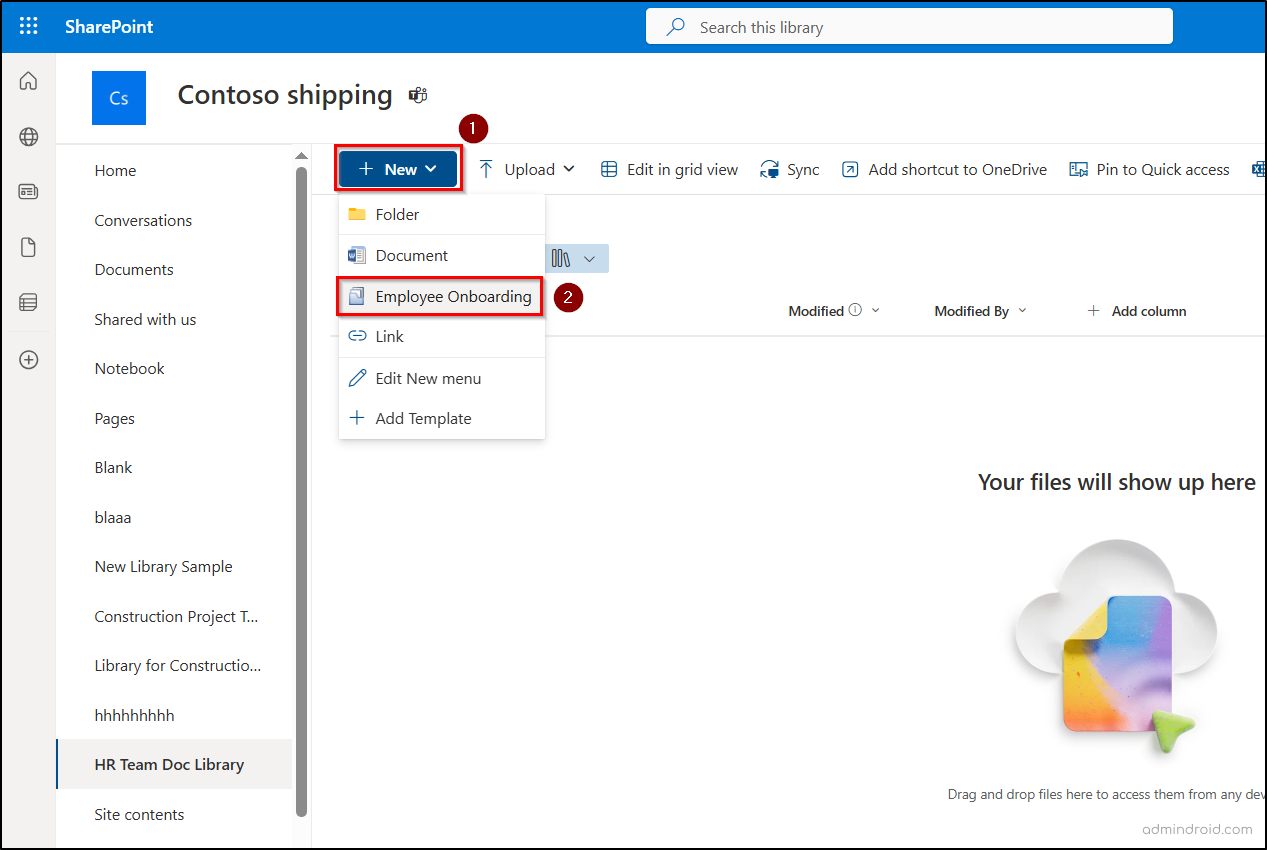
- Enter a suitable name and provide the required values. Then, click Save to store your changes.
At this stage, the Document Set is created, but the site columns may not be immediately visible. To view the defined metadata columns, switch the view from ‘All Documents’ to the automatically generated ‘Employee Onboarding’ view. You can make this view the default by selecting “Set current view as default.”
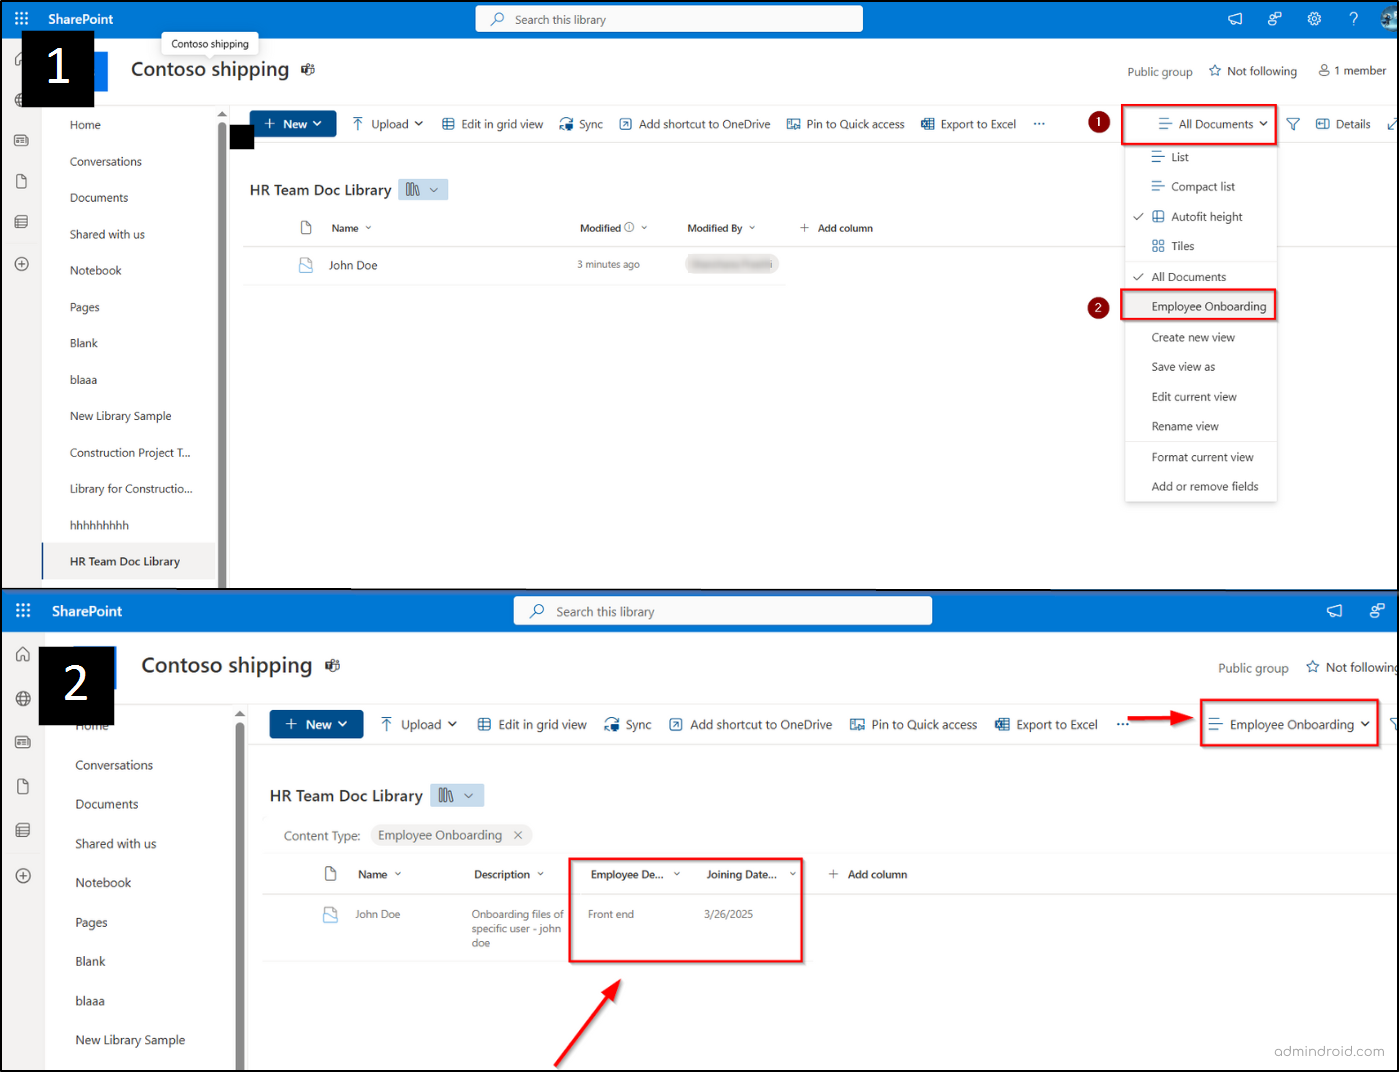
When you create a Document Set, the file-level Content Type is automatically added to the library. Since the file-level Content Type is embedded within the Document Set, it is seamlessly included upon creation. You can now upload and tag onboarding users’ documents within the Document Set.
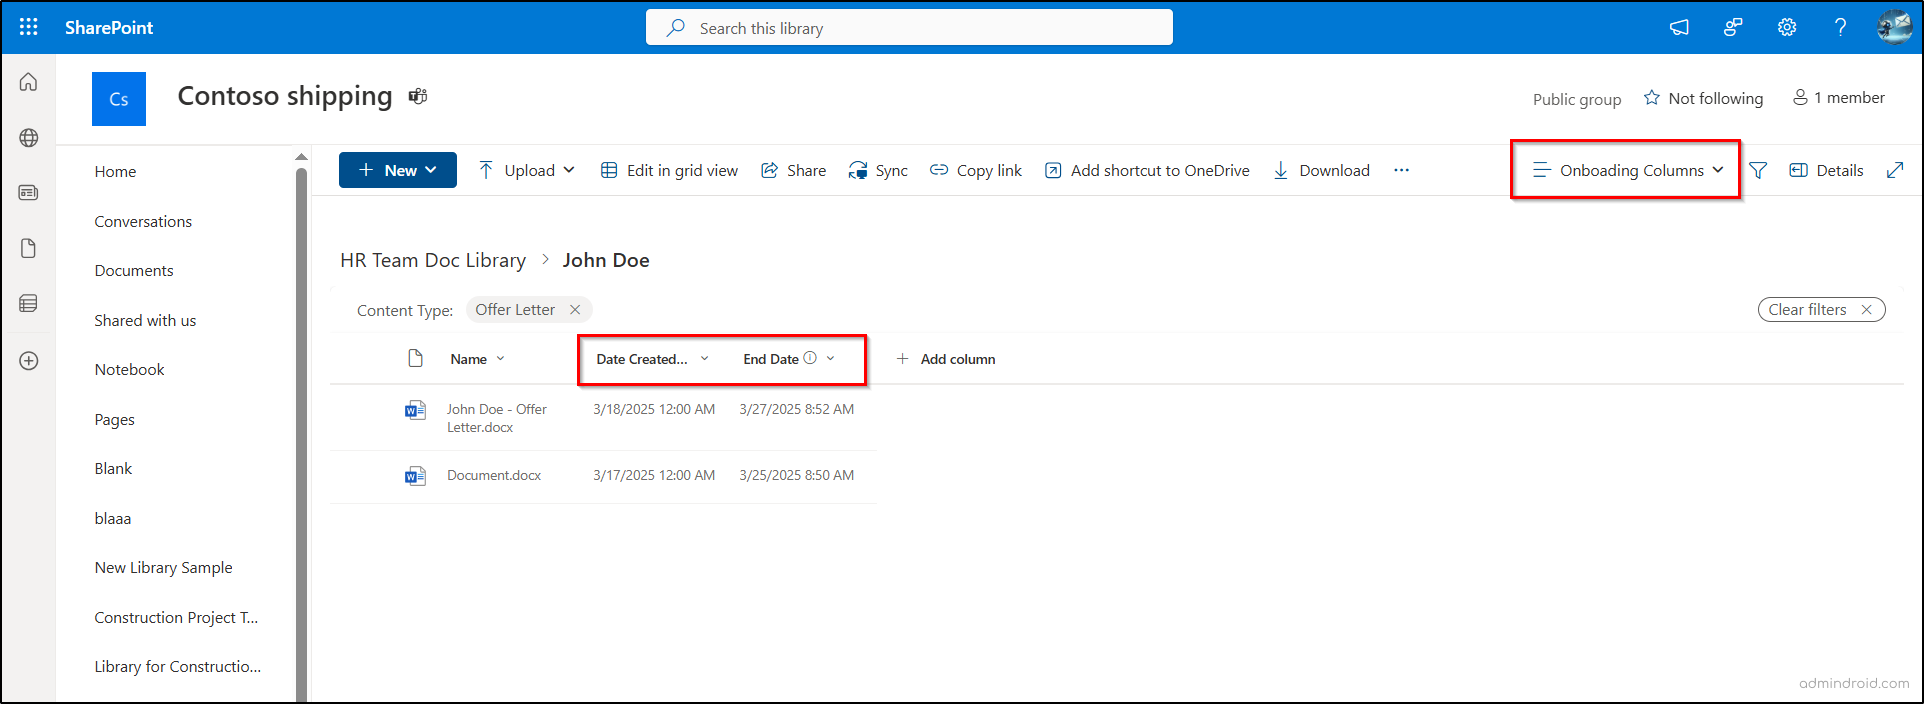
By default, when users open a Document Set, they see metadata at the Document Set level (e.g., Employee Department and Joining Date). However, we need a file-level view that displays metadata specific to individual documents, such as the Date Created and End Date. This helps users easily filter and view files inside a Document Set folder.
Steps to Create a File-Level View:
- Navigate to the existing Employee Onboarding view and select Save view as to create a copy.
- Name the new view (e.g., Onboarding Columns) and click Save.
- Open the newly created view and click Edit current view.
- In the view settings, uncheck the document set-level metadata columns, as they are not needed for a file-level view.
- Scroll down and check the columns relevant to files, such as Date Created and End Date.
- In the Filter section, set Content Type equals to file-level content type (Offer Letter) to display only individual documents.
- Scroll down and click Save to finalize the file-level view.
Now, when users open a Document Set, the file-level view will make it easier to locate and filter files based on document-specific metadata.
Limitations of Document Sets in SPO:
Although Document Sets overcome many folder limitations, they have their own constraints that should be considered:
- Potential for Large Libraries – Over time, document libraries using Document Sets can grow significantly, impacting performance and making navigation cumbersome. Proper planning is required to avoid excessive data load.
- Restricted to Document Management – Document Sets are designed exclusively for grouping and managing documents. They are not suitable for broader content management needs, such as adding calendars or task lists. If you need to manage non-document information, consider creating separate SharePoint Online sites instead.
- No Metadata Synchronization – When syncing a document library containing Document Sets to your computer, metadata does not transfer to Windows Explorer. You will only see file names without their associated metadata. Additionally, metadata values do not sync automatically across individual documents within a Document Set, requiring manual updates.
- No Easy Way to Move Document Sets – Unlike regular folders, Document Sets cannot be moved easily between different libraries or sites while retaining metadata and version history.
In conclusion, Document Sets are one of the best practices to organize documents in SharePoint Online. By grouping related files with shared metadata, Document Set in SharePoint Online enhances structure, prevents duplication, and streamlines collaboration across projects, compliance, and workflows.
If you have any questions, feel free to drop them in the comments below! Happy organizing! 😌


