In our previous blog, we covered automating SharePoint guest access approvals for existing guests. In this follow-up, we’ll explore how to automate external user invitations for users who are not yet in your directory, using Power Automate and Adaptive Cards in Teams.
Granting guest access to SharePoint sites is a common scenario, especially when collaborating with external vendors, partners, or clients. Doing this manually can be cumbersome – it requires site admin privileges, verification of details, and accurate logging to ensure the right users get the right permissions.
To simplify this process, we have built a Power Automate flow that sends Adaptive Cards to Teams for guest access approvals.
How the Automated Guest Access Flow Works
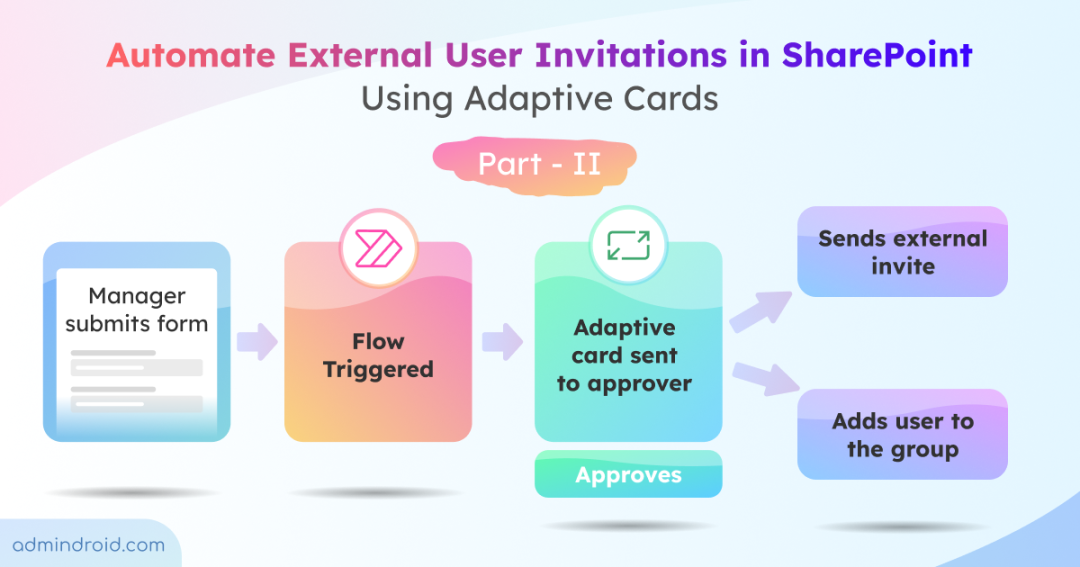
Here’s how external users are invited and granted access to SharePoint:
- A manager submits a SharePoint list form request with the details of the external user requesting access, including email ID, site URL, access level, etc.
- Once the form is submitted, a new row is added to the SharePoint list automatically.
- The addition of the new item triggers the workflow.
- The workflow retrieves the approver automatically from an internal SharePoint list based on the requested site URL.
- The workflow calls the Microsoft Graph API to get an authentication token.
- It checks if the external user exists in the directory.
- The workflow then sends an Adaptive Card in Teams to the identified approver. It includes all necessary details such as the user’s directory status.
- If the admin approves and the user already exists in the directory:
- The workflow adds the user to the respective SharePoint group.
- Notifies the external user of access approval.
- Updates the SharePoint list to reflect the approval status.
- If the user does not exist in the directory:
- The workflow sends an external invitation to the user’s email.
- Once the invitation is accepted, the workflow adds the user to the SharePoint group.
- Updates the SharePoint list to reflect the approved status.
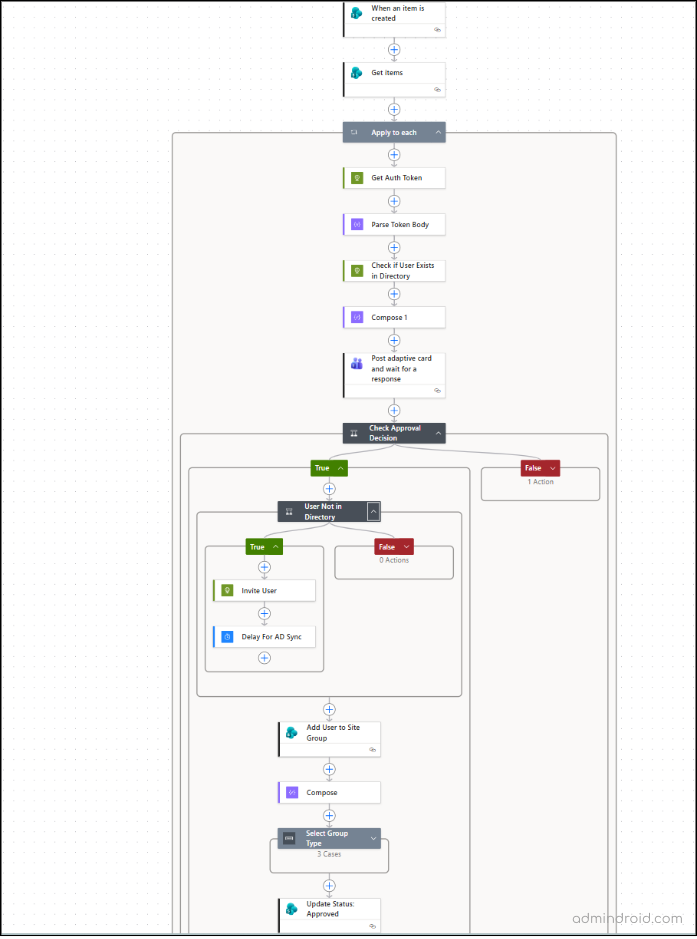
Here’s how the complete flow looks in Power Automate:
Prerequisites for Automating the External Invitation Process
Before building the workflow, ensure the following prerequisites are met:
- Power Automate Premium: The flow uses a premium connector (HTTP), so a Power Automate Premium license is required. You can opt for a 90-day free Power Automate trial if needed.
- Role-Based Permissions:
- Requester/Manager: Must be internal to your organization to submit the form.
- Approver: Must have Site Owner or Admin permissions to approve requests.
- Flow Creator: Must have access to the SharePoint list and Power Automate permissions to create and manage flows.
- Approvers Mapping List: This is a required component of the setup. It maps Site URL and Approver Emails, allowing the flow to automatically identify and notify the correct site owner/admin.

With these prerequisites in place, you’re ready to build the external user invitation workflow step by step.
Set Up Application-Level Authentication in Microsoft Entra ID
Since this flow uses the HTTP action to call Microsoft Graph, Power Automate must authenticate securely before it can send external invitations or perform directory-level operations.
To enable this, you must register an application in Microsoft Entra ID . This registered app acts as the identity that Power Automate will use when requesting an OAuth access token, which is then included in each HTTP request to Microsoft Graph.
When creating the app, set the supported account types to:
“Accounts in any organizational directory (Any Microsoft Entra ID tenant – Multitenant) and personal Microsoft accounts (e.g., Skype, Xbox)”
This option ensures that any external user, whether they use a work, school, or personal Microsoft accoun can be authenticated.
- After registering the app, add the following Microsoft Graph permissions:
- User.Read.All –– Allows the app to read user profiles in your directory. This is required to check whether a user already exists before sending an invitation, and to fetch user details during the flow.
- User.Invite.All – Allows the app to send invitations to external users and add them as guests to your directory. Without this permission, Power Automate cannot trigger the guest invitation process through Microsoft Graph.
- Then click Grant admin consent for your organization and confirm.
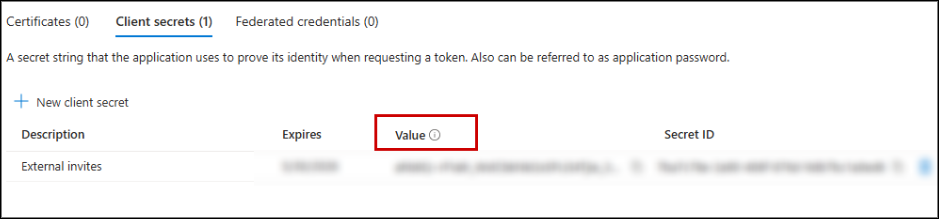
- Next, generate the client secret that Power Automate will use when requesting access tokens:
- In the left-hand menu, select Certificates & secrets.
- Click + New client secret.
- Provide a description and expiry date.
- Click Add.
- After creation, copy the Value of the client secret.
⚠️Note: This is the only time it will be fully visible. Save it securely to be used later in the flow.
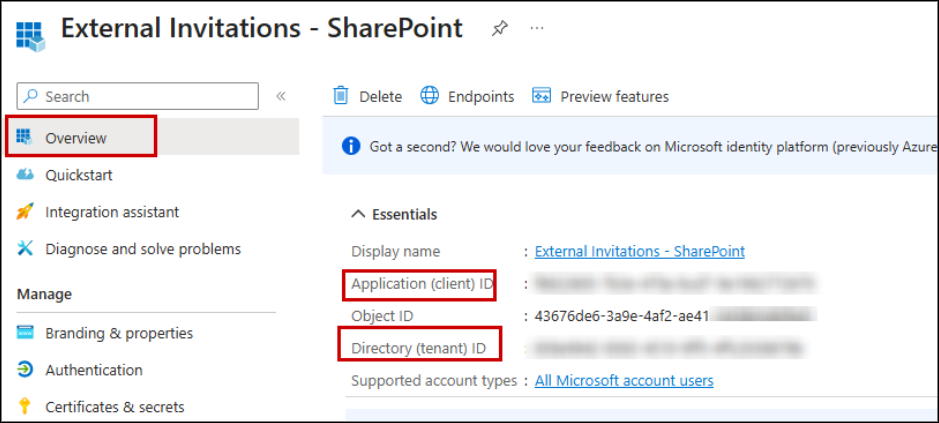
4. Now, we need to copy two more values. Go to the Overview tab and copy the Application (client) ID and Directory (tenant) ID.
Once these steps are complete, your application is ready, and you can start building your Power Automate flow with secure Graph API authentication.
Invite External Users Using Power Automate – Step-by-Step Flow Execution
Follow the steps one by one to execute the external user invitation workflow successfully:
- Prepare your SharePoint lists form to collect responses
- Build the Power Automate cloud flow for external user requests
- Automatically retrieve approver details from list
- Get Microsoft Graph API access token in Power Automate
- Extract OAuth token details for Graph API requests
- Check if the guest user already exists in Entra ID
- Send guest access requests to approvers using adaptive cards in Teams
- Verify if external user access approval is accepted
- Determine whether to send a new external invitation
- Send external user invitation via Microsoft Graph API
- Add delay to ensure new guest user is synchronized
- Retrieve the associated SharePoint groups
- Configure the flow to handle different SharePoint access levels
- Automatically add guest user to the appropriate SharePoint group
- Mark request as approved in SharePoint list automatically
1. Prepare Your SharePoint Lists Form to Collect Responses
Before creating the Power Automate flow, you need a SharePoint list to capture guest access requests from. In our previous blog, the manager entered the details directly into the list, but this required them to have access to the site, which isn’t always practical.
To overcome this, we have used the Lists form. You can create a Lists form, where responses submitted through the form will automatically be added to the list. This list will act as the trigger for your flow and store key details such as guest name, email, company, site URL, access level, and more.
Note: If you want external users to submit their own access requests, you could use Microsoft Forms instead of a Lists form, as Forms allows creating anonymous links. However, this approach has risks:
- You cannot automatically verify if the submitter belongs to a trusted organization.
- There’s a higher chance of incorrect or malicious entries.
- Integrating dynamic content into the Adaptive Card workflow becomes more complex.
For these reasons, we prefer using a SharePoint Lists form, which ensures submissions are made only by internal users and simplifies automation with Power Automate.
- Navigate to your desired SharePoint site and click + New -> Lists form.
- Give your lists form a name -> Click Create.
- Add form title and add logo optionally.
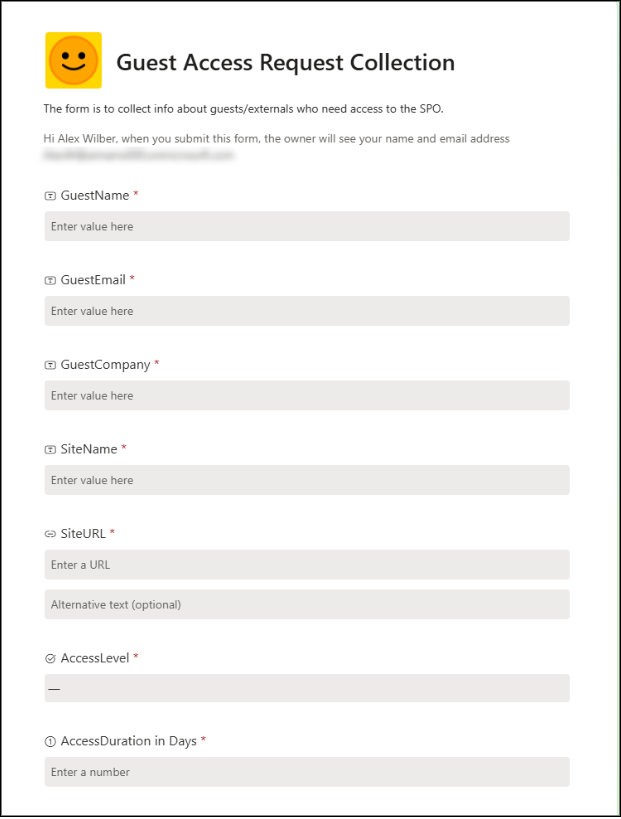
- Add the following columns to your list. Make all fields required:
| Field Name | Type | Notes / Choices |
| GuestName | Single line of text | |
| GuestEmail | Single line of text | |
| GuestCompany | Single line of text | |
| SiteName | Single line of text | |
| SiteURL | Single line of text | |
| AccessLevel | Choice | Read Only, Edit, Full Control |
| AccessDurationInDays | Number | |
| RequestStatus | Choice | Pending, Approved, Rejected |
Note: To prevent the manager from modifying it during submission, hide the Request Status field in the form by unchecking it under Customise -> Show or hide fields. SharePoint will still store the default value in the list automatically.
- Once the form is ready, click Send form -> Copy link to share it.
- Anyone in your organization, even if not part of the site, can submit responses using this link.
⚠️ Important: Ensure that the field values exactly match those above, as they will be referenced in the Adaptive Card JSON in your flow.
2. Build the Power Automate Cloud Flow for External User Requests
- Sign in to Power Automate.
- Select Create -> Automated cloud flow.
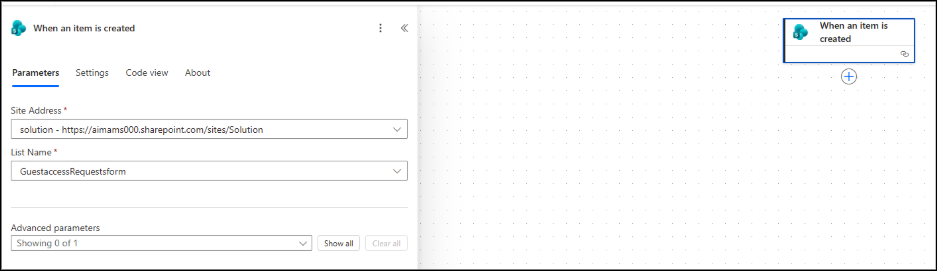
- Name your flow, then select the trigger When an item is created (SharePoint) -> Create.
- For the selected node, configure the action by selecting the Site Address and the Lists form name (the one you just created) from the dropdown menu.
3. Automatically Retrieve Approver Details from List
- Click the + icon below the trigger.
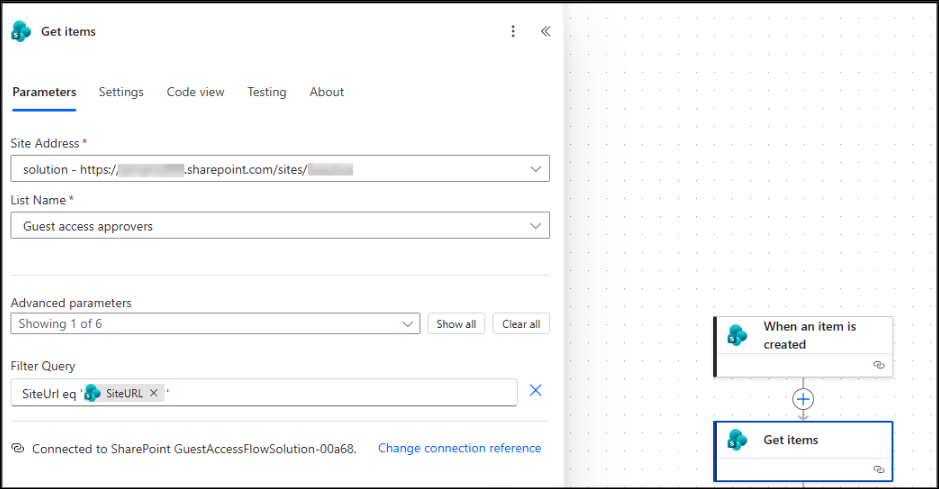
- Search for and select the “Get items – SharePoint” action.
- Configure the action as follows:
- Site Address: Select the site where the approver mapping list is stored.
- List Name: Choose the approver mapping list you created.
- Under Advanced Options, set the Filter Query to: SiteUrl eq ‘@{triggerBody()?[‘SiteURL’]}’
This ensures that only the approver assigned to the current site is retrieved.
- Click the + icon below the previous action.
- Select “Apply to Each” action.
- In the Select an output from previous steps field, choose the value output from the “Get items – SharePoint” action.
This will loop through each approver retrieved from the mapping list for the current site.
⚠️ Important Note: In the steps that follow, some action names have been renamed for clarity and easier understanding of the flow. When referencing dynamic content from a previous action, use the updated names if you renamed them. If you did not rename an action, keep the default name, otherwise the flow may fail.
4. Get Microsoft Graph API Access Token in Power Automate
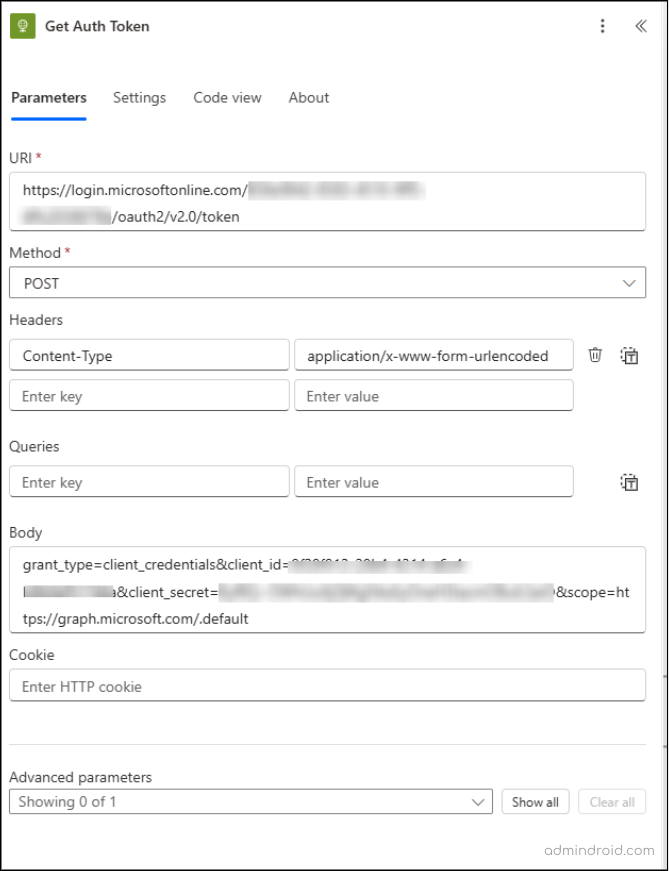
Under ‘Apply to Each’ action, add the HTTP premium connector to obtain an authentication token. Configure it as follows:
- URI: https://login.microsoftonline.com/<tenant ID>/oauth2/v2.0/token
(Replace <tenant ID> with your tenant ID.) - Method: POST
- Headers:
- Content-Type: application/x-www-form-urlencoded
- Body:
grant_type=client_credentials&client_id=<Client ID>&client_secret=<Client secret value>&scope=https://graph.microsoft.com/.default
(Replace <Client ID> and <Client secret value> with your application credentials.)
This action retrieves the authentication token required to interact with Microsoft Graph in the workflow.
5. Extract OAuth Token Details for Graph API Requests
After the HTTP action, click + and search for the Parse JSON action.
Configure it as follows:
- Content: Select the dynamic value body from the HTTP action.
- Schema: Copy and paste the JSON schema below:
|
1 2 3 4 5 6 7 8 9 10 11 12 13 14 15 16 17 |
{ "type": "object", "properties": { "token_type": { "type": "string" }, "expires_in": { "type": "integer" }, "ext_expires_in": { "type": "integer" }, "access_token": { "type": "string" } } } |
This action extracts the access token and other details from the HTTP response, making them available for use in later steps.
6. Check if the Guest User Already Exists in Entra ID
Now that we’ve retrieved the access token and parsed it successfully, the next step is to verify whether the guest already exists in your Entra ID tenant. This action searches Entra ID to determine if the guest email from the SharePoint request already exists.
- Click the + icon below the Parse JSON action.
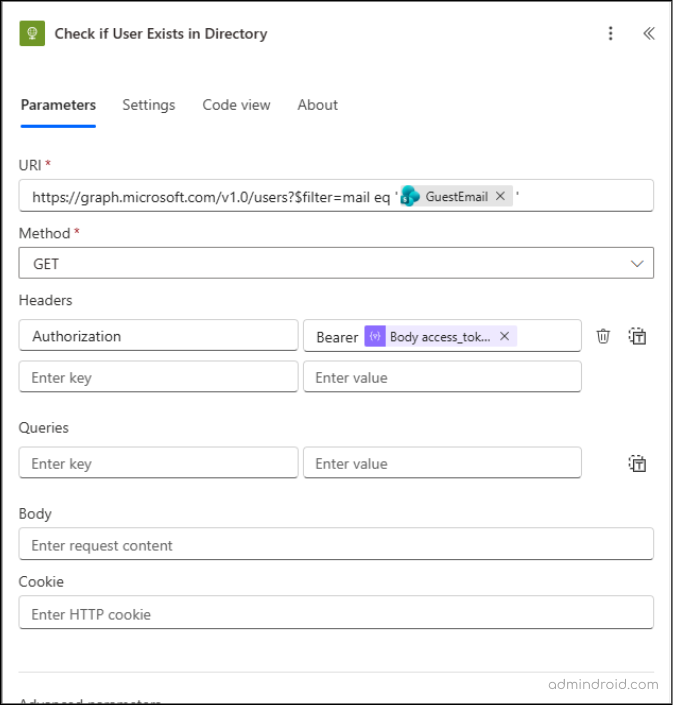
- Add a new HTTP action and configure it as follows:
- URI: https://graph.microsoft.com/v1.0/users?$filter=mail eq ‘@{triggerBody()?[‘GuestEmail’]}’
- Method: GET
- Headers: Authorization: Bearer @{body(‘Parse_Token_Body’)?[‘access_token’]}
Since the Adaptive Card can only retrieve information stored in the SharePoint list, the lack of directory visibility creates a security risk and a clear visibility gap. To bridge this, we need to fetch the value from the above HTTP response and store it in a Compose action. This saves the approver from guessing, prevents delays, and ensures they have full clarity before approving the access request.
- For that, add a Compose action right below the HTTP action and configure it using the below expression:
if(greater(length(body(‘Check_if_User_Exists_in_Directory’)?[‘value’]), 0), ‘🟢 User exists in directory’,’🔴 User not found in directory’)
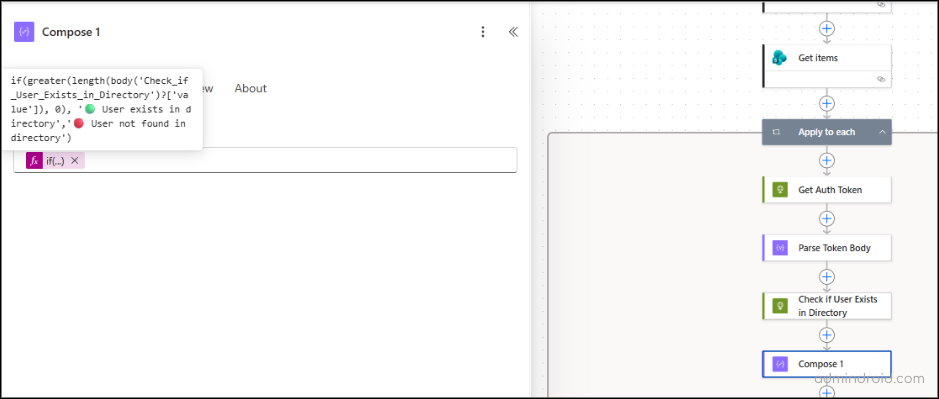
This captures the directory status in a reusable format so it can be easily displayed in the Adaptive Card.
7. Send Guest Access Requests to Approvers Using Adaptive Cards in Teams
- Click the ‘+’ icon below the ‘Compose’ action.
- Search and select the action Post adaptive card and wait for a response from the list. This action requires installing the Workflows app in your Teams environment.
- Configure the fields as:
- Post as: Flow bot
- Post in: Chat with Flow bot
- Message: Paste the following JSON code for your adaptive card:
|
1 2 3 4 5 6 7 8 9 10 11 12 13 14 15 16 17 18 19 20 21 22 23 24 25 26 27 28 29 30 31 32 33 34 35 36 37 38 39 40 41 42 43 44 45 46 47 48 49 50 51 52 53 54 55 56 57 58 59 60 61 62 63 64 65 66 67 68 69 70 71 72 |
{ "type": "AdaptiveCard", "$schema": "http://adaptivecards.io/schemas/adaptive-card.json", "version": "1.4", "body": [ { "type": "Container", "style": "emphasis", "items": [ { "type": "TextBlock", "text": "🚨 Guest Access Request", "weight": "Bolder", "size": "Large", "color": "Attention" } ] }, { "type": "FactSet", "facts": [ { "title": "👤 Guest Name:", "value": "@{triggerBody()?['GuestName']}" }, { "title": "📧 Email:", "value": "@{triggerBody()?['GuestEmail']}" }, { "title": "🏢 Company:", "value": "@{triggerBody()?['GuestCompany']}" }, { "title": "🔗 Site:", "value": "@{triggerBody()?['SiteURL']}" }, { "title": "🔐 Access Level:", "value": "@{triggerBody()?['AccessLevel/Value']}" }, { "title": "⏳ Access Duration:", "value": "@{triggerBody()?['AccessDuration_x0020_in_x0020_Da']}" }, { "title": "📌 Directory Status:", "value": "@{outputs('Compose_1')}" } ] } ], "actions": [ { "type": "Action.Submit", "title": "✅ Approve & Grant Access", "style": "positive", "data": { "action": "approve" } }, { "type": "Action.Submit", "title": "❌ Reject", "style": "destructive", "data": { "action": "reject" } } ] } |
- Recipient: items(‘Apply_to_each’)?[‘ApproverEmail’]
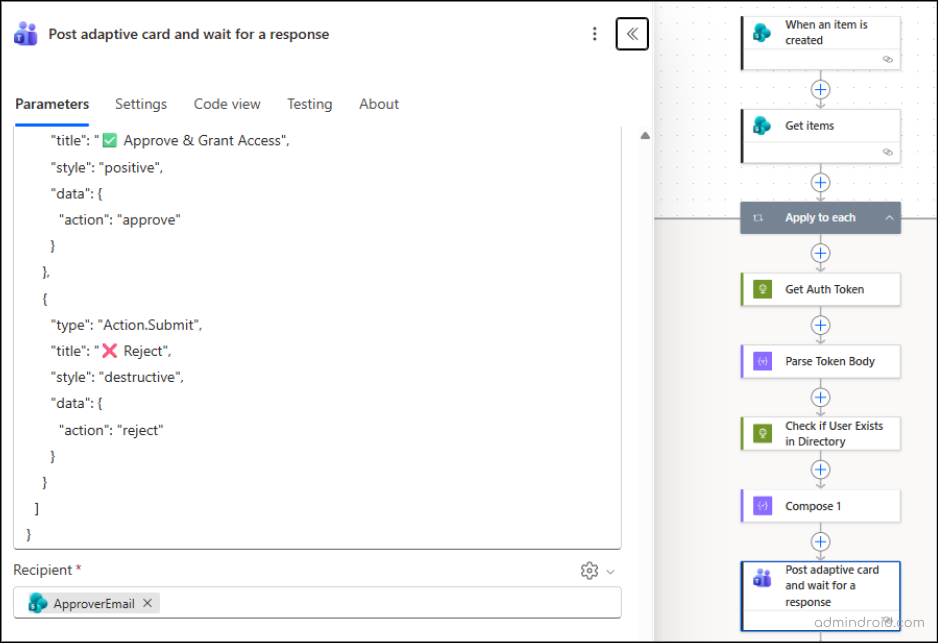
The request details are sent directly to the designated approver’s chat, allowing them to approve or reject access instantly. You can also customize the Adaptive Card using the Adaptive Card Designer for a visual experience.
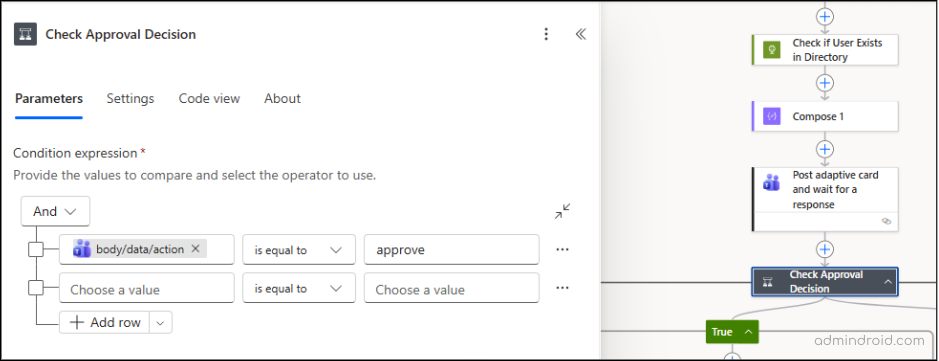
8. Verify if External User Access Approval is Accepted
This condition checks whether the admin selected Approve in the Adaptive Card and directs the flow accordingly.
- Click the ‘+’ (New step) icon below your Adaptive Card action.
- Search for and select the Condition control.
- Configure the AND operation in the action as follows:
- Choose a value: Click inside the field. Two icons will appear — select the Insert expression (fx) icon and paste the following expression: outputs(‘Post_adaptive_card_and_wait_for_a_response’)?[‘body/data/action’]
- Condition: is equal to
- Choose a value: approve
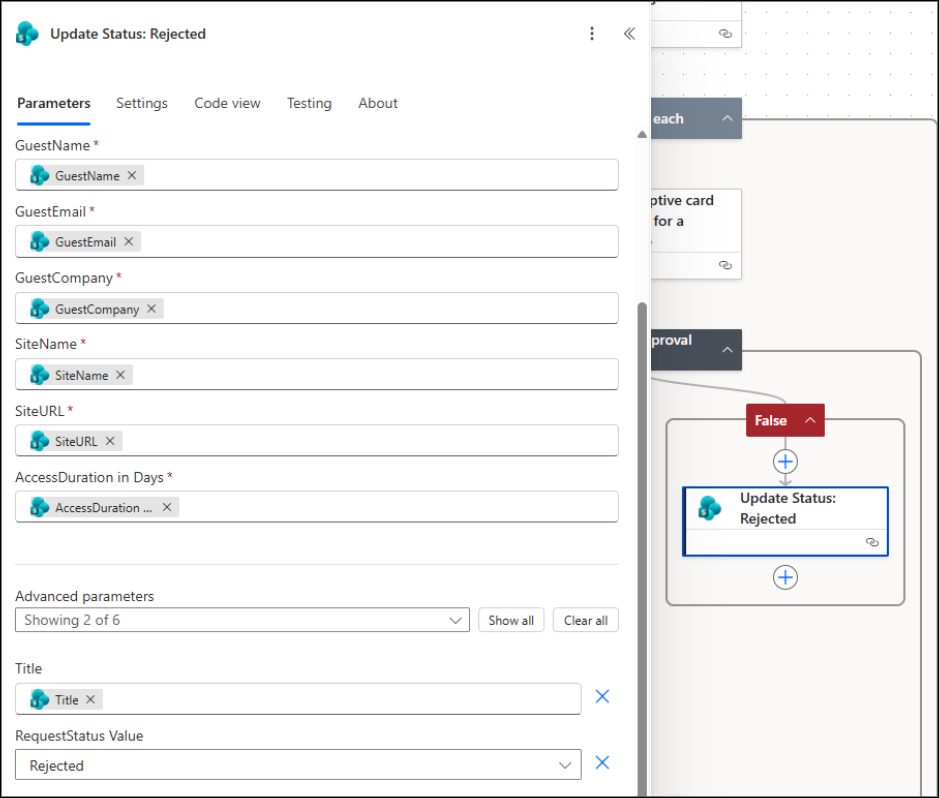
Under the False branch, click + and add the “Update item – SharePoint” action. Configure it as follows:
- Site Address: Select the site containing your list from the trigger.
- List Name: Choose the SharePoint list used for the form.
- Columns: Fill all required columns (such as ID, GuestName, etc.) using dynamic content from the trigger.
- Advanced Parameters -> Title: Set the Title field.
- RequestStatus Value: Set to Rejected.
This step ensures that if the approver rejects the request, the RequestStatus column is updated to Rejected.
Optionally, you can also add a “Send an email (V2)” action to notify the manager about the rejection by setting them as the recipient.
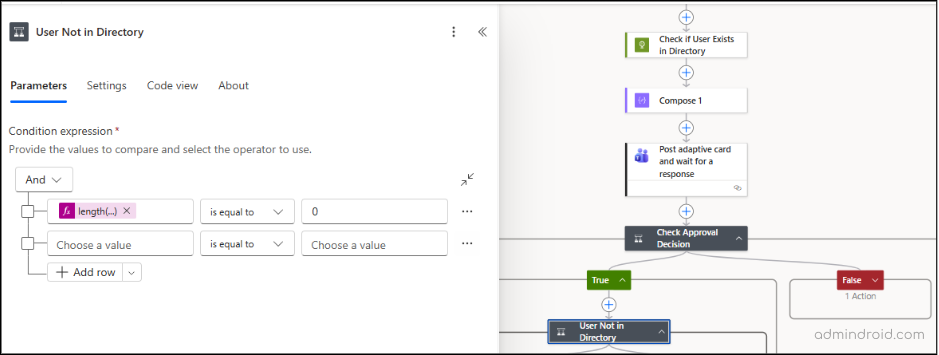
9. Determine Whether to Send a New External Invitation
Add a Condition action below the True branch and configure it as follows:
- Choose a value: Add an expression as length(body(‘Check_if_User_Exists_in_Directory’)?[‘value’])
- Condition: is equal to
- Choose a value: 0
If the value is 0, it means the user does not exist in the directory. When this condition is true, the flow will continue to create the user and then invite them.
10. Send External User Invitation via Microsoft Graph API (True Branch)
Under the True branch, add another HTTP action to send the guest invitation.
Configure it as follows:
- Uri: https://graph.microsoft.com/v1.0/invitations
- Method: POST
- Headers: Authorization: Bearer @{body(‘Parse_Token_Body’)?[‘access_token’]}
- Content-Type: application/json
- Body:
{
“invitedUserEmailAddress”: “@{triggerBody()?[‘GuestEmail’]}”,
“inviteRedirectUrl”: “@{triggerBody()?[‘SiteURL’]}”,
“sendInvitationMessage”: true
}
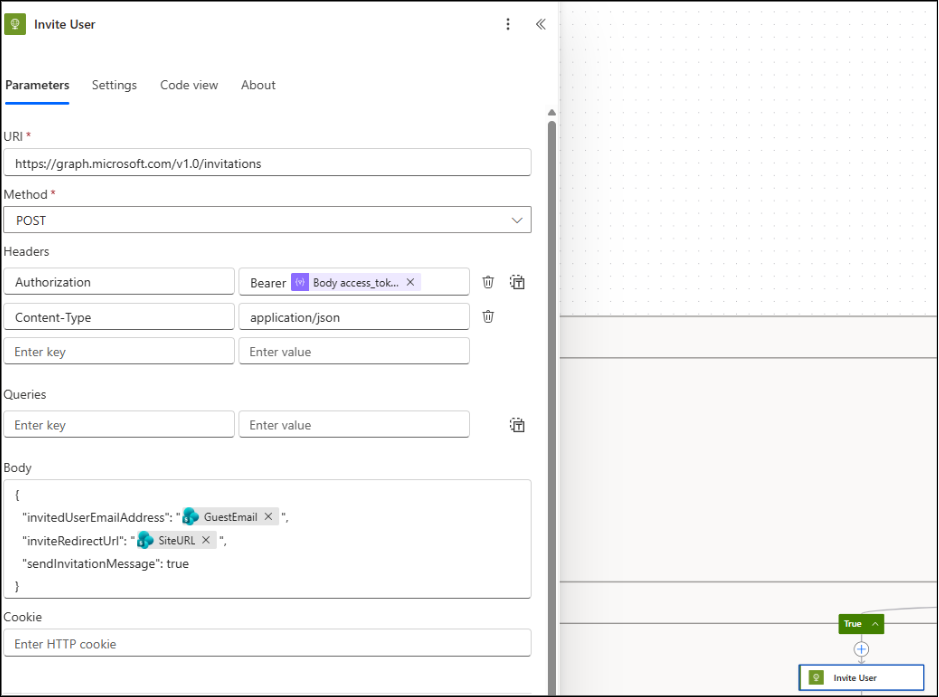
This request creates an invitation for the external user and sends them the standard Microsoft invitation email. The user is then added as a guest in your directory after accepting the invitation.
11. Add Delay to Ensure New Guest User Is Synchronized
Add a Delay action and configure it as:
- Count: 10
- Unit: Second
You can also modify the values if required.
This delay is required after the external user accepts the invitation. When the guest accepts, Entra ID begins provisioning the new account, and it may take a few seconds before the user becomes searchable in the directory.
Without this short delay, the flow may fail to find the newly created guest account in Entra ID, causing the “add to SharePoint group” step to fail.
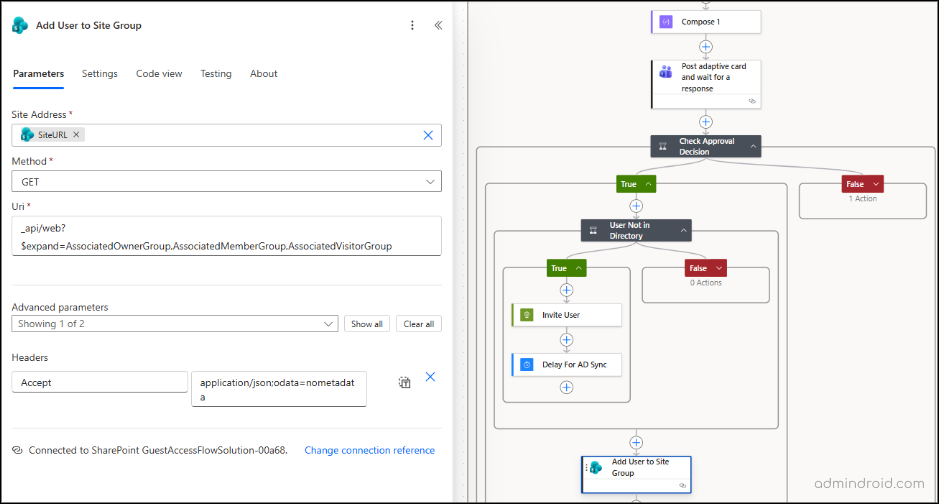
12. Retrieve the Associated SharePoint Groups
In this step, the flow retrieves the site’s associated SharePoint groups — Owners, Members, and Visitors — to automatically assign the correct access level to the guest user. This step is executed directly if the user already exists in the directory, ensuring they are added to the appropriate SharePoint group without needing a new invitation.
Under the Delay action:
- Click the ‘+’ icon. This step should be added using the + icon outside the condition branches, so it applies correctly regardless of whether the user already exists or is being invited.
- Search for and select ‘Send an HTTP request to SharePoint.’
- Configure the action as follows:
- Site Address: Select Enter custom value, then click the Dynamic content icon and choose SiteURL from the trigger action (If the list isn’t created with headers first, its properties won’t appear in dynamic content).
- Method: GET
- URI: _api/web?$expand=AssociatedOwnerGroup,AssociatedMemberGroup,AssociatedVisitorGroup
- Advanced Parameters -> Headers: Accept: application/json;odata=nometadata
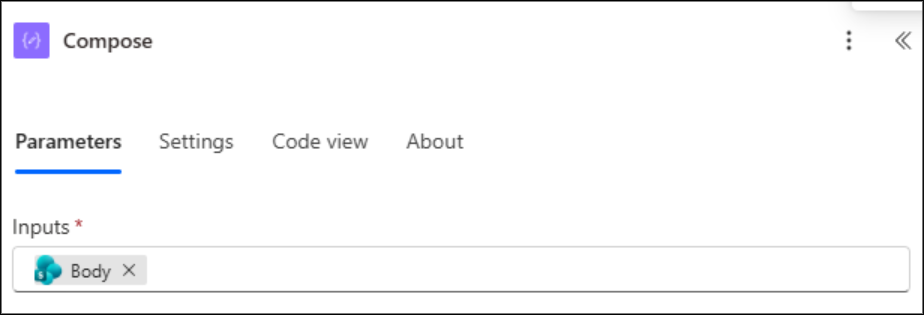
After this step, click the ‘+’ icon and add a Compose action. This allows you to view and verify the response returned from SharePoint before proceeding further.
- In the Inputs field, click Dynamic content and select Body under the Send an HTTP request to SharePoint.
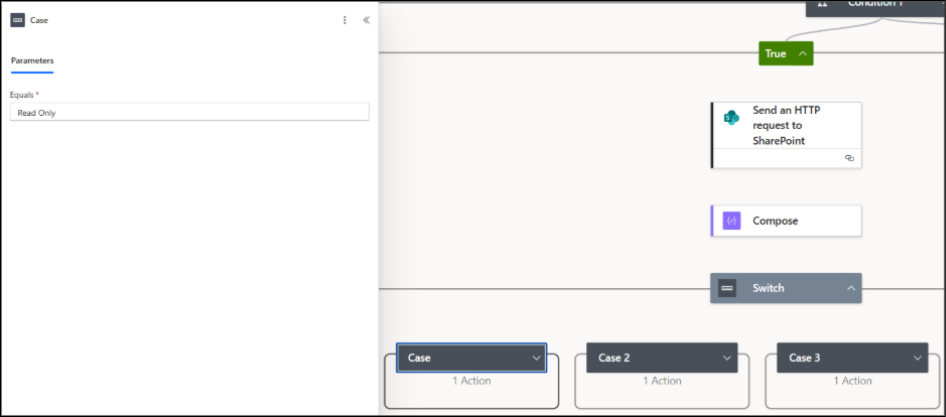
13. Configure the Flow to Handle Different SharePoint Access Levels
This setup ensures the flow handles each access level (Edit, Full Control, Read) separately, allowing you to define specific actions for every permission type.
- Click the ‘+’ icon under the previous Compose action.
- Search for and select the Switch control.
- In the On field, select AccessLevel Value from Dynamic content.
Under the Switch control, click the ‘+’ (Add a case) button to create three separate cases. The Default case acts as a fallback option – it runs if none of the specified cases (Read Only, Edit, Full Control) match the value in the AccessLevel field.
In each case, configure the Equals field under Parameters as follows:
- Case 1: Read Only
- Case 2: Edit
- Case 3: Full control
📌 Note: Make sure to give the case names exactly as they appear in the SharePoint list access value names.
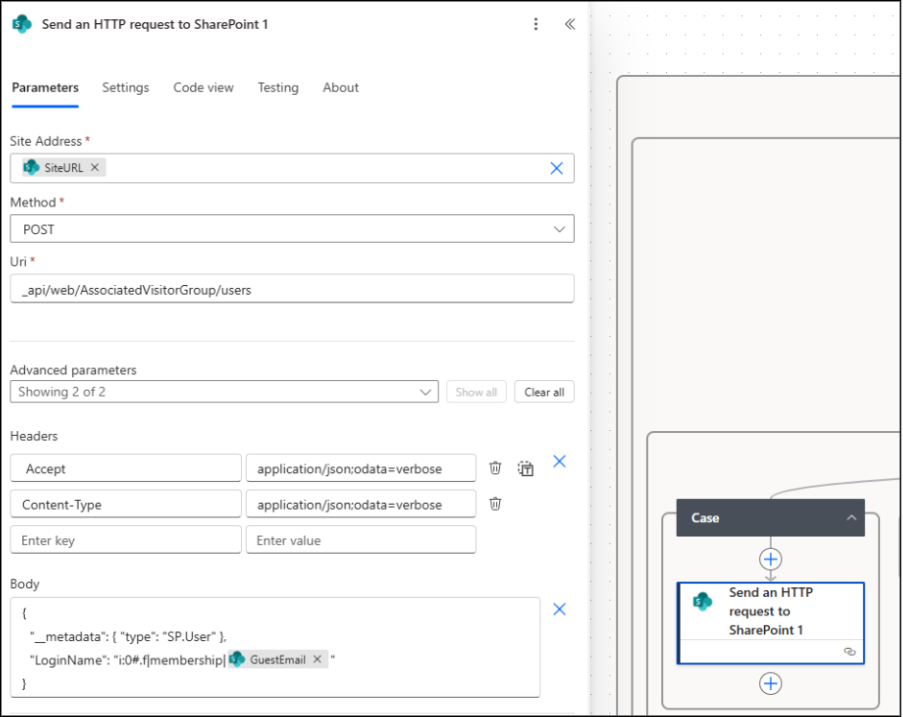
14. Automatically Add Guest User to the Appropriate SharePoint Group
For each case created under the Switch action, click ‘+’ ->Add an action and choose Send an HTTP request to SharePoint. Now, to let the flow add the guest into the respective SharePoint group defined by the manager, use the following configuration for each access level.
All parameters remain the same except the URI for all 3 cases, which changes based on the access type (Read Only, Edit, or Full Control):
- Site Address: Select Enter custom value -> click Dynamic content -> choose SiteURL from the trigger.
- Method: POST
- URI:
- Case 1: Read Only -> _api/web/AssociatedVisitorGroup/users
- Case 2: Edit -> _api/web/AssociatedMemberGroup/users
- Case 3: Full Control -> _api/web/AssociatedOwnerGroup/users
- Headers: Accept: application/json;odata=verbose
Content-Type: application/json;odata=verbose
- Body: {
“__metadata”: { “type”: “SP.User” },
“LoginName”: “i:0#.f|membership|@{triggerBody()?[‘GuestEmail’]}”
}
15. Mark Request as Approved in SharePoint List Automatically
Finally, add the ‘Update item’ action under the cases to mark the request as Approved in the SharePoint list.
- Site Address: Choose the same site where your request list is located.
- List Name: Choose your requests list.
- Id: Select the ID dynamic content from the trigger.
- Columns: Fill all required columns (such as ID, GuestName, etc.) using dynamic content from the trigger. Follow the same configuration as step 4.
- Title: Select the dynamic content ‘Title’ from the trigger.
- RequestStatus Value: Approved.
That’s it! Save the flow and run a test to ensure everything works as expected.
Flow result:
When a manager submits the list form, a new row is created in the SharePoint list, triggering the Power Automate flow automatically.
An Adaptive Card is instantly delivered to the admin’s Teams chat, displaying all the request details as shown below.
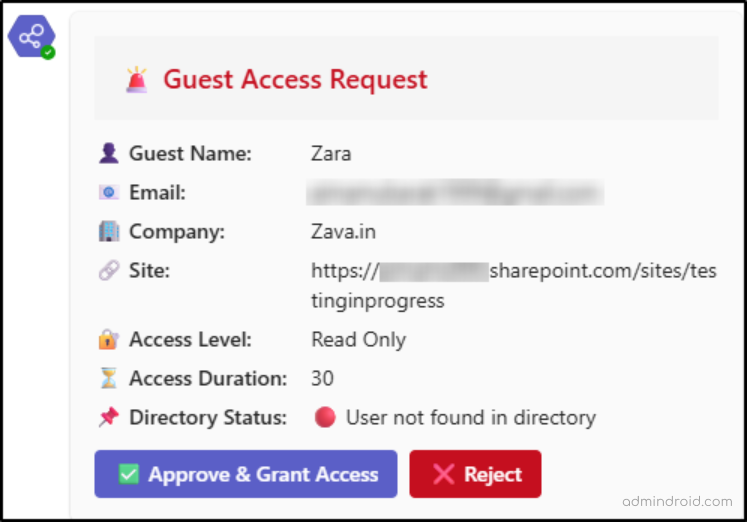
The flow then verifies whether the external user mentioned in the form already exists in the directory or not. Once the admin approves the request, the flow automatically adds the guest user to the appropriate SharePoint group, sends a confirmation email, and updates the SharePoint list item to “Approved.”
We hope this blog helped you set up the step-by-step flow to automate external user invitations and access approvals with ease. Power Automate can also simplify other admin tasks, such as onboarding, offboarding, inactive guest user management, and much more.
Thanks for reading! If you have questions or suggestions, feel free to drop them in the comments below.


