Organizations often configure a standardized signature in Outlook to ensure every employee’s email includes consistent branding, contact details, and legal information. However, this consistency can be lost when users modify or remove their signatures. As a result, emails across the organization may contain different formats, missing company information, or unapproved content. This can lead to an inconsistent brand image and reduces the professionalism of business communications.
To address this challenge, organizations often need to restrict users from modifying Outlook signatures to maintain a standardized signature across all mailboxes. However, there is no direct native method in Microsoft 365 to enforce this across all Outlook clients. To help admins, we’ve compiled the available approaches. In this blog, we’ll explain how to prevent users from modifying Outlook signatures without using third-party tools.
How to Prevent Users from Modifying Outlook Signatures in Microsoft 365
Administrators can choose between different control approaches based on how strictly they want to enforce standardization and the level of visibility users need.
- Method 1: Disable Outlook signatures and enforce with server-side signature (Hard lock)
- Method 2: Automatically enforce Outlook signatures with a scheduled PowerShell script (Soft lock)
Before choosing a method, it is important to understand how each approach works in real situations. Both methods help standardize email signatures in Outlook 365, but they differ in how signature options are applied. They also differ in what users can control and the level of administrative effort required.
Here is a comparison of both methods to help understand the differences clearly and choose the right method.
| Feature | Method 1 (Disable user signature + Transport rules) | Method 2 (Scheduled PowerShell script) |
| Signature visibility | Signature is not visible while composing the email. | Signature is visible while drafting the email. |
| User control | Hard enforcement. | Soft enforcement. |
| Device and client support | It works across most Outlook versions and devices, depending on the method selected. | Works mainly in Outlook Web App (OWA) and New Outlook. |
| Best suited for | When strict control and consistent branding is needed. | When users need to see a signature while composing emails. |
Method 1: Disable Outlook Signatures and Enforce with Server-Side Signature
This is the only way to make an Outlook signature truly unchangeable: block users from managing their own signatures, then apply the organization’s signature at the server level, where users cannot modify it.
Disable Outlook Signatures for All Users
There is no single method that works across all Outlook clients. The right approach depends on your environment, the Outlook version in use, and how your devices are managed.
To help you choose the most suitable option, we’ve compiled the common methods organizations use to prevent users modify outlook signature:
- Disable signature in OWA and New Outlook
- Disable signature using Microsoft Intune policy
- Disable signature using Active Directory GPO
The comparison table below will help you determine which method, or combination of methods, best fits your environment and requirements.
| Method | OWA Policy | Microsoft Intune | Active Directory GPO |
| When to choose | When users primarily use Outlook on the web or the new Outlook for Windows | When devices are enrolled and managed by Intune | When users are on domain-joined machines in Active Directory |
| Best suited for | Cloud-first organizations using Microsoft 365 | Organizations managing devices through Intune | Traditional on-prem environments |
| Applied to | OWA and New Outlook for Windows | Classic Outlook on Intune-managed devices | Classic Outlook on domain-joined devices |
1. Disable Outlook Signature in OWA and New Outlook
This method uses OWA policies to disable signature management in Outlook on the web and the new Outlook for Windows. Once configured, users can no longer create, edit, or remove email signatures.
- Sign in to the Exchange admin center and navigate to Roles → Outlook web app policies.
- Select the OwaMailboxPolicy-Default, then in the flyout under Features, choose Manage features.
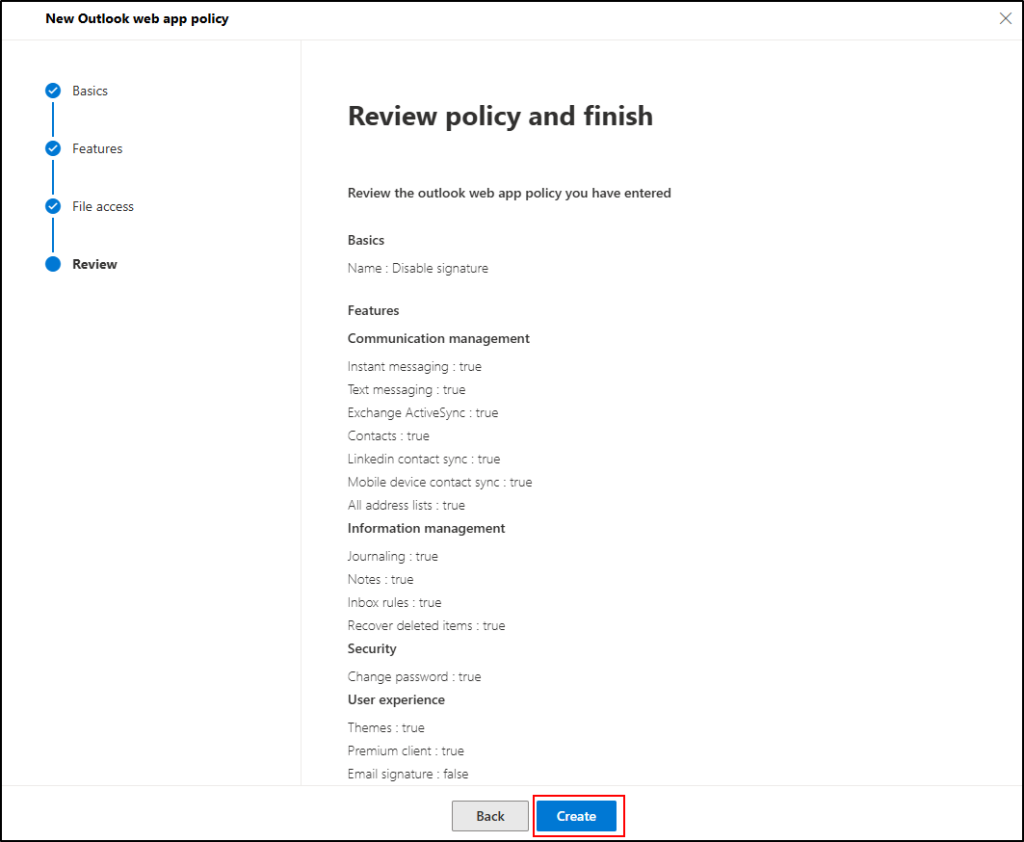
- Then in Edit features page, expand User experience, and disable Email signature.
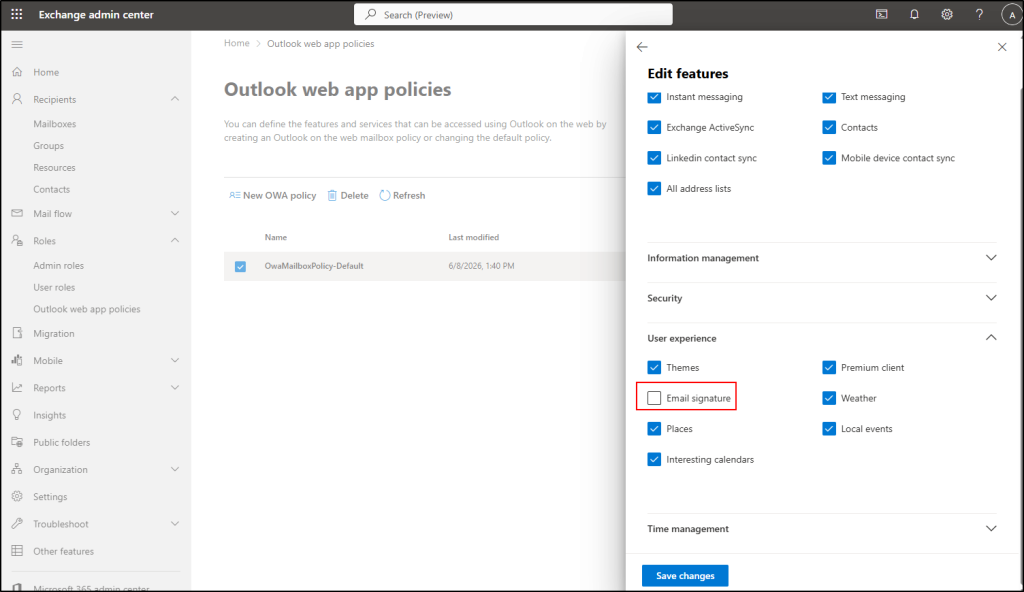
- Click on Save changes to update the policy.
You can also use PowerShell to manage Outlook signature settings in Microsoft 365. Run the following cmdlet to update the OWA mailbox policy.
|
1 2 |
Connect-ExchangeOnline Set-OwaMailboxPolicy -Identity "OwaMailboxPolicy-Default" -SignaturesEnabled $false |
This command disables signature management for users assigned to the default OWA mailbox policy.
After modifying the policy, signature options will no longer be visible in Outlook. However, existing signatures in Classic Outlook will remain available, and files in %AppData%\Microsoft\Signatures should be manually removed. As a result, users will not be able to create ormodify signatures in Outlook web and New Outlook.
2. Disable Outlook Signature Using Microsoft Intune Policy
Microsoft Intune policy helps to prevent users modify outlook signature in Classic Outlook by controlling settings directly on users’ devices. It applies configuration policies on managed devices.
In the following method, we’ll use an Intune Configuration Policy to disable Outlook signature settings on Windows managed devices.
- Open Intune admin center and navigate to Devices.
- Under Manage devices, select Configuration and choose +Create, and select New Policy from the dropdown.
- In the Create a profile flyout, choose the Platform as “Windows 10 and later” and Profile type as Settings catalog.
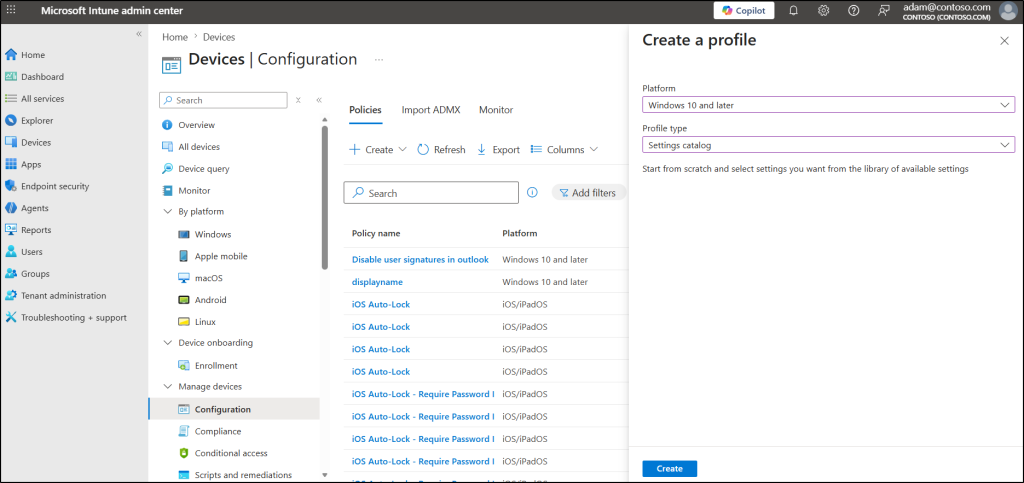
- Select Create to move to the next steps for creating a policy.
- Under the Basics section, provide the name and description of the policy, and click Next.
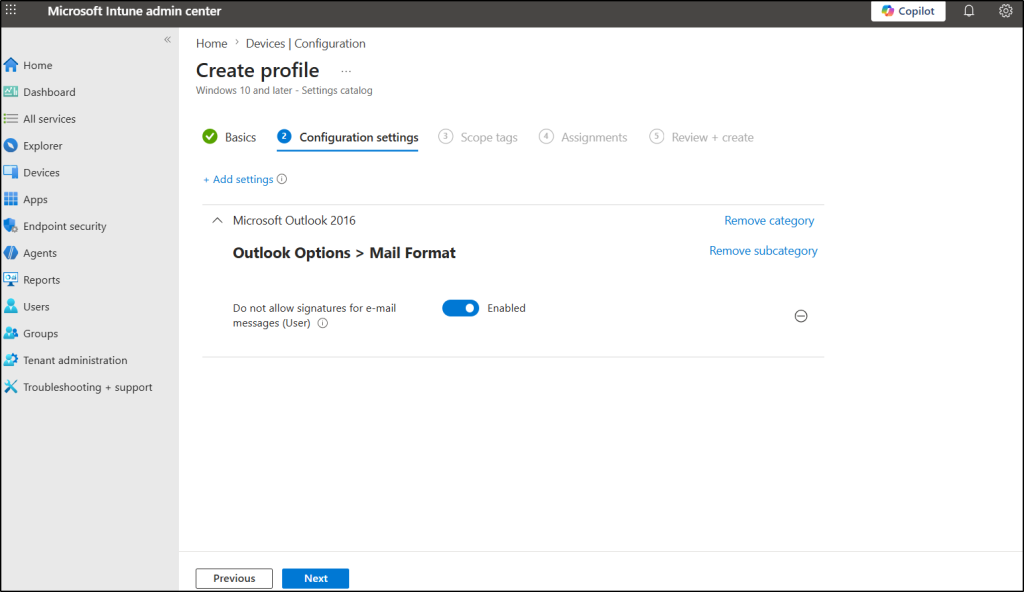
- In the Configuration settings section, choose +Add settings to open Settings picker.
- Search as signature and select Microsoft Outlook 2016\Outlook Options\Mail Format from the category.
- Enable the setting name Do not allow signatures for e-mail messages (User)
- Then turn the toggle switch to Enabled for the selected category
- Click Next and under Select scope tags, add any scope tags if needed.
- In the Assignments section, Include the users and devices for the policy.
- For selecting users and devices, choose Add groups and select the respective groups with the required user and devices.
- Choose Next, review the details of the policy and click Create to add a new policy for devices.
Similarly, create policies for other device types such as macOS, Windows, and other supported systems to ensure consistent configuration across the environment. Since this method applies only to devices enrolled and managed through Microsoft Intune, it may not cover all users or Outlook clients. To ensure full signature control across all devices and Outlook versions, it should be combined with additional restriction methods.
3. Disable Outlook Signature using GPO
If your organization uses Active Directory, you can use Group Policy (GPO) to prevent users from creating or modifying signatures in Classic Outlook for Windows. The policy is automatically applied to all domain-joined computers targeted by the GPO.
Tip: To configure this, ensure the Office Administrative Templates (ADMX) are installed. a Without them, the Microsoft Outlook policy settings will not appear in the Group Policy Editor.
Follow the steps below to configure the Group Policy and prevent users modify outlook signature.
- Open Group Policy Management.
- Create a new GPO or edit an existing one that applies to the target users.
- Next, navigate to User Configuration → Policies → Administrative Templates → Microsoft Outlook 2016 → Outlook Options → Mail Format.
- Then, select Do not allow signature for user, enable the Disabled checkbox, and select OK.
- Finally, run gpupdate /force in PowerShell on the client computers. This command forces the updated Group Policy to be applied immediately to the targeted users.
Once the policy is applied, users will be restricted from managing Outlook signatures.
Configure Email Signatures via Mail Flow Rule in Exchange Online
Email signatures are important for maintaining consistent branding and compliance, but user-configured signatures can lead to inconsistencies. To solve this, Exchange Online provides mail flow rules for centralized signature management.
Restricting users from creating or modifying Outlook signatures is only the first step. To ensure all outgoing emails contain a consistent signature, you should also configure a server-side signature in Exchange Online.
Exchange Online mail flow rules (transport rules) allow administrators to centrally apply signatures and disclaimers to outgoing messages. This ensures that every email sent from the organization includes the required branding, contact information, and compliance-related content, without requiring users to configure signatures manually.
When creating a mail flow rule, you can:
- Define when the rule should apply.
- Specify the signature or disclaimer content.
- Use HTML formatting to create professionally styled signatures.
- Apply the signature consistently across the organization.
You can follow the steps given here to setup email signature using mail flow rule
Since the signature is added by Exchange Online after the message is sent, users cannot modify or remove it. This makes mail flow rules the most reliable way to enforce a standardized email signature across all mailboxes and prevent users modify outlook signature.
Keep the following limitations in mind:
- Signatures added through mail flow rules are appended after the message is sent and cannot be inserted directly below the latest reply or forwarded message.
- The applied signature does not appear in the sender’s Sent Items folder and can only be seen by recipients.
Method 2: Automatically Enforce Outlook Signatures with a Scheduled PowerShell Script
If your goal is to maintain a standardized Outlook signature while allowing users to view the signature during email composition, this method is an effective option.
We developed a PowerShell script that automatically deploys approved email signatures directly to Outlook clients. The script supports both text and HTML signatures to be scheduled to run at regular intervals. If a user modifies or removes the signature, the approved version is automatically restored during the next scheduled execution.
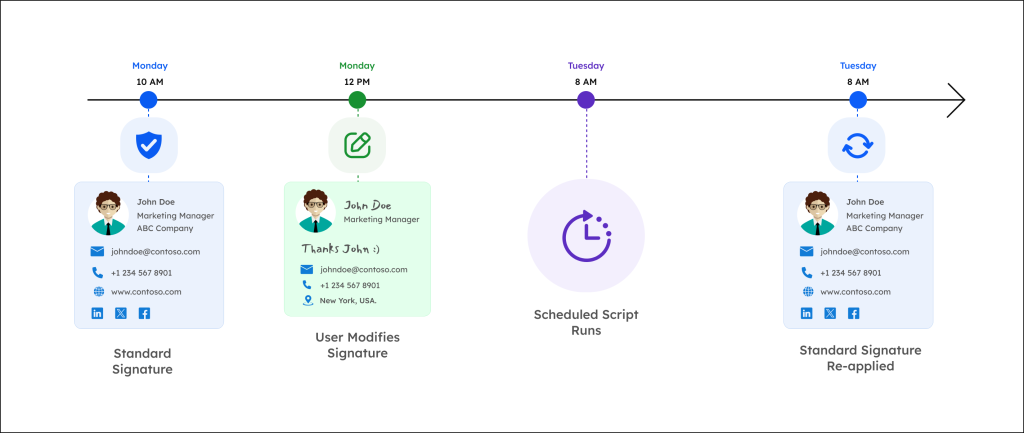
This approach helps organizations maintain consistent branding, contact information, and signature formatting across all users while ensuring the signature remains visible within Outlook during email composition.
Download Script: AutomateSignatureInOutlook.zip
The script can be configured to:
- Apply signatures to all users.
- Apply signatures to specific mailboxes.
- Apply signatures to users imported from a CSV file.
- Deploy either text or HTML signatures.
- Use built-in or custom signature templates.
To get started, follow the steps below to run the script and add the signature to Outlook.
Execute the Script
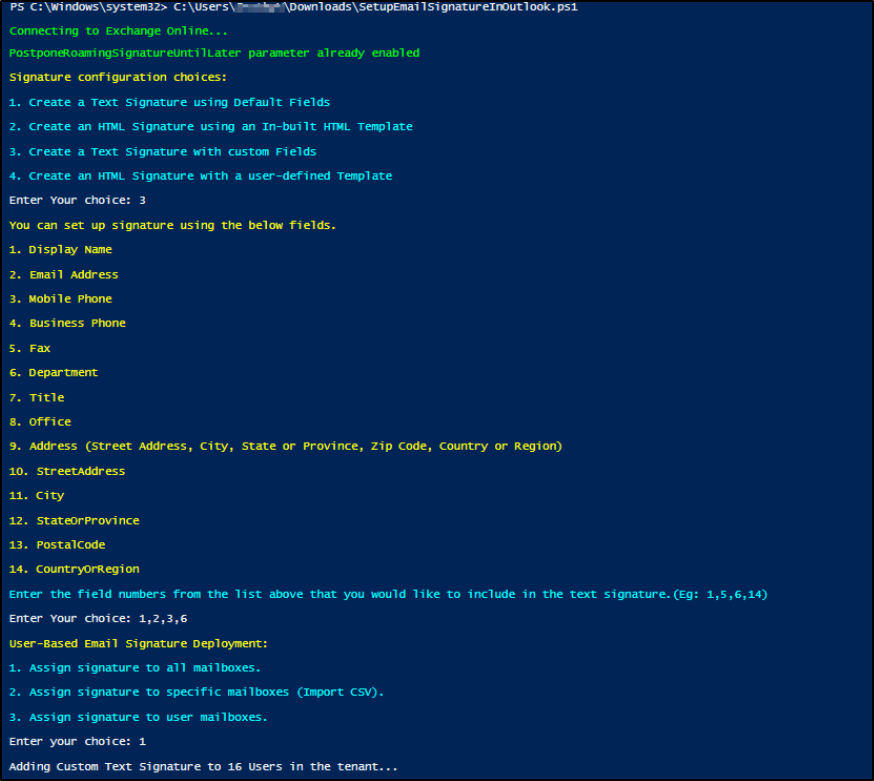
Before scheduling the script using Task Scheduler or Azure Automation, run it manually once to configure the signature settings. During the initial configuration, you can:
- Select the signature type.
- Choose the target users.
The selected options are stored in a configuration file, which the script uses during future scheduled executions.
To run the script for the first time:
- Register app in Entra ID to connect to Exchange Online using certificate.
- Download the script.
- Open the Windows PowerShell as Administrator.
- Run the script using below format.
|
1 |
./AutomateSignatureInOutlook.ps1 -Orgnaization <Domain> -ClientID <AppId> -CertificateThumbPrint <CertThumbPrint> |
Replace <Domain>, <AppId>, and <CertThumbPrint> with the corresponding values from your registered application configured for certificate-based authentication.
Automate the Script Using Task Scheduler
Once the configuration file has been created, you can schedule the script to run automatically. Follow the below steps to run the script on domain-joined devices.
- Open the Task Scheduler as administrator.
- Under Actions, click the Create Task option.
- In the General tab, provide a name for the task and choose Run whether user is logged on or not under Security options.
- Next, set the schedule to run daily by default or adjust the frequency based on the need.
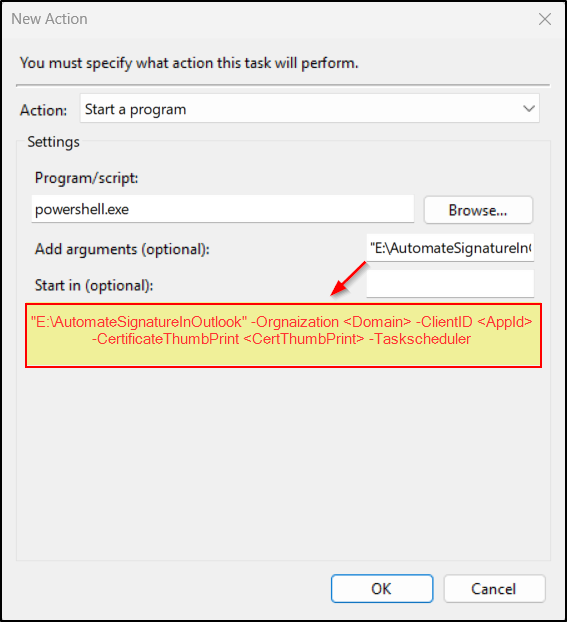
- In the Actions tab, click New.
- In the Program/script text box enter the ‘powershell.exe’ file name.
- In the Add arguments (optional) field enter the script path, authorization details and add the Taskscheduler parameter as shown below and click OK.
- Click OK on the Actions tab, then enter the credentials of the account that will run the scheduled task.
- Once completed, the task is created successfully.
For a detailed step-by-step guide on PowerShell script execution and capabilities, refer to the dedicated guide on automating email signatures in Outlook.
And that’s it! The script will automatically run according to the defined schedule and reapply the approved corporate signature whenever necessary.
We hope this guide helps you understand how to prevent users modify Outlook signature management using native Microsoft 365 and PowerShell capabilities. If you have any questions or feedback feel free to leave a comment below. Thank you for reading!


