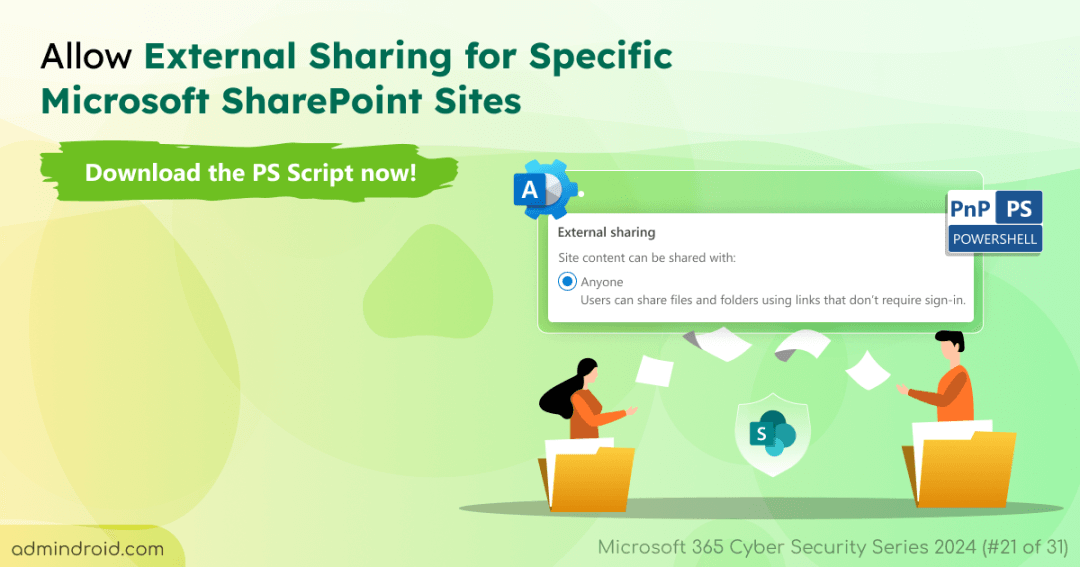
On Day 21 of Cybersecurity Awareness Month, learn how to easily configure Anyone sharing for specific SharePoint sites. Stay tuned for more tips in our Microsoft 365 Cybersecurity blog series!
There are instances when you need to enable “Anyone” sharing for specific SharePoint sites. For example, when you need to share documents or collaborate with external individuals like clients, vendors, or partners who don’t have a Microsoft account, “Anyone” links simplify the process. They allow easy access to content without requiring a sign-in.
So, let’s walk through how to configure external sharing for specific sites in SharePoint.
How to Enable External Sharing for Specific Sites in Microsoft 365?
There are three ways to enable external sharing (setting it to “Anyone”) for individual SharePoint sites. Before diving into those methods, here’s an important fact: to allow sharing with “Anyone” at the site level, the tenant-wide external sharing setting must also be set to “Anyone.”
Let’s configure this by navigating to:
SharePoint admin center > Policies > Sharing > External sharing > Adjust the SharePoint slider and set it to “Anyone.”
Done with the above configuration? Now, let’s look at the three methods to set Anyone sharing for specific sites.
1.Enable external sharing using SPO admin center
2.Enable external sharing using PnP PowerShell
3. Enable External sharing using PowerShell Script (Recommended)
Method 1: Configure External Sharing for a Site Using the SharePoint Admin Center
- Sign in to the SharePoint admin center and navigate to the Active sites option under Sites.
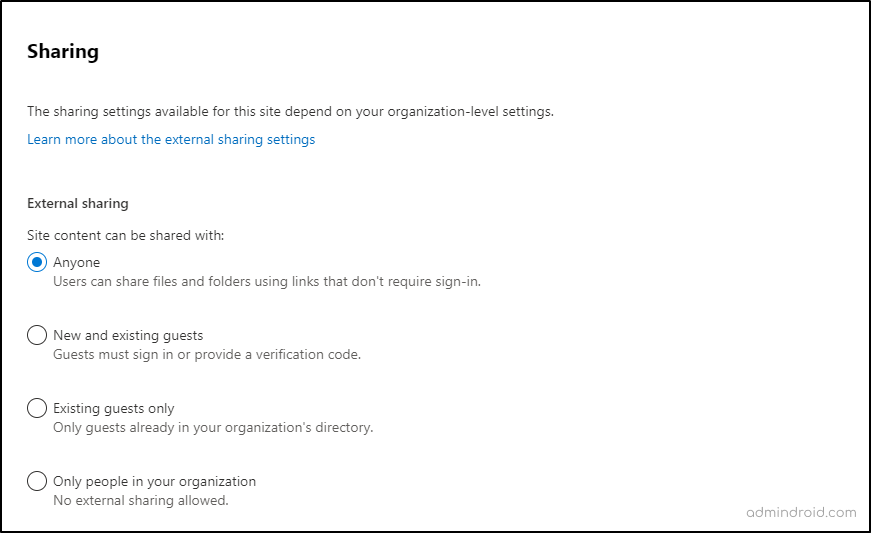
- Select the desired site and click the Sharing option that appears above.
- Select the Anyone option under External sharing.
- Finally, proceed to save the policy.
Method 2: Enable External Sharing Using PowerShell
- Open Windows PowerShell as an administrator and connect to SharePoint PnP PowerShell.
- Run the following cmdlet to set the site-level external sharing settings for a specific site to “Anyone”:
|
1 |
Set-PnPTenantSite -Url <Sites_Url> -SharingCapability “ExternalUserAndGuestSharing” |
Drawback of these two methods:
- You can use these methods to enable external sharing for a single site. However, this approach isn’t efficient for multiple sites. Because, you’ll have to do the same process for each site.
- Also, changes to tenant-wide external sharing settings in SharePoint Online can significantly impact how individual site settings behave. For example, if a site is initially set to allow “Anyone” sharing but you later adjust the tenant-wide setting to “Only people in the organization,” that site will automatically inherit the more restrictive setting. Conversely, if you later change the tenant-wide sharing settings back to “Anyone,” any sites that were previously restricted will revert to allowing “Anyone” sharing as well. This means you may have to manually restrict external sharing settings for each affected site one by one, which can be a cumbersome process.
To simplify this task, we’ve prepared a PowerShell script! Let’s dive in and explore how it works!
Method 3: Enable External Sharing for SharePoint Sites Using PnP PowerShell
We have developed a one-stop solution script that comes with different use cases to lessen your navigation hassle!
Here’s a quick preview: the script checks if the tenant-wide sharing setting is set to ‘Anyone,’ and if it is not, the script will enable the setting after getting confirmation from you. After that, it can handle two main scenarios: configuring external sharing (Anyone)for a single site and configuring for multiple sites. Bonus feature—this script also helps you restrict external sharing for remaining sites!
Download Script : EnableExternalSharingInSPOSites.ps1
Prerequisite: Register a Microsoft Entra ID Application for PnP PowerShell
Before proceeding to enable external sharing using this script, there is an important prerequisite you must complete.
Since this script relies on PnP PowerShell, you need to register a Microsoft Entra ID application before running it. Because Microsoft recently updated PnP PowerShell by removing the multi-tenant PnP Management Shell Entra ID application. Due to this change, you may encounter the following error:
AADSTS700016: Application with identifier ‘31359c7f-bd7e-475c-86db-fdb8c937548e’ was not found in the directory ‘[companyname]’.
To resolve this, administrators must register their own Microsoft Entra ID application for use with PnP PowerShell. This applies to both interactive authentication and app-only access.
If you haven’t registered an application yet and don’t have a Client ID, no need to worry—the script can handle it for you. By using the RegisterNewApp parameter, the script will automatically register a new application and provide the required Client ID.
|
1 |
.\EnableExternalSharingInSPOSites.ps1 -RegisterNewApp |
Once the app is registered, the script will automatically use the generated Client ID and you can proceed to enable anyone sharing for the configured SharePoint Online site.
Note: Ensure you run this command using PowerShell 7 or later.
Now, let’s see the three main use cases of this PowerShell script in detail now.
- Restrict sharing for remaining SharePoint sites. (Optional)
Sample Log File:
After running the script, a detailed log file will be generated, outlining the changes made to the external sharing settings for each site.

Note:
- If a specified site already has Anyone sharing enabled, the script will skip that site.
- If a sensitivity label is applied to a site, the script will not change the existing sharing configuration.
- The script will configure external sharing for SharePoint sites only. So, if you specify a OneDrive site URL, the script will skip it.
- Also, you need to use PowerShell 7 to execute the script.
1. Allow External Sharing for a Site Using PowerShell
You can enable Anyone sharing for a specific site that is designated for collaboration with external partners. To enable external sharing for such a site, you can run the script as follows.
|
1 |
.\EnableExternalSharingInSPOSites.ps1 |
During execution, you will be prompted to enter your Tenant ID, Client ID, and site Url. Alternatively, you can streamline this by specifying them in the “-TenantName”, “-SiteUrl”, and “-ClientId” parameters respectively.
|
1 |
.\EnableExternalSharingInSPOSites.ps1 -SiteUrl <url_Of_SPO_site> -TenantName <Tenant> -ClientId <Client_Id> |
Example:
|
1 |
.\EnableExternalSharingInSPOSites.ps1 -SiteUrl https://contoso.sharepoint.com/sites/Sales -TenantName contoso -ClientId a9873ee-d369-44e8-b1c7-17243e45jb6e |
The above cmdlet will enable Anyone sharing for the SharePoint site “Sales”.
2. Configure External Sharing for Multiple SharePoint Sites
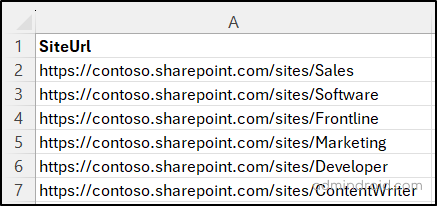
The need to enable external sharing for multiple SharePoint sites arises when your organization handles several projects that involve collaboration with different external partners. To achieve this, you first need to prepare a sample input CSV file with the column name “SiteUrl” containing the site URLs as shown below. Once the file is ready, you can run the script by specifying the CSV file path in the “-ImportCSV” parameter.
CSV Sample:
Cmdlet:
|
1 |
.\EnableExternalSharingInSPOSites.ps1 -ImportCsv <File_Path> -TenantName <Tenant> -ClientId <Client_Id> |
Example:
|
1 |
.\EnableExternalSharingInSPOSites.ps1 -ImportCsv D:\ExternalSharing -TenantName contoso -ClientId a9873ee-d369-44e8-b1c7-17243e45jb6e |
The above example will enable Anyone sharing settings for the following sites in Contoso: Sales, Software, Frontline, Marketing, Developer, ContentWriter.
3. Restrict External Sharing for Remaining SharePoint Sites
Now, you might be wondering, “If tenant-wide external sharing is set to ‘Anyone,’ how do I protect other sites from external access?” That’s where this script really stands out!
This PowerShell script not only allows external sharing for specific sites, but it also identifies all other sites in your environment, giving you the ability to manage their external sharing settings. You can choose from four sharing options to apply the right level of access to the remaining sites.
To execute, simply run the PowerShell script with the “SharingConfigForRemainingSites “ parameter. You can choose from the following four sharing options for the remaining sites: Only people in your org, Existing guests, New and existing guests, or Anyone.
The script will automatically retrieve all remaining sites and adjust the sharing settings accordingly.
|
1 |
.\EnableExternalSharingInSPOSites.ps1 -SiteUrl <url_Of_SPO_site> -TenantName <Tenant> -ClientId <Client_Id> -SharingConfigForRemainingSites <Sharing_Method> |
Example:
|
1 |
.\ EnableExternalSharingInSPOSites.ps1 -SiteUrl https://contoso.sharepoint.com/sites/Marketing -TenantName Contoso -ClientId a9873ee-d369-44e8-b1c7-17243e45jb6e -SharingConfigForRemainingSites “Only people in your org” |
The above cmdlet will enable ‘Anyone’ sharing for the Marketing site while restricting external sharing for other sites by configuring the permission to ‘Only people in your org”.
You can also run the script using Certificate-based Authentication as shown below.
|
1 |
.\EnableExternalSharingInSPOSites.ps1 -TenantId <TenantId> -ClientId <ClientId> -CertificateThumbprint <Certthumbprint> |
You can create a self-signed certificate or CA certificate based on your requirement. Also, this script is scheduler friendly.
That’s it! I hope this blog helps you allow external sharing for specific SharePoint sites. You can further strengthen security by applying external sharing best practices.
If you have any questions, please feel free to reach out through the comments section.


