On Day 24 of the Cybersecurity awareness month, learn how smart lockout works to mitigate credential attacks in Microsoft 365. Stay tuned for more blog posts in our M365 Cybersecurity blog series.
Passwords are the keys to our Microsoft 365 accounts, granting access to essential resources. However, as human beings, we often fall short when it comes to crafting robust passwords. We’re creatures of habit, opting for the familiar and easy-to-remember password over the complex and secure.
Microsoft 365 users often use sequential numbers or their company’s name as the password for their account. These are the loopholes for the attackers as they are easy to guess. Within fewer attempts, they will guess the correct password and may enter right in!
To prevent such brute-force, credential stuffing attacks, smart lockout in Microsoft Entra ID comes in. This acts as a guardian for M365 user accounts, shielding against malicious actors attempting to gain unauthorized access.
You might be wondering, how exactly does smart lockout achieve this? Well, dive into the blog to uncover the workings of smart lockout and see how it boosts the M365 security.
How does Microsoft Entra Smart Lockout Works?
Smart lockout safeguards user accounts by blocking them after a specified number of failed sign-in attempts. While it might seem similar to regular lockout, there’s a key distinction.
Regular lockout can block even genuine users, when they forget their passwords and make numerous sign-in attempts.
However, smart lockout is a more sophisticated approach that uses additional factors to determine whether to lock an account or not. This factor includes location, IP address of the sign in requests, password patterns and more. This extra check helps to distinguish between legitimate users who mistyped their passwords and attackers who are trying to gain unauthorized access.
By default, the smart lockout blocks the account after
- 10 consecutive failed login attempts – For Azure Public and Microsoft Azure operated by 21Vianet tenants.
- 3 consecutive failed login attempts- For Azure US Government tenants.
Also, by default, the lockout duration is set at 1 minute (60 seconds). But it gets increased after subsequent failed attempts.
However, Microsoft empowers admins to have a custom Azure AD smart lockout configuration. Let’s get into the steps to manage/implement the smart lockout values in MS Entra ID.
Manage Smart Lockout Values in Microsoft Entra ID
The smart lockout feature is available for all the users, but for customizing its values, an Azure AD P1 license is necessary. You need to configure lockout threshold and lockout duration for Microsoft Entra user by following the steps below.
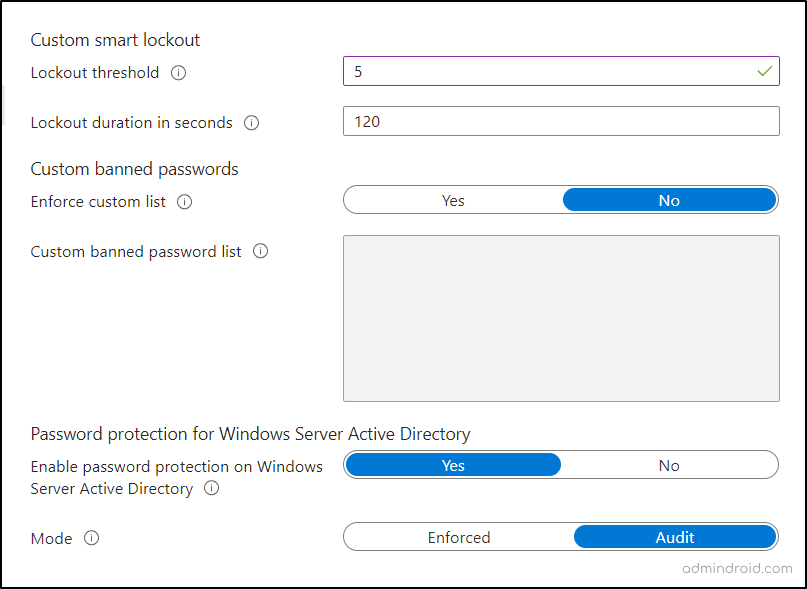
- Microsoft Entra admin center → Protection → Authentication methods → Password protection.
- Here, you can set the “Lockout threshold” values from 1 to 50 based on the requirement.
- Then, you can set the “Lockout duration in seconds” from 5 to 18,000 (30 minutes).
- Finally, proceed by saving the policy.
Once done, the smart lockout will disable the account when the specified threshold is reached.
Additionally, this smart lockout can be integrated with hybrid deployments. Let’s see about this in detail in the topic below.
Configure Azure AD Smart Lockout to Protect On-premises AD DS Accounts
Smart lockout can be integrated with hybrid deployments that use password hash sync or pass-through authentication. By doing this, you can effectively safeguard on-premises Active Directory Domain Services (AD DS) accounts, preventing them from being locked out due to malicious activities. But there are some key considerations for smart lockout when using pass-through authentication:
Lockout Thresholds: The threshold for AD DS account should be larger than lockout threshold of Microsoft Entra ID.
- For example, if you set the Azure AD lockout threshold to 5, you should set the on-premises AD DS lockout threshold to be at least 2 or 3 times greater, so it might be set to 10 or 15. This strategy helps filter out potential attackers before they reach on-premises AD DS.
Lockout Duration: The lockout duration for Entra should be greater than the lockout duration for on-premises AD DS.
- For example, you could choose 120 seconds (2 minutes) for Azure AD, while keeping an on-premises AD DS lockout duration at 60 seconds (1 minute). This ensures that an account locked in Azure AD remains locked for a longer period than in on-premises AD DS.
So, if you want to integrate it with hybrid deployments, verify the on-premises password protection policies to satisfy the above considerations.
To check the on-premises account policy follow the steps below.
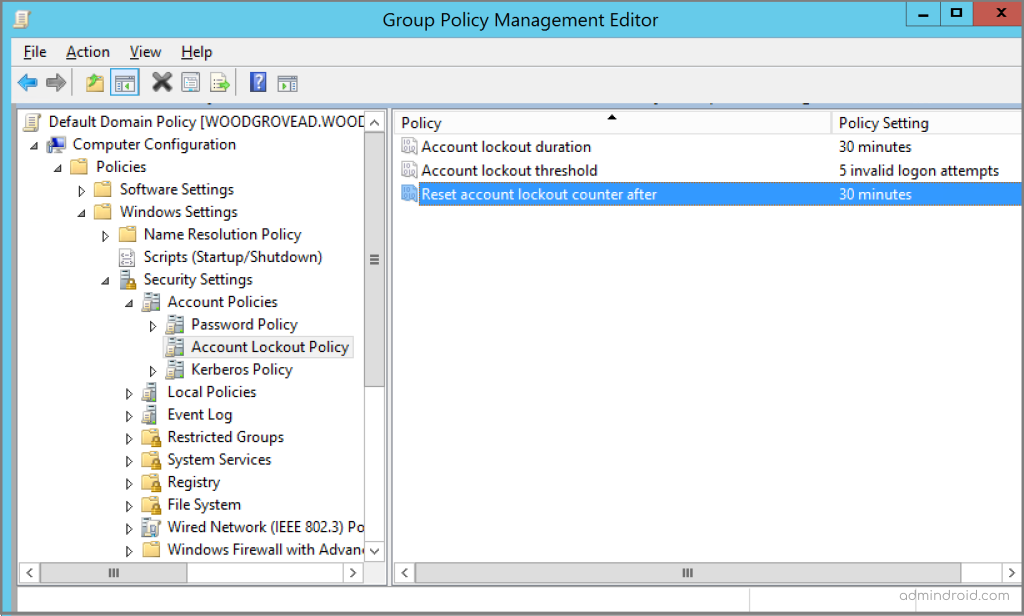
- Open the Group Policy Management tool.
- Locate and open the group policy that manages your organization’s account lockout policy, for example, the Default Domain Policy.
- Computer Configuration → Policies → Windows Settings → Security Settings → Account Policies → Account Lockout Policy.
Points to Note:
- Federated deployments using ADFS 2016 and ADFS 2019 can employ AD FS Extranet Lockout and Extranet Smart Lockout to enhance their account security.
- Azure AD B2C tenants support a smart lockout feature to mitigate credential attacks.
Now that you have a clear overview of managing Microsoft smart lockout values, you might wonder if this feature blocks legitimate users. Let’s find the answer below.
Does Smart Lockout in Azure AD Lock Legitimate Users?
Microsoft introduced the smart lockout feature to tighten account security against malicious actors while maintaining a smooth experience for legitimate users. However, it’s important to note that there’s no guarantee that genuine users will never face account lockout.
However, to strike the right balance, smart lockout employs several considerations. For instance, it tracks the locations from which sign-in attempts originate, distinguishing between familiar and unfamiliar locations. Each type of location has its separate lockout counter.
- In cases where repeated failed sign-in attempts occur from an unfamiliar location, the Microsoft 365 account lockout policy becomes more sensitive, as this behavior is often indicative of unauthorized access.
Also, smart lockout takes into account password variations to differentiate genuine users from bad actors. For instance, if a user mistakenly enters ‘12345’ instead of the correct ‘123’ as the password, the lockout counter doesn’t register it as a separate sign-in attempt but rather as a human error.
- However, when there are more significant variations in the password pattern, like ‘98765!’ and ‘ABCD2!’, the system identifies these as potentially malicious sign-in attempts and counts them accordingly.
Test Smart Lockout in Microsoft 365
To test it in my M365 test environment, I reduced the lockout threshold and intentionally attempted to sign in with the wrong password.
After reaching lockout threshold, I received a message stating,
‘Your account is temporarily locked to prevent unauthorized use. Try again later, and if you still have trouble, contact your admin.‘
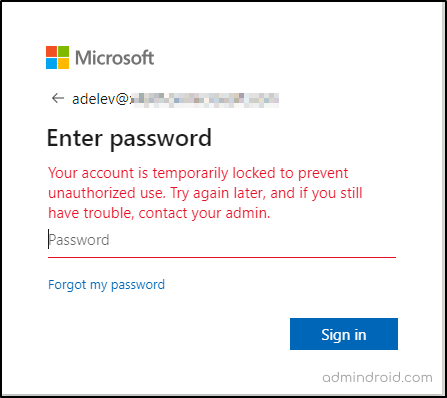
This indicates that the smart lockout feature is working as expected, adhering to the configured values.
Identify Locked Out M365 Accounts Using Azure AD Sign in Reports
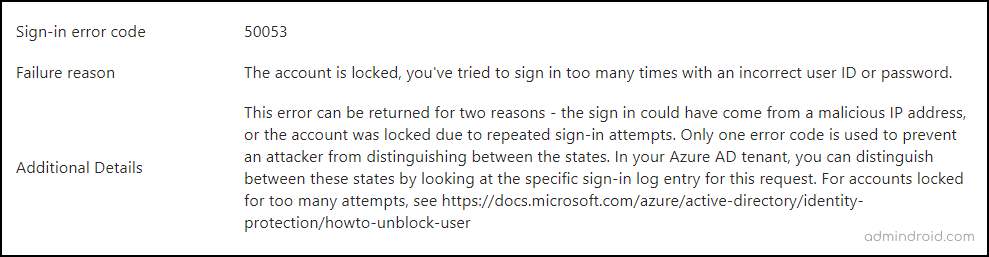
As an administrator, it is crucial to actively monitor Azure AD sign-in reports to identify any accounts that may be under attempted compromise. You can spot locked accounts by recognizing the AADSTS50053 – IdsLocked error code.
To view locked accounts, navigate to Microsoft Entra admin center → Monitoring & health → Sign in logs. Next, locate the failed user with sign-in error code 50053, and proceed to analyze the cause of the failure.
This approach allows you to make informed decisions, such as resetting the user’s password, to grant access to legitimate users while protecting their accounts from unauthorized access.
Suppose a legitimate user’s account is locked, what should their next course of action be to restore access?
How to Unlock User Account in Microsoft 365?
To regain access or unlock the legitimate M365 account blocked by Entra ID lockout policy, the password needs to be reset.
- Reset passwords with SSPR: Users can independently initiate a self-service password reset to unlock their accounts.
- Reset User Password as Admin: If Self-Service Password Reset (SSPR) is not enabled, administrators can reset the user’s password from the Microsoft 365 admin center to unblock the account.
Once users or admins reset their passwords, the lockout duration is reset to zero. Following this, users can typically proceed with their sign-in process without further hindrance.
Lastly, while smart lockout is there to provide protection, you can also guide users on crafting strong passwords to defend against such attacks. Additionally, implementing a custom password ban to deter the use of commonly exploited and weak local passwords is a proactive measure worth considering.
security is better when it’s built in, not bolted on
-Stephen Yu
I hope this blog brings you more information about how smart lockout detects and protects Azure AD accounts from brute-force attacks. Apart from Microsoft 365 accounts, Smart Lockout can also be configured to secure remote desktop access by blocking repeated failed sign-in attempts that could otherwise lead to unauthorized entry through RDP.
Furthermore, feel free to reach out to us in the comment section for further assistance.


