In today’s cloud-driven world, securing access to critical Microsoft 365 business resources like Exchange Online is crucial. While traditional username and password combinations have served us well, they’re increasingly vulnerable to phishing attacks and brute-force breaches. This is where Certificate based authentication (CBA) steps in, offering a robust and secure alternative to traditional username and password authentication for Exchange Online. Let’s get started with how to connect to Exchange Online with certificate!
What is Certificate Based Authentication?
To run scripts in Microsoft 365 for Exchange Online, you usually need to save usernames and passwords in files or secret vaults. Well, this method isn’t very secure. Certificate based authentication offers a safer way. It uses Azure AD apps and self-signed certificates for unattended Exchange Online PowerShell automation.
How Certificate Based Authentication Works?
Here’s how CBA functions:
1️⃣ Token Retrieval: The Exchange Online PowerShell module uses the Active Directory Authentication Library (ADAL) to generate an app-only token.
2️⃣ Credentials: This token is obtained using the application ID, tenant ID, and certificate thumbprint.
- Application ID: A unique identifier for the Azure AD application, which registers the app with Azure Active Directory.
- Tenant ID: A unique identifier for the Azure AD tenant, which specifies the organization’s directory.
- Certificate Thumbprint: A hash value used to identify a certificate, ensuring the application can securely authenticate without needing user credentials
3️⃣ Role Assignment: The Azure AD application is assigned a Directory Role, included in the token.
4️⃣ Access Control: The role information in the token sets up the session’s permissions, ensuring the right access level for the task.
This process ensures a more secure and efficient way to automate tasks in Microsoft 365.
How to Connect to Exchange Online with Certificate?
To set up certificate based authentication in Exchange Online, follow the steps mentioned below:
- Create and export a self-signed certificate
- Register the application in Microsoft Entra ID
- Upload the certificate to the registered application
- Assign API permissions to the application
- Add role assignment to the application
- Connect to Exchange Online using a certificate
1. Create and Export a Self-Signed Certificate
Microsoft Entra ID offers app-only authentication, allowing your applications to access resources without needing a user login. To achieve this, you’ll use a certificate instead of a password.
Self-signed certificates (SSL) are ideal for testing and offer a secure option for administrators requiring certificate based authentications. By using the New-SelfSignedCertificate PowerShell cmdlet, you can effortlessly generate an SSL certificate tailored to your specific needs and requirements.
Generate a Self-Signed Certificate using PowerShell
To create a self-signed certificate using PowerShell, run the following command.
|
1 |
$Certificate = New-SelfSignedCertificate -Subject <certificatename> -CertStoreLocation Cert:\CurrentUser\My |
Replace <certificatename> with the desired name for your certificate.
Export the Self-Signed Certificate using PowerShell
To export the certificate, run the Export-Certificate cmdlet. When you export a single certificate, the default file format is set to CERT.
To export the certificate in .cer format, use the script below.
|
1 2 3 4 5 6 7 |
# Get the certificate by its subject name $Cert = Get-ChildItem -Path Cert:\CurrentUser\My | Where-Object {$_.Subject -eq "CN=<certificatename>"} # Export certificate to .cer file with password protection $CertCerPath = "<certificatepath>.cer" Export-Certificate -Cert $Cert -FilePath $CertCerPath -Type CERT $Password = ConvertTo-SecureString -String "YourPassword" -Force –AsPlainText |
Replace <certificatename> with the actual name of your certificate.
Replace <certificatepath> with the path where you want to save the .cer file.
Replace “YourPassword” with your desired password to protect the .cer file.
For example,
|
1 2 3 4 5 6 7 |
# Get the certificate by its subject name $Cert = Get-ChildItem -Path Cert:\CurrentUser\My | Where-Object {$_.Subject -eq "CN=EXOcertificate"} # Export certificate to .cer file with password protection $CertCerPath = "C:\Users\Harvey\Downloads\EXOcertificate.cer" Export-Certificate -Cert $Cert -FilePath $CertCerPath -Type CERT $Password = ConvertTo-SecureString -String "certificate@999" -Force –AsPlainText |
2. Register the Application in Microsoft Entra ID
To enable app-only authentication for unattended scripts in Exchange Online, admins must register the application in Microsoft Entra ID as follows.
- Sign in to the Microsoft Entra Portal.
- Navigate to Applications –> App registrations –> New registration.
- Enter a name for your application and choose the suitable account type.
- Click Register.
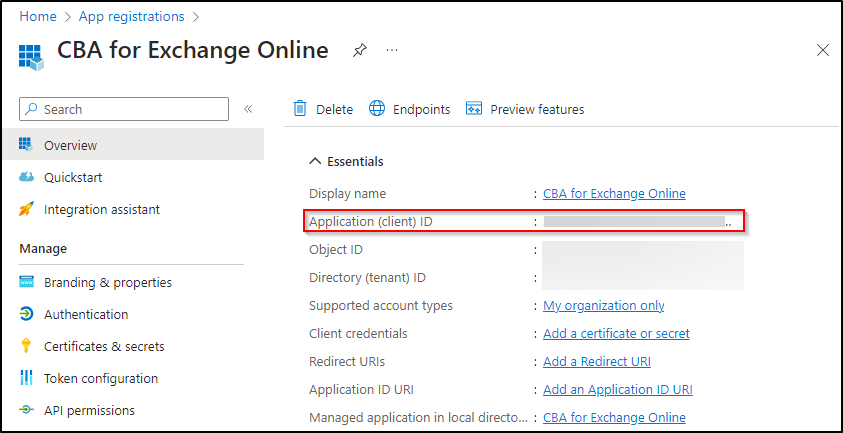
Once the application is registered, you will be redirected to its overview page. Note down the generated Application (client) ID, as it will be used in the last step.
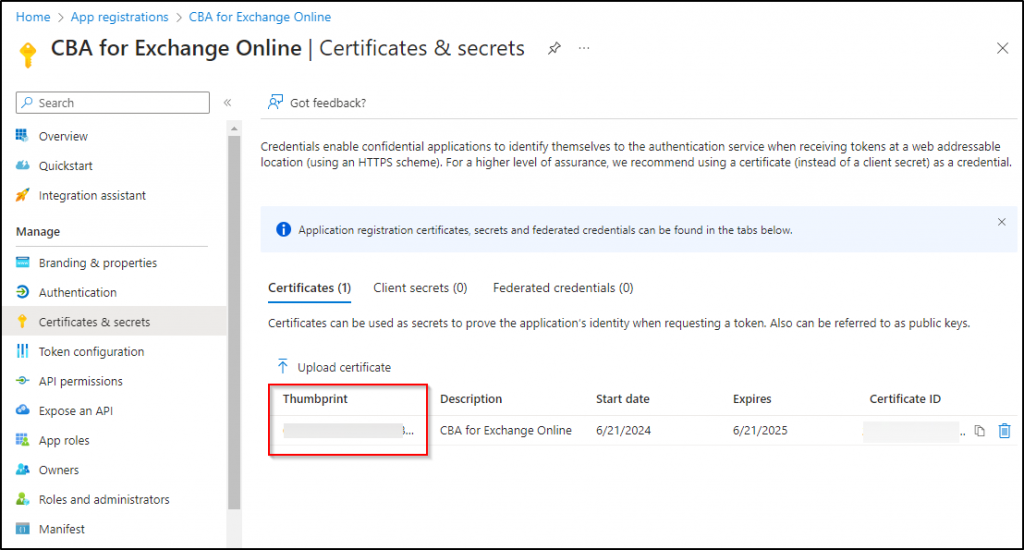
3. Upload the Certificate to the Registered Application
After getting the app registration ID, navigate to Certificates & secrets on the same page to upload the SSL certificate we generated earlier.
- Switch to the Certificates tab.
- Select Upload certificate.
- Browse the .cert file and add it.
Once you upload the certificate to the application, the certificate will now display as installed. Here, note down the Thumbprint, as it will be used to connect to EXO PowerShell in the last step.
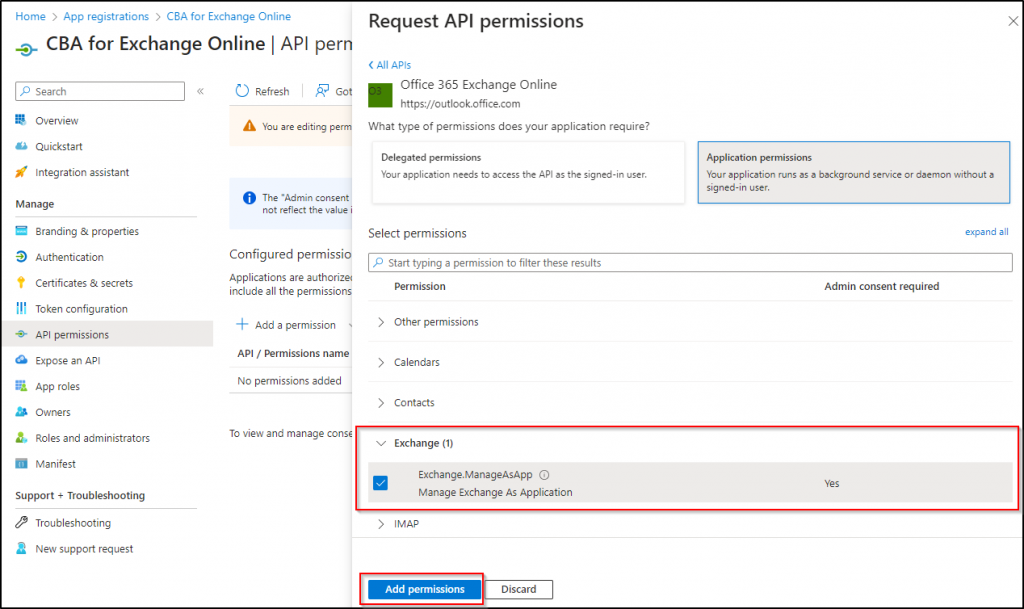
4. Assign API Permission to the Application
The next step is to configure permissions for the registered application. To do so, click on API Permissions under ‘Manage’.
- Click on Add a permission.
- Switch to the APIs my organization uses tab.
- Search for Office 365 Exchange Online and select it.
- Then, choose Application permissions.
- From the available permissions, select Exchange.ManageAsApp from the ‘Exchange’ dropdown.
- Select Add permissions.
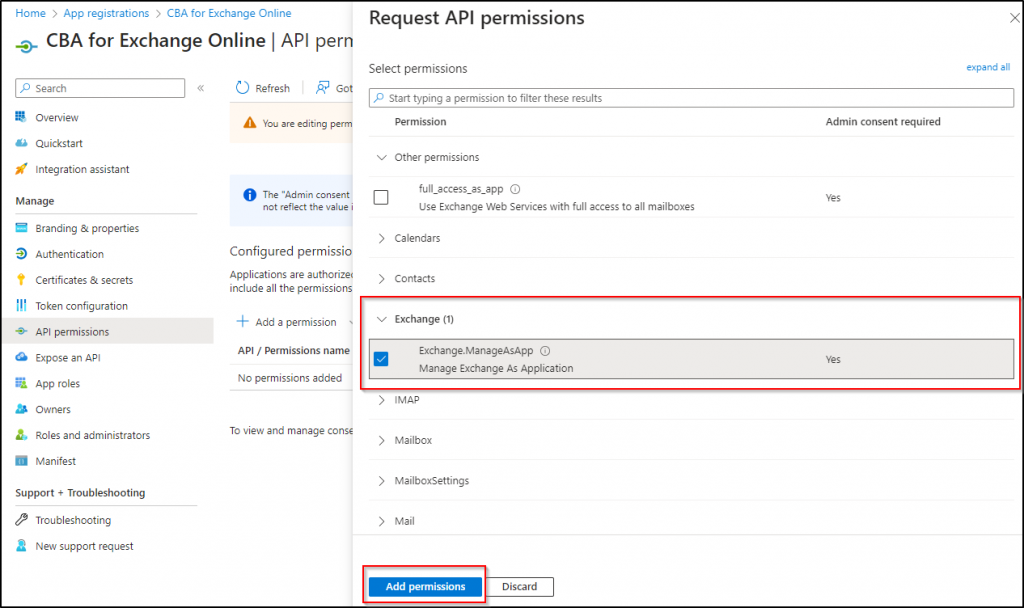
To use the Exchange.Manage.AsApp permission, admin consent from your tenant is required. So, Click the “Grant admin consent for {{organization name}}” button, then confirm by clicking Yes at the top.
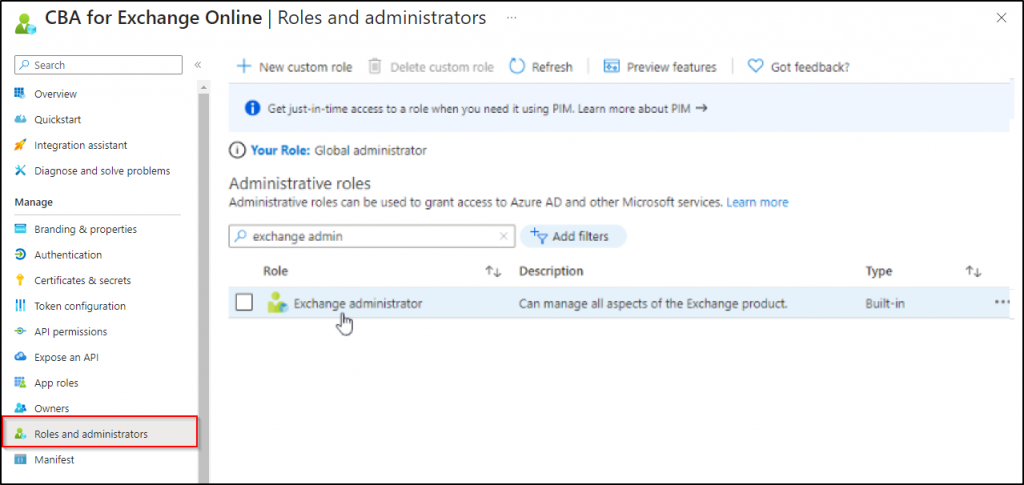
5. Add Role Assignment to the Application
Now, admins need to assign an Exchange administrator role to the application. To do so,
- Navigate to Role and administrators under ‘Manage’.
- Search for Exchange administrator and click on it.
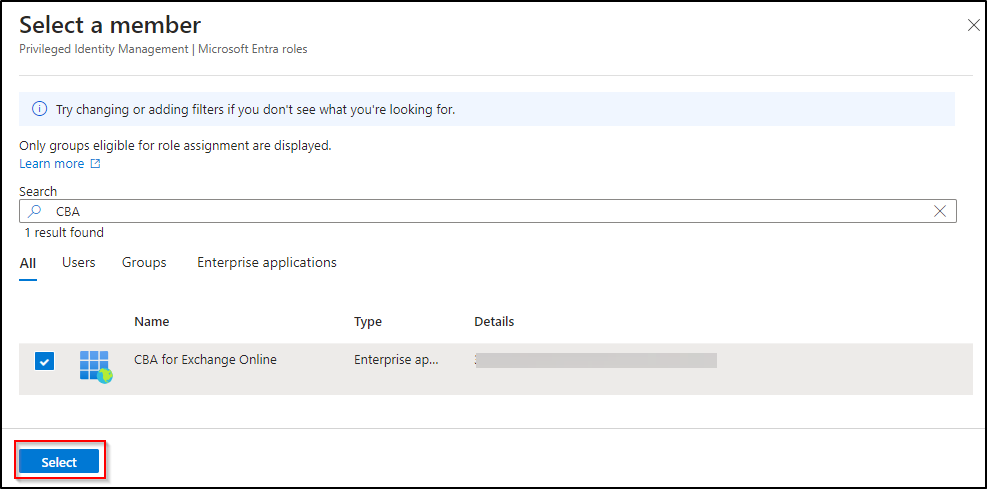
- Choose Add assignments.
- Under the ‘Membership’ tab, click to select members.
- Now, search for the application’s name that we registered in the above steps and select it.
- Click on Next.
- Then, Enter Justification under the ‘Setting’ tab.
- Finally, click on Assign.
That’s it! Now, you are good to connect to Exchange Online using a certificate.
Note – If you feel Entra app registration tedious, you can check out the PowerShell script to automate Azure app registration!
6. Connect to Exchange Online using a Certificate
To connect to Exchange Online PowerShell using certificate, the following details are needed.
- Tenant address of your Microsoft 365 organization.
- App ID and Certificate Thumbprint, which we obtained in the previous steps.
For Certificate based authentication for Exchange Online PowerShell, use the following command.
|
1 |
Connect-ExchangeOnline -CertificateThumbPrint <certifcationthumbprint> -AppID <appid> -Organization <tenantaddress> |
For example,
|
1 |
Connect-ExchangeOnline -CertificateThumbPrint "022THISISADEMOTHUMBPRINT" -AppID "36ee4c6c-0812-40a2-b820-b22ebd02bce3" -Organization "contoso.onmicrosoft.com" |
Once you have successfully connected to Exchange Online PowerShell using certificate, you can execute various commands to manage your Exchange Online environment such as Get-Mailbox, Get-MailboxFolderPermission, and others.
Similarly, you can also connect to SharePoint Online using certificate. I hope this blog has given you all the information you need to connect to Exchange Online using a certificate. If you have any questions, feel free to reach out in the comments section.


