On Day 2 of the cybersecurity awareness month, learn how to create access reviews in Microsoft Entra ID. Stay tuned for more blogs in the M365 Cybersecurity blog series.
Access management in modern organizations has become a complex task, especially with the rise of remote work, collaboration tools, and the need to ensure data security. This is where Access reviews in Azure Active Directory step in as a helpful security setting for smart and careful access management. Microsoft Entra access reviews help admins make sure only the right users have access to the right things, thereby preventing unauthorized access. This blog explores the concept of access reviews in Microsoft Entra (previously known as Azure AD), their importance, where to create them, the license requirements, and so on! 🔐
The path to data security and privacy begins with understanding and controlling data access permissions.
-Sundar Pichai
What are Access Reviews in Microsoft Entra?
We already know, with Continuous Access Evaluation, administrators have the power to restrict a user’s resource access for various reasons. But Microsoft Entra access reviews take access management to the next level.
Access reviews in Microsoft Entra play a vital role in managing user access to resources and applications within organizations. They facilitate the regular assessment of user permissions, group memberships, and role assignments, ensuring that only authorized individuals maintain their access. This is particularly useful for big companies, as it automates oversight of access, permissions, and roles for Microsoft 365 groups and guests. This smart Identity Governance feature keeps everything secure and organized, helping to maintain security and compliance. 🙌🏽
Why are Access Reviews Important?
As mentioned earlier, reviewing access permissions on a regular basis allows admins to identify and remove inappropriate permissions. Here are some example scenarios!
- When onboarding new employees, access reviews ensure that they swiftly gain access to the necessary resources, enabling them to be productive from day one.
- When users switch roles, access reviews prevent them from retaining unnecessary permissions, preventing potential security vulnerabilities.
- When an employee leaves the organization, access reviews help admins promptly terminate their access to company resources, reducing the risk of data breaches.
- For collaborations involving external users, access reviews help ensure that these external users have the appropriate level of access, protecting sensitive information.
- When privileged accounts are included in excess, admins can unassign Azure AD directory roles that are unnecessary using access reviews.
Who can Create Access Reviews in Microsoft Entra?
Find the license requirements and what roles you need to create access reviews in Microsoft Entra.
License requirements:
- To initiate access reviews, you will need a Microsoft Azure AD Premium P2 license.
- For conducting reviews specifically for inactive users and recommendations related to user-to-group affiliations, a Microsoft Entra ID Governance license is mandatory.
Admin Role Requirements:
- Individuals with the roles of Global administrator, User administrator, or Identity Governance administrator are authorized to initiate reviews for groups or applications.
- Global administrators and Privileged Role administrators possess the capability to conduct reviews for role-assignable groups.
- Apart from this, owners of Microsoft 365 group and security group can create and review access reviews.
| Access Rights of Users | Reviewers can be | Access Reviews created in | Reviewer Experience |
| Security group/Microsoft group members | Specified reviewers, group owners, self-review | Azure AD groups | Access panel |
| Assigned to a connected app | Specified reviewers, self-review | Azure AD enterprise apps (in Preview) | Access panel |
| Azure AD role | Specified reviewers, self-review | PIM | Azure portal |
| Azure resource role | Specified reviewers, self-review | PIM | Azure portal |
| Access package assignments | Specified reviewers, group members, self-review | Entitlement management | Access panel |
Where to Create Access Reviews in Microsoft Entra?
Let’s see how to create an access review of groups or applications and how to assign reviewers in the organization. 🚀
- Choose what to review
- Select the review stage, reviewers, and recurrences
- Configure additional settings
- Review and create access review
1. Choose What to Review
This section includes the steps involved in configuring access review parameters in the Microsoft Entra admin center.
- Sign in to Microsoft Entra admin center.
- Navigate to Identity Governance > Access Reviews.
- Click New access review.
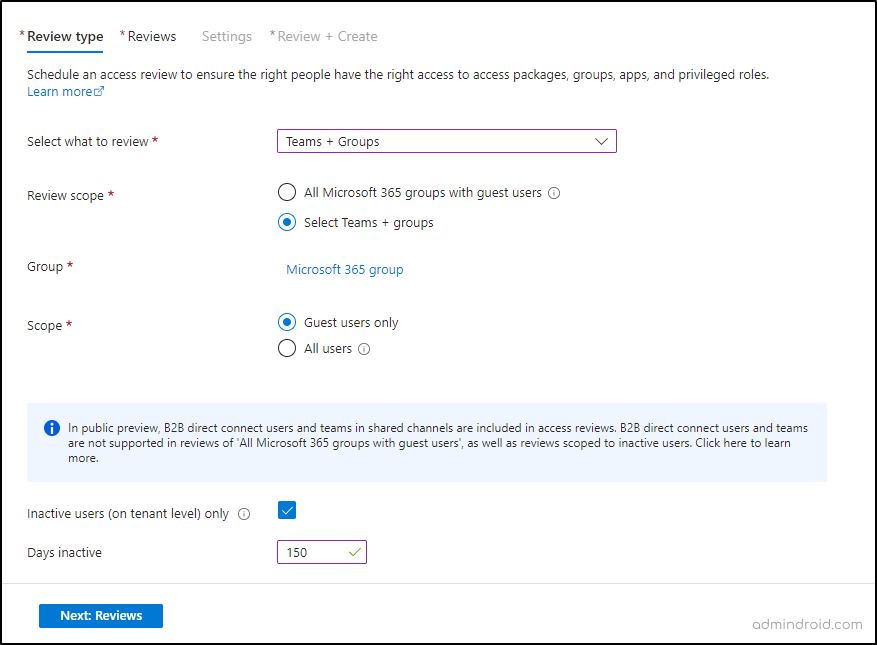
- In the “Select what to review” box, choose the resource, either Teams + Groups or Applications.
Let’s say, now we are going to create an access review to find inactive guests in a Microsoft 365 group. So, I will include a specified group here.
- Choose the scope for the review, which can be either Guest users only or All users. Here, I am opting for ‘Guest users only’ based on the requirement.
- Check the box next to “Inactive users (on tenant level)” in the Users scope section.
- Specify the number of days of inactivity. It can be up to 730 days (two years).
- Click the Next: Reviews button to proceed further.
2. Select the Review Stage, Reviewers, & Recurrences
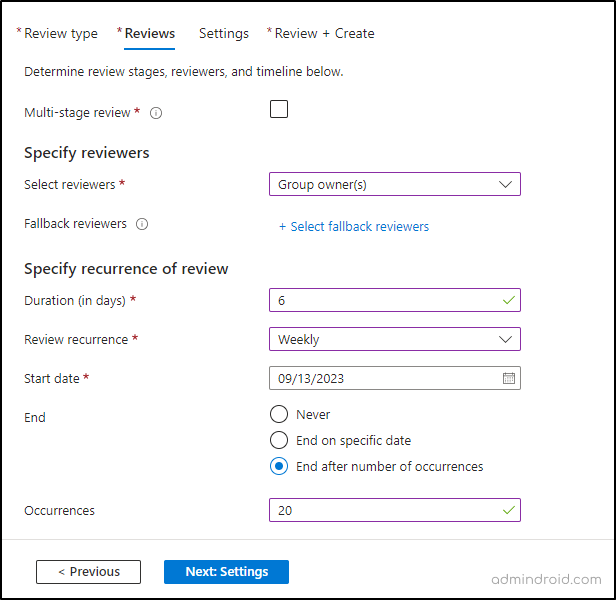
In this section, you can specify the review stages and reviewers involved in access reviews.
- You can create either a single stage or multi-stage review.
Single-stage access review – In a single-stage review, all reviewers evaluate access permissions together at once.
Multi-stage access review – A multi-stage review involves breaking down a review process into two or three separate rounds, where different groups of reviewers evaluate the same thing in each round.
Since I am doing a single-stage review, I will not check a multi-stage review.
- In the “Specify reviewers” section, select one or more people to review. Reviewer options include group owners, selected users or groups, users reviewing their own access, and managers of users.
- Now, you can specify a fallback reviewer for cases where there is no assigned manager or group owner.
- Following the reviewers, specify the review’s duration, start date, and end date.
- Click on Next: Settings.
3. Configure Additional Settings
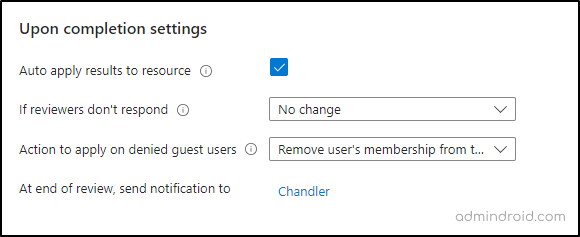
Here, you can configure additional settings under three sections such as Upon completion settings, Enable review decision helpers, and Advanced settings.
Upon Completion Settings
This section is about what happens after a review is done.
Auto apply results to resource: Check this box to automatically remove access for denied users when the review duration ends. If this option is turned off, you will need to manually remove the user’s access after the review is completed.
If reviewers don’t respond: When reviewers do not provide feedback within the review period, you can choose how to handle users who have not been reviewed. This choice does not impact users who have already been reviewed. The available options in the dropdown list are:
- No change: Maintains a user’s current access status.
- Remove access: Revokes a user’s access.
- Approve access: Grants a user access.
- Follow recommendations: Adheres to the system’s recommendation to either deny or approve the user’s ongoing access.
Note – If you choose to remove access or follow recommendations and have auto-apply enabled, all access to the resource could be revoked if reviewers don’t respond.
Action to apply on denied guest users: If the review specifically targets guest users, you can choose how to handle them if they’re denied either by a reviewer or due to non-response.
- Remove user’s membership from the resource: This option takes away a denied guest user’s access to the reviewed group or application, but they can still sign in and use other resources.
- Block user from signing-in for 30 days, then remove user from the tenant: This choice temporarily prevents a denied guest user from signing into the tenant, regardless of their access to other resources.
At end of review, send notifications to: You can add additional users and groups who should receive completion updates, once the review is done.
Enable Review Decision Helpers
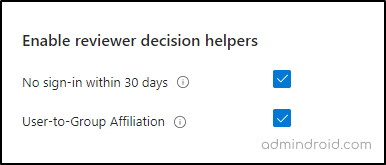
This section allows you to choose whether reviewers should receive recommendations during the review process.
No sign-in within 30 days: If you check this box, it recommends approval for users who’ve signed in recently and denial for those who haven’t.
User-to-Group Affiliation (Preview): If you opt for this option, reviewers will receive recommendations to either Approve or Deny user’s access. Users who are distant from all other users in the group will be categorized as having “low affiliation” and will receive a denial recommendation in group access reviews.
Note– If you see the warning ‘User-to-Group Affiliation not available’, it indicates that you need to purchase a Microsoft Entra ID Governance license.
Advanced Settings
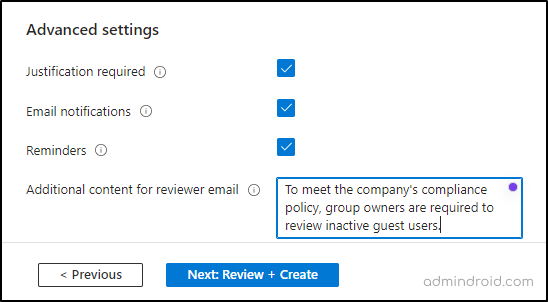
Under this section, you will find more options like email notifications, reminders, etc.
Justification required: Enable this option to make reviewers provide a reason for their approval or denial.
Email notifications: Check this box to enable Azure AD to send email notifications to reviewers when a review starts and to administrators when it finishes.
Reminders: Check this box to allow Azure AD to send reminders to reviewers during the review process.
Additional content for reviewer email: You can add extra information, like instructions or contact details, to the emails sent to reviewers.
Then, select Next: Review + Create.
4. Review and Create Access Review
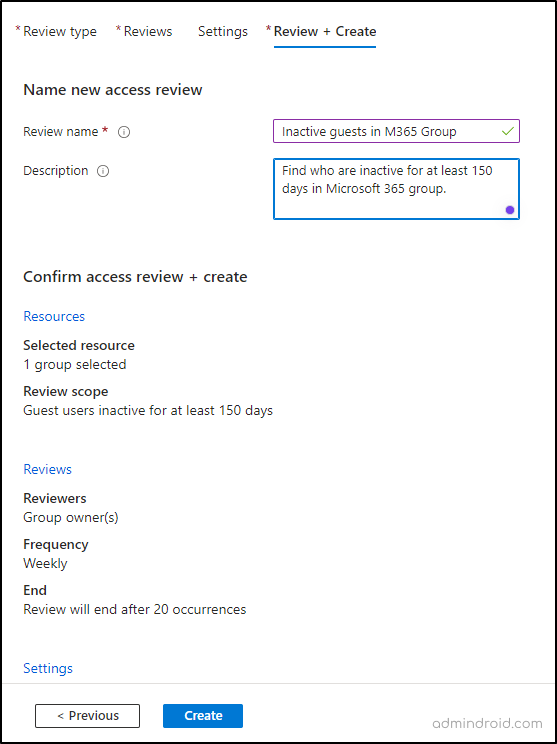
- As a final step, name the access review along with a description.
- After reviewing the provided information, select Create to initiate the access review.
It’s done!
Where to View the Results of Access Reviews in Azure AD?
It is possible to track the progress of access reviews as they are completed.
To access the results of a review, follow these steps:
- Navigate to Microsoft Entra admin center –> Identity governance –> Access Reviews.
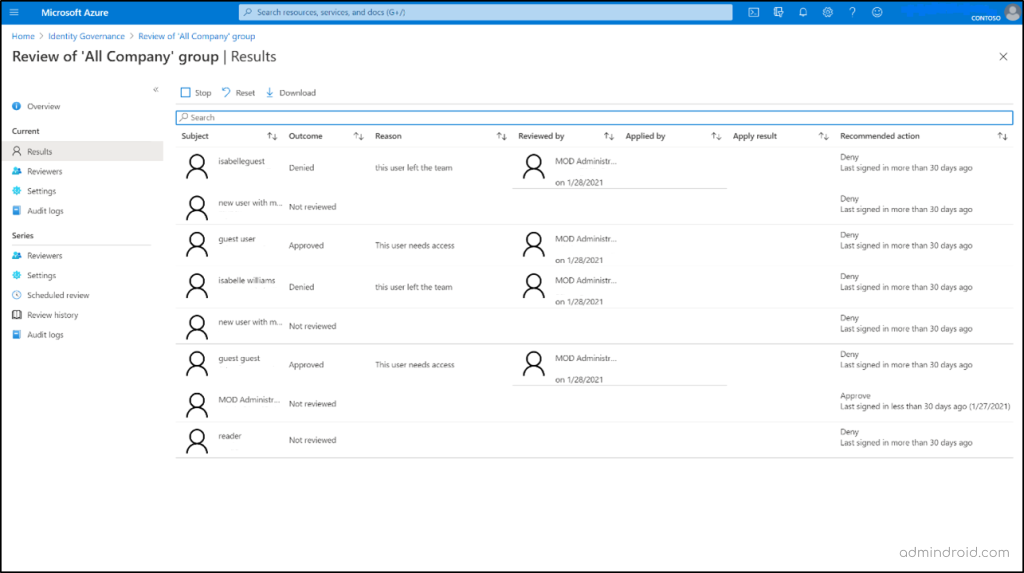
- Select an access review and click on Results from the overview page.
- To specifically view the access status of a particular user, use the Search box. Enter either the user’s display name or their user principal name (UPN) for whom you want to review access.
For ongoing or recurring access reviews, follow the below:
- Access the Review history section.
- From the list of completed access review instances, select the one corresponding to your desired review period, using the start and end dates as reference.
- The results for this particular review instance can be accessed through the Results page.
To download access review results, whether they are in progress or completed, follow these instructions:
- Simply click on the Download button.
- The result will be delivered as a CSV file, which can be easily viewed using Excel or any other software that supports UTF-8 encoded CSV files.
Points to Ponder
Here are some key points you need to remember while creating an Azure AD access review. 🔎
- Selecting multiple groups or applications results in the creation of multiple access reviews, with each group or application having its own review.
- In Privileged Identity Management for Groups (Preview), it is mandatory to select Group owner(s) and assign at least one fallback reviewer to the review; active owners are reviewers by default.
- The action to apply on denied guest users is not configurable in reviews that are scoped to more than guest users. This limitation also applies to reviews of All Microsoft 365 groups with guest users. The default action is to remove a user’s membership from the resource.
- Access reviews for applications are based on the user’s last 30-day sign-in, not the entire tenant history.
- B2B direct connect users and teams are only included in single-stage reviews. If multi-stage reviews are enabled, these users and teams won’t be included in the access review.
- Fallback reviewers can only be added when the reviewer type is a manager or a group owner.
I hope this blog provides detailed info on what access review is and where you can configure it. Feel free to reach us through the comment section if you have any queries.

