As an admin, managing access to critical Microsoft 365 resources involves a delicate balance between empowering individuals and safeguarding against potential threats. Picture a scenario where a group of Microsoft 365 users requires access to specific SharePoint sites for designated tasks. Instead of individually delegating access for each user, Microsoft Entra Privileged Identity Management for groups stands out as a seamless solution. Let’s check how!
This blog covers,
- What is Privileged Identity Management?
- Privileged Identity Management for groups – An Overview
- Why should you configure PIM for groups?
- How to configure Privileged Identity Management for groups in Microsoft 365?
What is Privileged Identity Management (PIM)?
Often, attackers target privileged accounts for accessing critical resources and sensitive data. Privileged Identity Management in Microsoft Entra safeguards such privileged accounts and precious resources. PIM uses ‘just-in-time access‘ and ‘access reviews‘ to reduce the risk of unauthorized access.
There are different components for PIM such as,
PIM for Groups: Utilizing PIM for groups, users can allocate just-in-time membership and ownership access to groups.
PIM for Microsoft Entra roles: This manages access for important roles within Microsoft services. Privileged Role Administrators can designate users for permanent roles, not just temporary ones.
PIM for Azure resources: For Azure resources, it deals with roles, such as Owner, User Access Administrator, Contributor, Security Admin, Security Manager, & various built-in and custom Azure roles.
Within these three PIM components, we delve into the specifics of PIM for groups.
Note: Privileged identity management (PIM) and privileged access management (PAM) both focuses on reducing unwanted access. The difference between them is that PAM offers granularity at task level, while PIM works at the role level to perform multiple tasks.
Privileged Identity Management for Groups
Microsoft Entra PIM for groups can be used to control access to various scenarios, including Microsoft Entra roles, Azure roles, Azure SQL, Azure Key Vault, Intune, other application roles, and even extends to third-party applications. PIM for groups empowers users to activate ownership and membership of a Microsoft Entra security group or a Microsoft 365 group.
With PIM for groups, you have the flexibility to customize policies, such as requiring approval for membership or ownership activation, enforcing multi-factor authentication (MFA), mandating justification, limiting maximum activation time, etc. Each group in PIM is equipped with two distinct policies—one for activating membership and another for activating ownership within the group.
It’s worth noting that PIM for groups was formerly recognized as Privileged Access Groups in Azure AD (Microsoft Entra) until January 2023. PIM for groups is more efficient and flexible when compared to traditional Privileged Access Groups, which will only allow role-assignable groups.
Requirements for PIM for Groups
- Microsoft Entra ID P2 license is required for utilizing PIM for groups.
- For effective management of groups in Microsoft Entra PIM, specific roles and permissions are also necessary.
- Role-assignable groups:
- Global Admin, Privileged Role Admin, and Group Owners.
- Non-role-assignable groups:
- Exchange Administrators, Groups Administrators, User Administrators, Authentication Administrators, Helpdesk Administrators, etc.
- Role Assignment Scope:
- Admin roles should be scoped at the directory level, not the administrative unit level.
- Role-assignable groups:
NOTE: Any user who is a member or owner of a privileged access group must have a Microsoft Entra ID Premium P2 license. P2 licenses are also necessary for users with assignments in PIM for Groups, those approving activation requests, and participants in access reviews.
However, administrative tasks like setting up PIM, configuring policies, and receiving alerts do not require a specific license. In essence, all users benefiting from PIM features should technically have a P2 license.
Role-assignable Groups in Microsoft Entra
You can assign a security or Microsoft 365 group to a Microsoft Entra role, but this is only possible for groups that are created as role-assignable groups.Admins with elevated privileges, as outlined in the requirements, can manage these groups.
Importantly, this ensures that no other users can alter the credentials of active group members. This feature serves as a safeguard, preventing admins from escalating higher privileged roles without undergoing a request or approval procedure.
NOTE: In Microsoft Entra ID, role-assignable groups cannot have nested groups (a group being an active member of another role-assignable group).
Role-assignable Groups and PIM for Groups
Curious about role-assignable groups and their relationship with PIM for groups? Here’s the breakdown:
- Microsoft previously mandated that Privileged Access Group should be enabled exclusively for role-assignable groups. However, this restriction has been lifted under Privileged Identity Management, enabling the use of over 500 groups per tenant in PIM.
IMPORTANT: Microsoft recommends creating role-assignable groups not only for Microsoft Entra roles but also for highly valued resources. Create role-assignable groups to manage highly valued data and implement an approval process for eligible member assignments mitigating security risks. Without this, data becomes vulnerable to least-privileged admins, enabling actions like a Helpdesk admin resetting an eligible user’s passwords.
Non-role-assignable Groups
On the other side, non-role-assignable groups have no restrictions. Any Microsoft Entra roles have the authority to manage these groups and modify the credentials of active users.
NOTE: Roles like Exchange Administrators for non-role-assignable M365 groups and administrators with assignments scoped at the administrative unit level can still inf
Why Should You Configure PIM for Groups?
Configuring PIM for groups in Microsoft 365 is crucial for several important reasons. They are,
- Risk Reduction: By enforcing time-bound privileged access, PIM minimizes potential security threats. Users are granted elevated permissions only for the necessary duration, reducing the overall risk exposure.
- Just-In-Time Access: In case of an emergency, PIM allows administrators to activate privileged roles for a specific user on demand. This just-in-time access is closely monitored and logged, ensuring that any exceptional access given is documented and can be reviewed later.
- Security Alerts and Notifications: PIM for groups notifies and requests approval from designated approvers for privileged role activation. This enables proactive monitoring and quick response to potential security incidents.
- Audit Trail: PIM provides detailed logs and reports about who activated privileged roles, when they were activated, and for how long. This level of auditing is crucial for compliance requirements and internal security policies.
- Review Privileged Roles: PIM mandates approval for elevated permissions, fostering a least privilege approach. When coupled with Conditional Access, it guarantees minimal access for privileged users, thereby reducing the attack surface. Moreover, access reviews for PIM groups ensure only the right users have continued access and promptly remove unauthorized ones.
Configuring PIM for groups isn’t just a matter of cleaner access management; it’s a strategic move to uphold personal data protection, ensuring that only authorized users can manage or access group-controlled resources.
How to Configure Privileged Identity Management for Groups in Microsoft 365?
Let’s explore the steps involved in configuring PIM for groups in Microsoft Entra.
1. Onboard Groups into Privileged Identity Management
To manage a Microsoft Entra group in PIM, you must first onboard the group into PIM. To enable PIM for groups, follow these steps:
- Log in to the Microsoft Entra admin center with a Privileged Role Administrator role.
- Go to “Identity governance” and choose “Privileged Identity Management”.
- Under the Manage section, click “Groups”.
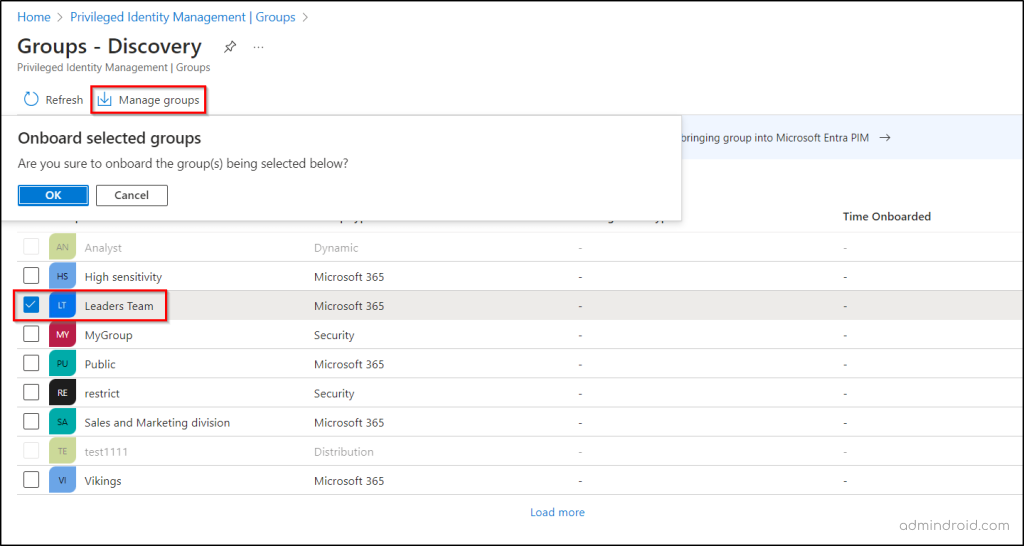
- On the Groups page, select “Discover groups”, then pick a specific group for managing with PIM.
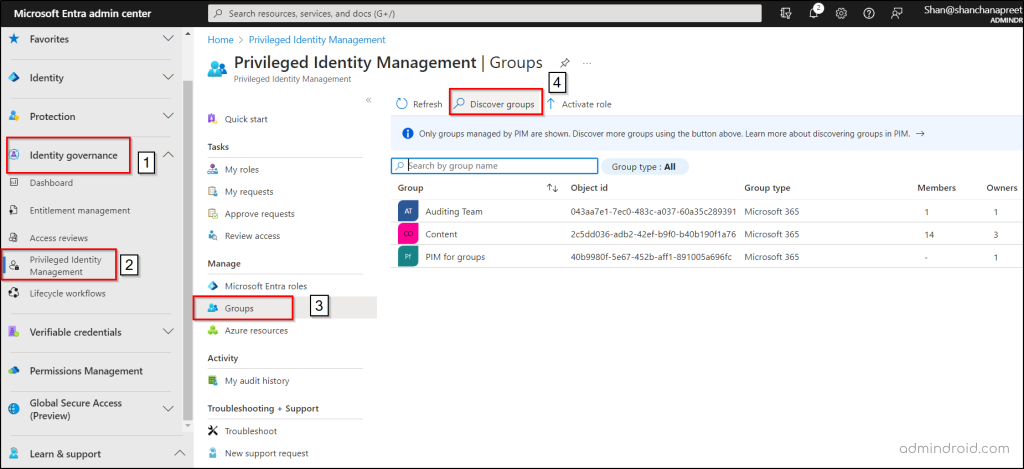
- Click “Manage groups”, confirm your selection in the dialog box, and click Ok.
- Return to the list of PIM-enabled groups by selecting the “Groups” option.
Things to be considered:
- Dynamic groups and on-premises synchronized groups cannot be managed in PIM for groups.
- Alternatively, you can use the Groups section under Microsoft Entra ID to onboard groups into PIM.
- Once a group is enabled in PIM, it cannot be removed from management immediately, preventing accidental removal by other admins.
- If a group is deleted from the Microsoft Entra Admin center, it takes 24 hours for the group to be removed from the PIM.
By following these steps, you can efficiently bring groups into Privileged Identity Management, ensuring a more secure and controlled access management process.
2. Configure Role Settings in PIM for Groups
In PIM for groups, configuring role settings is vital for defining group membership and ownership properties, such as MFA, activation duration, activation approval, etc. These settings are specific to each role within a group. Also, settings for one group or role don’t overlap with others. Let’s see how to configure role settings in PIM for groups.
- Navigate to the “Groups” section within Privileged Identity Management and select a group for which you intend to configure role settings
- Under the Manage section, click on “Settings.”
- Choose the role you want to configure, whether it’s “Member” or “Owner.”
- Review your existing role settings and click “Edit” to update them.
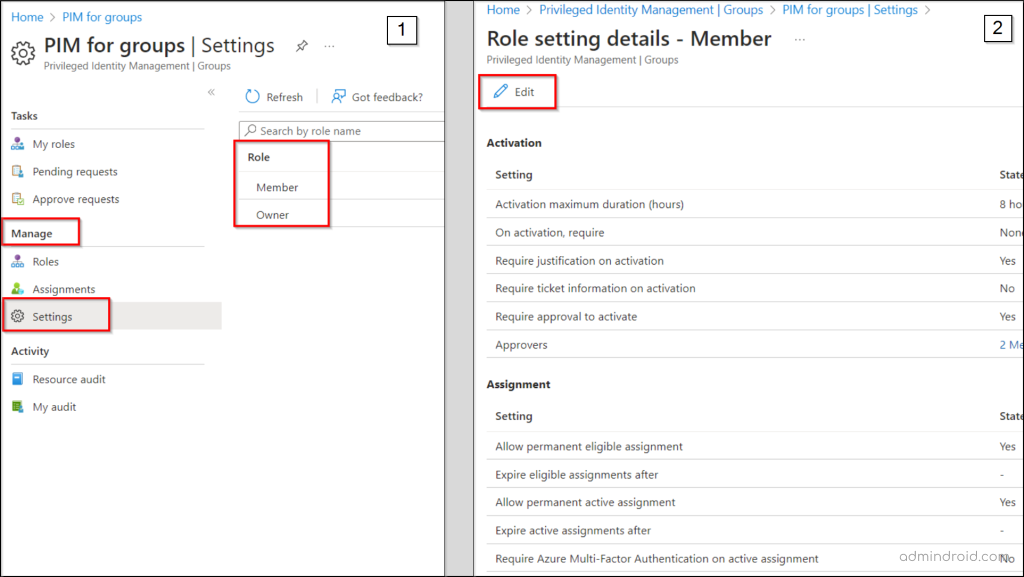
- Upon selecting the “Edit” option, you will encounter three tabs: Activation, Assignment, and Notification. Each of these tabs provides a distinct area where you can modify and fine-tune the role settings within PIM for groups.
3. Assign Eligibility for a Group in Privileged Identity Management
Now, you need to assign members and owners of the group. This process is known as assigning eligibility for a group in Privileged Identity Management.
Consider the below when assigning membership or ownership in PIM for groups:
- The assignment cannot be set for a duration of less than five minutes.
- It cannot be removed within the first five minutes of being assigned.
So, let’s delve into how to assign eligibility for a group in Privileged Identity Management.
- Go to the “Privileged Identity Management” section and navigate to “Groups” within the Manage section.
- View groups that have already been activated for PIM for Groups.
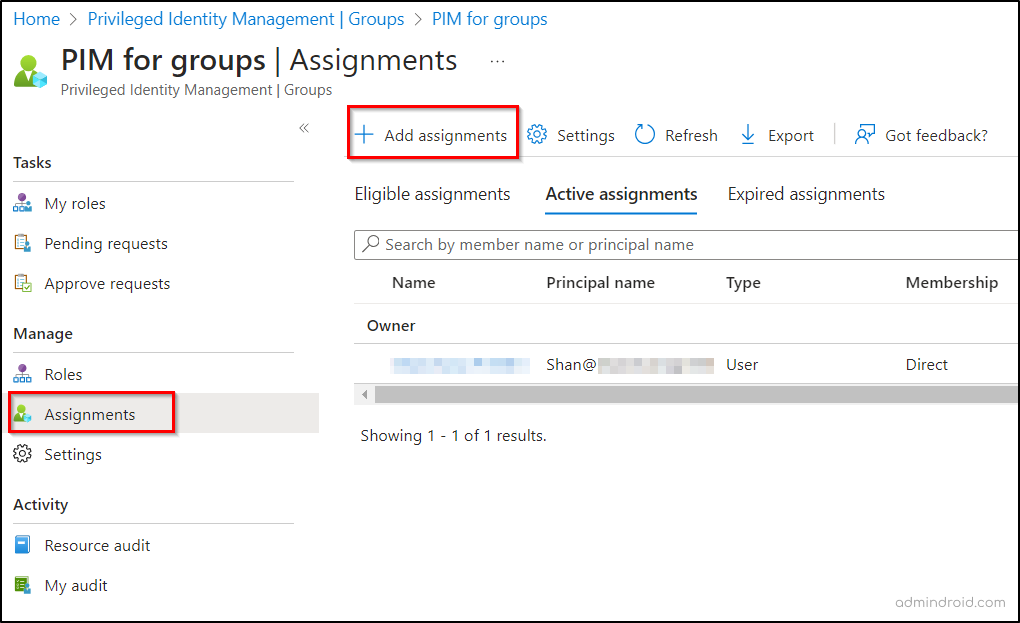
- Select the specific group to manage and find the “Assignments” option under the Manage section.
- Use “Eligible assignments” and “Active assignments” tabs to review existing assignments for the selected group.
- Click “+Add assignments.”
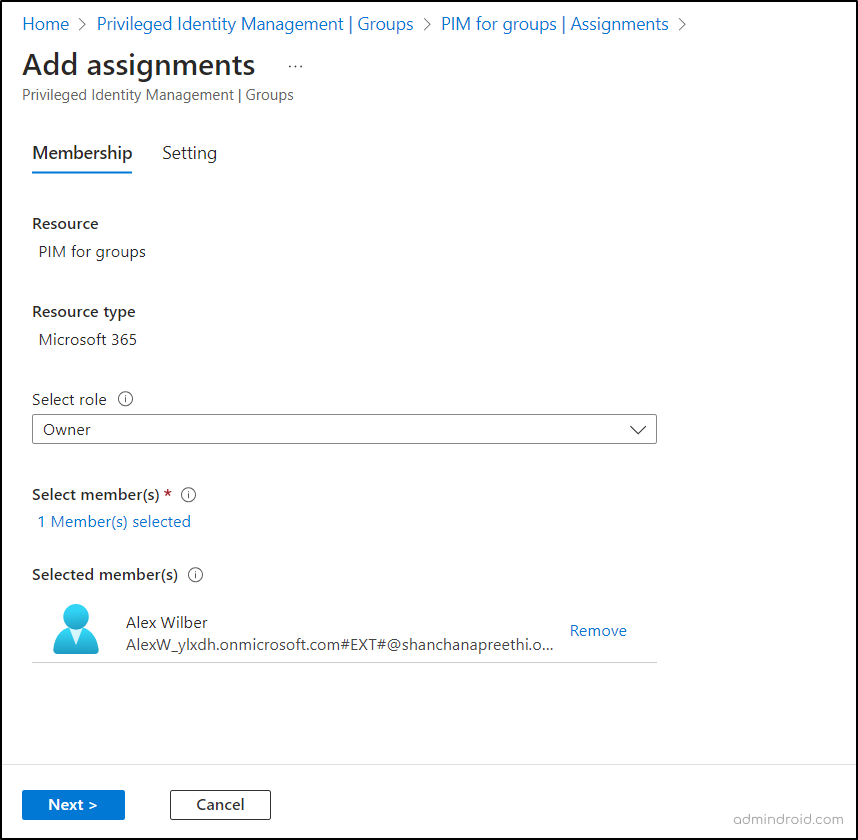
- Under “Select role” in the Membership tab, choose Member or Owner.
- Select members or owners and click Next.
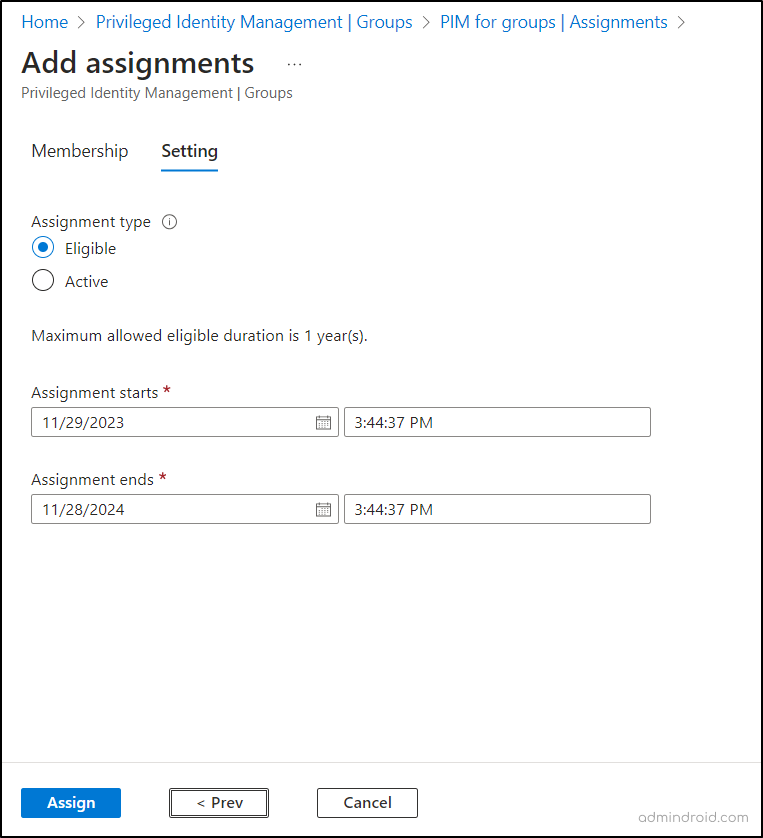
- Microsoft Privileged Identity Management offers two distinct assignment types under the “Assignment type” in the Settings tab. They are:
- Eligible:
- Users assigned with an eligible role are required to perform an activation process to use the assigned role.
- Activation steps may include multi-factor authentication (MFA), providing business justification, or obtaining approval from designated approvers.
- Active:
- Users assigned with an active role have immediate access to the assigned privileges without the need for additional activation steps.
- Members or owners assigned under this active assignment consistently possess the privileges associated with the role without any time restrictions.
- Eligible:
NOTE: The maximum allowed duration can be set as “Permanently eligible,” and the option’s availability is determined by your group configuration. If the checkbox is currently unavailable, you must configure PIM for group assignment settings to make it accessible.
- Finally hit the “Assign” button.
Update or Remove an Existing Role Assignment in PIM for Groups
You can easily update or remove an existing role assignment in PIM for groups by following the steps below.
- Navigate to the “Privileged Identity Management” page.
- In the “Groups” section, choose the specific group for which you want to update or remove the role assignment.
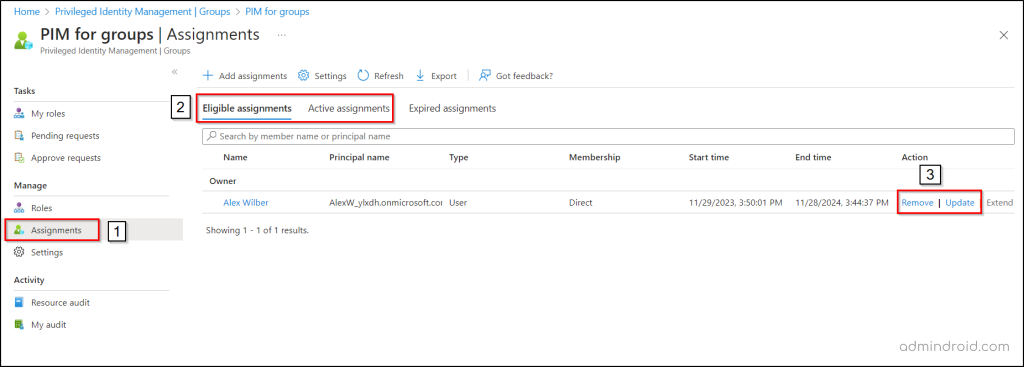
- Under the selected group in the “Manage” section, select “Assignments.”
- Use the “Eligible assignments” and “Active assignments” blades to review existing assignments.
- Locate the particular assignment and choose “Remove” or “Update” as needed.
- Confirm your changes as required to ensure that the updates or removals are accurately applied.
4. Activate Eligible Group Owner or Member in Privileged Identity Management for Groups
To activate your specific role as an eligible owner or member, navigate to “My roles” page. Follow the provided steps to activate group membership or ownership in Privileged Identity Management.
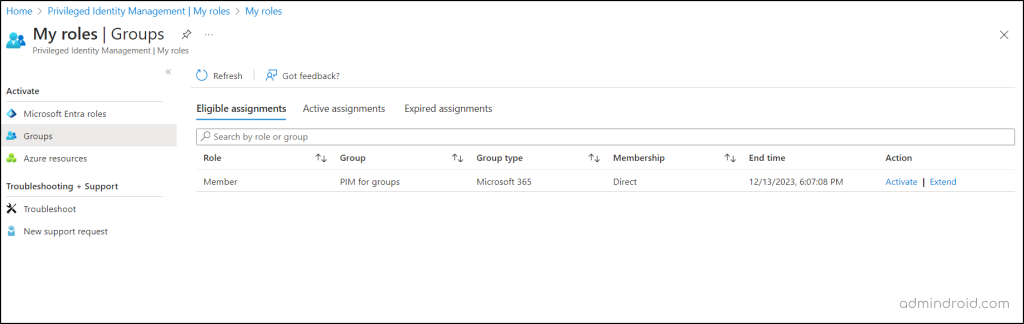
- Go to “My roles” in Privileged Identity Management.
- Select “Groups.”
- Review eligible assignments in the “Eligible assignments” section.
- Click “Active” to initiate activation.
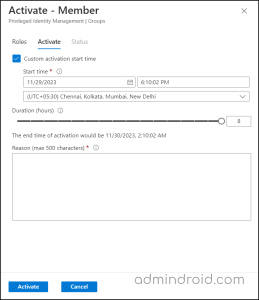
- Complete any required authentication and set an optional activation start time.
- If prompted, provide valid reasons for activation in the “Reason box.”
- Finally, press “Activate” to complete the process.
NOTE: In case the role activation requires approval, then an Azure notification appears in the right corner of your browser informing the request is pending for approval.
View and Cancel Activation Requests
You can view the status of your activation requests in PIM for groups by navigating through My requests 🡢 Groups. There, you can cancel the pending activation requests in PIM for groups after reviewing your request.
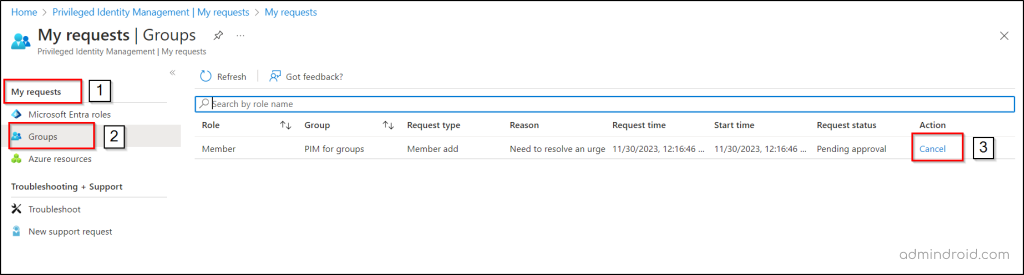
Clicking “Cancel” halts the request. To reactivate the role, submit a new activation request.
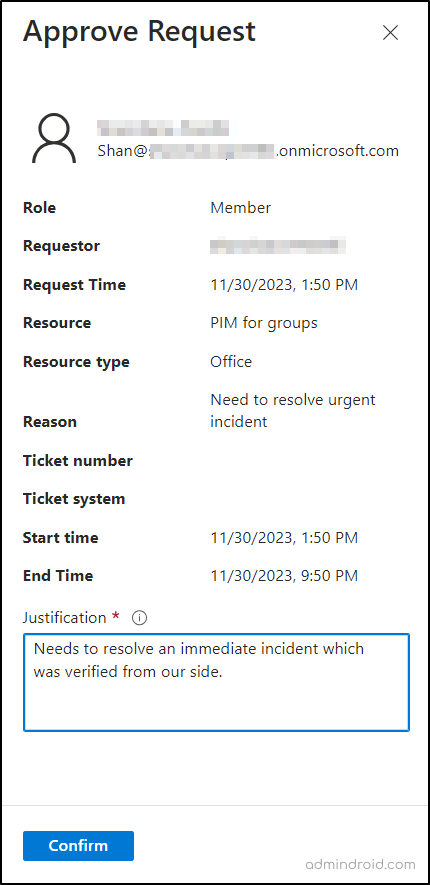
5. Approve or Deny Activation Requests for Group Members and Owners
Approvers are responsible for approving role configuration requests. Delegated approvers receive email notifications for pending Azure resource role requests and can manage these requests through the Privileged Identity Management page.
- Simply go to “Approve requests -> Groups” to access the “Requests for role activation” section, displaying a list of requests awaiting your approval.
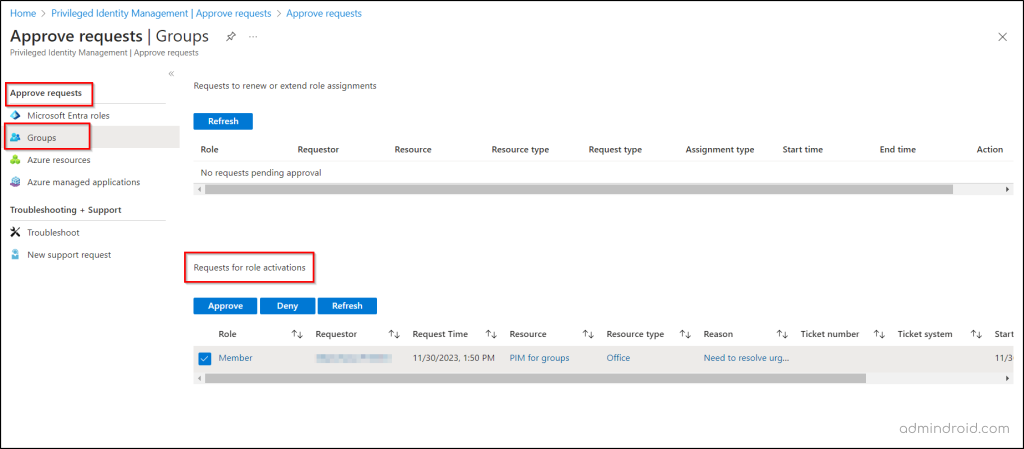
- Choose the request you’d like to Approve or Deny, then click the corresponding button.
- Enter a brief business justification for your decision in the “Justification box”.
- Select “Confirm” to initiate an Azure notification based on your approval or denial.
Workflow Notification Insights:
- Approvers stay in the loop through email notifications, providing a direct link to pending group assignment requests. This link empowers them to swiftly approve or deny with just a click.
- The first approver’s decision is conclusive for the request, whether it is approval or denial.
- Admins holding reservations about an approved user’s activity can easily revoke their group assignment in Privileged Identity Management.
Bonus Tip: Resource admins who are not approvers remain unaware of pending requests. However, they can view or cancel pending requests for all users through Privileged Identity Management.
Wrap up your security game with Microsoft Entra Privileged Identity Management for groups—it’s not just a Microsoft 365 security measure, it’s a proactive stance against breaches. By striking the perfect balance between collaboration and control, admins can confidently safeguard privileged identities within groups. Additionally, you can enhance security by integrating Conditional Access in PIM for groups. Hope this blog provides in-depth information about PIM for groups in Microsoft Entra ID. For any queries, reach out to us through the comments section.


