In large, multi-region organizations, Intune can quickly become a visibility nightmare. An admin in London ends up seeing devices from the Middle East, policies meant for the US, and apps deployed only for teams in Asia. Before they even find what they need, they’re forced to scroll through hundreds of irrelevant objects. This not only slows down their work but also increases the serious security risk. If a compromised user account is assigned an Intune role, the attacker gains access to all devices and policies across the entire organization.
Scope tags address this by creating visibility boundaries that align with your organizational structure, whether by region, department, business unit, or function. This blog walks you through how to use scope tags to simplify Intune management.
What Are Scope Tags in Intune
Scope tags in Microsoft Intune are labels that help control what different admins can see. You add scope tags to Intune items like configuration profiles, apps, policies, or device groups. You also assign the same labels to the admins who should manage them. When the labels match, the admin can see and work on those specific items. If they don’t match, the items stay hidden from that admin. In short, scope tags create clear boundaries, so each admin only sees the devices and settings they are responsible for.
Note: Every Intune tenant comes with a default scope tag. This tag is automatically applied to all objects and all admins. It’s there to make sure everything keeps working smoothly, even if you haven’t set up custom tags yet.
How to Use Scope Tags with Role-Based Access Control in Intune
In MS Intune, Role-Based Access Control (RBAC) and scope tags work together to control who can do what and where.
- Roles – Define actions: Roles in Microsoft Intune decide what an admin can do, like deploying apps, creating policies, or viewing reports. You can use built-in roles (Help Desk Operator, Application Manager, Endpoint Security Manager) or create custom ones.
- Assignments – Define who: Assignments in Intune Tenant administration roles define the complete access boundary for an admin by combining three components: Admin Groups, Scope Groups, and Scope tags.
- Admin Group (Who gets access): These are the administrators who will receive the permissions defined in the role. For example, the “London Admins” group contains the actual people who will manage devices.
- Scope Group (What they can manage): This defines which devices and users the assigned admins can take actions on. For example, if you assign the “London Devices” scope group, admins can only perform management tasks (like deploying policies or wiping devices) on devices within this group.
- Scope Tag (What they can see): This controls which Intune objects, devices, policies, applications, and configurations, admins can view in the portal. For example, assigning the “London” scope tag means admins will only see objects that have been tagged with “London,” filtering out everything else from their view.
This combination forms a tight Intune RBAC governance model that ensures accurate visibility, secure permissions, and controlled regional administration.
Real-World Scenarios for Using Scope Tags
Before jumping into configuration, here are a few real-life situations where scope tags bring clarity:
1. Region-Based Visibility
Large organizations often want regional teams to manage device by Country tags. In practice, a technician in Germany should manage only German devices and should not see or modify devices from other regions like France or the UK. This approach keeps device management organized and minimizes errors in global deployments.
2. C-Suite Protection
Executive devices hold highly sensitive information. By creating a “C-Suite” scope tag and assigning it only to senior IT admins, you ensure that regular Help Desk staff cannot see or access executive devices while troubleshooting.
3. BYOD Separation
Personal devices (BYOD) often need different rules and different admins. A “BYOD” scope tag lets the BYOD team manage only personal devices, while corporate device admins handle company-owned laptops, keeping both sides cleanly separated.
These scenarios show why scope tags are essential. Now let’s move to the implementation of Intune scope tags!
Prerequisites to Ensure Scope Tags Implementation in Intune
Before creating scope tags, ensure the following:
- Administrator permissions: You must have either the Global Administrator or Intune Service Administrator role in Microsoft Entra ID to create scope tags.
- Organized security groups: Create security groups based on your organizational needs (Intune admin center – Groups –> New group).
1️⃣ Device groups: Create device security groups based on regions, departments, or business units (for example, “London Devices” containing all devices in that location).
Tip: If you want all London-based devices to be automatically added to the correct scope tag, you can create a dynamic device group filtered by country with the rule: (‘<yourcustomextensionattributename> -eq “UK”‘)
You can also create a DDL based on country scope tag using PowerShell. After connecting to Microsoft Graph PowerShell, run the following. Before that, ensure your tenant has a custom device extension attribute and that devices are populated with values for it. If the attribute doesn’t exist, create it first. Once ready, run the script to automatically generate a dynamic device group based on the specified attribute.
|
1 2 3 4 5 6 7 8 9 10 |
$membershipRule = '<yourcustomextensionattributename> -eq "UK"' New-MgGroup ` -DisplayName "London Devices" ` -Description "Dynamic group for London-based devices" ` -MailEnabled:$false ` -SecurityEnabled:$true ` -MailNickname "LondonDevices" ` -GroupTypes @("DynamicMembership") ` -MembershipRule $membershipRule ` -MembershipRuleProcessingState "On" |
2️⃣ Admin groups: Create admin security groups containing the administrators responsible for managing those specific regions or units (for example, “London Admins”).
In the following example, we will configure region-based scope tags for a London office, assign them to RBAC roles, and verify that admins only see devices from their assigned region.
- Create scope tags in Intune
- Assign scope tag to a RBAC role
- Add a scope tag to a device compliance policy
How to Create Scope Tags in Microsoft Intune
Follow these steps to create a region-based scope tag in Intune.
- Sign in to Microsoft Intune admin center.
- Navigate to Tenant administration → Roles → Scope tags.
- Click + Create.
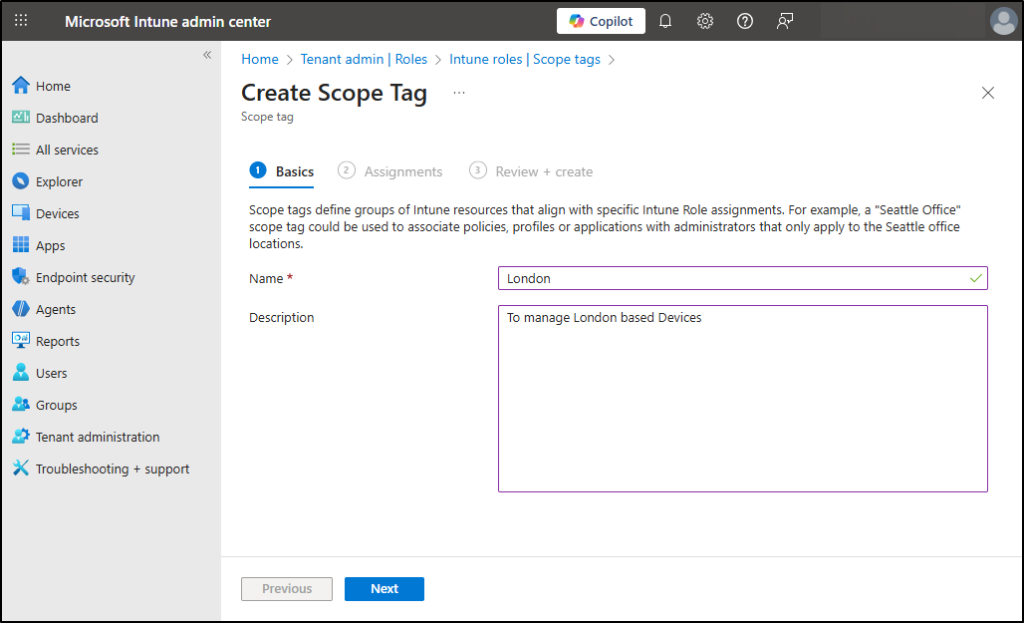
- Enter a name (e.g., London) and Description for your tag. Click Next.
- On the Assignments page, assign the scope tag to the relevant security groups that contain the devices (for example, ‘London Devices’, where all London based devices have been added as members), then click Next.
- On the Review + Create page, review and click Create.
This setup limits admin access to only the devices with the assigned scope tag, ensuring region-specific Intune control.
Once the scope tag is created, it must be linked to RBAC roles. Now, let’s see how to use role-based access control with scope tags.
How to Assign Scope Tag to a RBAC Role
Assigning a scope tag to an admin role ensures that users receiving that role only see the tagged resources. Follow the steps below to add a scope tag to a role in Intune:
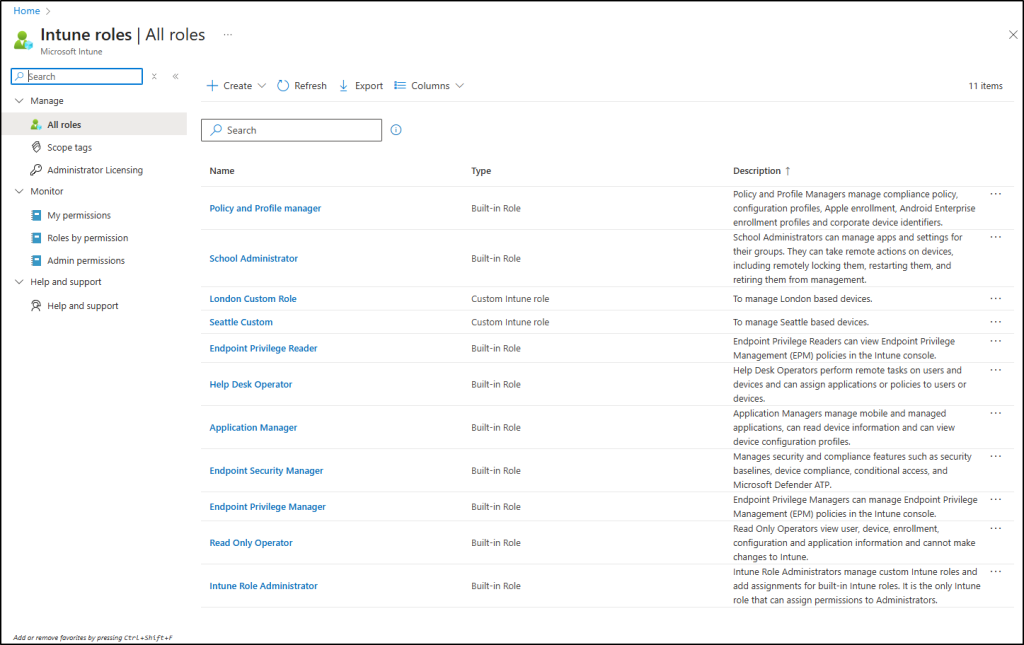
- In Microsoft Intune admin center, go to Tenant administration → Roles → All roles.
- Select the desired built-in or custom role (e.g., Help Desk Operator).
- Select Assignments > + Assign.
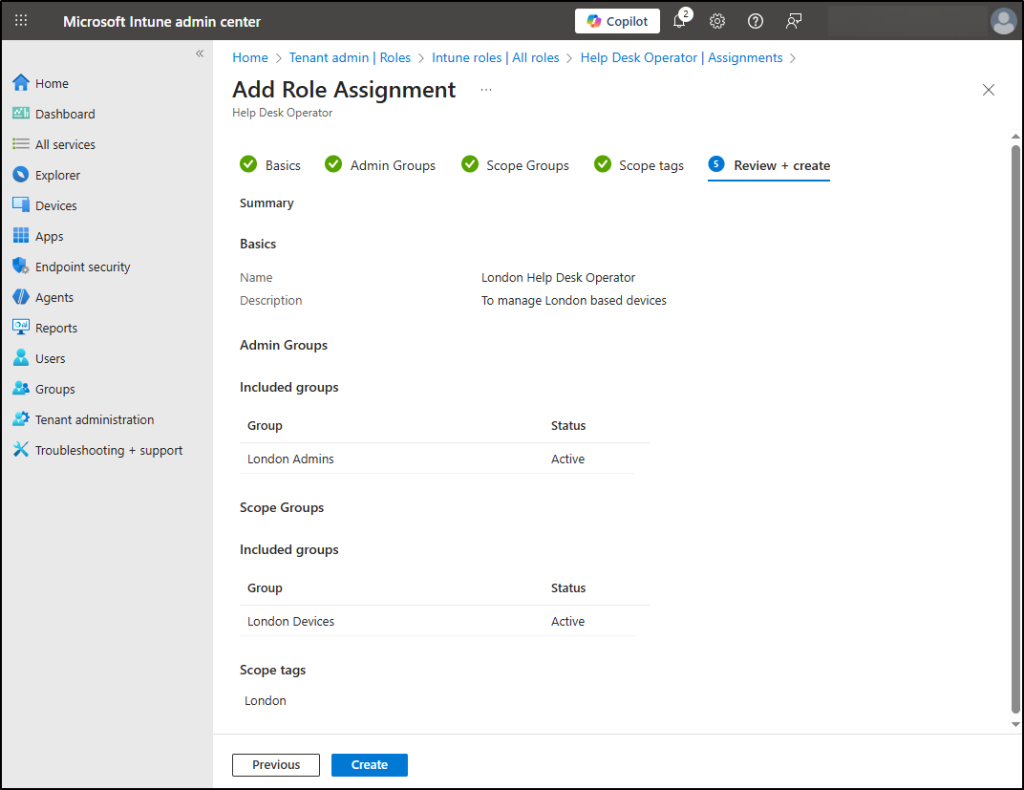
- On the Basics page, enter an Assignment name (e.g., London Help Desk Operator) and Description. Choose Next.
- On the Admin Groups page, select Add groups, and select the Microsoft Entra security group that contains users whom you wish to manage the particular devices (e.g., London Admins – I have added an admin named Alex to this security group). Choose Next.
- On the Scope Groups page, define which end-users or devices these admins are allowed to manage. Select Add groups and choose the security groups containing the target users/devices (e.g., London Devices). Choose Next.
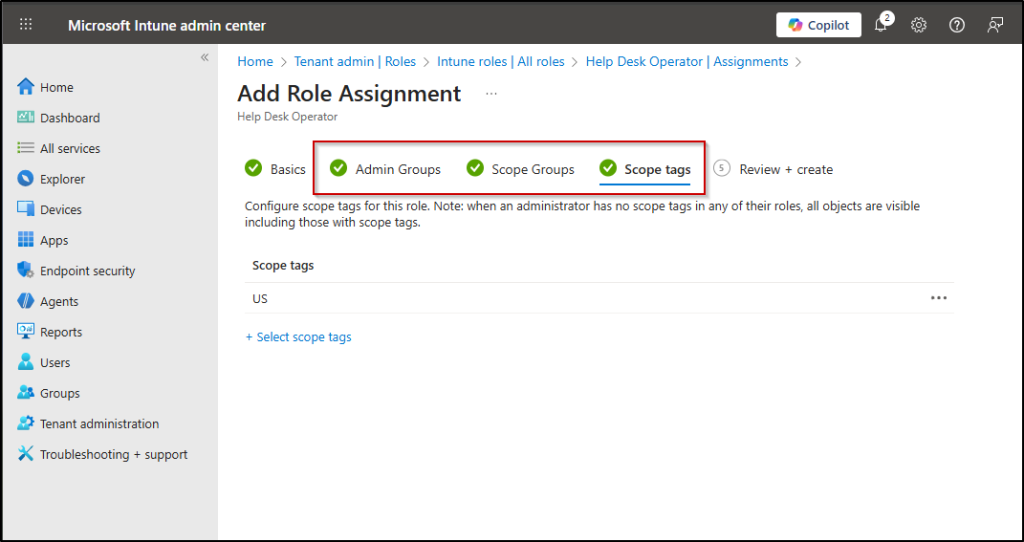
- On the Scope tags page, select the custom tag you created above. (e.g., London). This limits which Intune objects the admins can see in the console. Choose Next.
- On the Review + create page, review your choices and select Create.
Important: Intune RBAC rules don’t restrict Entra roles. For example, the Intune Service Administrator always has full access, regardless of scope tags. So, the added user (Alex) shouldn’t have any administrator permissions.
Scope tags aren’t limited to devices; they can also be used across many other Intune objects, including apps, configuration profiles, device compliance policies, update rings, and compliance notifications.
However, some Intune objects don’t support scope tags. These include Corp Device Identifiers, Windows Autopilot Devices, Device Compliance Locations, Jamf Devices, and VPP apps/ebooks (which inherit tags from their VPP token instead).
Now let’s see how to assign scope tags specifically to device compliance policies in endpoint analytics.
How To Add a Scope Tag to a Device Compliance Policy
Basically, a device compliance policy in Intune defines the minimum-security standards, such as requiring a PIN, disk encryption, or the latest OS, a device must meet to be considered “compliant.”
If a device fails any of these checks, it becomes non-compliant, and Conditional Access can block the user from services like Outlook or Teams. Because these policies directly influence who can access sensitive data, keeping them organized and restricted is critical.
This is why applying a scope tag to a compliance policy is important. It ensures that only the right regional or functional admins can see or modify that policy, preventing confusion and avoiding accidental changes to policies outside their responsibility.
You can assign scope tags during the creation of a device compliance policy or update them afterward. For all Intune resources, the option to add or edit scope tags is always available within the Properties section.
- Open the Intune admin center, navigate to Endpoint security → Device compliance → Policies.
- Select the compliance policy you want to update and click on Properties tab.
- In the Properties page, under ‘Scope tags’ section, select Edit.

4. Pick the scope tags you want to apply and click on Select. An individual resource can hold up to 100 tags.
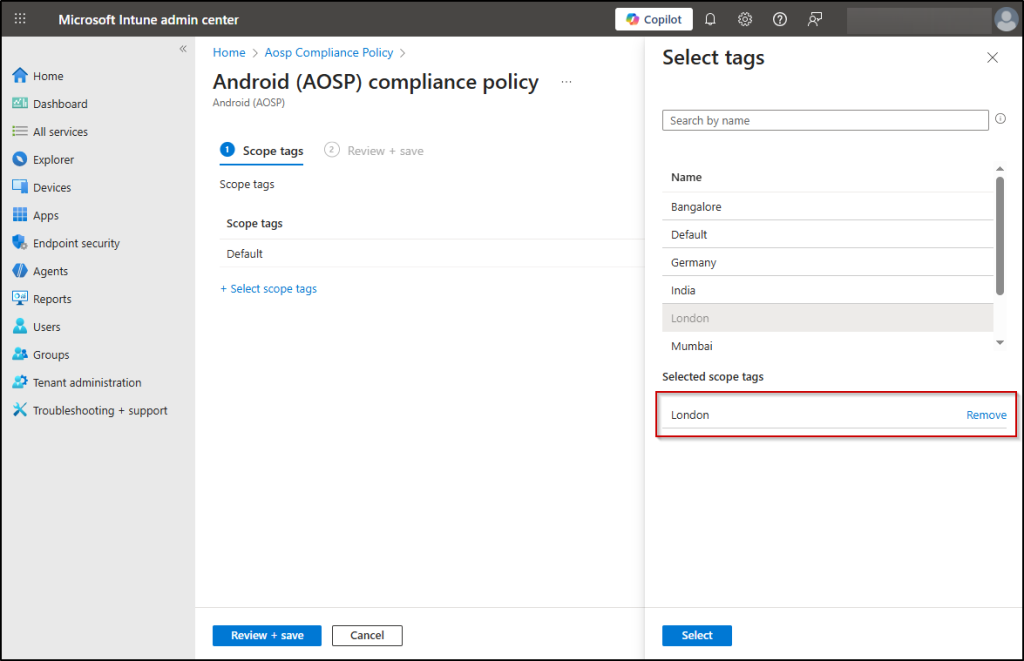
5. On the Review + create page, review your choices and select Create.
Real Time Testing of Scope Tags in Intune
Once your RBAC role and scope tags are configured, it’s crucial to verify that the restrictions are actually working.
In my testing, I created a scope tag named London and a security group called London Devices, which includes only three devices from that region. I also have an admin group named London Admins, and I added Alex to that group.
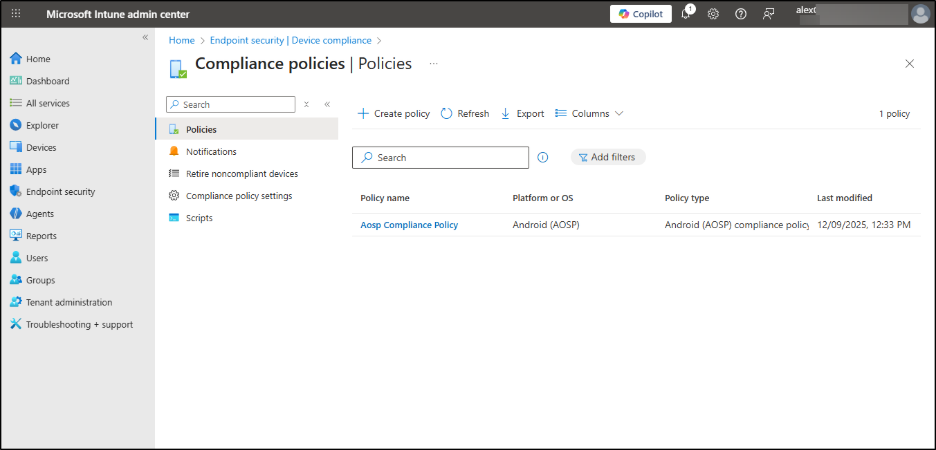
When Alex signs into the Intune portal, he should only see those three London devices and one compliance policy and no resources from other regions.
The scope tag filters his entire portal view, meaning he’ll only see London-tagged policies, applications, and configuration profiles. Remember that scope tags control what Alex can see, while his assigned RBAC role determines what actions he can perform on those visible objects.

Warning: Even with scope tags in Intune, Alex will still see all devices in the Microsoft Entra admin center. Scope tags only restrict visibility within Intune; they do not remove devices from Entra.
The most effective way to prevent a non-admin user from enumerating all devices (and users/groups) is to restrict user access to Entra admin center entirely. It can be done effectively using CA policies with the tokens issued for application IDs related to several administrative portals.
Since I tagged the compliance policy with London, Alex, will see only that policy in their Intune portal and not all policies configured.
Both device visibility and compliance policy visibility behave exactly as expected. Together, scope tags + RBAC ensure Alex can only see London-specific resources and only act on them according to his role permissions.
Points to Remember When Managing Multiple Role Assignments & Scope Tags in Intune
Here are the key points to keep in mind when working with multiple role assignments and scope tags in Intune.
- Any new object created by an admin automatically receives all scope tags assigned to that admin, ensuring consistent tagging from the beginning.
- A role assignment without any scope tags gives the admin visibility into all objects they’re permitted to manage. Use unscoped assignments only when broad access is intentional.
- When a user has more than one role, permissions combine. If one role gives Read and another gives Read/Write, the user gets Read/Write. Always check overlapping roles to avoid accidental permission escalation.
- If your role has a scope tag, you cannot delete all scope tags from an object; at least one tag must remain to preserve access boundaries.
- Intune treats each object type separately. Permissions granted for policies apply only to policies, and not to apps, configuration profiles, or other object types. This separation ensures precise and controlled access.
- Scope tags and permissions stay within the specific role assignment where they are configured. They don’t automatically influence other role assignments unless the same tags are deliberately added there.
I hope this blog helped you understand how scope tags work in Microsoft Intune. Feel free to reach us through the comments section, if you have any questions.


