During this pandemic period, every organization is completing their work from home. It leads to an increase in demands and usage of Microsoft Teams more than Email. As every in-person meeting and communication now happens online, it logs more content in Office 365, which demands the need for Microsoft Teams eDiscovery. As Microsoft Teams stores its contents in Various places, it adds more burden to admins to perform complete eDiscovery. This blog here is to resolve your burden on Microsoft Teams eDiscovery.
Microsoft Teams’ Storage Locations
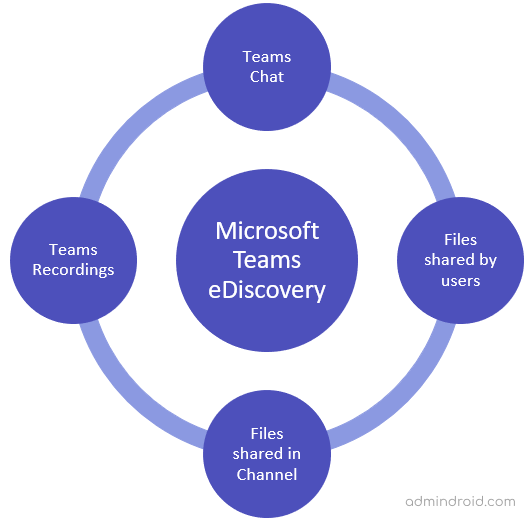
As Teams uses different Office 365 services to handle its Teams data, it’s essential to understand the storage location before diving into eDiscovery. As we have already explored how Teams preserves the copy of the data, just adding the overview here.
| Office 365 Service | Purpose |
|---|---|
| Exchange Online | Microsoft Teams chat storage location |
| OneDrive for Business | Microsoft Teams files storage location |
| SharePoint Online | Microsoft Teams files storage location |
| Microsoft Stream | Microsoft Teams recording storage location |
Using Core eDiscovery for Microsoft Teams
Core eDiscovery tool in the Office 365 Security and Compliance center can be used to retrieve Teams’ content. Before knowing the steps to use the Office 365 eDiscovery tool, we should know the licenses and permissions required to perform several actions.
What are the licenses required?
For Organization – To access the features of Core eDiscovery in security & compliance center, the organization must have Microsoft 365 E3 or Office 365 E3 subscription or higher.
For Users – As stated before, Microsoft Teams stores its content in various places. So, the eDiscovery hold should be placed on an Office 365 user mailbox, SharePoint Online, etc. To place a hold, the respective user must have
- Microsoft 365 E3 (Previously known as Office 365 E3) or higher OR
- Office E1 with an Exchange Online Plan 2 or Exchange Online Archiving add-on license
AND
Office 365 E1 with a SharePoint Online Plan 2 or OneDrive for Business Plan 2 add-on license
What are the permissions required for eDiscovery?
There are two significant roles available in the eDiscovery Manager role group, such as eDiscovery manager and eDiscovery Admin. You can assign eDiscovery permissions using the Security & Compliance center. If you look for PowerShell to assign the roles to users, then use Add-RoleGroupMember cmdlet like below.
Add-RoleGroupMember -identity “Discovery Management” -Member <UserName>
eDiscovery Manager
- Can use Content Search tool to search the content locations.
- Can perform several actions like preview and export the search results.
- Members Can create cases, holds, run searches associated with the case, access case data and add or remove members.
- Managers Can access only the cases they create. They can’t access cases created by another eDiscovery managers.
eDiscovery Admin
- Can access all the cases in the eDiscovery and Advanced eDiscovery pages.
- Can access case data in Advanced eDiscovery for any case.
- Can manage any eDiscovery case by adding themselves as a member to the case.
For more details about each role related to eDiscovery, you can refer RBAC roles related to eDiscovery.
How to do Microsoft Teams eDiscovery?
There are four steps that admins need to do for retrieving and exporting the Microsoft Teams’ content using eDiscovery. In eDiscovery, admins can specify the content that they want to retrieve and export the data in various formats.
- Creating a Case in Office 365 Core eDiscovery
- Creating an Office 365 eDiscovery hold
- Searching the Teams content in a Core eDiscovery case
- Exporting the search results (optional)
Let’s see these steps in detail.
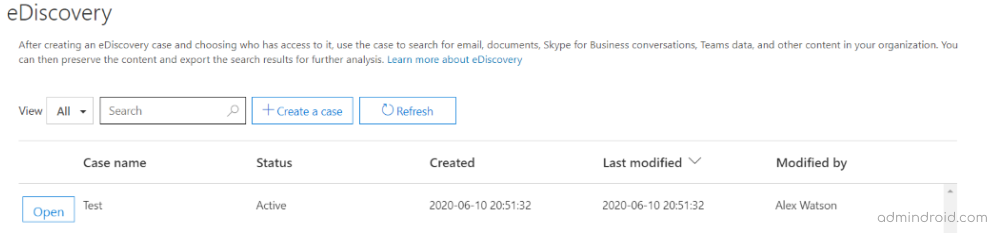
Step 1: Creating a Case in Office 365 Core eDiscovery
Create a new eDiscovery Case
- Go to the Security & Compliance center.
- In the left pane, select eDiscovery–> eDiscovery.
- In the eDiscovery page, select ‘Create a Case’ option in the top. A page will appear that prompts you to enter the Case name and Case description (optional).
- Then click ‘Save’. The case will appear in the eDiscovery page.
Add members to the Case (Optional)
- Click the name of the case in the Core eDiscovery page to add members.
- In the ‘Manage the case’ flyout page, you can add members and role groups to the case. Click the ‘Add’ button under ‘Manage members (to add members)’ or ‘Manage role groups (to add role groups)’.
- In the search box, type the first three letters of the username. Select the name and then click ‘Add’.
- Click ‘Save’ in the flyout page.
Step 2: Creating an Office 365 eDiscovery hold
You can create multiple holds inside a case to preserve the respective Teams content in eDiscovery. The content will be preserved until you remove or delete the hold. If you create a hold, it may take up to 24 hours to take effect. You can place eDiscovery hold on any Exchange mailbox, Teams content, SharePoint and OneDrive for Business sites. To create a hold, follow the below steps.
- In the Core eDiscovery page, click ‘open’ on the case in which you want to create a hold.
- A new page will open and then click ‘Holds’ which appears in the top. In the hold page, click ‘Create’ button to create a new hold.
- A flyout page will appear which prompts you to enter the name and description(optional) of the hold. Then click ‘Next’ button.
- You need to choose locations to place a hold. You can choose mailbox, sites and public folders.
- For Mailboxes, select “Choose users, groups or teams”. The ‘Edit locations’ page will appear in which you need to click “Choose users, groups or teams” button. Then search the required location and click ‘Choose’ button. Then click ‘Done‘.
- For sites, select ‘Choose sites’. In the ‘Edit locations’ page click ‘Choose sites’ button. Search the site name or paste the URL of the required site and click ‘Choose’. Then click ‘Done’.
- For Exchange public folders, you need to enable the toggle switch available there. At last click ‘Next’.
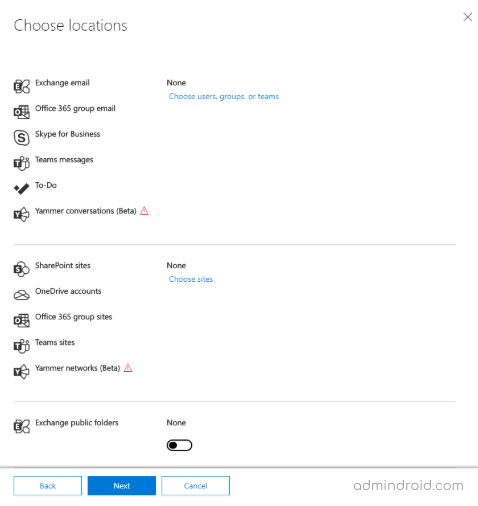
- If you want to create an Office 365 query-based eDiscovery hold, you need to give the query condition. Also, you can create hold without any condition. You can add various condition by clicking ‘Add condition’ button. Then click ‘Next’ button.
- At last, you can review your hold and click ‘Create this hold’ button. Then the hold statistics will appear.
Step 3: Searching the Teams content in a Core eDiscovery case
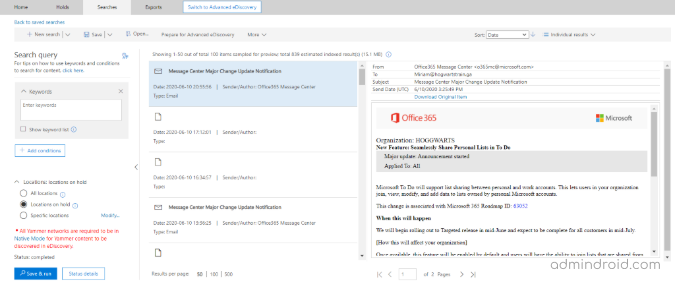
- After the hold creation, select the ‘Searches’ tab in the top. Click ‘New Search’ button to create a new teams content search.
- You can search Teams’ content using the query conditions. Click ‘Add conditions’ button to add query conditions. The multiple keywords are connected by OR operator in the search query.
- Now, you shall select the locations for searching the content. Here, you can search the locations on hold, all locations or specific location based on your requirements.
- Then click ‘Save & run’. A flyout page will appear that prompts you to enter name and description (optional) for the search. You can’t reuse the name which exists in the organization. Then click ‘Save’.
- The results will appear along with the preview.
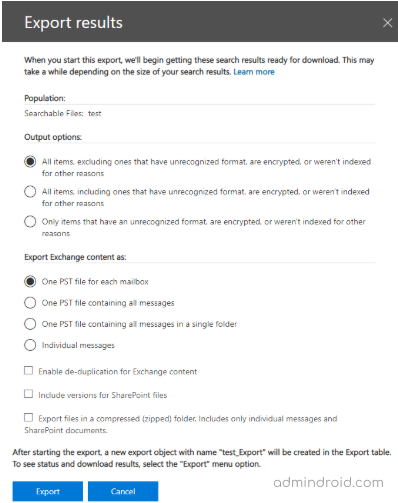
Step 4: Exporting the content from Core eDiscovery case (optional)
- You can export the eDiscovery search results to a PST file by using the eDiscovery PST export tool. Follow the below steps to export the results.
- In the search results page, click ‘more–>Export results’.
- A flyout page will appear in which you need to select the output options and the number of PST files needed for the export content. Also, the page will show the result estimation.
- After selecting the required options, click ‘Export’ button.
- Then select the ‘Export’ tab on the top. The search result export will be available in that page. Select the results which you want to export.
- A flyout page will appear with the total items of the results and the export key. For downloading, the Chrome browser will not support. You need to use Microsoft edge or Internet Explorer.
- Then you need to paste the export key to download the results. Then the file will be downloaded to your local system.
Discoverable and Non-discoverable Teams Contents in eDiscovery tool
Discoverable Items
- Teams chat messages
- Private channel messages
- Emojis, GIFs, and stickers
- Chat links
- Edited messages
- Inline images
- Subject
- Quotes (The results don’t indicate that the content was quoted)
Non-discoverable Items
- Audio recordings
- Code snippets
- Reactions (likes, emoji reactions, etc.)
- Name of the channel
Why E-discovery is preferred over Content Search?
Admins require the team’s content for security and auditing. eDiscovery is preferred over content search because of the eDiscovery hold feature. By applying the hold in the content, we can retrieve any message modified by the users. Admins can obtain both the original and the modified messages. In the content search tool, we can get only the latest messages.
Limitations in Office 365 Core eDiscovery
- There is no limit for the number of cases in an organization.
- Only 10,000 case holds can be created in an organization.
- Only 1000 mailboxes can be placed in a single case hold.
- Only 1000 SharePoint and OneDrive sites can be placed in a single case hold.
- Only 1000 cases will be displayed in case page, holds, searches and exports page.
Even though this tool is very handy for preserving content across several Microsoft services, still some content isn’t discoverable. Hopefully, we will soon discover the audio recordings, channel name, Stream video recordings in the eDiscovery tool. I hope this blog will help you to find the Teams content using the eDiscovery tool without any need to surf further. Let us know your challenges in discovering the Microsoft Teams content.


