Have you ever unlocked a user account only to hear, “It’s locked again” a few minutes later? As an administrator, you know that account lockout policies are a vital shield against attackers guessing their way into your Active Directory domain. However, when lockouts become frequent and repetitive, they quickly turn from a security feature into a major productivity drain.
That’s why it’s essential to identify the account lockout source and cause in Active Directory before unlocking any account. Finding where the lockout originated reveals the root cause, explains why it happened, and ensures the issue is fixed before restoring access.
In this blog, we will explore:
- Common causes of repeated account lockouts
- How account lockouts are processed in Active Directory
- Requirements to track the account lockout source
- How to find the account lockout source in Active Directory
- Common errors and fixes when finding account lockout sources
So, without further delay, let’s see why and how to trace the account lockout source in Active Directory!
1. What Are the Common Causes of Repeated Account Lockouts
Here are some of the common reasons behind frequent account lockouts in Active Directory:
- Mapped network drives using outdated credentials
- Windows services running with expired passwords
- Scheduled tasks configured with old account credentials
- Mobile devices or mail clients caching previous passwords
- Remote desktop sessions with outdated credentials
- Applications or scripts using old, hardcoded passwords
- Password spray or brute-force attack attempts
- Slow or delayed Active Directory replication across domain controllers
Understanding the causes is only half the battle. The real starting point is knowing how account lockouts are processed within Active Directory.
2. How Account Lockouts Are Processed in Active Directory
Here’s a concise look at what happens behind the scenes when repeated failed sign-ins lead to an account lockout in Active Directory:
The process begins when an administrator configures an account lockout policy—defining the lockout threshold, lockout duration, and reset counter.
- When a user enters an incorrect password, or a service uses invalid credentials, the computer where the sign-in originates (workstation, member server, or domain controller) records a failed logon event (Event ID 4625) in its local Security log.
- Active Directory tracks these failed attempts through the Domain Controller holding the PDC Emulator role.
- When the number of failures reaches the threshold defined by a GPO or FGPP, the PDC Emulator locks the account and logs Event ID 4740 in its Security log.
- Event 4740 is logged only on the PDC Emulator—not on the client machine. The PDC Emulator immediately replicates the lockout status of the user account to all other domain controllers.
- Once the account is locked, any further sign-in attempts return a message indicating that the account is locked. The account remains locked until the configured lockout duration expires or an administrator manually unlocks it.
Now that you have a grasp of the basics, you will need the right tools and prerequisites to pinpoint the source of these lockouts.
3. Requirements to Track Account Lockout Source in Active Directory
Account lockouts do not occur without an account lockout policy configured through the a Group Policy Object or Fine Grained Password Policies. While these policies trigger the lock, enabling appropriate audit logs is the only way to make those events traceable.
The following checks ensure your environment is prepared to capture and surface these events without gaps. Performing these actions requires Domain Admin privileges.
- Enable auditing for account lockouts
- Enable remote event log access using Group Policy
A. Enable Audit Logging for Account Lockouts
Auditing account lockouts ensures that every failed sign-in attempt is recorded in the Security log, giving you the evidence needed to trace where each lockout originated. To enable auditing for account lockouts:
- Open Server Manager and launch Group Policy Management. Expand your forest and select the domain you want to modify.
- Right-click the appropriate GPO and select Edit. If you want to create a new GPO instead, right-click the appropriate container and select Create a GPO in this domain, and Link it here.
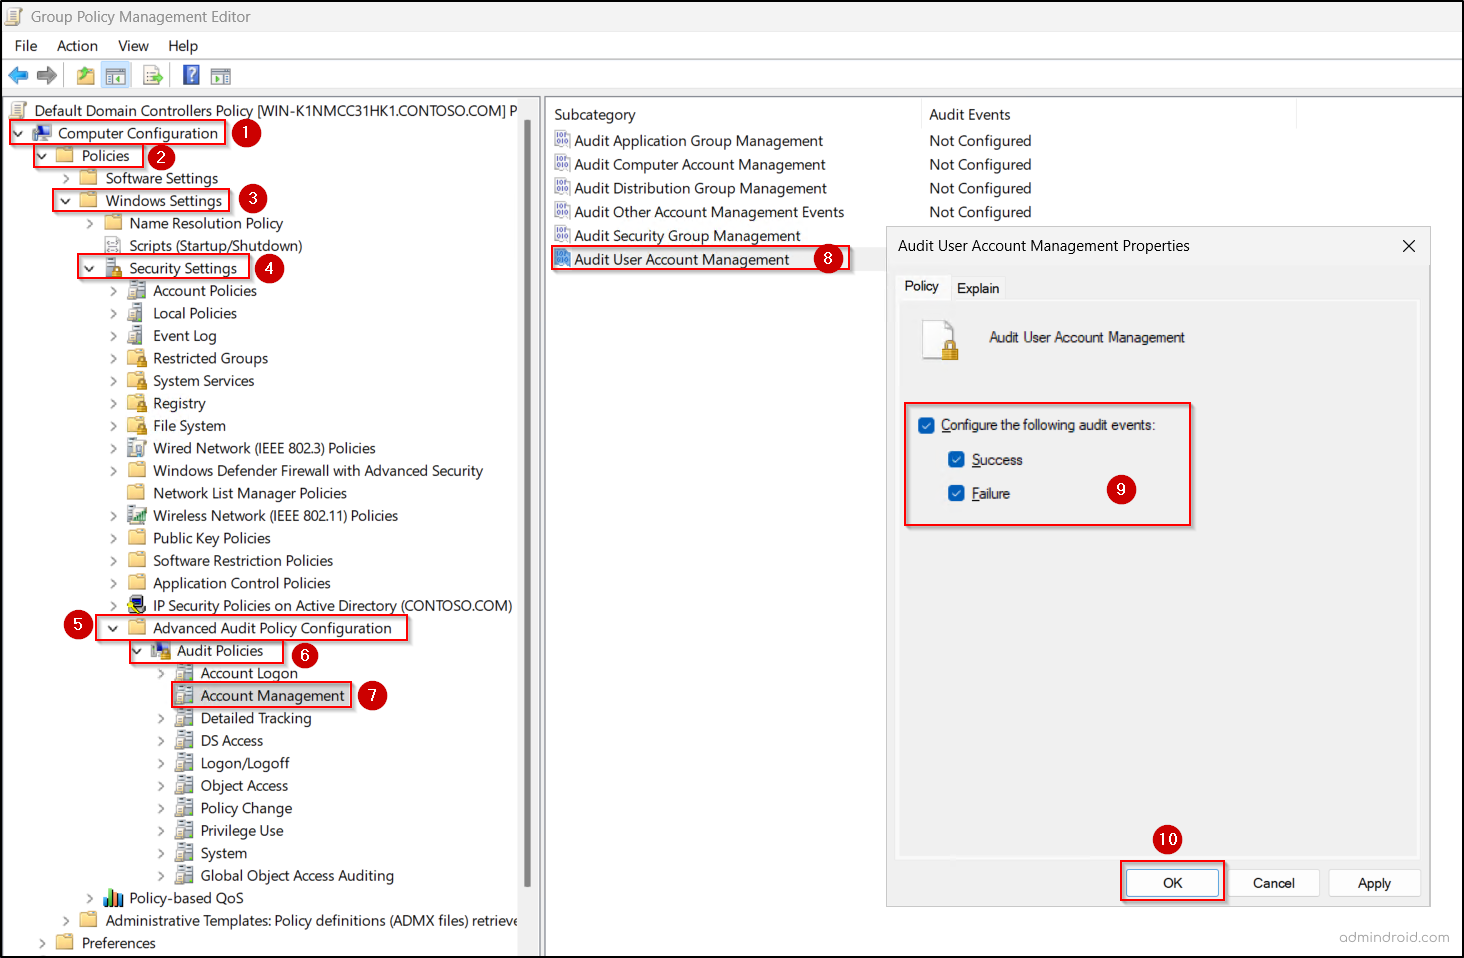
- In the GPM Editor, navigate to:
Computer Configuration → Policies → Windows Settings → Security Settings → Advanced Audit Policy Configuration → Audit Policies
- From here, configure the following audit categories:
For Event ID 4740 (Account Lockout – DC scope)- Go to Account Management → open Audit User Account Management.
- Select Configure the following audit events.
- Enable Success and Failure and then click OK to save the policy.
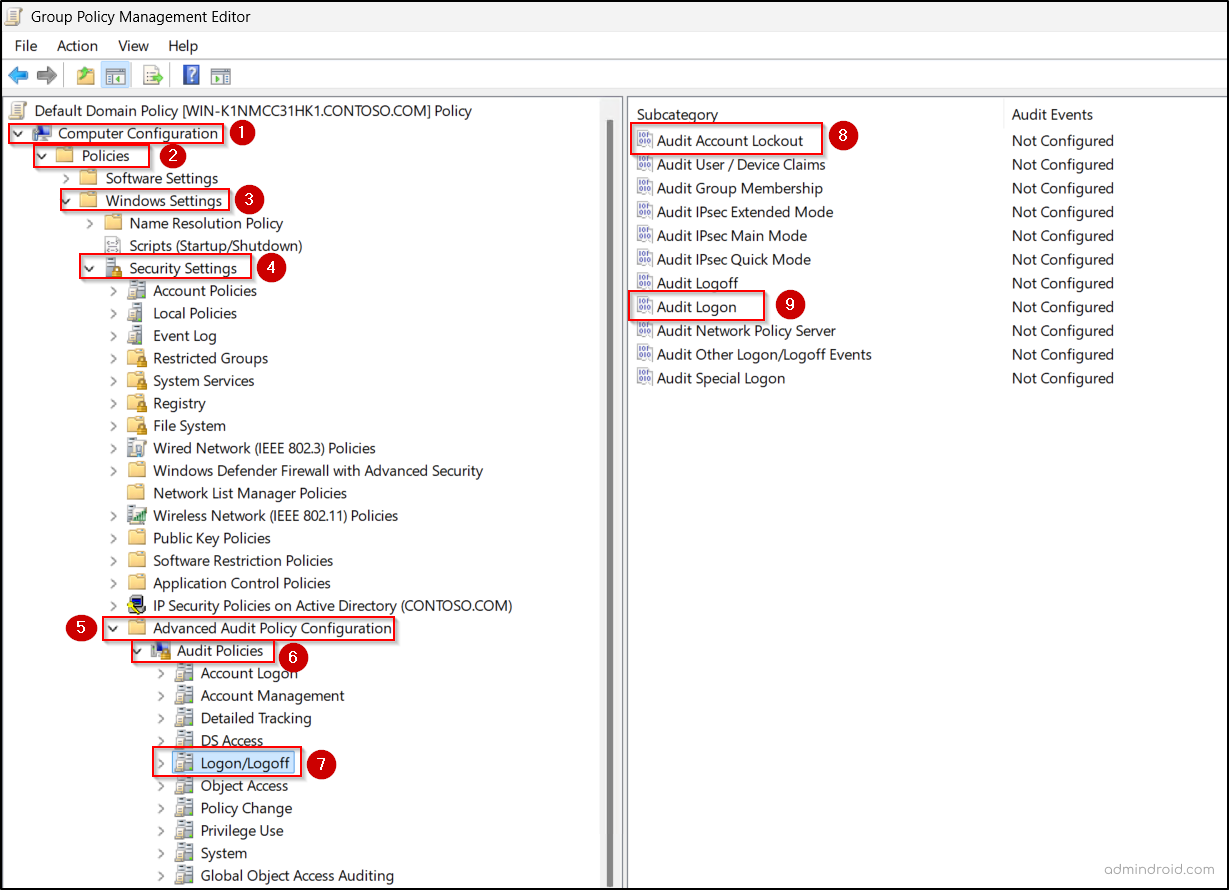
5. For Event ID 4625 (Failed Logon – Domain scope)
- Go to Logon / Logoff and enable Success and Failure for:
- Audit Account Lockout
- Audit Logon
Note: Enable 4740 auditing in the Default Domain Controllers Policy or equivalent, as lockout events are generated on DCs. Enable 4625 auditing in the Default Domain Policy or equivalent to capture failed sign-ins from all clients and services. Together, these settings ensure every failed attempt and lockout is logged, giving you the event data needed to trace the account lockout source.
In addition, increase the Security log size in Event Viewer to prevent critical lockout events from being overwritten—especially in high-traffic environments with frequent authentications.
B. Enable Remote Event Log Access Using Group Policy
Tracing account lockouts with Event Viewer is traditionally slow and manual—you jump from the DC (Event ID 4740) to the client machine (Event ID 4625), repeating this process for every incident. During mass lockouts, this back-and-forth quickly becomes impractical.
That’s where enabling Remote Log Event Access becomes invaluable. It allows you to use Event Viewer’s Connect to Another Computer feature to investigate both the Domain Controller and the source system from a single machine.
- Open Group Policy Management and either edit the Default Domain Policy or right-click the appropriate OU and select Create a GPO in this domain, and Link it here option.
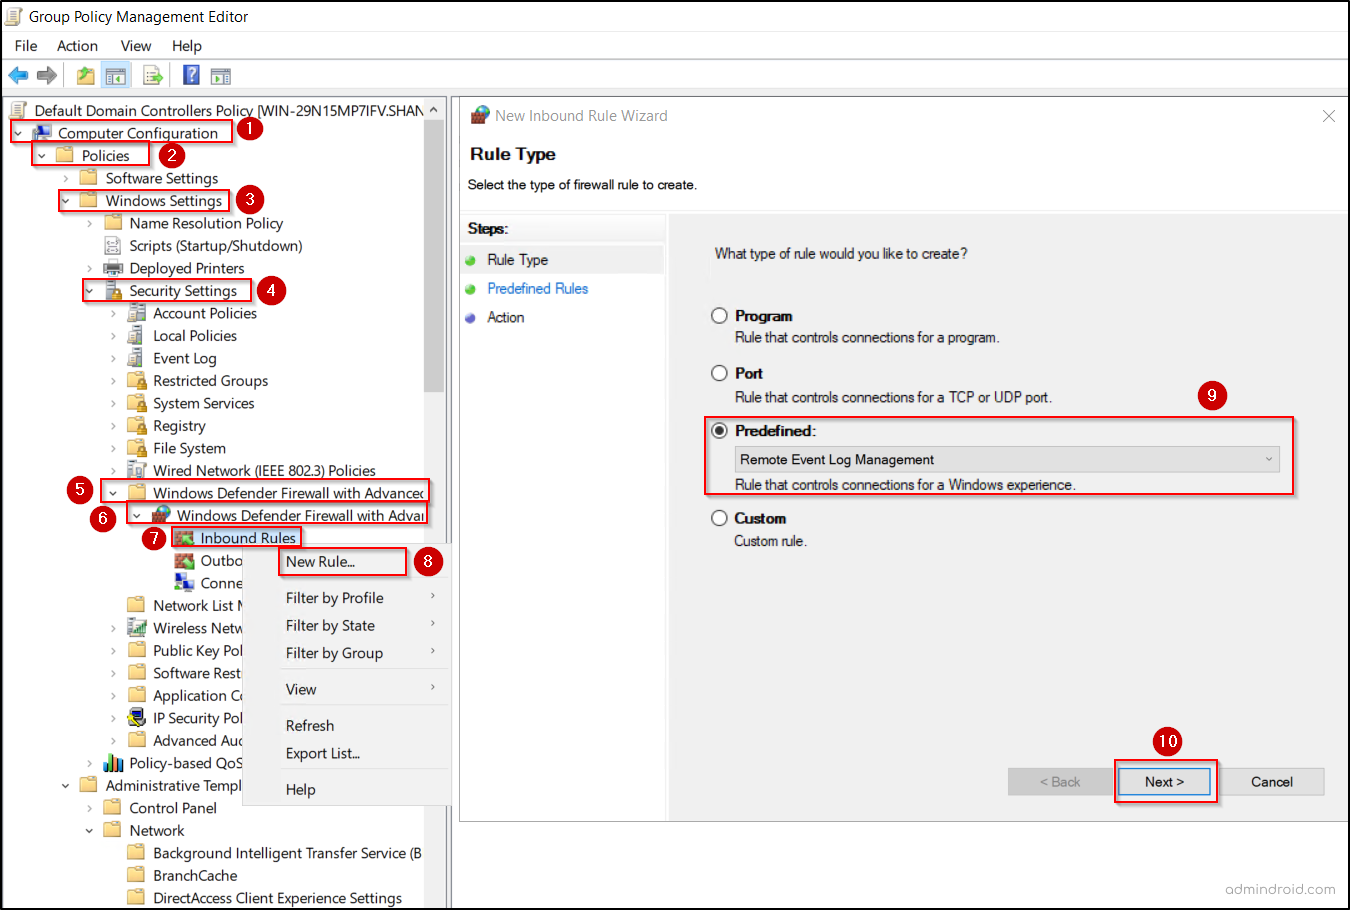
- Then navigate to Computer Configuration > Policies > Windows Settings > Security Settings > Windows Defender Firewall with Advanced Security > Inbound Rules.
- Right-click Inbound Rules and select New Rule.
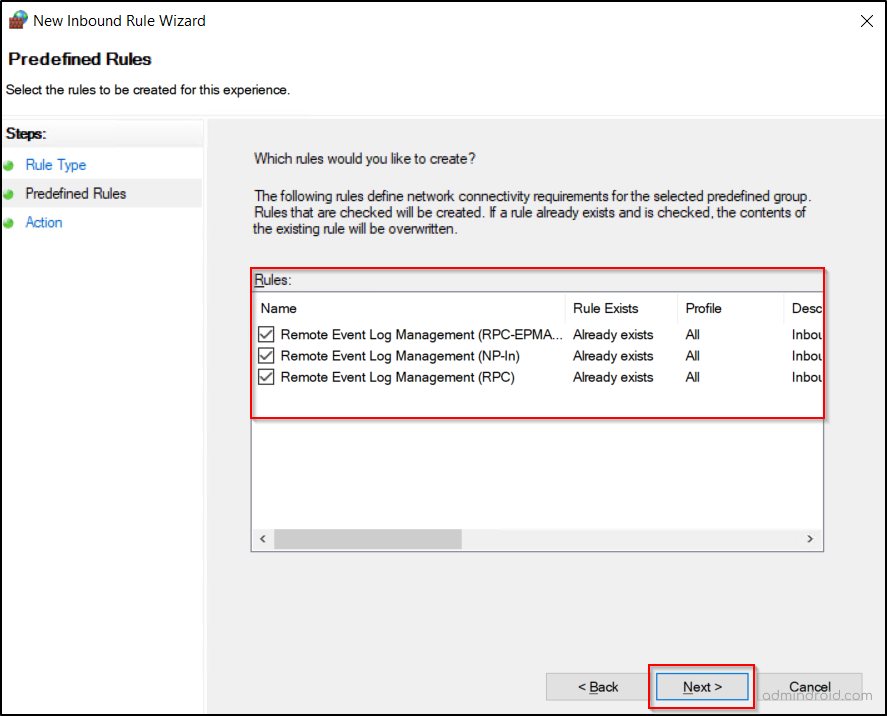
- Choose Predefined under What type of rule would you like to create?
- From the drop-down, select Remote Event Log Management and click Next.
- Select all three rules below and click Next:
- Remote Event Log Management (RPC): The main data highway used to actually transmit the event log data and management commands.
- Remote Event Log Management (NP-In): A backup connection method that allows log access through the file-sharing protocol (SMB) instead of dedicated RPC ports.
- Remote Event Log Management (RPC-EPMAP): Acts as the directory service that tells your computer which specific network port to use for the connection.
- Choose Allow the connection and click Finish.
- Then, right-click the newly created rule and select Properties → Advanced.
- Under Profiles, enable only Domain and clear the other profiles, such as Private and Public. This ensures that remote event log access is allowed only on the domain joined machines and prevents access from systems connected to private or public networks.
Tip: To apply the configured Group Policy objects immediately, run gpupdate /force in Command Prompt or Windows PowerShell.
4. How to Find Account Lockout Source in Active Directory
You can identify exactly which computer or service is causing a user account to lock in Active Directory using either Event Viewer or PowerShell. To do this, you need at least Event Log Reader privileges to access the security events that reveal the lockout source.
A. Track Account Lockout Source Using Event Viewer
You can trace the account lockout source in Event Viewer using these two steps:
- Identify the source computer on the Domain Controller
- Connect to the source computer and find failure events
I. Identify the Source Computer and Lockout Timestamp on the Domain Controller
Here is how to find AD user lockout events and determine the time and specific computer causing the lock.
- To trace a lockout accurately, identify the DC holding the PDC Emulator role using the following PowerShell command:
|
1 |
(Get-ADDomain).PDCEmulator |
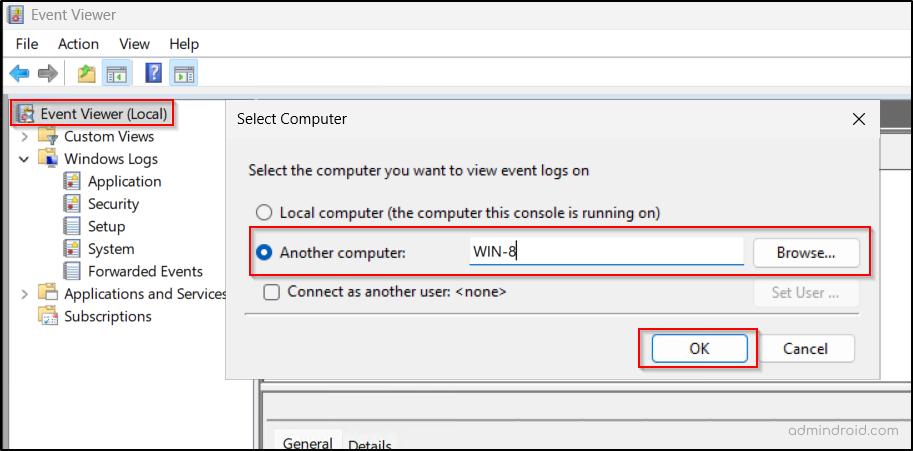
- Open Event Viewer, right-click Event Viewer (Local), and select Connect to Another Computer.
- Enter the name of the PDC Emulator in the Another computer field and click OK. Skip this step if you are already logged in to the current PDC Emulator of the domain.
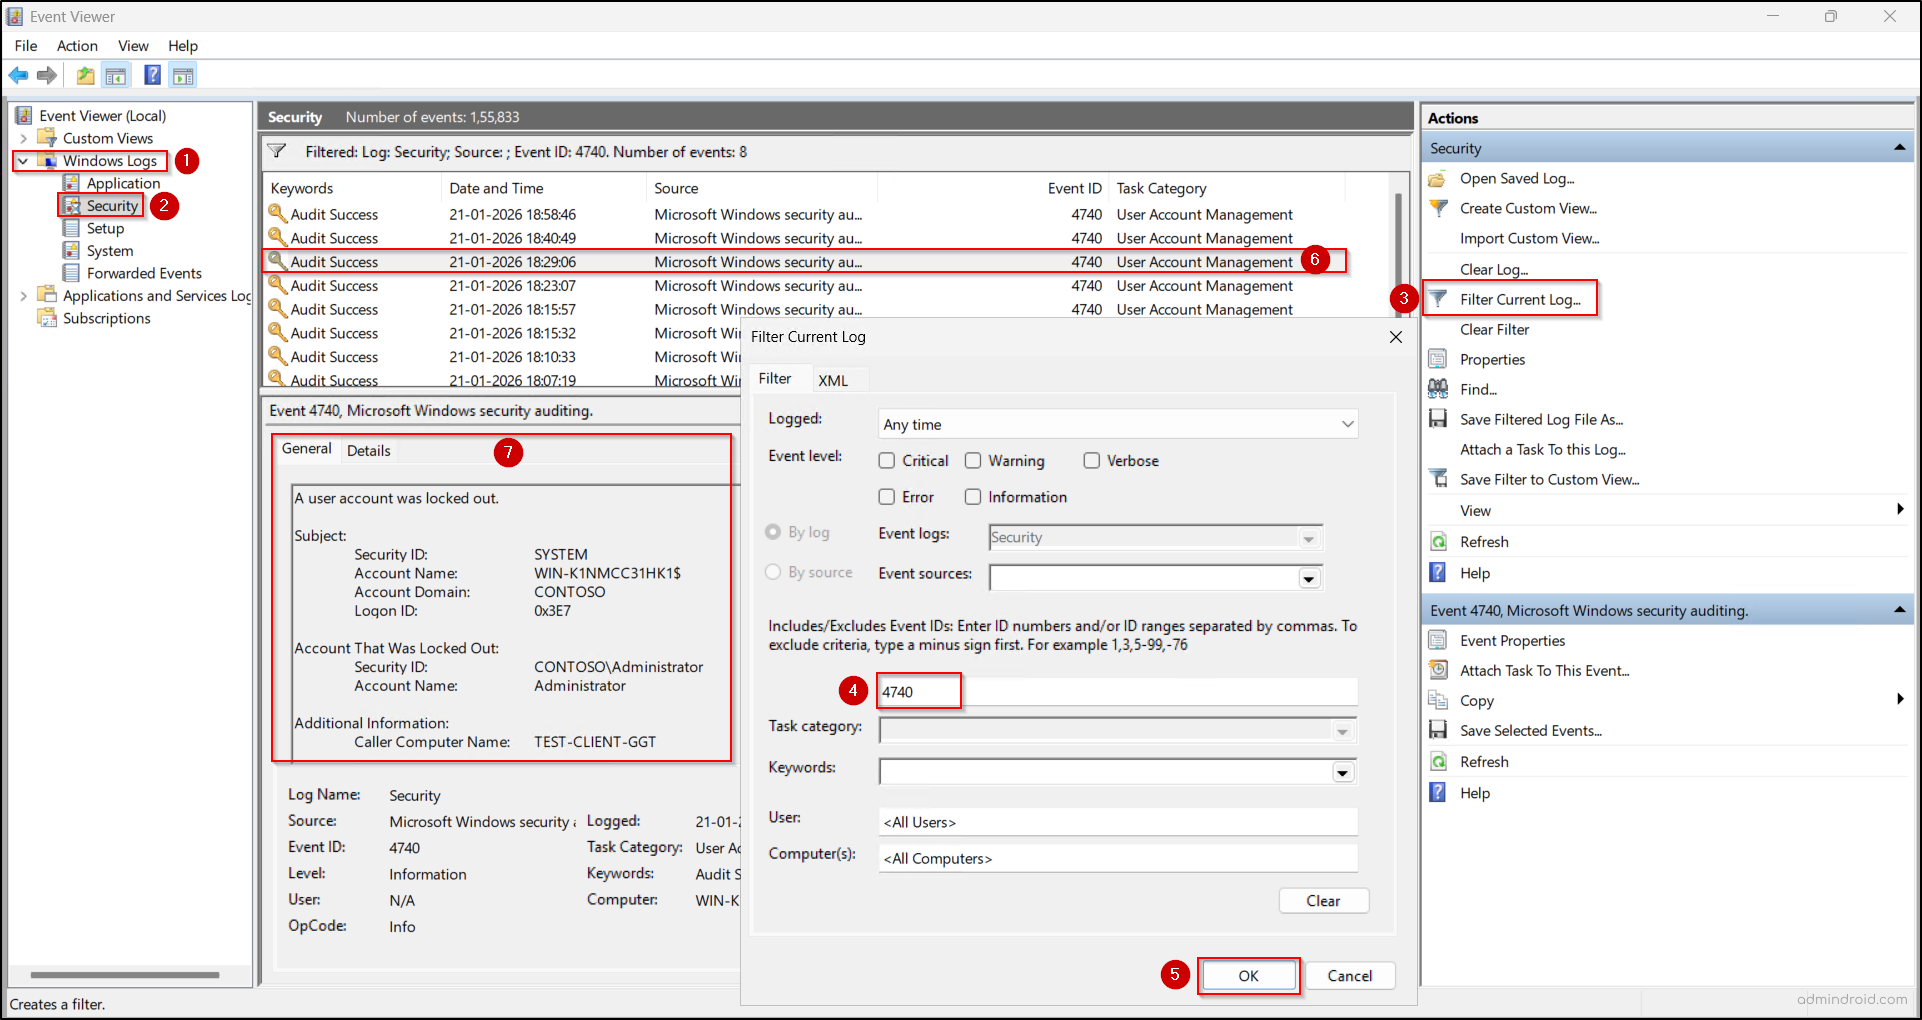
- Navigate to Windows Logs → Security.
- Select Filter Current Log and search for Event ID 4740 (A user account was locked out). Open the event and review these fields:
- Account Name – The locked user
- Caller Computer Name – The source machine causing the lockout
- Time Generated – When it occurred
The Caller Computer Name pinpoints the device responsible—often a workstation or server. For RDP sessions using NLA authentication, this field records the host machine that initiated the connection, rather than the remote system the user attempted to access.
II. Connect to the Source Computer and Locate Failure Events
- Open a new Event Viewer instance, right-click Event Viewer (Local), and select Connect to Another Computer.
- Enter the computer name or IP address of the caller computer in the Another Computer field, then click OK. You can also use Browse to search and select the client machine.
Note: If the Caller Computer Name in Event ID 4740 points to a host machine that initiated the connection through RDP, it indicates that the actual lockout source may lie beyond that system. In such cases, you must repeat the following steps on all computers in the domain to find the exact lockout source of the respective lockout event.
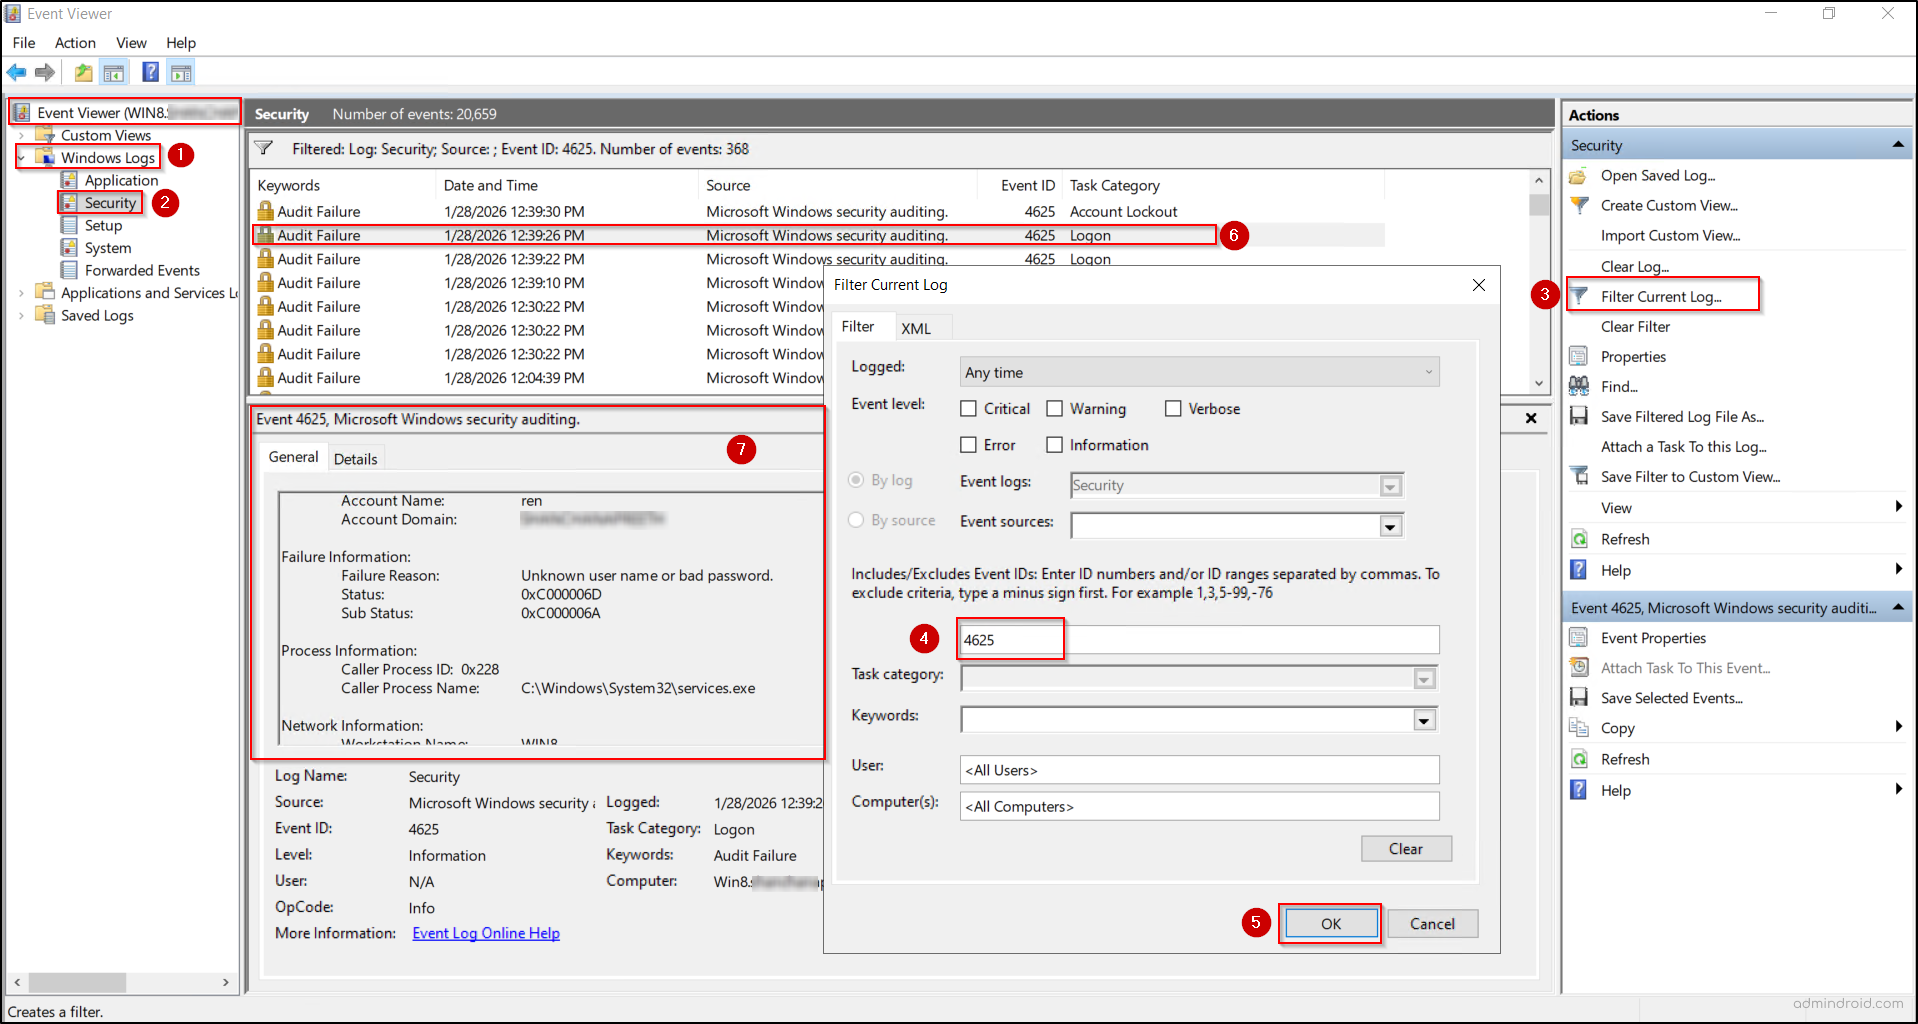
- Once connected, query the source computer’s logs for failed sign-ins by navigating to Windows Logs → Security.
- Select Filter Current Log, enter Event ID 4625, and click OK (An account failed to log on).
- Match the timestamps with the corresponding 4740 events on the Domain Controller and review the related 4625 failures around that time.
- Review the event details for Account Name, Logon Type, and Process Name to determine whether the failures come from a service, scheduled task, or application.
B. View Account Lockout Source Using PowerShell
Even tracing account lockouts across multiple Event Viewer instances can be tedious and time-consuming. PowerShell streamlines this process by instantly revealing the reason and the source where user locked out in Active Directory.
Ensure the Active Directory module is available and imported on your machine, then execute the following PowerShell script:
|
1 2 3 4 5 6 7 8 9 10 11 12 13 14 15 16 17 18 19 20 21 22 23 24 25 26 27 28 29 30 31 32 33 34 35 36 37 38 39 40 41 42 43 44 45 46 47 48 49 50 51 52 53 54 55 56 57 58 59 60 61 62 63 64 65 66 67 68 69 70 71 72 73 74 75 76 77 78 79 80 81 82 83 84 85 86 |
$Computers = Get-ADComputer -Filter { Enabled -eq $true } -Properties OperatingSystem | Where-Object { $_.OperatingSystem } | Select-Object -ExpandProperty Name $DCs = Get-ADDomainController -Filter { Enabled -eq $true } | Select-Object -ExpandProperty Name $allLockOutEvents = @() $allLogonFailures = @() foreach ($DC in $DCs) { Get-WinEvent -ComputerName $DC -FilterHashtable @{ LogName = 'Security' Id = 4740 } -ErrorAction SilentlyContinue | ForEach-Object { $allLockOutEvents += [PSCustomObject]@{ TimeCreated = $_.TimeCreated LockedOutUser = $_.Properties[0].Value CallerComputer = $_.Properties[1].Value } } } foreach ($Comp in $Computers) { Get-WinEvent -ComputerName $Comp -FilterHashtable @{ LogName = 'Security' Id = 4625 } -ErrorAction SilentlyContinue | Where-Object { $_.TaskDisplayName -eq 'Logon' } | ForEach-Object { $processName = if ($_.Properties.Count -gt 18) { $_.Properties[18].Value } else { $null } $logonProcessName = if ($_.Properties.Count -gt 11) { $_.Properties[11].Value } else { $null } $status = if ($_.Properties.Count -gt 8) { $_.Properties[8].Value } else { $null } $subStatus = if ($_.Properties.Count -gt 9) { $_.Properties[9].Value } else { $null } $failureReason = ($_.Message -split "`r?`n") |Where-Object { $_ -match "Failure Reason" } |ForEach-Object { ($_ -replace 'Failure Reason:\s*', '').Trim() } $allLogonFailures += [PSCustomObject]@{ TimeCreated = $_.TimeCreated UserName = $_.Properties[5].Value EventLoggedOn = $_.MachineName ProcessName = $processName LogonProcessName = $logonProcessName Status = $status SubStatus = $subStatus FailureReason = $failureReason } } } $results = @() foreach ($lock in $allLockOutEvents) { $match = $allLogonFailures | Where-Object { $_.UserName -eq $lock.LockedOutUser -and $_.TimeCreated -le $lock.TimeCreated -and $_.TimeCreated -ge $lock.TimeCreated.AddSeconds(-30) } | Sort-Object TimeCreated -Descending | Select-Object -First 1 if ($match) { $results += [PSCustomObject]@{ LockoutTime = $lock.TimeCreated LockedOutUser = $lock.LockedOutUser CallerComputerName = $lock.CallerComputer FailedLogonTime = $match.TimeCreated ProcessName = $match.ProcessName LogonProcessName = $match.LogonProcessName EventLoggedOn = $match.EventLoggedOn FailureReason = $match.FailureReason } $allLogonFailures = $allLogonFailures | Where-Object { $_ -ne $match } } } $results | Sort-Object -Descending LockoutTime | Format-Table -AutoSize |
Once after execution, the script immediately returns key details such as the lockout time, affected user, caller computer name, process name, logon process name, and event logged computer.

After exploring the hurdles involved in tracing an account lockout source, why not switch to the easiest approach? AdminDroid’s Active Directory Lockout Source report slices and dices lockout data to place every critical detail right at your fingertips — no DC hopping, no scripts, no complexity.
5. Common Errors and Fixes When Finding Account Lockout Sources
The following are the most common errors encountered while tracing account lockout sources, along with clear guidance on how to resolve them.
- Error 1: An object (Computer) with the following name cannot be found: “<ComputerName>”.
This error occurs when Event Viewer cannot locate the specified computer in Active Directory.
Solution: Check that the correct computer object and location are selected and confirm that the computer name is entered accurately.
- Error 2: Computer “<ComputerName>” cannot be connected.
This error occurs when you attempt to connect to another computer through Event Viewer where remote event log access is not properly enabled.
Solution: Ensure the computer name is correct, the machine is powered on, and it is reachable on the network. Also, verify that the required Windows Firewall inbound rules for remote event log access are enabled on the target computer.
- Error 3: Get-WinEvent: Attempted to perform an unauthorized operation.
This error occurs when PowerShell connects to another computer, but remote event log access isn’t permitted on the target system. It can also occur when the user lacks sufficient privileges to read the Security logs.
Solution: Confirm the computer name is correct, the machine is online and reachable, and the required remote event log access is enabled on the target computer. Also, ensure that you have sufficient privileges.
- Error 4: Get-WinEvent: The RPC server is unavailable
This issue occurs when the DC cannot connect to the target computer while the PowerShell script attempts to retrieve its event logs.
Solution: Perform the following checks to resolve this error:
- Enable the Remote Event Log Management inbound rules in the firewall settings on the target computer.
- Ensure the Remote Procedure Call (RPC) service is running.
- Verify network connectivity using ping and confirm proper DNS resolution for the computer.
Points to Consider
- PDC & DC Visibility: While the PDC Emulator is the primary authority for lockouts, it is not a single point of failure. If the PDC is unreachable or experiencing replication lag, any available Domain Controller (DC) can process the lockout.
- Role Transfer or Seizure Impact: When the PDC Emulator role is transferred or seized, upcoming account lockout events are logged on the new role holder. During this transition, lockouts may appear on other domain controllers, so ensure all DCs are included in your investigation. In cases where the existing role holder is decommissioned from the domain, lockouts logged there are not accessible.
- Environment-Wide Lockout Event Capture: The given script’s approach of querying all DCs for 4740 and querying all domain-joined computers for the 4625 is the most reliable way to capture events across the entire environment.
- Timestamp Correlation: When matching Event 4740 with 4625, allow for a few seconds of tolerance to account for logging delays or clock skew, especially in newer infrastructure setups.
- Blank Caller Names: If Event 4740 lacks a “Caller Computer Name,” the lockout likely originated from a service, an outdated protocol (NTLM), or a non-Windows device where IP tracking becomes essential.
- Infrastructure Availability: Comprehensive investigation requires consistent access to logs across all Domain Controllers (DC), Workstations (WS), and Member Servers (MS) to trace the original login attempt. If any machine involved in the lockout or its processing is offline or disabled, it can prevent you from obtaining accurate results.
- LockoutStatus.exe: This is a specialized Microsoft utility that shows an account’s lockout state and password metadata across all domain controllers. However, it requires you to manually query each target user account one at a time, making it less efficient for bulk investigations or environments where multiple users experience frequent lockouts.
In conclusion, identifying the account lockout source is the key to effective troubleshooting. We hope this blog eases that process for you. Thanks for reading! Share your thoughts or questions in the comments—we’d love to hear from you.


