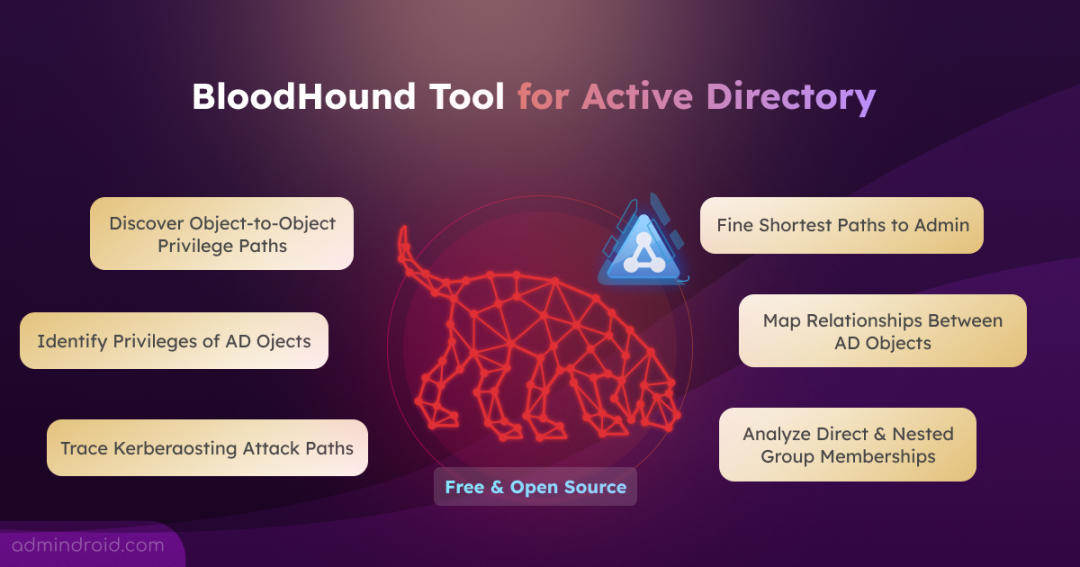
Managing Active Directory permissions gets harder as the environment expands. A user may not be a direct member of the Domain Admins group but could still gain elevated privileges through nested group memberships, delegated permissions, or access control entries (ACEs). When hundreds or thousands of Active Directory objects are connected through memberships and permissions, tracing every possible path manually is impractical.
This is where the BloodHound tool helps. It maps relationships across Active Directory to uncover potential attack paths and identify how permissions can be chained to gain privileged access. In this blog, we’ll walk you through how BloodHound works, how to set it up, and how to use it defensively in your Active Directory environment. Let’s dive in!
What is BloodHound Tool for Active Directory
BloodHound is a free, open-source security analysis tool developed by SpecterOps. It maps relationships between objects in a Windows domain including users, groups, computers, sessions permissions, group memberships, GPOs, etc. This helps penetration testers, blue team operators, and security admins analyze privilege relationships. It also helps them identify potential attack paths and understand how adversaries could move through the environment.
BloodHound is built around a data collector called SharpHound, which gathers information about Active Directory objects and their relationships. SharpHound is the primary official collector for BloodHound, but it is not the only way to collect data. Other tools and custom scripts can also gather compatible information, which can then be imported into BloodHound.
BloodHound then uses graph theory to represent these relationships as a graph, making it easier to identify connections and potential attack paths. The collected data is stored in Neo4j, a graph database, and presented through BloodHound’s graphical interface for analysis.
BloodHound is available in two editions:
- BloodHound Community Edition (CE): A free, open-source version that provides point-in-time attack path analysis. It must be re-run manually whenever you want to collect and analyze updated environment data.
- BloodHound Enterprise: A commercial platform designed for continuous attack path management. It automatically deploys the tool and continuously monitors, prioritizes, and remediates identity attack-path risks across Active Directory.
Although BloodHound is widely known for Active Directory analysis, it can also be extended to analyze identity attack paths across Microsoft Entra ID, Okta, AWS, and other supported identity providers.
Now, let’s look how BloodHound works to identify attack paths in Active Directory.
How the BloodHound Community Edition Components Work Together
BloodHound follows a simple workflow to uncover potential attack paths in Active Directory.
- Collect Active Directory Data: Once deployed, SharpHound collects information about Active Directory objects, permissions, sessions, group memberships, ACLs, GPOs, and other relationships from a domain-joined machine. It packages the collected data into a ZIP archive containing JSON files.
- Ingest the Collected Data: The archive is then imported into the BloodHound UI, which processes the JSON files and stores the relationship data in Neo4j – the graph database that powers attack path analysis.
- Analyze Potential Attack Paths: BloodHound then visualizes Active Directory objects and their relationships as an interactive graph. This makes it easier to explore how users, groups, computers, and other directory objects are connected.
- Remediate and Validate the Identified Risks: Once an attack path is identified, admins can remediate the underlying permissions or configurations that create the risk. After making the changes, run SharpHound again, import the updated data into BloodHound, and verify that the attack path has been removed or reduced.
This tool provides capabilities that allow admins to:
- Uncover hidden trust relationships and complex attack paths
- Identify the shortest paths to critical assets.
- Enumerate privileged relationships and understand identity topology.
- Identify potentially abusable conditions across the AD domain, and more.
Before analyzing attack paths, you’ll need to set up BloodHound and collect data from your Active Directory environment. Let’s get started!
How to Install BloodHound Community Edition
BloodHound Community Edition (CE) supports different deployment methods depending on your operating system and deployment preference. Let’s explore each of them.
1. Install BloodHound CE on Kali Linux
Kali Linux is one of the most commonly used platforms for running BloodHound, particularly in penetration testing and Active Directory security assessments. Its native package repositories provide the BloodHound components, including its python-based data collector (BloodHound.py). This makes the installation simple with the apt package manager.
In your Kali Linux environment, open the Root Terminal Emulator and follow the steps below to install and configure BloodHound CE.
Step 1: Update the package repository
Run the following command to update the Kali Linux APT package list before installing BloodHound:
|
1 |
sudo apt update |
Step 2: Install BloodHound CE
Install BloodHound CE along with its required dependencies, including Neo4j, and PostgreSQL libraries by running the command below:
|
1 |
sudo apt install –y bloodhound |
Step 3: Initialize BloodHound
Run the following command to configure the required backend services:
|
1 |
sudo bloodhound-setup |
This command configures the required backend services for the application and graph databases, then displays the initial Neo4j credentials.
Step 4: Sign in to Neo4j
Opens the Neo4j browser at http://localhost:7474, sign in using the default credentials (Username: neo4j, Password: neo4j) and click Connect. You’ll be prompted to change the default Neo4j password. Enter your new password, confirm it, and then click Change password.
Step 5: Update the BloodHound API configuration with new credentials
Run the following command to open the configuration file:
|
1 |
sudo nano/etc/bhapi/bhapi.json |
Update the secret field in the neo4j section with the new password. Verify the change by running:
|
1 |
sudo cat /etc/bhapi/bhapi.json. |
Step 6: Start BloodHound CE
Start the BloodHound services by running the following command:
|
1 |
sudo bloodhound-start |
BloodHound CE automatically launches the BloodHound API server at http://127.0.0.1:8080/ and opens the login page. Sign in using the default administrator credentials (Username: admin and Password: admin) and click Login.
Note: You can also deploy BloodHound CE with Docker on Kali Linux. Docker provides an alternative deployment method that runs BloodHound and its dependencies in containers, while the native installation runs the components directly on the system.
2. Deploy BloodHound CE App on Windows
The previous method is specific to Kali Linux. On Windows, BloodHound Community Edition is deployed using Docker, which automatically starts all the services BloodHound requires in separate containers. This deployment method works on Windows, Linux, and macOS, and does not need to be domain joined machine.
Prerequisites to Install BloodHound CE on Windows
Before deploying BloodHound Community Edition on Windows, ensure the following requirements are met:
- Operating system: Windows 10/11 (64-bit) or Windows Server 2019 and later.
- Docker Desktop: Install Docker Desktop and ensure the state is Engine running.
If Docker Desktop does not start, press (Win + R), type optionalfeatures, and enable Virtual Machine Platform, Windows Hypervisor Platform, and Windows Subsystem for Linux. Then run wsl –install in PowerShell as Administrator to install WSL. - System requirements: Minimum 8 GB RAM, 4 CPU cores, and 10 GB of free disk space. Larger Active Directory environments with more than 50,000 users require additional resources of 96 GB RAM, 12 processor cores, and 50 GB disk space.
- Network connectivity: The Windows machine must be able to communicate with the Active Directory domain controller over LDAP (389) or LDAPS (636) to collect directory data.
- Permissions: An Authenticated Users account is sufficient for basic Active Directory data collection. Higher privileges are required for certain collection methods, such as local sessions or local group memberships.
Once the prerequisites are met, deploy BloodHound CE using Docker Compose or BloodHound CLI.
Option 1: Configure BloodHound CE Using Docker Compose
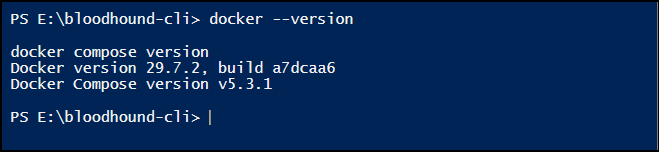
- Open PowerShell and verify that Docker and Docker Compose is running using the below command:
12docker --versiondocker compose version
- Create a dedicated directory and download the official Docker Compose configuration.
123mkdir C:\BloodHoundcd C:\BloodHoundcurl -L https://ghst.ly/getbhce -o docker-compose.yml
- Validate the configuration and start the deployment by running the command below:
12docker compose configDocker compose up -d
Docker downloads the required images and starts the BloodHound, PostgreSQL, and Neo4j containers.
- Verify whether the containers are running using the command below:
1docker compose ps
Review the output and make sure all required containers are running and show a healthy status.

If any container is not running as expected, view its logs using the command: docker compose logs.
- BloodHound CE generates an initial admin password. Retrieve it using the below command:
1docker compose logs bloodhound | Select-String "Initial Password"
- Open http://localhost:8080/ui/login in a web browser and sign in using admin (email) and the generated password. After the first login, reset the admin password using the command below:
1docker compose exec bloodhound ./bloodhound-cli resetpwd --user-id admin --password 'YourNewPassword'
Then restart the BloodHound container by running the command: docker compose restart for the password change to take effect.
Option 2: Set Up BloodHound CE Using BloodHound CLI (Recommended)
BloodHound CLI automates the deployment of BloodHound CE using Docker, reducing the manual setup steps required for the application and its backend services. SharpHound, the Active Directory data collector (ingestor), runs separately on a Windows domain-joined machine to collect and upload Active Directory data to BloodHound CE.
- Download and extract the BloodHound CLI package for your operating system from the BloodHound CLI repository. Alternatively, use the following commands to download and extract the Windows AMD64 package to your Downloads folder:
1curl.exe -L -o "$env:USERPROFILE\Downloads\bloodhound-cli-windows-amd64.zip" https://github.com/SpecterOps/bloodhound-cli/releases/latest/download/bloodhound-cli-windows-amd64.zip cd "$env:USERPROFILE\Downloads"; tar -xf bloodhound-cli-windows-amd64.zip
- Open PowerShell directory in the location where you extracted the BloodHound CLI files and run the following command:
1.\bloodhound-cli.exe install
- Wait for the deployment to complete, then open http://localhost:8080/ui/login in web browser.
- Sign in using admin (Email) and the password displayed in the terminal. To reset the administrator password, run the command: .\bloodhound-cli.exe resetpwd.
The initial password is exposed through the container logs, so it should not be used as a permanent credential. After your first successful login, change the generated administrator password immediately.
Collect Active Directory Data for BloodHound CE
After signing in to BloodHound CE in Windows, the next step is to collect Active Directory data using the SharpHound collector, the official BloodHound data collector for Windows environments.
- In BloodHound CE, click Download Collectors and click Download SharpHound. You can also obtain releases from the official SpecterOps SharpHound repository.
- Extract the ZIP file on a domain-joined Windows machine with network access to Active Directory. If BloodHound CE is running on a non-domain-joined machine, copy the ZIP file to a domain-joined machine and extract it there.
- (i) Open PowerShell in the extracted folder and run the cmdlet below to gather all Active Directory information:
(ii) You can also choose specific collection methods based on the data you need. For example, use Session to collect active session information:1.\SharpHound.exe -c All1.\SharpHound.exe -CollectionMethods Session
To repeatedly collect session data at regular intervals, use the Loop option. This method is useful when you need to capture changes in active logon sessions during an assessment.
1.\SharpHound.exe -CollectionMethods Session -Loop
Alternatively, if you want to perform Active Directory data collection directly from Kali Linux, you can use BloodHound.py. Replace the placeholders with your Active Directory details. The collected JSON files are saved in the current directory.
|
1 |
bloodhound-python -u <UserName> -p <Password> -ns <IPAddress> -d <Domain> -c All |
Depending on the selected collection method, SharpHound can collect information about Active Directory users, groups, computers, memberships, sessions, permissions, ACLs, trusts, policies, and delegation settings.
Ingest the Collected Active Directory Data into BloodHound
Once the collection is complete, you need to ingest the collected data into BloodHound CE. The ingestion method is the same across all the deployment methods described above.
To do this, copy the generated SharpHound ZIP file to the machine running BloodHound CE. Then, open BloodHound CE, click Quick Upload and upload the ZIP file.
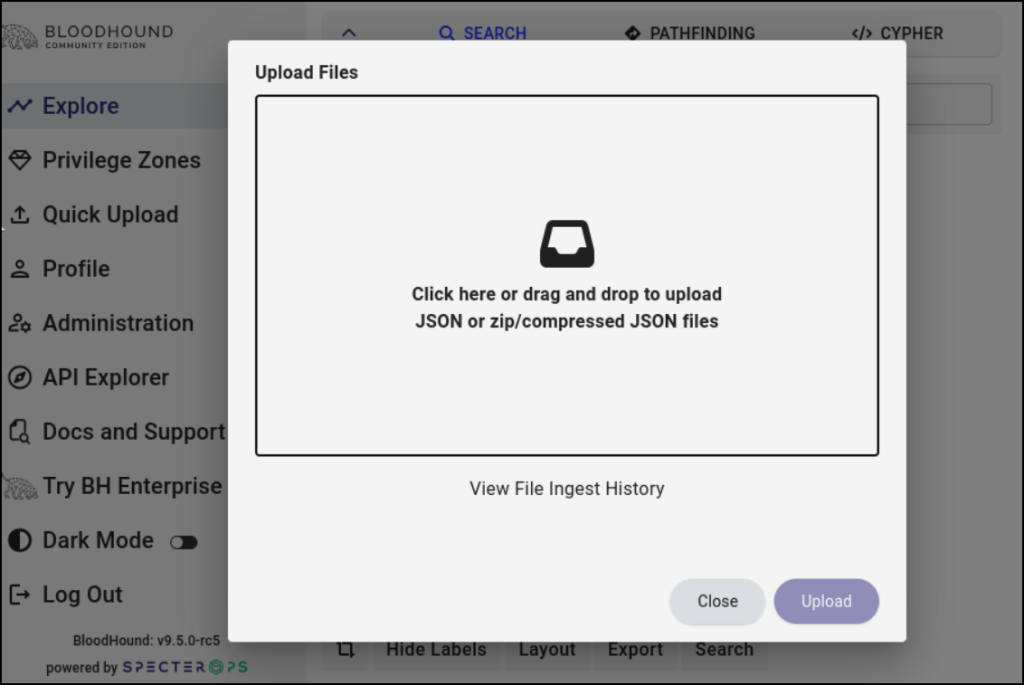
Once the file is uploaded, BloodHound CE processes the data and populates the interface with the discovered Active Directory objects, relationships, and attack paths.
Once the data is mapped, you can use BloodHound’s 3 main features to explore the environment and identify potential attack paths:
- Search: Use the search bar to find specific users, groups, computers, GPOs, or domains and view their relationships.
- Pathfinding: Use the pathfinding features to identify relationships and potential attack paths between a specified source node and a target node.
- Cypher Queries: Use Cypher queries to search for specific relationships, permissions, or security configurations. Use Saved Queries to quickly run common investigations. If they do not meet your requirements, use Custom Query to create and run your own queries.
With these features in place, let’s see how to analyze the collected data directly in the BloodHound CE interface.
How To Analyse Results in BloodHound to Identify Attack Paths
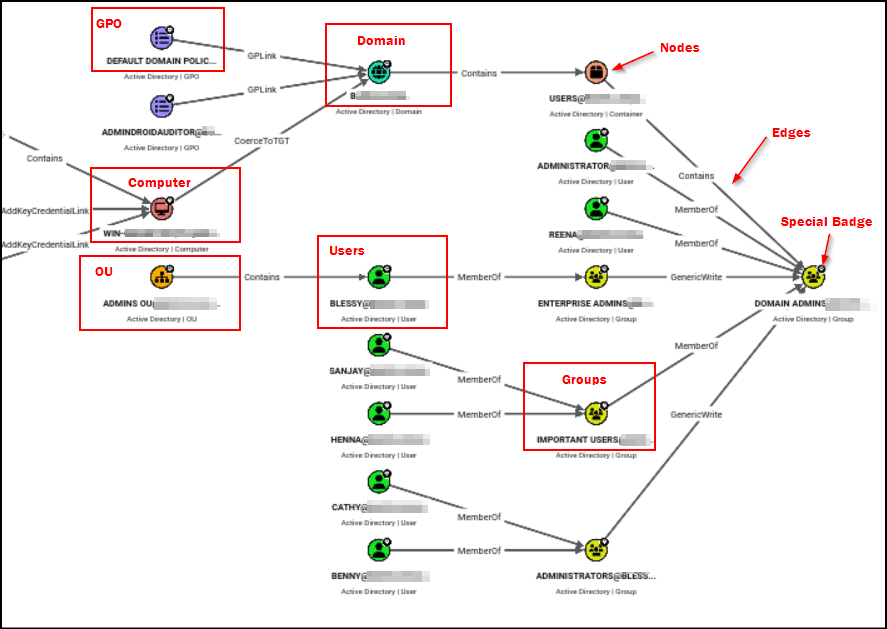
When you select an object from the search results, BloodHound displays it in a node-and-edge graph.
Active Directory objects are represented as nodes, while their relationships and permissions are represented as edges (lines). There are several edge types available in BloodHound including:
- MemberOf: Indicates that a user or group is a member of another group.
- AdminTo: Indicates that an object has administrative privileges over a computer.
- CanRDP: Indicates that an object can connect to a computer using Remote Desktop.
- DCSync: Indicates that an object has permissions that can be used to perform DCSync and request password hash data from a domain controller.
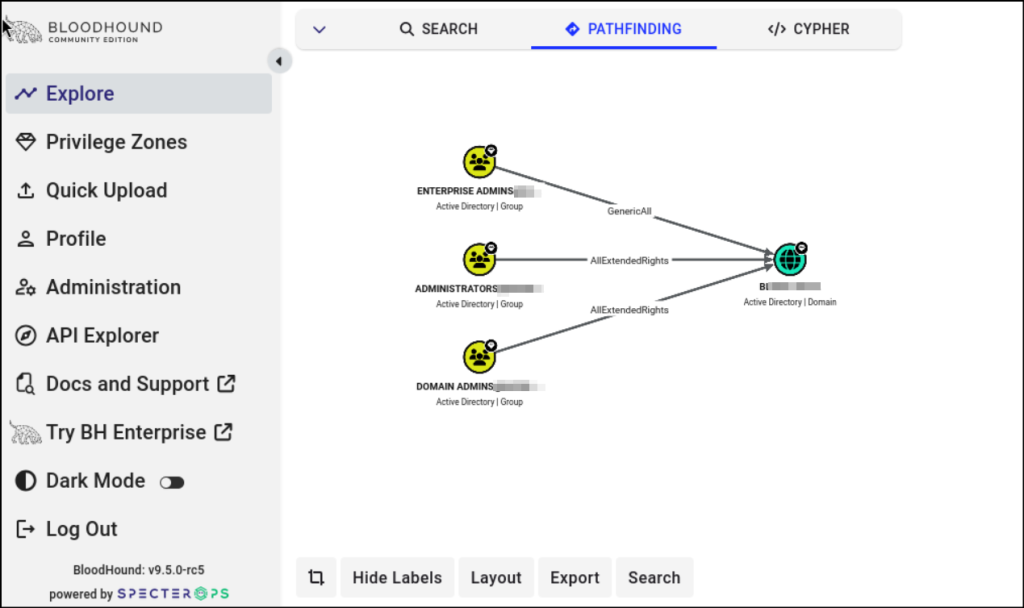
- GenericAll: Indicates that an object has full control over another object.
And more…
In the graph, BloodHound uses different node colours to distinguish object types:
- Green nodes represent user accounts.
- Yellow nodes represent Active Directory groups.
- Persian Blue nodes represents domains
- Purple nodes represents GPOs
Red nodesrepresents computers- Orange nodes represents OUs
Other coloured nodes represent other AD objects. BloodHound also displays a special badge on the avatars of certain users, such as accounts with elevated permissions or active administrative sessions, and groups such as Domain Admins, Enterprise Admins, and Backup Operators. These badges help identify privileged or security-sensitive objects and high-value targets in the environment.
Click on an object (avatar) to open the right-side panel and review its privileges and relationships through the available tabs:
- Object Information: View details such as the object ID, domain SID, distinguished name, creation timestamp, and BloodHound collection information.
- Members: View direct and nested members of the group.
- Member Of: Identify the groups that the selected object belongs to.
- Sessions: Review active sessions associated with the object, where available.
- Local Admin Privileges: Identify the computers where the selected object has local administrator privileges.
- Execution Privileges: Review the execution rights the selected object has over other objects.
- Inbound Object Control: Identify objects that have control over the selected object.
- Outbound Object Control: Identify objects that the selected object can control.
How to Use BloodHound to Find Attack Paths in Your Active Directory
Now that we’ve seen how to analyze the results in BloodHound CE. Let’s explore the following few practical use cases for identifying potential attack paths in a real-world Active Directory environment.
- Review privileged accounts in Active Directory
- Identify the shortest path to Domain Admin privilege
- Identify the Full Control Privileges of one AD object over another
- Identify principals with DCSync permissions
- Find all kerberostable accounts in Active Directory
1. Review Privileged Accounts in Active Directory
Active Directory admin accounts have the highest level of privilege and, if compromised, can give attackers control over the entire domain. Therefore, you should regularly review highly privileged groups such as Domain Admins.
To identify the Domain Admins group, click Search, enter Domain Admins, and select the group from the results.
BloodHound displays the selected group as a node. Click the group and explore the Members, Sessions, Inbound Control, Outbound Control, and other available tabs to understand how privileged access is connected across your Active Directory environment.
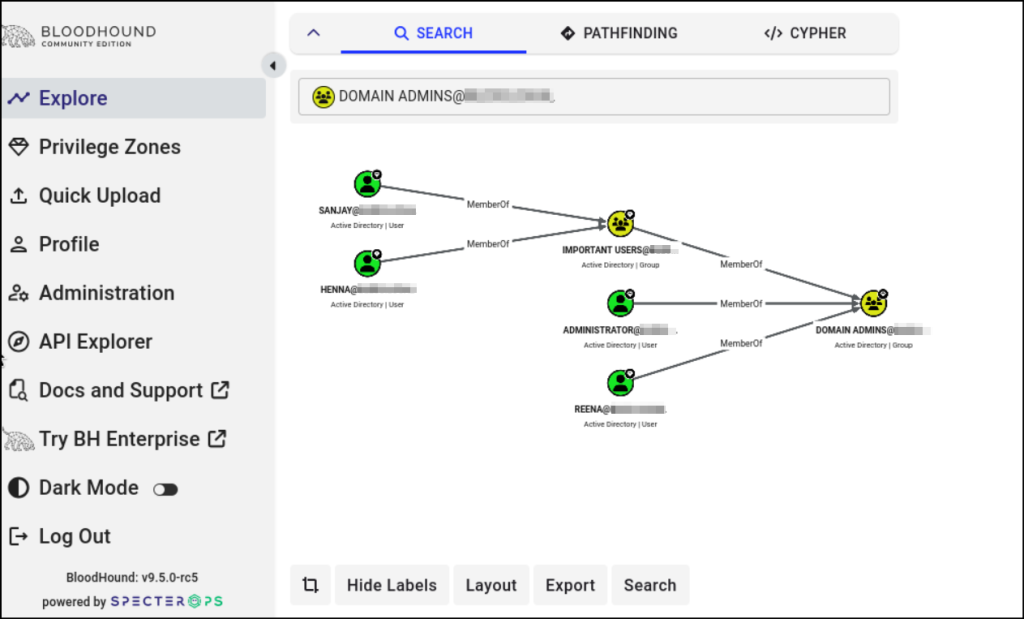
By exploring these graphs, you can move beyond simply listing privileged accounts and understand how privileged access is connected, where it exists, and which relationships could introduce security risks.
The same approach can be used to investigate other users, groups, computers, GPOs, and domains and understand their relationships and privilege levels within the Active Directory environment.
2. Identify the Shortest Path to Domain Admin Privilege
The Search query used above shows memberships, permissions, and other relationships separately based on the search term. While this helps you investigate individual objects and relationships, it may not be enough to understand how a user, group, or computer could ultimately reach Domain Admin privileges.
This is because, a user does not always need to be a direct member of the Domain Admins group. They can also reach the privilege when multiple nested group memberships, delegated permissions, and other relationships combine to create an indirect path to privileged access.
Therefore, a search may not be sufficient to bring up this attack path. So, instead of relying only on Search, you can use a built-in Cypher query to identify the shortest path to Domain Admin privileges. Go to Cypher –> Saved Queries and search for Shortest Path to Domain Admins.
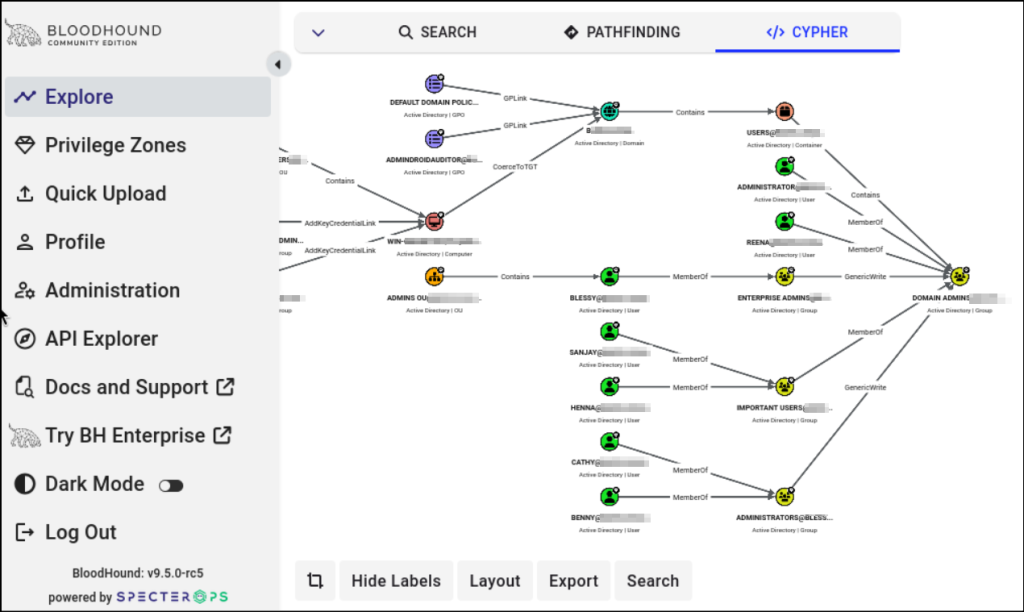
Run the query to generate the path to the Domain Admins group. You can further narrow the results using filters such as Platform, Category, and Source. The resulting graph shows the sequence of relationships, or edges, connecting the starting object to Domain Admins. Examine each edge in the path to understand how the privilege can be reached. For example, the path may pass through a nested group membership or a permission that allows one object to control another.
3. Identify the Full Control Privileges of One Active Directory Object Over Another
Consider a HelpDesk user who has been delegated broad control over a security group. While this may seem like a routine delegation, the group contains accounts that can access sensitive resources. By adding or removing members, the HelpDesk user could therefore influence who gets that access, giving them more control than intended.
The challenge is tracing this level of control across related Active Directory objects. The user, the security group, and the permissions connecting them may look harmless when reviewed individually, but together they can form a privilege path such as:
HelpDesk User → Full Control (GenericAll) → Security Group → Privileged Access.
BloodHound can help bring up those hidden relationships.
To investigate this relationship in BloodHound, use Pathfinding and select the HelpDesk user as the source and the security group as the destination. Examine the edge connecting the two objects and look for the GenericAll relationship. This confirms that the source has Full Control over the target rather than merely a limited permission such as membership modification.
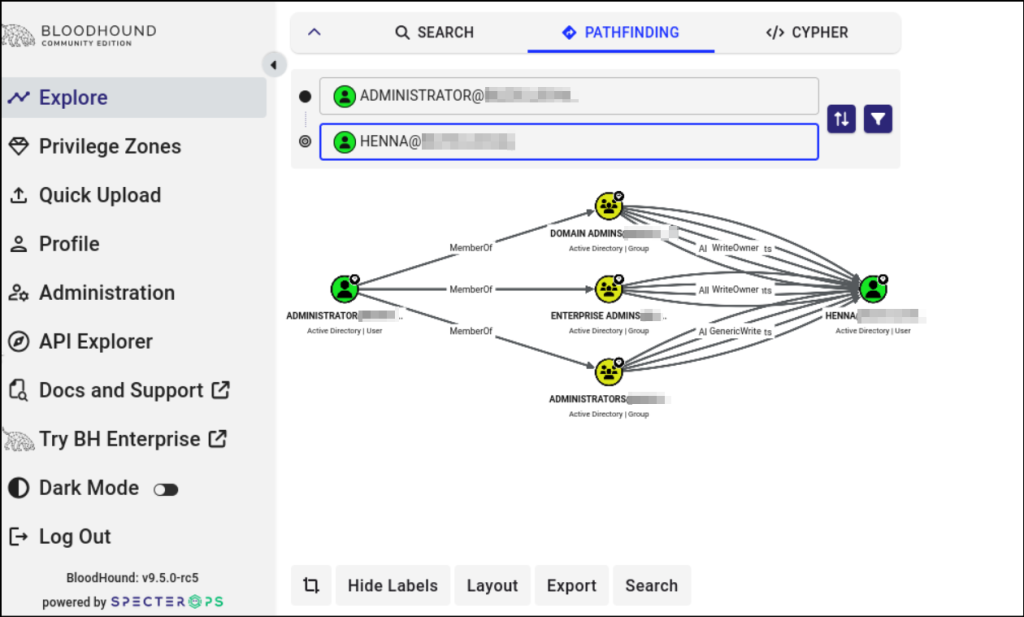
The value of BloodHound here is that it shows exactly how the source object can control or interact with the destination object.
To investigate similar permission risks at scale, run the “Find Dangerous Rights for Domain Users Groups” query in BloodHound. This helps identify potentially dangerous rights such as GenericAll, GenericWrite, WriteDACL, WriteOwner, AddMember, and ForceChangePassword assigned to domain users or groups. Review these relationships to identify excessive permissions that could lead to unintended or elevated access.
4. Identify Security Principals with DCSync Privileges
DCSync privileges allow an account to request password hash information from a domain controller. If granted to an unauthorized user or group, these permissions can be abused to perform a DCSync attack, potentially exposing password hashes across the domain. Therefore, admins should regularly check which users or groups have these permissions over the domain.
To identify them in BloodHound, use the Saved Queries to find Principals with DCSync Privileges. Click a user or group from the results and open Inbound Object Control to see which objects grant the user or group these privileges and how the access is established.
Pay particular attention to unexpected users, service accounts, or groups with these permissions, as they could potentially be used to obtain sensitive credential information from the domain.
5. Find All Kerberoastable Accounts in Active Directory
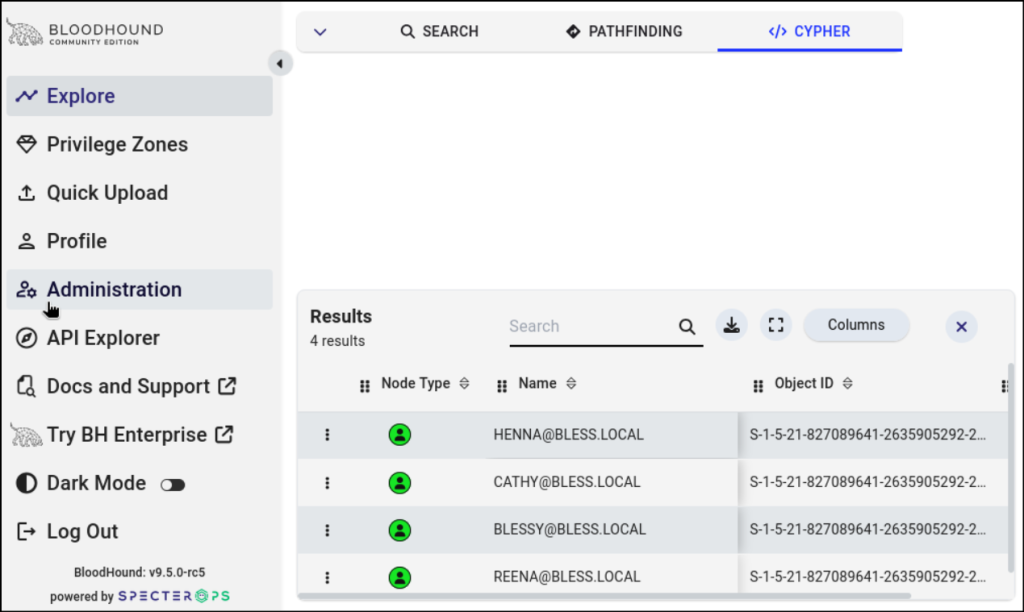
Kerberoastable accounts deserve attention because accounts with Service Principal Names (SPNs) can have Kerberos service tickets requested and potentially targeted for offline password cracking. The risk is higher when the account has Tier 0 or administrative privileges.
To identify them in BloodHound, go to Saved Queries and search for Kerberos Interaction. Under that, select any of the relevant query. Review the results and check whether any of these accounts have privileged access or control sensitive objects.
Click an account to examine its relationships and determine what privileges it has and which objects it can control. This helps administrators identify high-risk Kerberoastable accounts and prioritize them for security review.
Mitigating the Attack Paths BloodHound Finds
Once BloodHound identifies attack paths, the next step is to break those privilege relationships and reduce opportunities for lateral movement and privilege escalation.
Common remediation actions include:
- Enforce least privilege: Make sure to follow least privilege by removing unnecessary permissions such as GenericAll, GenericWrite, WriteDacl, and WriteOwner, especially when assigned broadly.
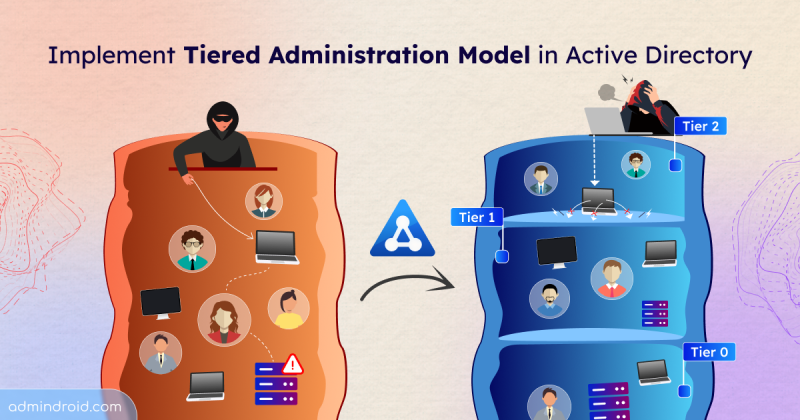
- Secure privileged accounts: Follow a tiered administration model and prevent Tier 0 accounts, such as Domain Admins, from signing in to lower-tier workstations and servers.
- Review AS-REP roastable accounts: Identify accounts with Do not require Kerberos preauthentication enabled and remove the setting unless there is a valid requirement.
- Harden service accounts: Use strong, unique passwords or replace traditional service accounts with gMAs. Review unnecessary SPNs and service account privileges to reduce Kerberoasting risks.
- Review delegation settings: Find and disable unconstrained delegation where possible, and use constrained or resource-based constrained delegation instead.
- Restrict DCSync permissions: Ensure only authorized accounts, such as Domain Admins, Enterprise Admins, and Domain Controllers have directory replication permissions.
- Review privileged group memberships: Remove unnecessary direct and nested members from privileged groups like Domain Admins, Enterprise Admins, etc.
- Monitor active logon sessions: Avoid leaving privileged accounts logged on to shared servers or lower-tier systems as cached credentials can enable lateral movement.
Validate the Remediation Regularly Using BloodHound
BloodHound analysis should not be a one-time activity. Active Directory permissions, group memberships, and configurations change over time, which can create new attack paths even after existing risks are remediated. Run BloodHound regularly to identify newly introduced paths and verify that previously identified risks remain resolved.
Wrapping Up
BloodHound CE is one of the free Active Directory management tools that helps admins uncover hidden relationships and potential attack paths. But it doesn’t reduce security risks by itself, it simply shows you the attack paths that already exist in your Active Directory environment.
The real protection comes from what you do next. As an administrator, it’s up to you to review permissions regularly and remove unnecessary privileges before they become an attack path.
We hope this blog helped you understand how to use BloodHound CE to discover and analyze attack paths in Active Directory. If you have any questions, ran into an issue while following the steps, or have your own BloodHound experience to share, let us know in the comments below. We’d be happy to help. Stay tuned for more blogs!