We are living in a place where a single click can send information soaring across the globe! So, keeping control of your organization’s email flow is crucial. 🚀Whether it’s a business update or a simple information request, messages flow constantly, connecting individuals and teams seamlessly! However, with
Great convenience comes with great responsibility
That’s where message approval in Exchange Online comes to the rescue! But while moderating all emails organization-wide is not a good approach, it’s important to pay particular attention to emails sent to external users. 💯Sending emails to external recipients without proper oversight and review processes in place poses a serious risk, like data breaches, inadvertent disclosure of sensitive information, etc.
So, in this blog, let’s delve deep into moderating recipients in EXO, where admins will discover techniques to ensure the right information reaches the right people at the right time.
What is Message Approval in Exchange Online?
Imagine a scenario where a junior employee accidentally sends an email to external contacts instead of their internal team. And as a bitter pill to swallow, the email contains confidential personal details, financial records, and transaction history.
But here is where message approval in Exchange Online comes secondhand! Here, the moderated recipient in Exchange Online can review the outgoing messages and identify potential errors (such as sensitive info, executable files, etc.) before they are distributed, serving as a crucial safeguard.
Message approval in Exchange Online allows the configured moderated recipients to review and authorize outgoing emails before they are sent to the intended recipients. Here, they can carefully inspect the email content and grant approval or make necessary corrections to maintain confidentiality and security standards.
Multiple Scenarios to Configure Moderated Recipients in Exchange Online
Whether you’re trying to enhance control over email communication or enforce strict policies within your organization, these two fundamental methods can help to implement moderated mail flow in Exchange Online:
Configure a Moderated Distribution Group in EAC
Here let’s take a common scenario of moderating a “corporate announcement” distribution group. This group will serve as a platform for sharing corporate announcements such as company-wide updates, policy changes, and organizational news.
- So, moderating this distribution group can offer multiple benefits such as ensuring accurate and consistent messaging, and removing unwanted flooding of emails to the group. Overall, moderating the group enables employees to stay updated on important company-wide developments, instead of deviating from unwanted spam mail, etc.
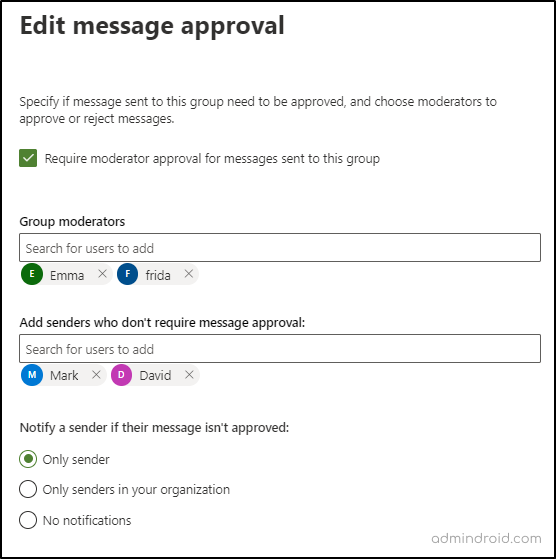
To illustrate, let’s configure moderation for the distribution group named CONTOSOians with the following settings:
- Assign “Emma” and “Frida” as the Group moderators.
- The setting is such that if any user, except “Mark” and “David”, attempts to send a message to the distribution group, then the message will be subject to approval.
- If a message is rejected, internal senders will receive notifications, while external senders will not.
Steps to Moderate the Distribution Group in EAC:
- Open the Exchange admin center and navigate to the below path:
Recipients → Groups → Distribution list → Select the “specific distribution group” → Settings → Edit message approval.
After reaching the Edit message approval page, the following settings were configured as discussed:
- Group moderators: “Emma” and “Frida” have been added as moderators to review moderated emails.
- Add senders who don’t require message approval: An exception has been made for “Mark” and “David” by tagging them, allowing their messages to bypass the approval process.
These adjustments aim to streamline the Exchange Online message approval system and ensure efficient communication within the group.
Note: Ensure the “require moderator approval for messages sent to this group“ setting is checked in order to configure the remaining settings.
How to Approve Emails in Microsoft Outlook?
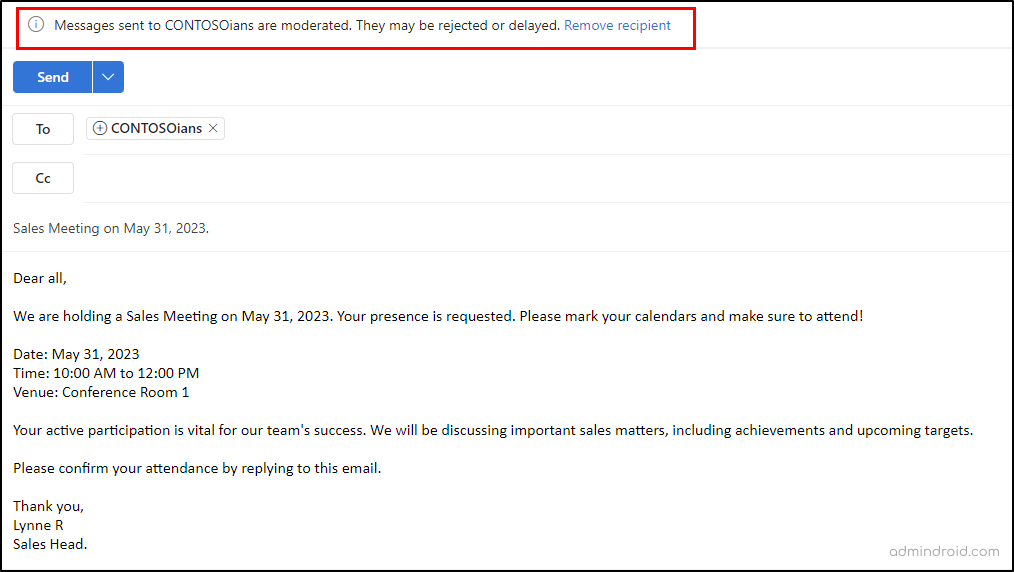
- Whenever a user sends a message to the moderated recipient, they’ll receive the notification below.
Messages sent to <GroupName> are moderated. They may be rejected or delayed. Remove recipient
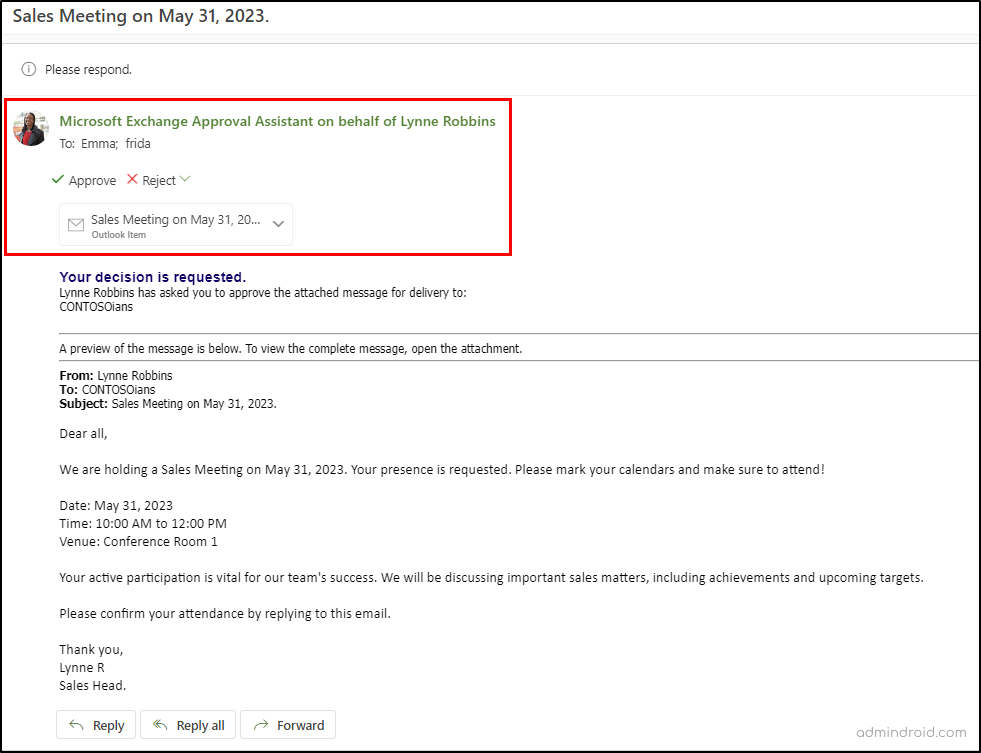
2. Then, the moderator received an email notification to approve/reject the delivery of the message with the respective buttons. Then, the moderator reviews the entire email message, covering attachments, recipient addresses, etc.
- Approve: Once the email message is approved, it will be sent to the recipients.
- Reject: If the message is rejected, the sender will receive a rejection message. Also, the moderator can add review comments, include additional information, or remove sensitive content.
Point to Remember: All messages sent to the moderator for approval are temporarily stored in the arbitration mailbox.
Use Mail Flow Rules for Various Message Approval Scenarios
What if you need to assign moderators or configure moderation more deeply? Got you puzzled? It’s not a big deal! Get ready to unlock the potential of mail flow rules in Exchange Online.
With mail flow rules in place, organizations can establish tailored workflows that streamline the approval process and enhance message management. So, let’s dive in and see some sample workflows which require moderation and ease the approval process.
- Require message approval based on file attachment extensions.
- Require message approval for moderated external recipients.
- Forward messages to a sender’s manager for approval.
Require Message Approval Based on File Attachment Extensions
While it may be hard to monitor every file attachment in every email, at least admins can alleviate the burden by reviewing only certain file types.
Because certain file types, such as executable files(.exe) or script files (.bat/.ps1), can contain malware or viruses that can harm systems or compromise data. Therefore, to reduce the risk of introducing malicious software into the network, let’s see how to create a moderation rule for emails with specific file extensions.
1. Navigate to the following path in the Exchange admin center.
Mail flow → Rules → Add a rule → Send a message to a moderator
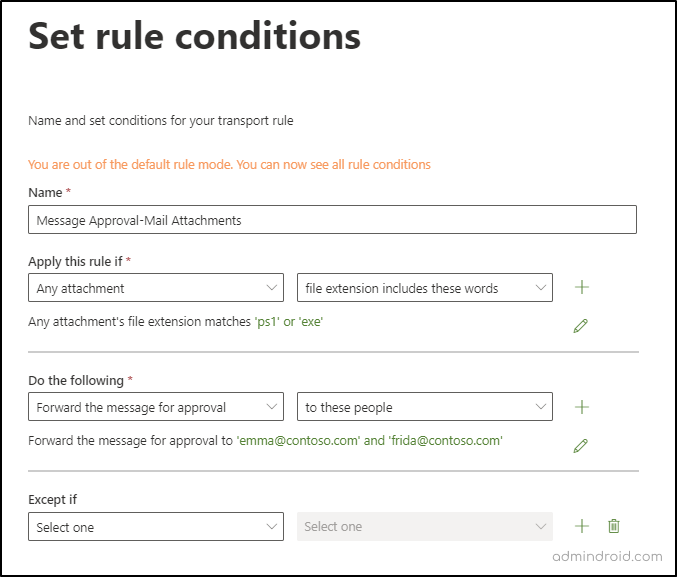
2. Once the Set rule conditions page shows up, fill in the suggested necessary conditions.
- Name: A relevant name of the moderation rule.
- Apply this rule if: For this example, we are considering moderating the file extensions .exe and .ps1, so select Any attachment and input the file extensions in the “file extensions include these words” field.
- Do the following: Mention the specific users to whom the email should be sent for review and elevate them as moderators.
- Except if: This is an additional choice! If you want certain users to bypass moderation, then you can tag those users here.
3. And now the rule condition part is done! Then, admins need to configure the “rule settings,” including rule mode and severity. Also, admins can set a specific date to activate and deactivate the rule.
4. So, finally review all your “rule settings” and click Finish.
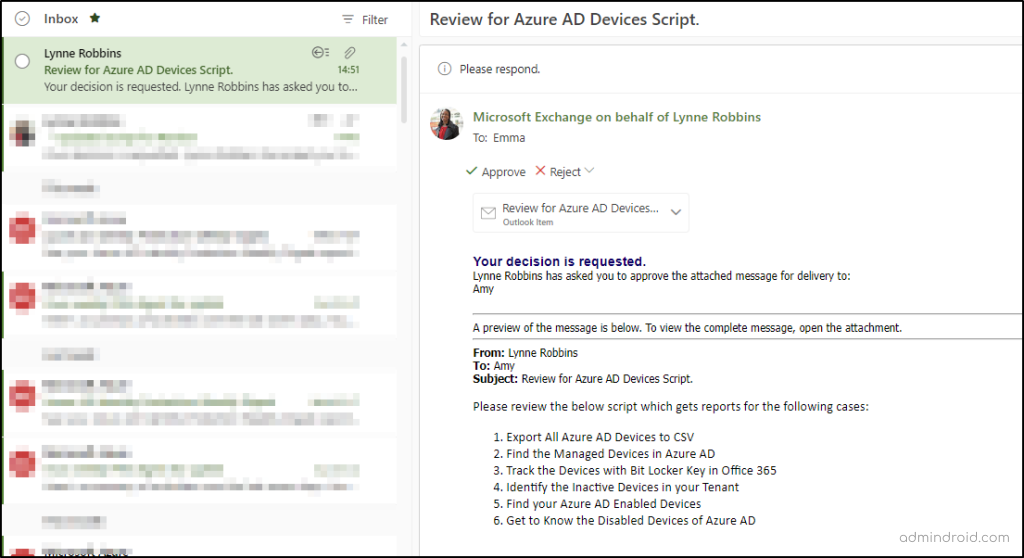
Moderation Rule Execution: When any user tries to send a message with the .exe or .ps1 file, the rule will be automatically applied. Then, it forwards these email messages to a moderator for review, as shown in the image below.
Require Message Approval for Moderated External Recipients
Collaborating with external partners extends your network, facilitates resource sharing, drives innovation, supports market expansion, and more. But this is just one side of the coin! While you flip it, the hazardous part awaits! This collaboration is not to be misused, such as sending confidential info unintentionally to unauthorized recipients.
Therefore, moderating external recipients offers several benefits, and a few of them are:
1. Content Control: It aids organizations in maintaining control over shared content to prevent accidental or unauthorized sharing of sensitive or inappropriate information.
2. Reputation Management: Message approval safeguards the organization’s reputation by ensuring accurate and appropriate content, preventing misleading information and reputational damage.
3. Security and Anti-Malware Measures: Message approval enhances security by scanning messages for malware before sending, minimizing the risk to external recipients.
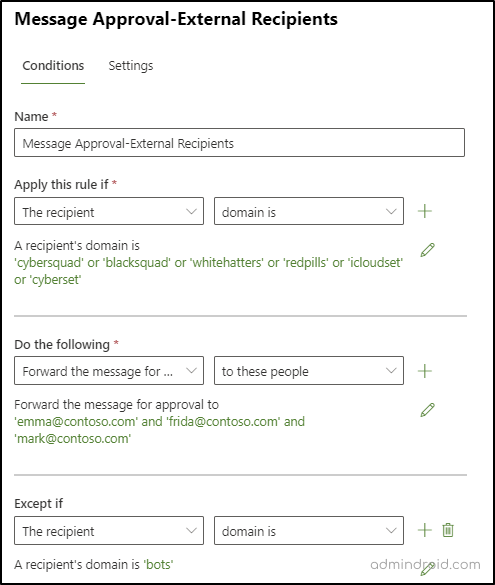
Admins can create a new mail flow rule in EAC to moderate external recipients. In the below example, I have created a mail flow rule with the following objectives:
- If a user attempts to send an email to the “specified 5 external domains”, the message will be forwarded to the designated moderators.
- But an exception has been set for the external domain “bots.” This means that users can send emails to this domain without any moderation.
Forward Messages to a Sender’s Manager for Approval
Not always forwarding to the moderator will work! If the moderator is assigned multiple administrative works, it will be hard to manage message approval in Exchange Online for all users. So, to lower the burden, we have a different approach.
Instead of assigning a specific user as a moderator, it is more effective to adopt the approach of forwarding messages to the sender’s manager for approval. This method helps managers stay informed about their team’s work and ensures every message is reviewed and adheres to organizational standards. Now, let’s learn how to assign a manager as a moderator for message approval in Office 365.
1. First open the Exchange admin center and navigate to the below path.
Mail flow → Rules → Add a rule → Send a message to a moderator
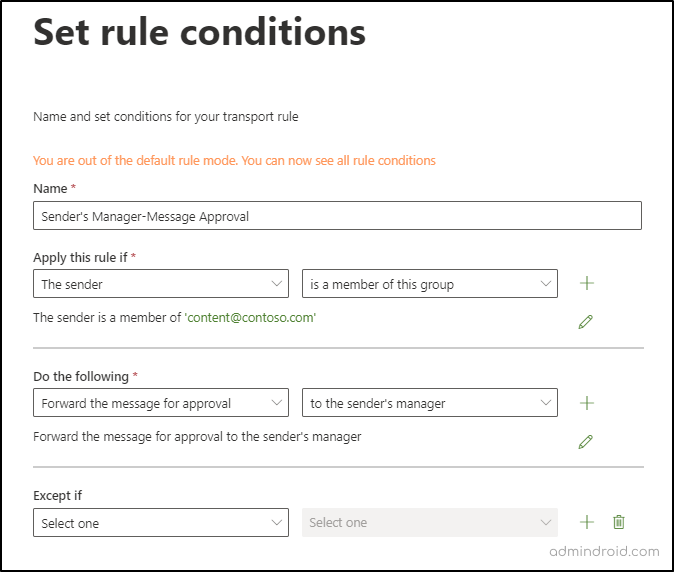
2. I’ve configured the transport rule condition as below: If the sender belongs to the Content Management group, their emails will be forwarded directly to their respective manager for approval. Once approved, the message will be delivered to the intended recipient.
- Name: A relevant name of the moderation rule.
- Apply this rule if: First, select The Sender option. In the subsequent dialog, choose the ‘is a member of this group’ option from the available options. Once selected, specify the distribution group you want to use.
- Do the following: Now here, select the “Forward the message for approval” from the first dropdown, and select the “to the sender’s manager” instead of “to these people” option.
Note: Please feel free to make any adjustments to the rule according to your needs.
Don’t stop here! There are multiple scenarios you can consider and tweak & twist the rules once you are familiar with the start. And the above is the start you might search for! Here, let me present a few sample use cases where configuring message approval is the best choice.
- Messages with sensitive info: Require message approval if any email contains sensitive information, such as include social security numbers, credit card numbers, and a lot more.
- Messages containing large attachments:If a user sends a message with attachments exceeding a certain size limit, admins can require message approval.
- Require multiple approvals from different moderators if the message is from a specific group/user.
- Messages sent to executive mailboxes: If messages need to be sent to executive mailboxes, they must be approved before delivery.
- Messages with higher SCL (Spam Confidence Level): If the messages have an SCL greater than the specified rate, they should undergo moderation.
- For messages sent by new/temporary employees: When a new intern/employee sends an email, it is essential to review it firsthand before delivering it to the recipient.
The list doesn’t end here! These are just a few of the most common message approvals scenarios used by Office 365 admins. Most importantly, you can implement message approvals in different ways, so choose wisely!
Message Approval Reports – Find Out Who Approved the Email?
Imagine a scenario where an approved email by a moderator sparks controversy or contains data inaccuracies. Then, identifying the approver is the initial step in addressing the issue, which helps to identify potential problems, and enhances security.
So, it is important to find who approved an email going to a moderated distribution group or an external domain. Overall, this can be done by message tracing the moderator accounts in the Exchange admin center. To message trace the information in the Exchange admin center, follow these steps:
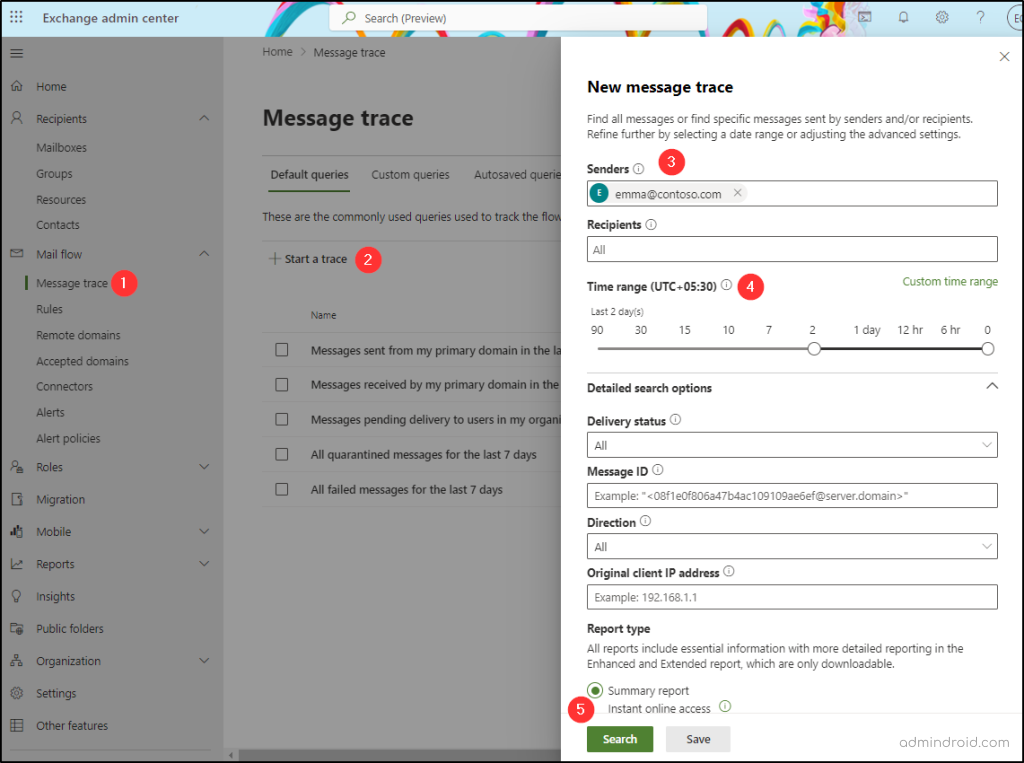
1. Follow the following path in the EAC.
Exchange admin center → Mail flow → Message trace → Start a trace
2. To conduct message tracing, simply enter the names of the three moderators in the Sender box and adjust the time range values accordingly. Afterward, initiate the message tracing process by clicking on the Search button.
3. Now, the message approval report lists the actions executed by the moderators, enabling admins to pinpoint the approver for each message within Exchange Online.
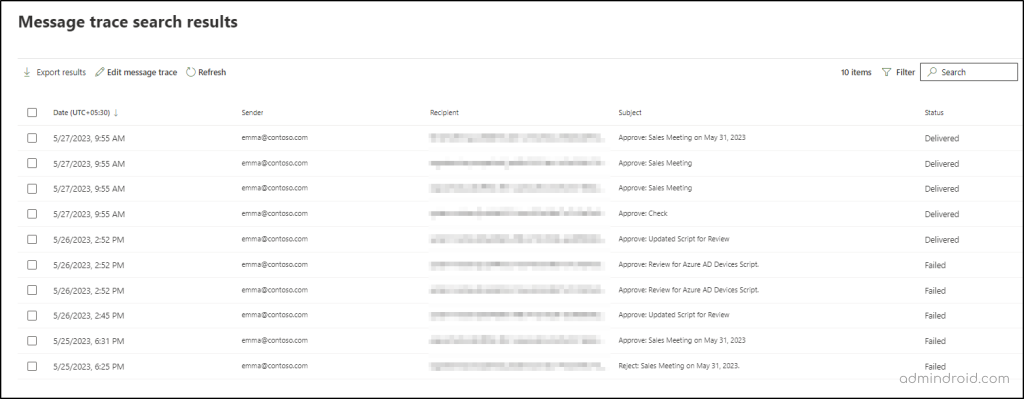
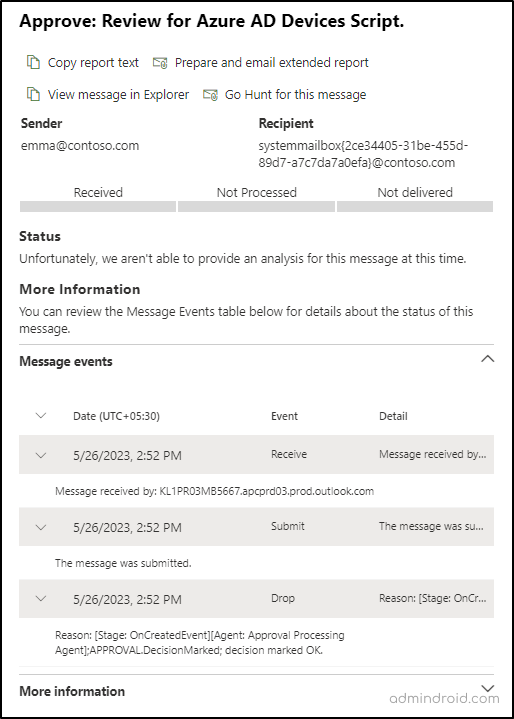
Not only does this list the actions, but it also gives a detailed look into the complete message event. The message event covers detailed information on key stages, such as when the email was flagged for review and submitted and when the message was finally received, with accurate timestamps. Below are the attached samples of a message trace report for the moderator Emma.
Moreover, admins can also Report message to Microsoft for further analysis!
Message Approval in EXO – Approve and Secure with Flair:
From streamlining workflows to safeguarding sensitive information, message approval facilitates collaboration and protects your organization from various risks. Having a second eye on every email message is not just another method; it’s the next vital step toward effectively shielding your organization from potential threats.
So, take the power of having moderated recipients in Office 365 and embark on a journey of enhanced security and seamless collaboration within your organization. Moreover, with the added feature of improved recall in new Outlook, you can further strengthen your organization’s defenses in email communication. Get started now and repel malicious actors from breaching your digital domain! Empower yourself with Microsoft 365 security measures, and ensure your organization is in competent hands.


