
Do you think the outbound messages from your domain are always trusted? What if someone spoofs your domain identity? Yes, spoofing is falsifying one’s original identity to obtain credentials from users and access confidential information. Hence to protect organizations from domain spoofing, Microsoft uses some email authentication methods to verify the emails in transit.
SPF, DKIM, and DMARC are the trio of email authentication methods in Exchange Online protection for safeguarding the domain from being phished or spoofed. Among the three methods of email validation, Domain Keys Identified Mail (DKIM) plays a key role as it prevents forged emails by using a digital signature.
Most business organizations prefer setting the DKIM method since it lets you sign all emails with an encrypted digital signature. It notifies the receiving server that the email is from an authorized domain and significantly reduces the false positives in spam reporting.
So, without further delay, let’s know what DKIM is and how to enable them to secure your domain.
Exchange Online Email Authentication Methods
Exchange Online Protection uses SPF, DKIM, and DMARC to protect organizations against email spoofing and phishing attacks. For the default Microsoft domains, the SPF and DKIM email validation methods are enabled by default. But, in the case of custom domains, these listed email validation methods have to be manually enabled under certain conditions, even though Microsoft handles DKIM configuration for them.
- Sender Policy Framework (SPF) – This framework validates IP addresses based on SPF TXT records.
- Domain Keys Identified Mail (DKIM) – This method uses private keys to encrypt the outbound emails with a digital signature and public keys to decrypt and authenticate the received email.
- Domain-based Message Authentication, Reporting, and Conformance (DMARC) -This method will check for both SPF and DKIM alignment. For SPF alignment, it compares the ‘From’ address with the ‘Mail From’ field. For DKIM alignment, it compares the domain in the ‘d’ tag with the ‘Mail From’ field. Remember that DMARC is not enabled by default for .onmicrosoft domains.
As of now, we are clear with the required methods to prevent your domain from getting spoofed. However, many organizations prefer DKIM as it encrypts emails with a digital signature and retains domain reputation against intra-organizational & cross-domain spoofing. Thus, let us delve deep into DKIM and its configuration methods.
Microsoft 365 Domain Keys Identified Mail (DKIM)
DKIM authentication method is used to validate outbound email messages through digital signatures. Once the DKIM configuration is successful, a digital signature is added to the message header. Later, the receiving server verifies the signature to authenticate the sender’s domain.
This cryptographic authentication method uses a private key to encrypt the header and body content of the outbound email. Then, the receiving servers use a public key established in the domains’ DNS records for decrypting the header and body content of email messages.
Although Microsoft provides DKIM setup for all Microsoft (.onmicrosoft.com) and custom domains by default, sometimes DKIM must be enabled and handled by respective organizations to take control of your email authentication when you have multiple custom domains.
License Requirements for Microsoft 365 DKIM Configuration
Now easily enable DKIM in your Microsoft 365 with the following add-on licenses.
- Microsoft 365 Defender for Office 365 Plan 1 and Plan 2
- Microsoft 365 Defender
However, these licenses are available by default in basic subscriptions such as Microsoft 365 Business Basic, Microsoft 365 Business Standard, and Microsoft 365 Business Premium.
Why Should DKIM be Enabled for Custom Domains in Microsoft 365?
As discussed earlier, though Microsoft also handles DKIM for custom domains, it has to be enabled manually under certain situations which are listed below.
- When you have one or more custom domains.
- If you are about to set up DMARC.
- If you want to take control of your private key.
- In case, you need to customize CNAME records.
- When you use a third-party domain to send emails.
Thus, these are the various reasons why Microsoft asks organizations to handle DKIM for better validation and reputation among email services.
How to Enable DKIM in Microsoft 365?
Now, enable DKIM in any of the following ways to build a good domain reputation in your Microsoft 365 environment.
Enable DKIM in Microsoft 365 Defender Portal
Are you struggling with how to enable DKIM in your Microsoft 365 space? Drop your worries! Here are our comprehensive steps to enable it in Microsoft 365 Defender portal.
- First and foremost, navigate to the path below to find the DKIM page.
Microsoft 365 Defender 🡢 Email & Collaboration 🡢Policies & rules 🡢Threat policies 🡢Rules 🡢Email authentication settings 🡢DKIM

- Now select the desired domain, and you will see a flyout saying the status is “No DKIM keys saved for this domain” if you are configuring DKIM for the first time.
- Then, select the Create DKIM keys button at the bottom of the page to get the selector records.
- Clicking on the Create DKIM keys button, publishes the CNAME records in a pop-up window.

- Copy the CNAME records and paste them to your domain’s DNS.
- After pasting, now come back to the DKIM page for further settings.
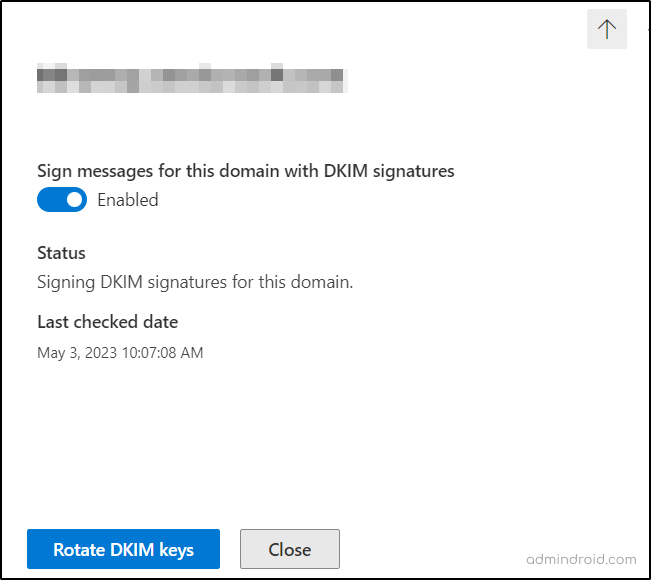
- Now, slide the “Sign messages for this domain with DKIM signatures” toggle bar from the Disabled to Enabled state in the fly-out.
- If you face an error message stating “CNAME record doesn’t exist”, wait for the synchronization to occur for a few hours or otherwise check for any human errors while copy-pasting the records.
- Try to repeat the process patiently without any errors in case the problem persists.
Since we have seen how to enable DKIM in the Defender portal, let us now look at how to configure it using PowerShell manually.
Configure DKIM in Microsoft 365 Using PowerShell
Configuring Microsoft 365 DKIM using PowerShell can be carried out with the following steps.
- Connect to the Exchange Online PowerShell module.
- Most importantly, establish two CNAME records for every additional custom domain you have. Thus, you can easily add DKIM signatures for them.
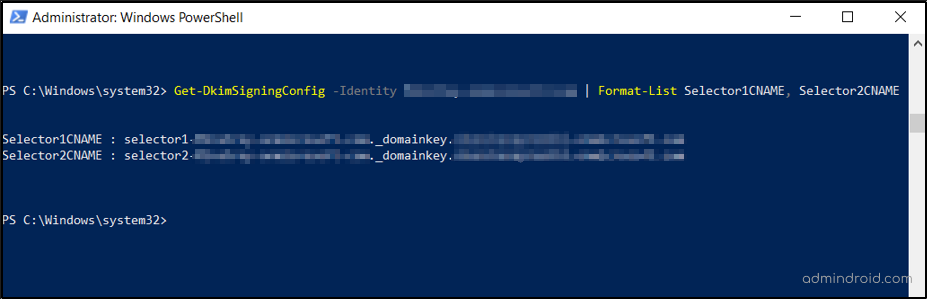
- Usually, DKIM selectors denote the specific location of the public key for the receiving servers to identify the public key location. Thus, create the selector records for additional domains by executing the following cmdlets.
|
1 |
Get-DkimSigningConfig -Identity <domain> | Format-List Selector1CNAME, Selector2CNAME |
Also, note that you should manually enter the DKIM selectors for this case.
- Next, paste the established CNAME records into your domain’s DNS. Although the second record points to an address that does not exist, it is used for seamless DKIM key rotation.
NOTE: If you encounter an error saying “No DKIM keys saved for this domain”, then run the following cmdlet to enable DKIM signing after replacing your domain name in the cmdlet.
|
1 |
Set-DkimSigningConfig -Identity <Domain> -Enabled $true |
DKIM Key Rotation in Microsoft 365
Microsoft 365 DKIM key rotation is the process of creating a new pair of public and private keys to authenticate email messages and secure their domain identity. One must rotate DKIM keys in Microsoft 365 for every six months to prevent them from getting compromised. Let’s see how to rotate DKIM keys in Microsoft 365.
Rotate DKIM Keys in Microsoft 365 Defender Portal:
Navigate to the DKIM page in the Defender portal and rotate DKIM encryption keys by clicking the “Rotate DKIM keys” button.
Rotate DKIM Keys Using PowerShell:
Run the following commands to rotate DKIM key bitness in Microsoft 365 after configuring DKIM.
|
1 |
Rotate-DkimSigningConfig -KeySize 2048 -Identity <DkimSigningConfigIdParameter> |
Verify DKIM Configuration in Microsoft 365
Now you can verify the DKIM configuration by sending email messages from your custom domain to Outlook.com or Hotmail.com. You can also verify DKIM by viewing the message headers in Outlook. But don’t conduct your DKIM verification with aol.com since it skips DKIM validation if the SPF validation is successful.
How to Disable DKIM in Microsoft 365?
If you disable DKIM for a custom domain, it will not be completely disabled. Since Microsoft will use a default policy to create and enable DKIM for that particular custom domain, it will automatically turn the DKIM into an enabled state. Thus, to disable DKIM in your Microsoft 365, one has to disable DKIM on both custom and default domains. So, let us discuss the steps to disable DKIM in Office 365 under this section.
- Disable DKIM in Microsoft 365 Defender portal by navigating through the following path.
Microsoft 365 Defender 🡢 Email & Collaboration 🡢Policies & rules 🡢Threat policies 🡢Rules 🡢Email authentication settings 🡢DKIM
- Select the desired domain from the DKIM page.
- Change the Enabled toggle bar to Disabled for the desired domain.
- To disable DKIM through PowerShell, connect to the Exchange Online PowerShell module.
- Run the code below to disable DKIM by mentioning the domain name.
1$Dkimpolicy = Get-DkimSigningConfig -Identity <Domain>1$Dkimpolicy[0] | Set-DkimSigningConfig -Enabled $false
In conclusion, configure DKIM in your Microsoft 365 environment along with SPF and DMARC for utmost email security in your organization. Utilize the available authentication methods to eliminate the potential risks imposed by spoofing and phishing techniques against your organization.
Monitoring DKIM configuration and its changes is crucial for organizations to prevent domain spoofing and phishing. Above all, it is significant for protecting the organization’s reputation in the business environment. With Microsoft 365 Defender and PowerShell, we can only enable DKIM and rotate keys. But there is no easy way to keenly observe the details like who added new DKIM signatures, when the keys were rotated last, who performed the rotation, and many more in the audit logs or PowerShell.
Discover All Details of DKIM Configuration with AdminDroid!
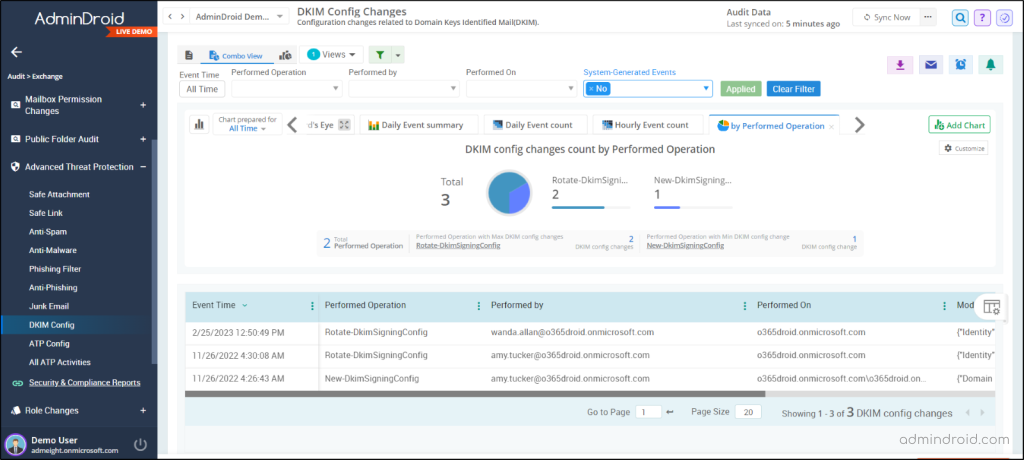
AdminDroid’s Exchange Online Advanced Threat Protection changes reports provides explicit information on DKIM configuration and key rotations. These drill-down reports provide valuable insights regarding the working of DKIM, keys rotation, etc. Therefore, admins can analyze the DKIM configurations and make decisions like creating, enabling, and disabling the DKIM signing policies. Also, they can tighten their email security by adopting SPF, DMARC, and other advanced threat policies available. AdminDroid’s DKIM configuration report includes,
- Daily event summary by performed operation
- Daily event stats
- Hourly event stats
- DKIM configuration changes count
- Performed DKIM operation
- Users who performed DKIM configuration and rotation
- DKIM performed tenant with event time
- Modified Parameters
Apart from the advanced threat protection, the AdminDroid Exchange Online auditing tool provides reports on mailbox activities, mailbox access, mailbox permission changes, mailbox management, etc. Have a 360-degree view of your Exchange Online environment with the AdminDroid Exchange Online management tool comprising 170+ reports on mailbox usage, security permissions, and Exchange settings.
Why is AdminDroid the Ultimate Choice for Email Monitoring?
- AdminDroid offers AI-powered dashboards and detailed reports, especially for email monitoring.
- The tool provides in-depth reports on malware, spam, phishing, and spoofing emails for enhanced email security.
- Above all, AdminDroid is an easy to setup tool with a user-friendly interface to monitor user mail activity, group mail activity, and delegated mailbox activity.
- Set and trigger alerts based on suspicious email activities with the AdminDroid alerting tool.
- Monitor your Office 365 email activities from anywhere by scheduling reports in AdminDroid.
AdminDroid provides 1800+ comprehensive reports and 30+ stunning dashboards on various services such as Azure AD, Microsoft Teams, Exchange Online, SharePoint Online, OneDrive, Yammer, etc., for overall Office 365 management. Also, it possesses breathtaking features like granular delegation, enriched filters, and advanced customization options for efficient administration. On top of this, AdminDroid offers a 15-day trial for admins to have hands-on experience in Microsoft 365 reporting and monitoring.
Download AdminDroid now to have granular control over all events in and around your Microsoft 365 environment.
I hope this blog provides you with a deeper understanding of DKIM email validation and will have made the DKIM enabling procedure easy for you. Along with that, enjoy hassle-free DKIM monitoring with AdminDroid. For any doubts, feel free to reach us through comments.


