Every organization generates tons of digital content, like emails, chats, documents, and more. But what happens when you no longer need old data? Keeping everything forever can clutter your system, increase storage costs, and create compliance risks. At the same time, deleting too much too soon might lead to loss of important business records.
That’s when Microsoft 365 retention policies become essential. They help you decide how long information should be retained and what happens after that, whether it should be deleted automatically or kept for legal or compliance purposes.
In this blog, we’ll break down retention policies in detail and guide you through a clear, step-by-step setup process.
What is a Retention Policy in Microsoft 365?
A retention policy is a set of rules that tells Microsoft 365 how to handle your data over time. Depending on organizational needs, administrators can configure policies with the following actions:
- Retain only: Preserve content indefinitely or for a defined duration.
- Delete only: Permanently remove content after a set period.
- Retain and delete: Preserve content for a period, then automatically delete it.
With retention policies, content stays where it is. The configured actions are applied automatically by Microsoft 365, so administrators don’t have to perform these actions manually.
However, if users modify or delete it, Microsoft 365 quietly stores a protected copy in the following locations:
- SharePoint and OneDrive -> Preservation Hold library
- Exchange -> Recoverable Items folder
- Teams, Viva Engage, Copilot & AI apps -> SubstrateHolds (within the Recoverable Items folder)
Where Can We Apply Retention Policies in Microsoft 365?
Retention policies can be applied across multiple Microsoft 365 services such as:
- Exchange mailboxes
- SharePoint classic and communication sites
- OneDrive accounts
- Microsoft 365 Group mailboxes & sites
- Skype for Business
- Exchange public folders
- Teams channel messages (standard channels and shared channels)
- Teams chats
- Teams private channel messages
- Microsoft Copilot experiences
- Enterprise AI apps
- Other AI apps
- Viva Engage community messages
- Viva Engage user messages
📝 Note: A retention policy can be applied to multiple Microsoft 365 locations, but not all locations can be combined into one single policy. For example, you can apply a single policy to Exchange mailboxes, SharePoint sites, OneDrive accounts, and Microsoft 365 Groups together — but Teams locations (chats and channel messages) can’t be part of the same policy.
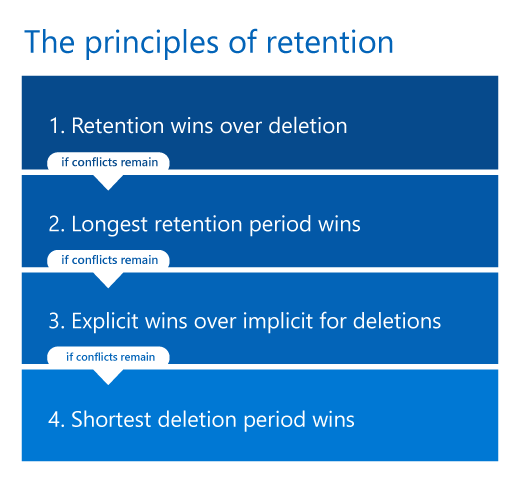
If more than one policy applies to the same location, Microsoft 365 uses its principle of retention to decide which setting takes effect.
- Retention wins over deletion: If one policy says keep emails for 5 years and another says delete after 3 years, the 5-year retention applies.
- Longest retention period wins: If two policies both say retain content, one for 7 years and another for 10 years, the 10-year policy applies.
- Explicit deletion wins over implicit deletion: If one policy explicitly says “Delete items after 2 years,” and another says “Retain for 2 years, then delete,” Microsoft 365 applies the direct delete policy (delete after 2 years).
- Shortest deletion period wins: If two deletion policies apply, one says delete after 3 years and another says delete after 5 years, the 3-year deletion applies.
Note: For scenarios where sensitive content in Exchange mailboxes needs to be deleted immediately, Microsoft Purview offers a Priority Cleanup feature. It can override existing retention policies and labels, allowing organizations to quickly delete content for security, privacy, or compliance reasons.
Retention Policies vs. Retention Labels in Microsoft 365
Organizations often get confused about when to use a retention policy and when to use a retention label, since both manage data lifecycle but at different scopes. To make the distinction clear, here’s a simple breakdown of the difference between retention policies and retention labels in Microsoft 365:
- Retention Policy – Broad rules applied at a container level (mailbox, site, OneDrive, Teams). Example: “Keep all emails for 7 years.”
- Retention Label – More specific rules applied at the item level (individual documents, folders, emails). Example: “Mark this contract as ‘retain for 10 years.’”
License Requirements for Retention Policies
To configure retention policies in Microsoft 365, you generally need:
- Microsoft 365 E5/A5/G5/E3/A3/G3, Business Premium
- Microsoft 365 E5/A5/G5/F5 Compliance and F5 Security & Compliance
- Microsoft 365 E5/A5/F5/G5 Information Protection and Governance
- Office 365 E5/A5/G5/E3/A3/G3
Permissions required: Global administrator/Compliance administrator
For more details on the license requirements and permissions, you can refer to this doc.
How to Configure Retention Policies in Microsoft 365?
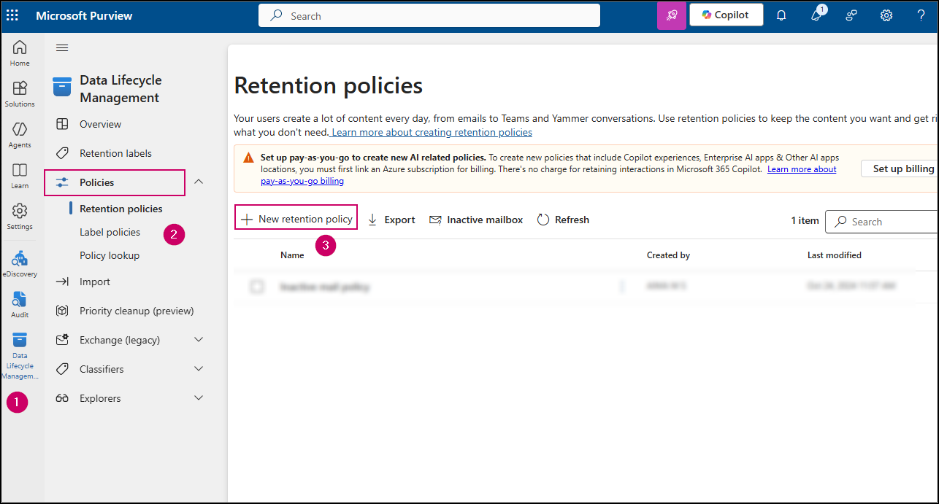
To create and manage retention policies in Microsoft 365,
- Go to the Microsoft Purview portal.
- In the left navigation, click Data Lifecycle Management -> Policies -> Retention policies.
- Click + New retention policy to create a new policy.
Note: If you plan to create retention policies that include Copilot experiences, Enterprise AI apps, or other AI-related policies, Microsoft 365 requires a pay-as-you-go Azure subscription for billing. There’s no charge for retaining standard Microsoft 365 data.
- Provide a name and description for the policy.
- Add administrative units if needed. When retention policies are applied to administrative units, the policy scope is limited only to the users, groups, or resources inside that unit.
- Now choose the type of retention policy based on your requirements.
- Adaptive Policy Scope: An adaptive retention policy applies automatically based on properties, such as a user’s department, role, or location. For example, you can set a policy that covers all employees in the HR department without selecting them individually.
- Static Policy Scope: A static retention policy, on the other hand, requires you to manually choose the users, groups, or sites where it should apply. For example, you might create a policy just for five specific users or one SharePoint site.
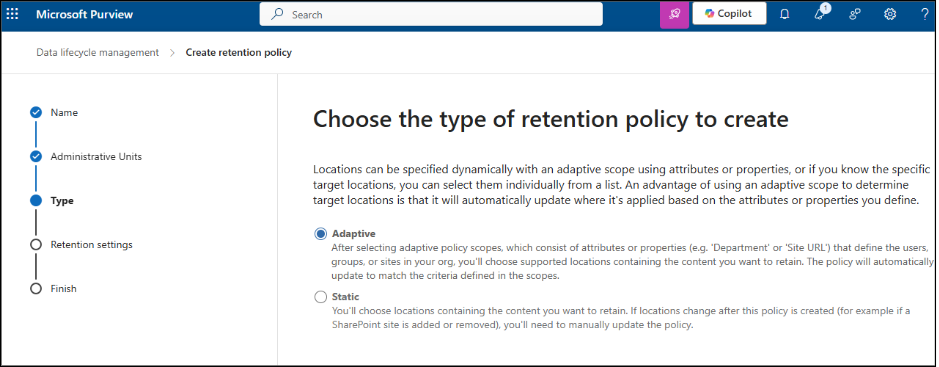
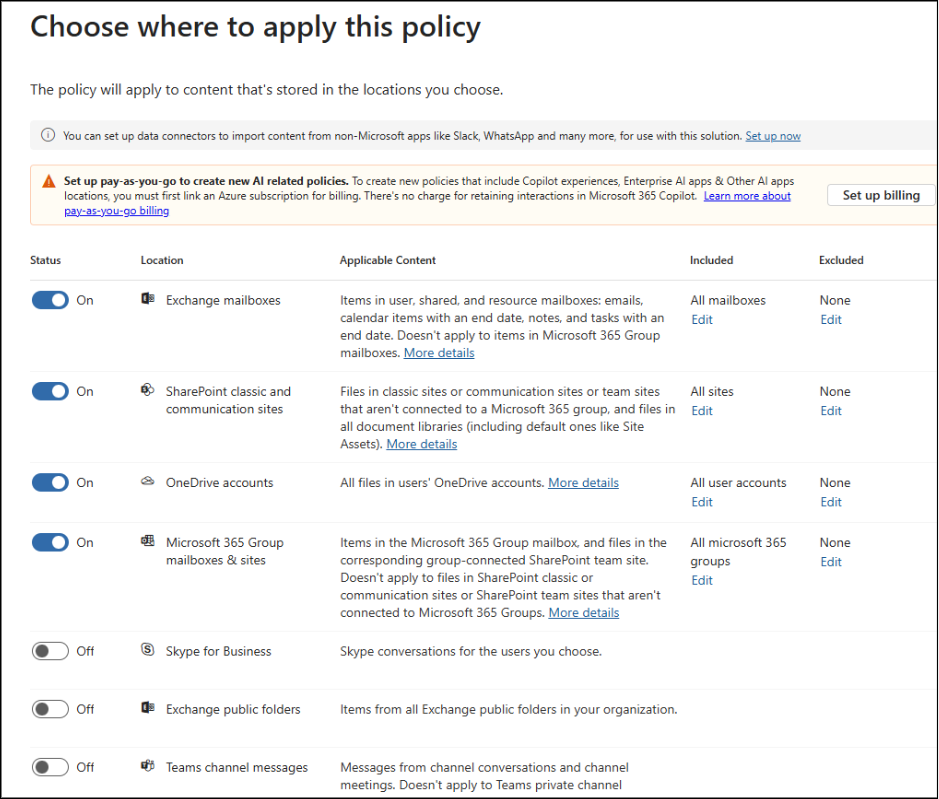
- Based on your choice, add adaptive policy scopes or static locations in the next step. In this example, I’ve chosen the Static option. On the Choose where to apply this policy page, select the required locations.
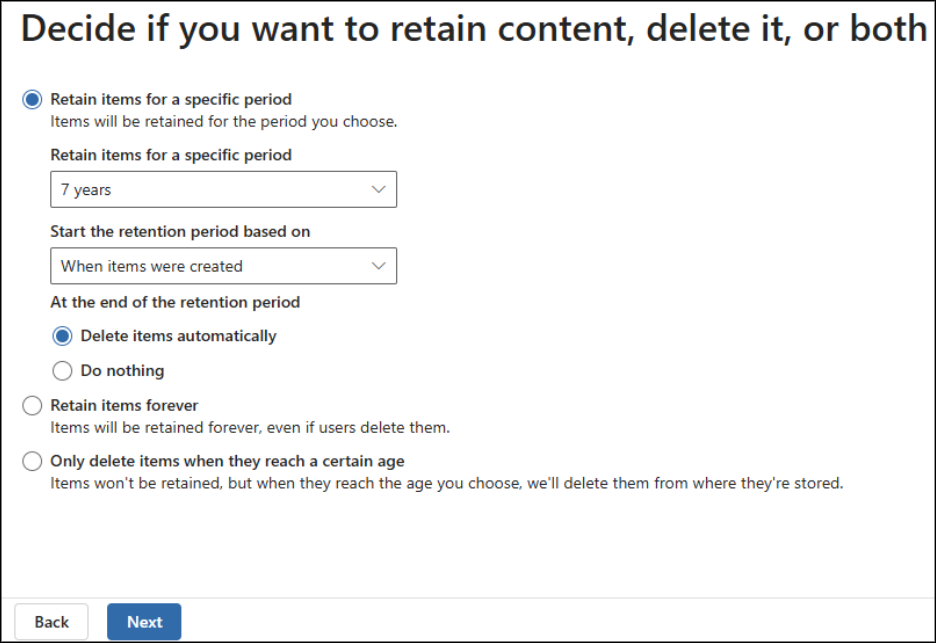
- This is the stage where you decide what happens to your content. Choose whether you want to retain the content, delete it, or do both by selecting from the available options.
- Review the configurations and click Submit.
That’s it! You now know how to create Microsoft 365 retention policies.
Common FAQs on Microsoft 365 Retention Policies
1. How long does it take for retention policies to take effect?
Usually, within 1 day, but it can take up to 7 days to fully apply across services.
2. How to check if a retention policy is applied in Outlook/Exchange Online?
To get mailboxes with retention policy in Exchange Online, Go to Outlook settings > Mail > Retention policies or check with PowerShell cmdlets.
3. What if I delete something under retention? Can I recover it?
Yes, data is preserved for the retention period—even if the user deletes it.
4. What’s the difference between archive and retention policy in Exchange Online?
- Archive Policy – Moves emails to an archive mailbox.
- Retention Policy – Controls whether emails are kept or deleted.
5. Can I update a retention policy later?
Yes, you can update a Microsoft 365 retention policy at any time in Purview by selecting the Edit option.
Retention policies in Microsoft 365 aren’t just about deleting old content—they help your organization stay compliant, maintain control over data, and protect valuable business information, even in inactive mailboxes.
We hope this blog gave you a clear understanding of retention policies and how to configure them. Thanks for reading! If you have questions, feel free to drop them in the comments.


