As cyber threats rise, it’s becoming harder than ever to trust the emails we receive, right? So, Microsoft gave us several built-in security features such as SPF, DKIM, and DMARC protocols to prevent phishing and email spam, but still, some malicious emails manage to slip through the cracks! 🫤
Therefore, to add additional security, Microsoft introduced external email tagging in Exchange Online to let users give extra priority to external senders and monitor their email messages closely. But external email tagging led to false positives, user confusion, and limited customizability, making it an unreliable way to manage email security.
So, going one step ahead, Microsoft brought in the concept of a ‘first contact safety tip’ in anti-phishing policies to improve email security and educate users about potential email-based threats. Therefore, let’s get deep into what the first contact safety tip in anti-phishing policies is and how it defends users from suspicious email messages in this blog!
What is First Contact Safety Tip in Anti-phishing Policies?
Before delving into the reasons behind enabling first contact safety tips, let’s first look at what these safety tips are.
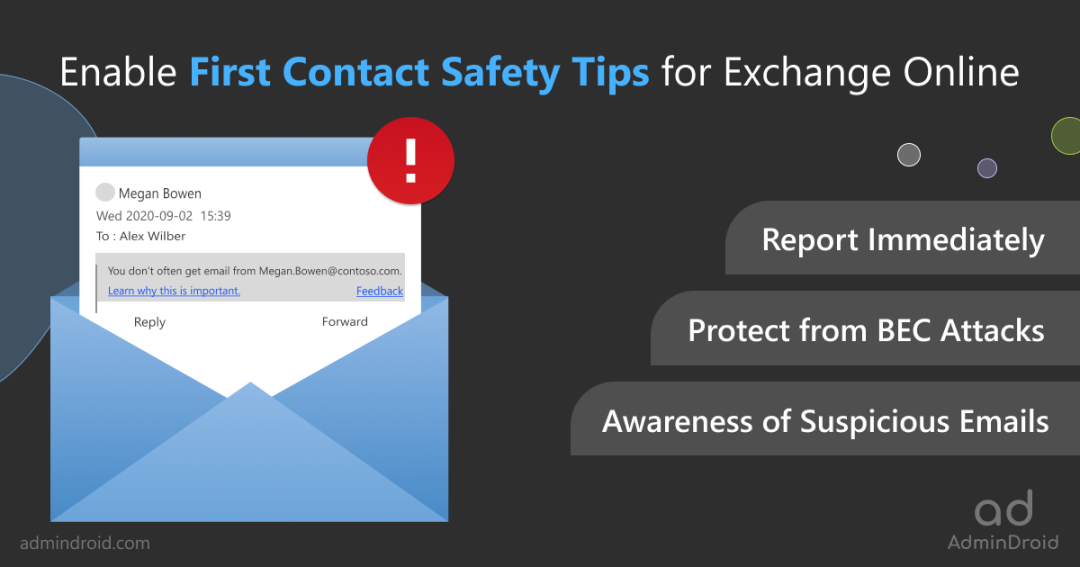
The ‘first contact safety tip’ is a feature in Office 365 anti-phishing policies that warn users to be cautious when interacting with emails from users they don’t usually receive messages from or external senders.
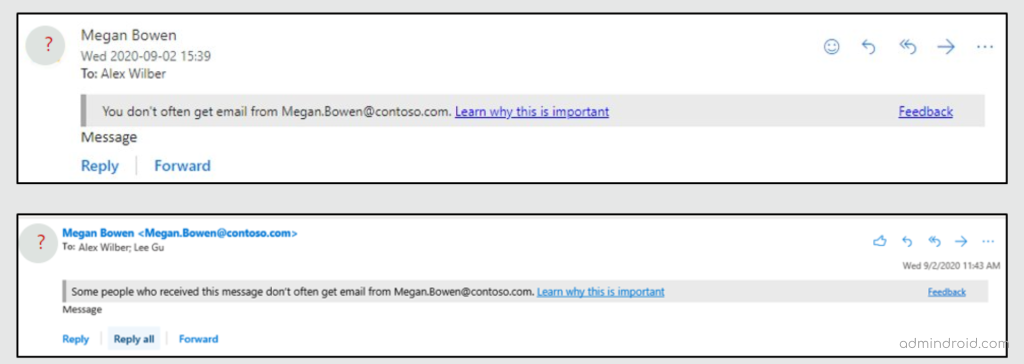
Basically, this safety tip will be displayed in two cases:
- First, when you receive an email from a sender for the first time.
- Second, when you receive an email from a sender you don’t often hear from.
These alert notifications serve as a fast-warning reminding users not to fall for any phishing scams! Usually, it will display the sender’s full email address to help you verify their identity at a glance, along with a link to the Microsoft support page.
Why Should Admins Enable First Contact Safety Tip for Outlook?
Until now, we have learned about what these first contact safety tips are, but where exactly do these tips come in handy? Despite looking simple, these tips offer a lot of benefits. Let’s see how these safety messages helps users further.
Several use cases of the ‘first contact safety tip’ in anti-phishing policies help Office 365 users are:
- Awareness of suspicious emails: This will help to identify potential suspicious emails from any unknown or external senders and raise awareness of the risks associated with such email messages.
- Report immediately: On noticing any doubtful senders, users can report those suspicious emails directly and defend against potential security threats.
- Protect from BEC attacks: Executives in organizations not only hold great power but also become prime targets of every attack, and one such attack they fall is for Business Email Compromise (BEC) attack. This attack targets higher-level business executives within an organization. Now, with the first contact safety tip enabled in your organization, you can provide additional protection against BEC attacks for executives by flagging emails from impersonated senders.
Overall, with this cutting-edge First Contact Safety Tip feature, your organization can not only enhance its security posture but also reduce the risk of compromise; while raising user awareness of email-based attacks.
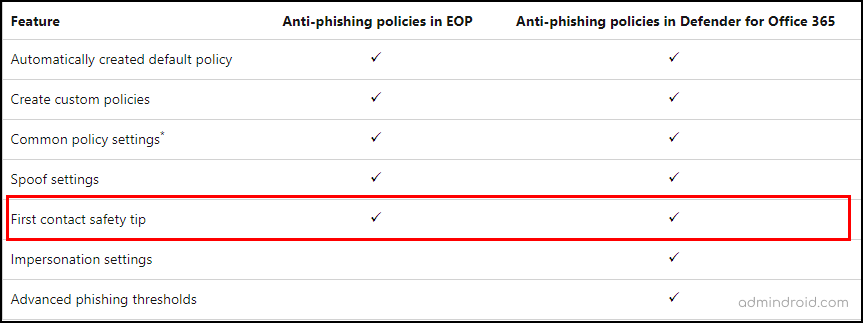
☑ Moreover, all Business license users have access to anti-phishing policies through Exchange Online Protection, which comes with first contact safety tips.
So, are you still having second thoughts? If you want to keep your organization safe from cybercriminals and take your email security to the next level, it’s time to enable first-contact safety tips!
How to Enable First Contact Safety Tip in Microsoft 365 Defender Portal?
As we have seen many reasons for enabling these tips, let’s move on to exploring ways to enable first contact safety tips. Usually, there are two ways to turn on first contact safety tips in anti-phishing policies. Firstly, navigate to the below path and start creating a new anti-phishing policy.
Microsoft 365 Defender Portal → Email & Collaboration → Policies & rules → Threat policies → Anti-phishing (Under ‘Policies’ section)
- So, as we get into the anti-phishing page, click on the ‘+’ icon and start to create a new policy.
- Then, give an appropriate name and description for the policy.
- Next, add the required users, groups, and related domains for the custom policy.
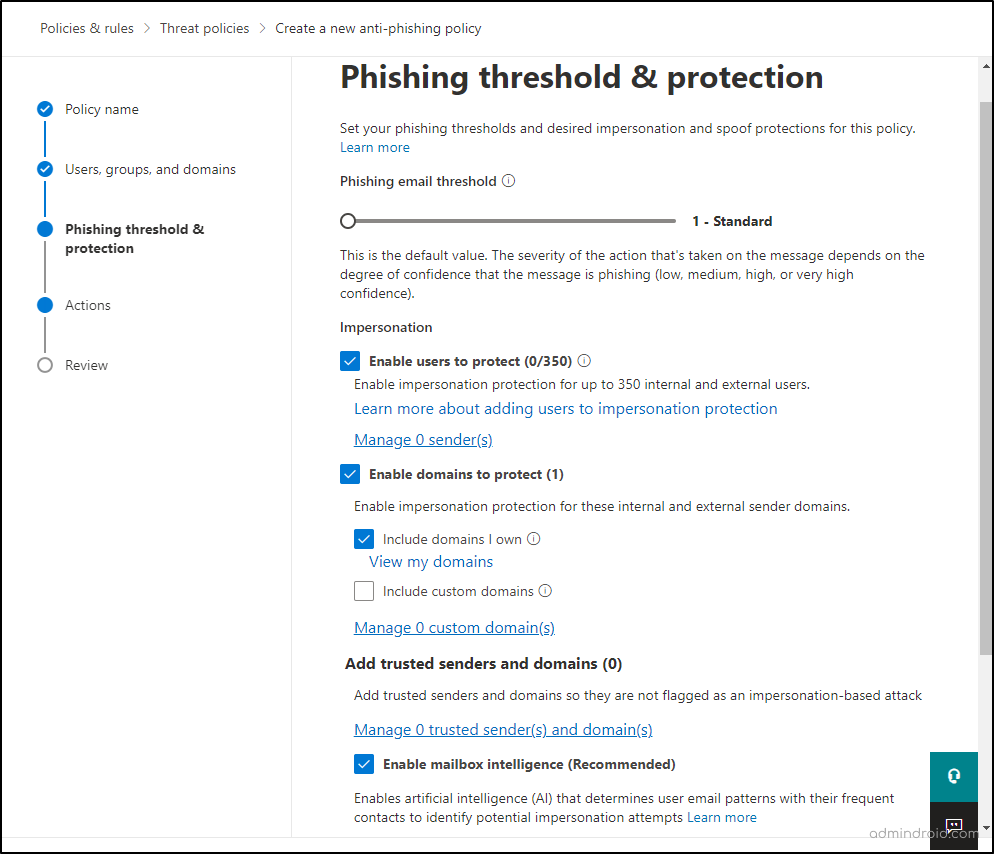
- Completing all these will take you to the ‘Phishing threshold & protection’ settings page. This page consists of Impersonation and spoof settings.
Impersonation Settings in Anti-phishing policies– Imagine you receive an email from a company whose domain name looks legitimate, but when you look closer, you see that it is slightly different, i.e., contosso.com instead of contoso.com. This is how email impersonation looks!
So, to protect from such impersonation, you can configure the impersonation settings that are only available in the Microsoft 365 Defender portal. With these settings,
- You can prevent specified internal/external email addresses from being impersonated as message senders.
- You can prevent the specified domains from being impersonated in the message sender’s domain.
You can configure the ‘impersonation and spoof settings’ on this page as per your requirement and proceed further!
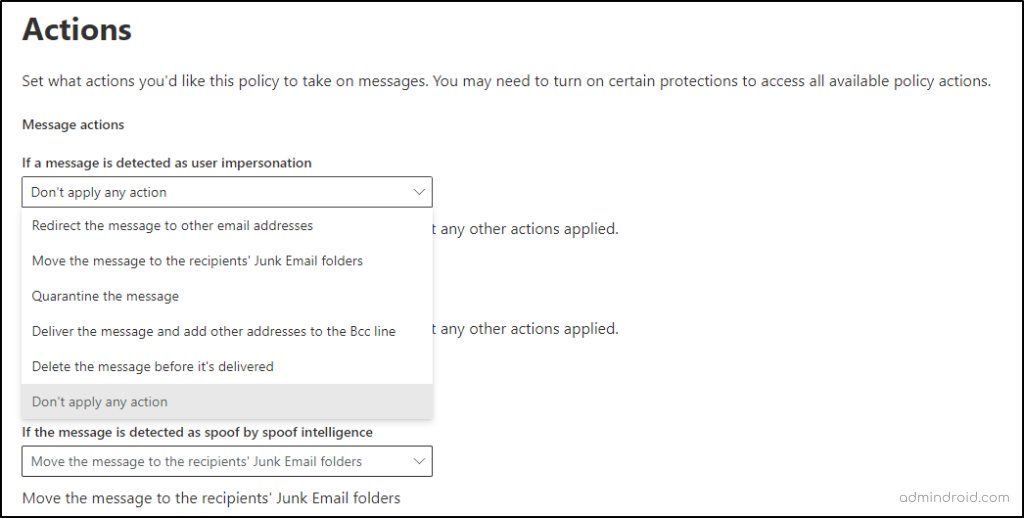
5. Upon completing these steps, you will be taken to the ‘Actions’ page. In this section, you can configure what actions you would like the policy to take on messages.
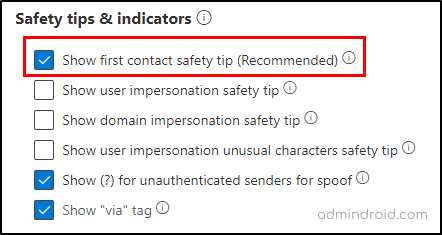
6. We’re not stopping here! Furthermore, you can alert users with ‘safety tips & indicators’ whenever a suspicious situation occurs within the environment. And here is where the first contact safety tip comes in!
➤ It is highly recommended to enable first contact safety tips as it helps in safeguarding your organization from potential impersonation attacks and enhances protection.
7. Finally, after turning on the safety tips, proceed to review and create the anti-phish policy.
Enable First Contact Safety Tips Using Mail Flow Rule
Among the two, enabling first contact safety tips using the mail flow rule was the initial approach. This rule added the X-MS-Exchange-EnableFirstContactSafetyTip X-header to external messages.
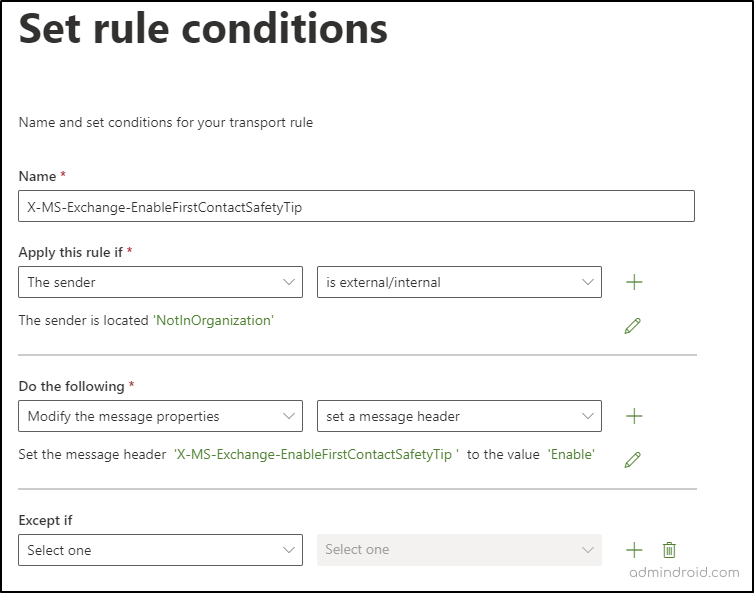
This X-header will be added to all incoming external emails and will trigger the Defender portal to generate a safety tip if it detects that the sender has not previously communicated with the recipient. When this rule is reflected, all incoming external email messages will display the below safety tip.

Enable First Contact Safety Tip Using PowerShell
Another way to create anti-phishing policies is PowerShell. You can use the New-AntiPhishPolicy and New-AntiPhishRule cmdlets to create the policies. But we won’t go there now! Let’s look at something at another serious case here.
As a matter of fact, the default Office 365 anti-phishing policy does not have first contact safety tips enabled by default! Seems like a serious outbreak in waiting, right? ⚠️Therefore, to add an additional layer of enhanced security, we’re bringing back the simple checkbox and letting everyone know how important it is.
So, to enable these safety notifications to default anti-phishing policy, you can use the Set-AntiPhishPolicy cmdlet and enable it. Below is a sample cmdlet that modifies the default anti-phishing policy named “Office365 AntiPhish Default”.
|
1 2 3 4 5 6 7 8 |
Set-AntiPhishPolicy -Identity "Office365 AntiPhish Default" -EnableOrganizationDomainsProtection $true -EnableMailboxIntelligenceProtection $true -MailboxIntelligenceProtectionAction Quarantine -EnableSimilarUsersSafetyTips $true -EnableSimilarDomainsSafetyTips $true -EnableUnusualCharactersSafetyTips $true -EnableFirstContactSafetyTips $true |
That’s it, done! This is how you modify the default anti-phishing policy settings in Microsoft 365. In conclusion, phishing attacks continue to be a major threat to individuals and organizations alike. So, having strong defenses in place is even more important than ever, isn’t it? And here, first contact safety tips in Office 365 anti-phishing policies can be a powerful weapon in your arsenal! 💯
Therefore, by using simple yet effective security settings, such as first contact safety tips, and zero-hour auto purge, moderating Office 365 emails, you can take the first step to prevent your organization from falling prey to phishing attacks. So don’t wait until it’s too late – take the time to enable and configure this feature today.


