Imagine your organization just sent thousands of customers an important email campaign. But, much to your horror, all the emails landed straight into the recipient’s spam folders! ⚠️This isn’t the impression you want to leave with your customers, is it? And here is where the outbound spam policy in Office 365 comes to the rescue! 💯
The Outbound Spam Policy in Office 365 is a feature that scans all emails sent from your organization’s domain, protecting recipients from spam and phishing emails.
Hereafter, your organization’s reputation will no longer be negatively affected by spam! So, let’s gear up and learn how to take control of your organization’s email reputation with Office 365’s outbound spam policies.
Outbound Spam Filtering in Exchange Online Protection (EOP)
Similarly, to inbound spam filtering, an equal amount of care should be given to outbound spam. If spam emails exiting your network are not handled properly, there is a high risk of your IPs and domains being blacklisted by your customers.
In a typical scenario, organizations using EXO mailboxes undergo an evaluation of spam and unusual sending activity during the outbound email transmission through EOP. Similarly, standalone organizations without EXO mailboxes also undergo the same evaluation. By default, there is a built-in outbound spam policy in the Microsoft 365 Defender portal.
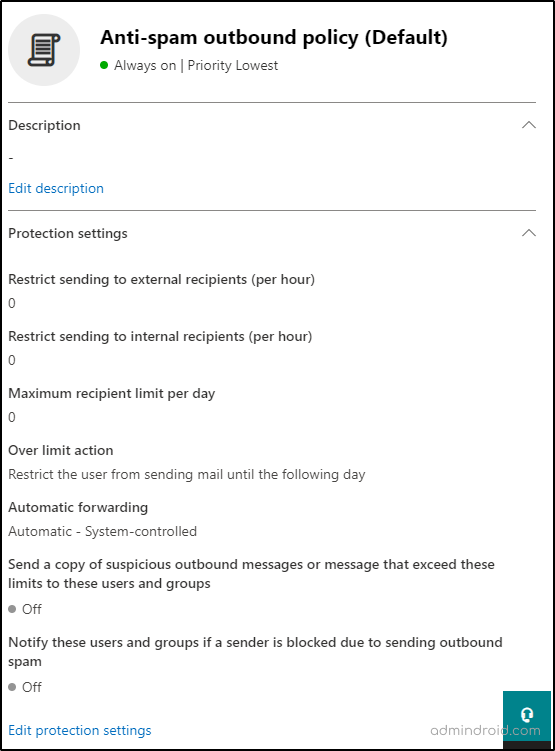
→ Admins can view and modify the default configurations; however, you cannot delete the default outbound spam policy.
→ Regardless of any unique inclusions or exclusions, the default policy applies to all users (senders).
→ In general, if a user exceeds the specified condition, like sending mail to multiple external recipients than permitted, then the policy limits their ability to send mail until the next day.
Administrators can create custom outbound spam policies based on two approaches for greater granularity and stricter restrictions.
Configure Outbound Spam Policy in Microsoft 365 Defender
First, consider looking at Microsoft Secure Score recommended spam protection settings before diving into the steps for configuring outbound spam policies for better email filtering practices.
This outbound spam filtering finely checks for the amount of spam in the email before sending it to the recipients, ensuring that only legitimate emails leave your organization.
It includes various spam-filtering algorithms to identify and block potentially malicious email messages before they reach the recipient’s inbox.
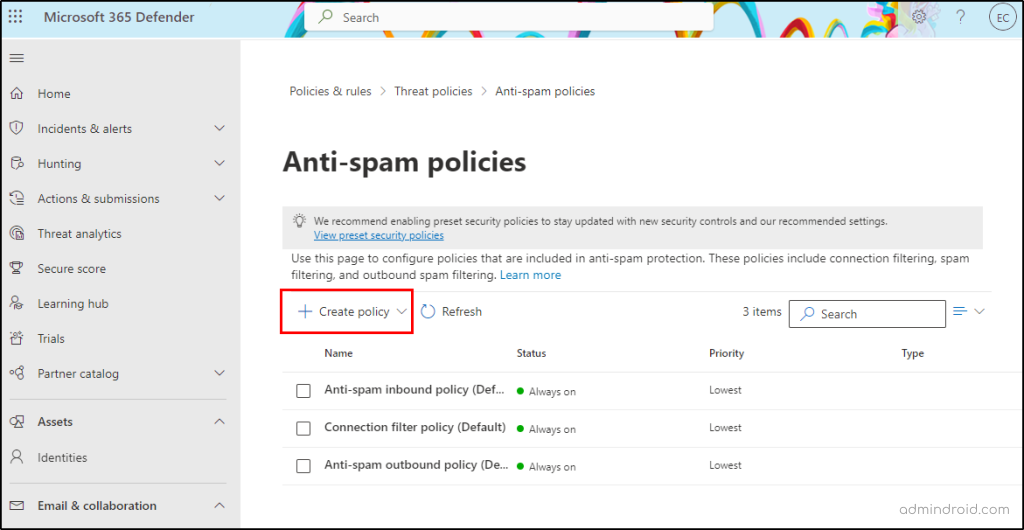
1. Navigate to the path below and click Create Policy, then choose the Outbound filter policy from the drop-down menu.
Microsoft 365 Defender Portal → Email & Collaboration → Policies & Rules → Threat Policies →Policies → Anti-spam
- Next, give an appropriate name and a suitable description for the policy.
- Then, add the required users, groups, and related domains for the custom policy.
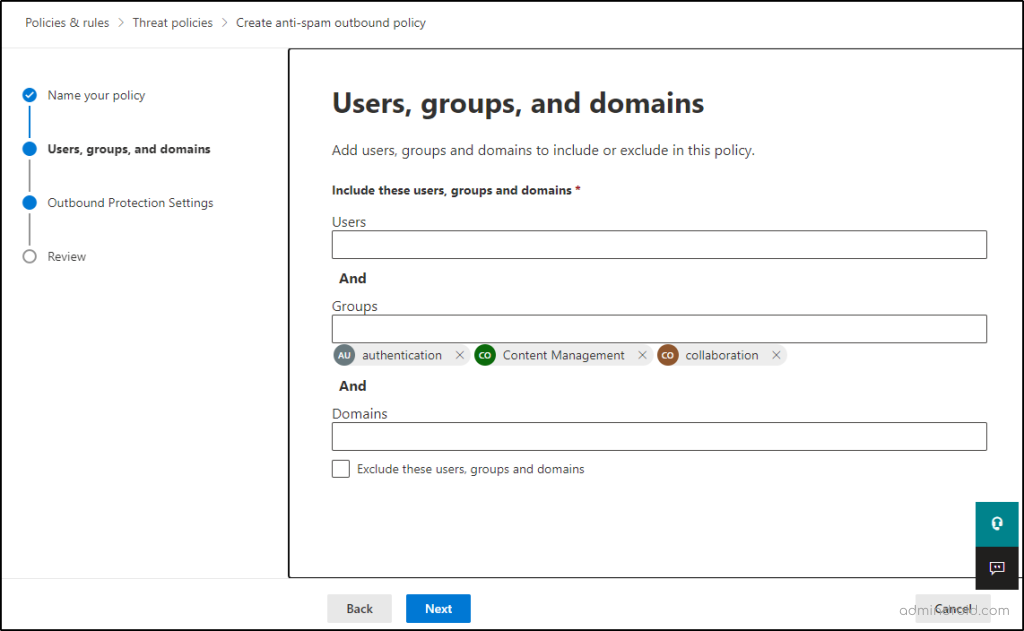
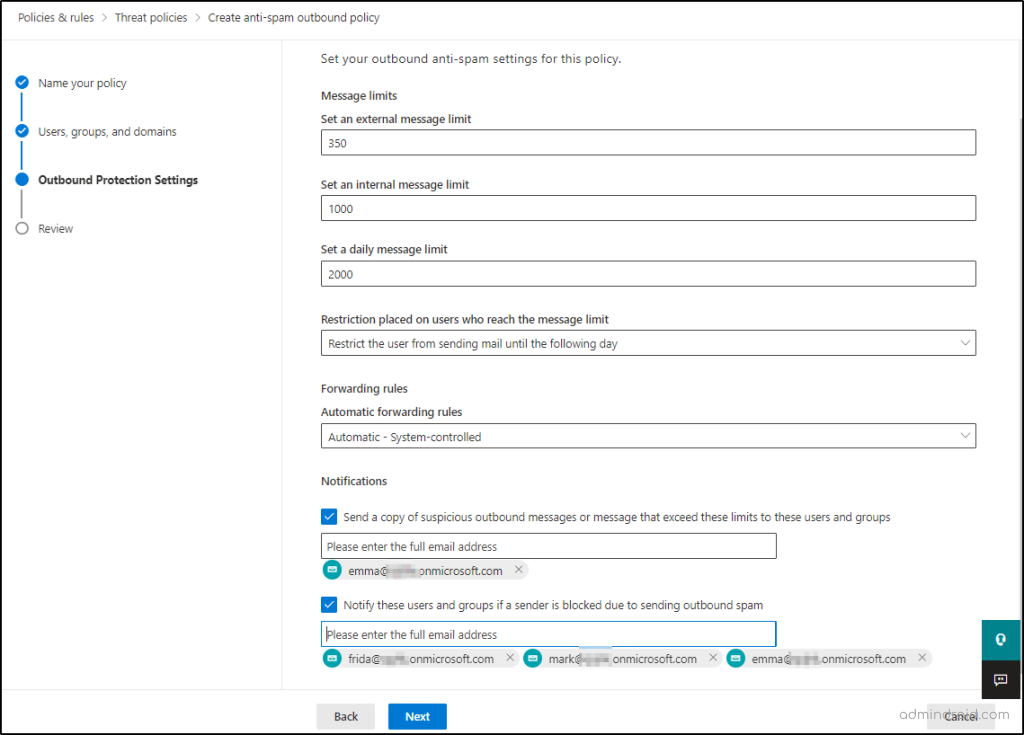
- And here comes the ‘outbound anti-spam settings’ for the policy. There are two main components to the outbound spam policy in EOP.
- The outbound spam filter rule – Admins should specify to whom the policy applies, such as users, groups, and domains.
- The outbound spam filter policy – Define what actions need to be taken and who should be notified.
Note: The ‘Protection Settings’ dialog allows you to create the spam filter rules and the outbound spam filter policy at the same time. However, PowerShell follows a different procedure. (We’ll have to look into it in the PowerShell topic)
Now, let’s have a close look at every protection setting in this tab.
MESSAGE LIMITS:
This section’s configurations determine the limits for outbound email messages from Exchange Online mailboxes.
- Set an external message limit – The maximum number of external recipients per hour.
- Set an internal message limit – The maximum number of internal recipients per hour.
- Set a daily message limit – The maximum total number of recipients per day.
The valid range is 0 to 10000 with a default of 0. And, the most important thing to note is if you give an internal or external message value that exceeds the daily message limit value, it will throw an error. Make sure to give the value in range with the daily message limit!
Note: Microsoft has introduced stricter outbound email limits for external recipients in Exchange Online. Be mindful of these limits when configuring external message thresholds to prevent unexpected delivery restrictions.
DIFFERENT KINDS OF RESTRICTIONS PLACED ON USERS:
- Restrict the users from sending emails until the following day – This is the default value, which means the user cannot send emails until the next day, based on UTC time. Most importantly, admins cannot override this block who reach the message limit.
- Restrict the user from sending emails – Users added to the restricted list in Microsoft 365 Defender will be unable to send emails until manually removed, and a notification will be sent to the specified recipient.
- No action, alert only – Only email notifications are sent to the intended recipient.
FORWARDING RULES:
- Automatic – System – controlled: This will let the outbound spam filtering to control automatic external email forwarding, and this is the default value.
- Off – Forwarding is disabled: Automatic external forwarding is disabled and will result in a non-delivery report (also known as an NDR or bounce message) to the sender.
- On – Forwarding is enabled: Automatic external forwarding is allowed and not restricted.
5. Once you have filled in all the above criteria, you can save the policy by clicking ‘Create’ and review the settings.
Configure Outbound Spam Policy Using PowerShell
As we previously discussed, the outbound spam policy settings consist of two fundamental components: the outbound spam filter rule and the outbound spam filter policy. While the Defender portal integrates these into a single step, the PowerShell procedure is distinct!
- The first step is to create the outbound spam filter policies and then the outbound spam filter rules.
- We will manage the outbound spam filter policies by employing the *-HostedOutboundSpamFilterPolicy cmdlet and manage the outbound spam filter rules through the *-HostedOutboundSpamFilterRule cmdlets.
- When you want to modify an outbound spam setting, you must change both the policy and rule settings separately.
- In addition, an important point to note is that removing the outbound spam filter policy using PowerShell will not remove the corresponding outbound spam filter rule, and vice versa.
As creating a complete outbound spam policy is a dynamic duo of steps. Let’s delve into each one with precision.
1. Create Outbound Spam Filter Policies Using PowerShell:
The outbound spam filter policy outlines the required actions to be executed when the agreed-upon limit is surpassed. You can use one outbound spam filter policy for multiple outbound spam filter rules, but vice versa should not be the case.
Now, the following cmdlet creates a new policy with the specified actions to be taken when the threshold is reached.
|
1 |
New-HostedOutboundSpamFilterPolicy -Name "<FilterPolicyName>" -RecipientLimitInternalPerHour <Value> -RecipientLimitExternalPerHour <Value> -RecipientLimitPerDay <Value> -ActionWhenThresholdReached <ActionToBeTaken> -NotifyOutboundSpamRecipients $true |
2. Create Outbound Spam Filter Rule Using PowerShell:
Admins must specify to whom the policy will apply, such as users, groups, and domains. Now that we’ve created the ‘policy settings’ with the outbound spam filter policy, we will define who will be covered by that policy.
|
1 |
New-HostedOutboundSpamFilterRule -Name "<FilterRuleName>" -HostedOutboundSpamFilterPolicy "<FilterPolicyName>" -FromMemberOf "<GroupName>" -Priority 1 |
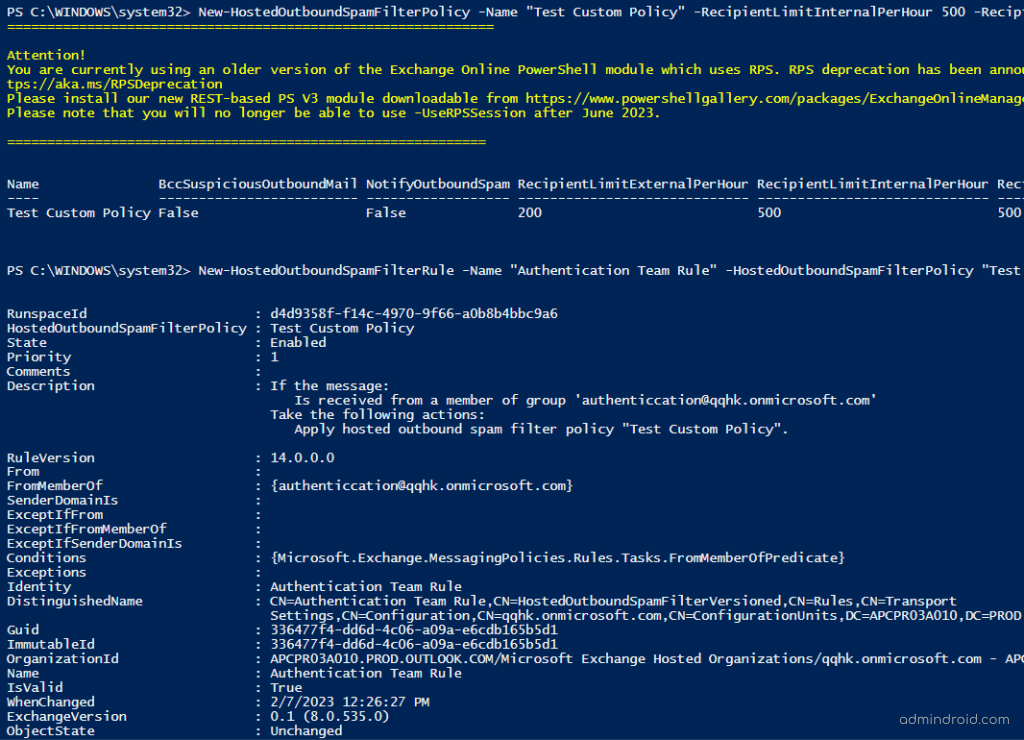
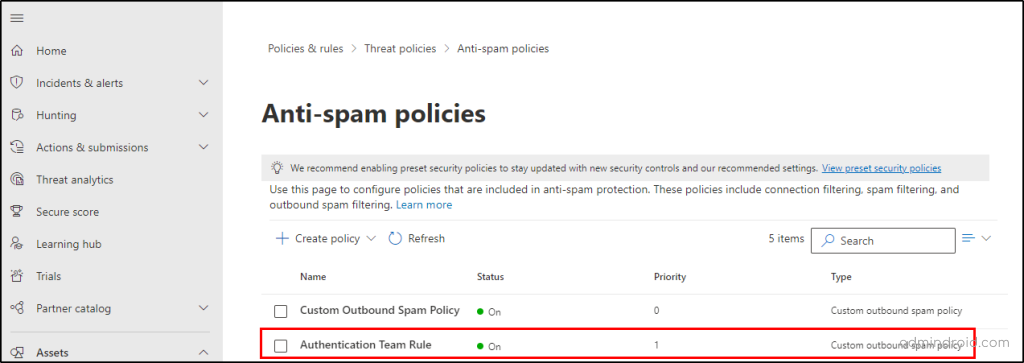
Note: A single outbound spam filter rule cannot be linked to multiple outbound spam filter policies. An outbound spam filter policy will only become visible in the Microsoft 365 Defender portal once an outbound spam filter rule has been assigned to it.
To edit custom outbound spam filter policies and rules, you can use the Set-HostedOutboundSpamFilterPolicy cmdlet and Set-HostedOutboundSpamFilterRule cmdlet.
Remove Outbound Spam Filter Policies and Rules
You have to use separate cmdlets for removing the outbound spam filter policies and rules. However, when you remove a specific outbound spam filter policy, the corresponding outbound spam filter rule will not be removed, and vice versa.
You can use the following cmdlets to remove outbound spam filter policies and rules.
|
1 |
Remove-HostedOutboundSpamFilterPolicy -Identity "<PolicyName>" |
|
1 |
Remove-HostedOutboundSpamFilterRule -Identity "<PolicyName>" |
The above is a simple yet effective method for managing outbound spam and elevating the reputation of your business. Not only does it protect your reputation as a trustworthy and reliable email sender, but it also helps you avoid malicious activities like phishing attacks, malware transmissions, and unwanted spams!
In short, configuring outbound spam filter policies in Office 365 is like having a virtual bouncer for your email system, keeping unwanted and potentially harmful messages at bay! 💂
Also, you don’t have to worry about your email ending up in the spam folder since you’ll be 100% sure that your message will reach the intended recipients.
So why wait? Until then, start using Microsoft 365 Defender’s simple yet effective solutions, such as first contact safety tips, moderating Office 365 emails, and zero-hour auto purges, and safeguard your organization from suspicious malicious attacks.
Make the most of Microsoft 365 best security settings, and elevate your organization’s professional image!


