On Day 28 of Cybersecurity, let’s learn how to restrict Remote PowerShell access for non-admins so that only trusted users can connect to servers and computers as needed for remote management. Stay tuned for more insights in the upcoming Cybersecurity blog series!
By default, running PowerShell cmdlets remotely is enabled by default for administrators and members of the Remote Management Users group. In some cases, non-admins (users) may legitimately need access to Remote PowerShell to perform certain tasks. While this setup isn’t inherently risky, improper use or lack of control can open the door to misuse, creating potential security concerns.
To prevent this, it’s crucial to carefully manage and, where possible, restrict Remote PowerShell access for non-admins. In this blog, we’ll break down what Remote PowerShell is, why restricting access matters, and how you can configure it step-by-step to strengthen your system’s security. Let’s get started!
What is PowerShell Remoting and Why is it Used?
PowerShell Remoting, also known as Remote PowerShell, lets authorized users to run PowerShell commands and scripts on on remote computers directly from their own system. It works through the Windows Remote Management (WinRM) service, which uses the WS-Management protocol to securely communicate between systems over the network. Here are the reasons why PowerShell remoting is used in organizations.
- Centralized Management: IT admins can manage many computers or servers from one place. This means they don’t need to walk up to each machine every time to perform tasks.
- Automation: It helps automate repetitive administrative tasks like installing software, running scripts, or updating settings. This saves time and reduces the chance of manual errors.
- Interactive Sessions: Administrators can start an interactive session on a remote computer and work on it just like you’re logged in directly.
In short, Remote PowerShell helps organizations manage their systems remotely in a secure, scalable, and efficient manner.
Now that you understand how critical PowerShell remoting is in an organization, it’s just as important to block unnecessary access and enable it only when truly needed.
Why IT Administrators Should Restrict Remote PowerShell for Non-admins?
Imagine granting an IT developer remote PowerShell access for server checks. Over time, if that permission is misused either intentionally or through a compromised account with remote PowerShell permissions, attackers could reach critical systems and execute high-privilege commands, such as creating admin accounts or running malicious scripts!
Moreover, giving remote PowerShell access to the wrong person is like handing them a master key to your organization. They can move around freely, steal data, and cause long-term damage. That’s why it’s essential to limit remote PowerShell access to only trusted admin accounts and closely monitor all sessions for make sure every session is monitored for suspicious activity.
How to Restrict Remote PowerShell Access for Non-Admins?
Now, if you want to control who can connect through Remote PowerShell, here are the most effective methods to disable Remote PowerShell access for non-admins:
- Configure Group Policy to enable Remote PowerShell access for admins only
- Block PowerShell access for non-admins with AppLocker
- Restrict Remote PowerShell access for non-admins using PowerShell
- Lock down Remote PowerShell access with Constrained Endpoints
- Give non-admins Just Enough Administration for Remote PowerShell
1. Configure Group Policy to Enable Remote PowerShell Access for Admins Only
As mentioned earlier, administrators and members of the Remote Management Users group have default permissions for PowerShell remote access. However, to strengthen your organization’s security posture, it’s highly recommended to restrict remote PowerShell access exclusively to administrators.
This helps minimize the attack surface and prevent unauthorized users from executing remote commands. You can enforce this restriction efficiently through a Group Policy Object (GPO).
Before you begin, make sure you have Domain Admin rights and that the Group Policy Management Console (GPMC) is installed.
- Create a Windows Remote Management policy
- Enable remote Windows PowerShell access for admins only
- Configure the WinRM service to start automatically
- Configure Firewall rules for WinRM service
1. 1: Create a Windows Remote Management Policy
To get started, WinRM must be enabled for PowerShell Remoting to work across the domain. Without it, remote commands will fail, and admins may face connection errors. To create the policy, follow the steps below:
- Open Group Policy Management from the Start menu or run gpmc.msc from the Run dialog box.
- In the console, right-click your root domain, select Create a GPO in this domain, and Link it here….
- Now, provide a suitable name for the GPO like PowerShell Remoting. Then, right-click the created policy and select Edit.
- In the Group Policy Management Editor wizard, navigate to.
Computer Configuration → Policies → Administrative Templates → Windows Components → Windows Remote Management (WinRM) → WinRM Service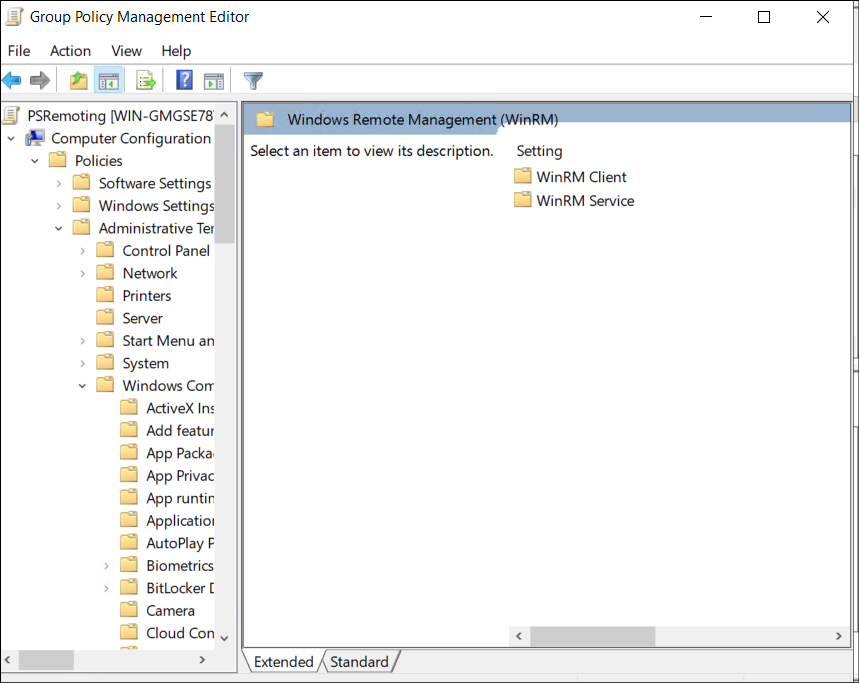
- Next, double-click Allow remote server management through WinRM and select Enabled. This setting allows Windows Remote Management (WinRM) to accept remote connections for PowerShell sessions.
- Under the IPv4 filter, enter * (an asterisk) to allow connections from all IP addresses (or specify trusted IPs for stricter access), and click OK.
Tip: To enhance security, restrict WinRM access to specific IPs, for example, admin workstations, instead of using the wildcard *.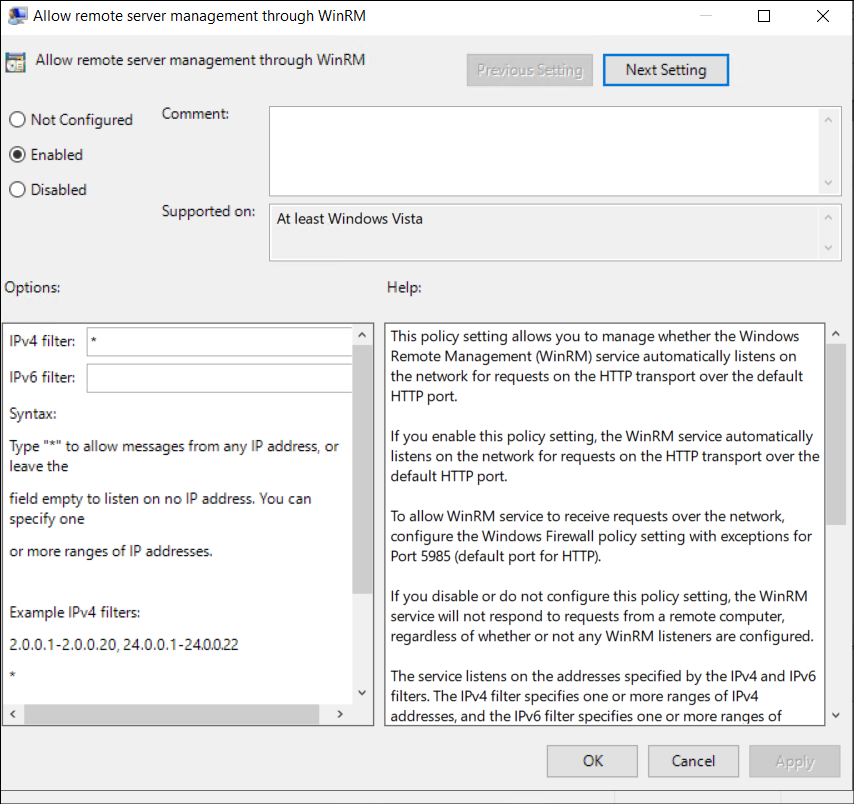
1. 2: Enable Windows PowerShell Access for Admins Only
Next, configure the policy so only trusted admins can run PowerShell commands. To set this up, follow the steps below.
- In the Group Policy Management wizard, right-click the policy you created earlier, select Edit and follow the navigation given below.
Computer Configuration → Policies → Windows settings → Security settings → Restricted Groups - Right-click the window → select Add Group → select Browse → type Domain Admins → Check Names → OK.
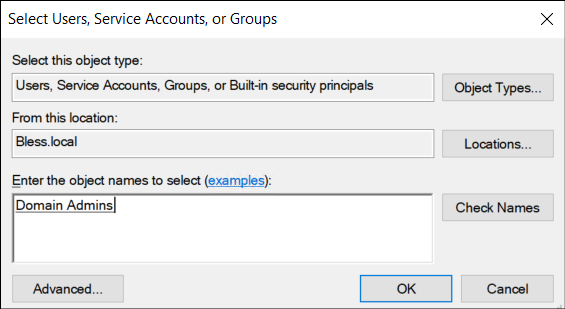
This configuration ensures that only only Domain Admins (or other specified admin groups) can connect remotely through PowerShell.
1. 3: Configure the WinRM Service to Start Automatically
After enabling PowerShell access for admins, configure the WinRM service to start automatically to keep PowerShell Remoting available even after reboot. This ensures that PowerShell Remoting remains available for administrative tasks even after a system reboot.
Important: ⚠️ If WinRM is stopped or set to manual, remote PowerShell connections may fail, disrupting automation and admin access.
Follow the steps below to configure the WinRM service to start automatically.
- Right-click the policy you created, select Edit, and follow the navigation path below:
Computer Configuration → Preferences → Control Panel Settings → Services - Right-click in the Services window and select New → Service.
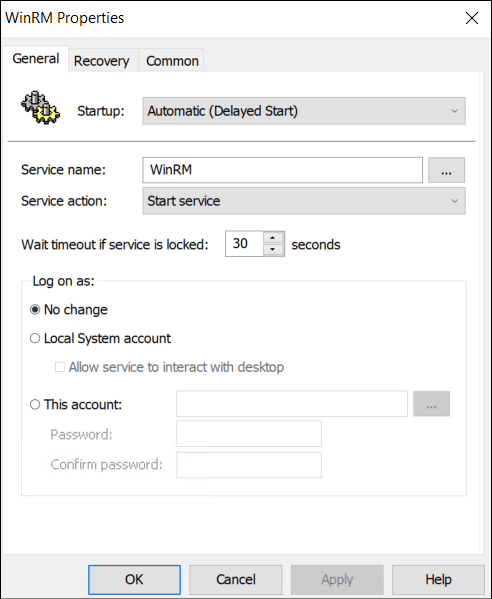
- Set:
- Startup: Automatic (Delayed Start)
- Service Name: WinRM
- Service Action: Start Service
- Finally, click OK to apply the changes.
1. 4: Configure Firewall Rules for WinRM Service
To add an additional layer of protection, it’s recommended to configure Windows Firewall rules for the WinRM service. This ensures only secure profiles (like Domain or Private) allow Remote PowerShell, while blocking access from public networks.
- Right-click the policy you created, select Edit, and navigate to:
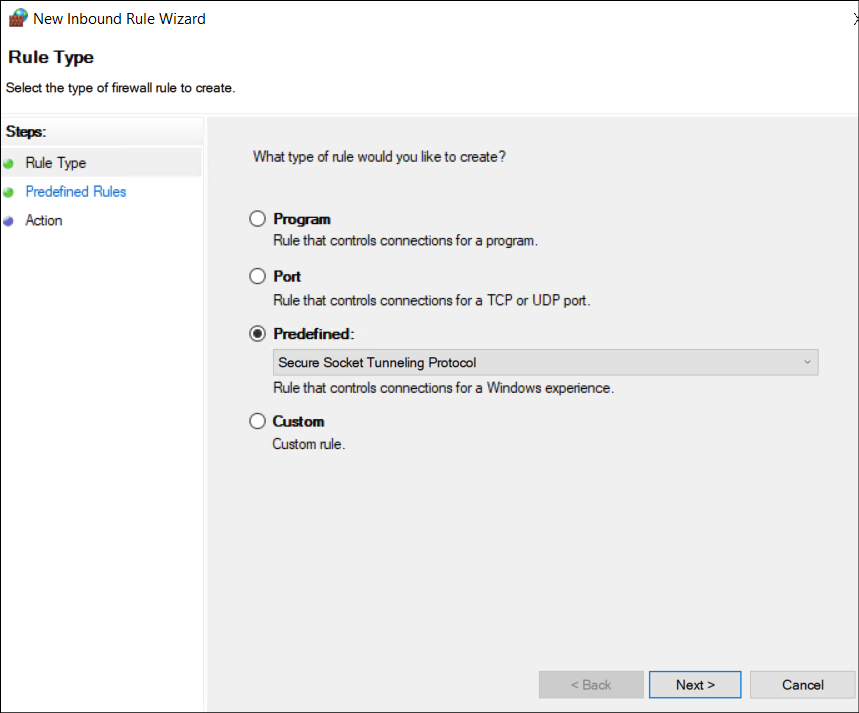
Computer Configuration → Policies → Windows Settings → Security Settings → Windows Defender Firewall with Advanced Security - Right-click on Inbound Rules in the LHS tree, then click New Rule.
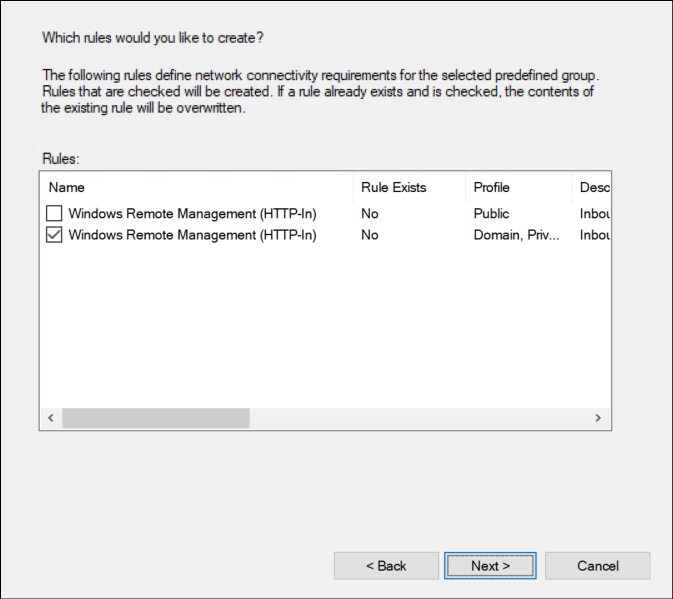
- Select Predefined, and from the dropdown list, choose Windows Remote Management. Click Next.
- Uncheck the Windows Remote Management (HTTP-In) box for the Public profile to prevent remote PowerShell connections over unsecured networks. Then click Next.
- Select Allow the connection, and then click Finish.
Finally, run the command below on the target systems to apply the policy immediately: gpupdate /force. This GPO setup ensures that only administrators can initiate PowerShell Remoting sessions, while non-admins are fully restricted.
2. Block PowerShell Access for Non-Admins with AppLocker
This method prevents standard (non-administrator) users from launching PowerShell.exe or pwsh.exe on their systems. But it still allows administrators to use it for management and automation tasks. Follow the steps below to restrict the entire PowerShell app for non-admin users.
Earlier, we restricted Remote PowerShell access. However, what if a user runs a malicious script locally on their own system through PowerShell? To strengthen endpoint security, you can also block the PowerShell application entirely for non-admin users. This ensures that unauthorized users can’t open PowerShell or execute commands locally.
AppLocker is the recommended way to enforce this restriction, as it provides granular control over which apps users can run, based on publisher, file path, or file hash. While Software Restriction Policies can also be used, AppLocker offers better flexibility and precision (though slightly more complex to configure).
Follow these steps to set up AppLocker and block PowerShell for non-admin users.
- Open the Group Policy Management Console and right-click your domain.
- Select Create a GPO in this domain, and Link it here….
- Provide a descriptive name for the GPO. For example: Block PowerShell app for non-admins.
- Now, right-click the policy created and select Edit and navigate to the following path.
Computer Configuration → Policies → Windows Settings → Security Settings. - Expand Application Control Policies and click AppLocker.
- Under Overview, click Executable Rules.
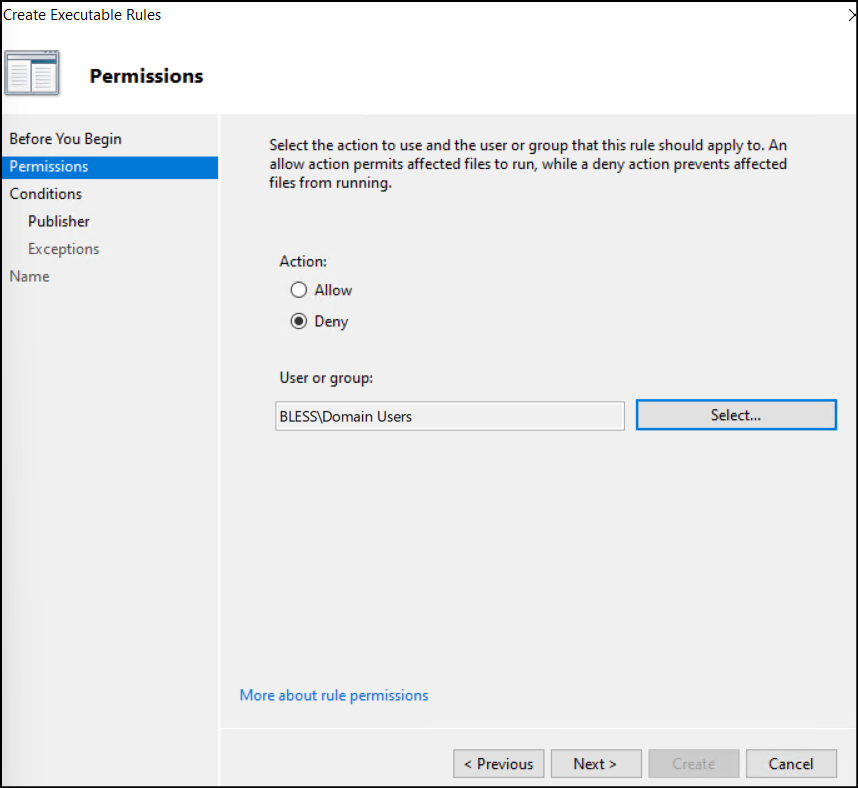
- Now, we can create an executable rule by right-clicking somewhere in the window and choose Create New Rule.
- In the Before You Begin screen, click Next.
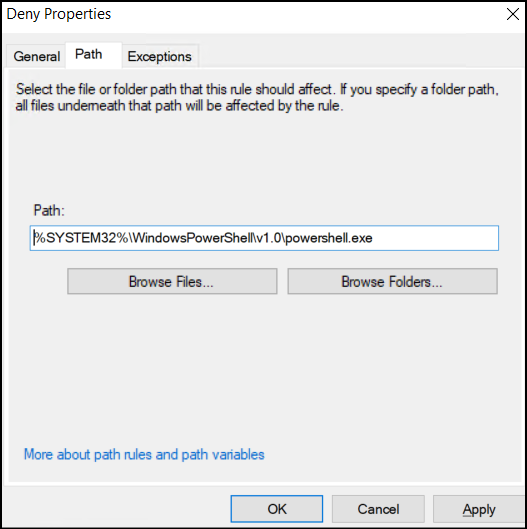
- On the Permissions page, select Deny.
- Click Select next to User or group, type Domain Users, and click Check Names → OK → Next. This target all the non-admin users.
- In the Conditions window, choose Path and click Next.
- In the Path field, enter the PowerShell.exe path or browse for the files given below. This adds both 32-bit and 64-bit PowerShell application to be denied access to the users.
12%SystemRoot%\System32\WindowsPowerShell\v1.0\powershell.exe%SystemRoot%\SysWOW64\WindowsPowerShell\v1.0\powershell.exe
- Optionally, block PowerShell 7 (PowerShell Core) by adding in the Path field. Then, click Next → Create.
1C:\Program Files\PowerShell\*\pwsh.exe
- To allow administrators to use PowerShell, create a separate rule with Allow permissions for the Administrators group.
- Finally, open Command Prompt and run gpupdate /force to apply the policy. You can also verify the AppLocker rules with the below cmdlet.
1Get-AppLockerPolicy -Effective -Xml
Result: This ensures that all non-admin users will be blocked from launching PowerShell.exe or pwsh.exe, while administrators retain full access. Also, this prevents misuse of PowerShell for unauthorized scripts or attacks.
3. Restrict Remote PowerShell Access for Non-Admins Using PowerShell
The previous methods used Group Policy Objects (GPOs), which can be more complex to set up. Alternatively, you can quickly restrict Remote PowerShell access for non-admin users directly using PowerShell commands.
- Open PowerShell and run as administrator.
- Once connected, first you need to check which users currently have access to PowerShell Remoting by running the following cmdlet:
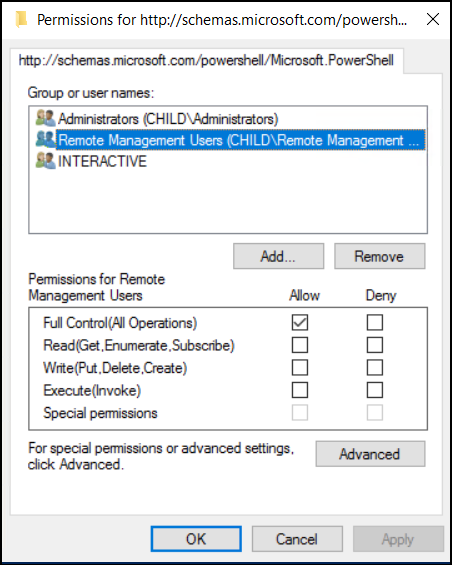
In the output, you may notice that the Microsoft.PowerShell session configuration allows access to the BUILTIN\Remote Management Users group. This means members of that group, including non-admins, can start a remote PowerShell session.1Get-PSSessionConfiguration | Select-Object Name, Permission

- Now, in order to block access to remote PowerShell for the users, execute the following Set-PSSessionConfiguration cmdlet.
1Set-PSSessionConfiguration -Name Microsoft.PowerShell -ShowSecurityDescriptorUI
- This opens a permissions window showing all users and groups allowed to connect through PowerShell Remoting.
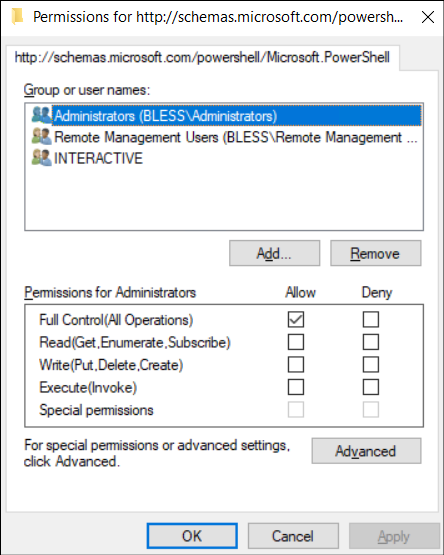
- From there, select Domain Users or Remote Management Users, click Remove. This ensures that only administrators remain enabled for PowerShell remoting. Click OK to apply the changes.
- Finally, apply and restart the WinRM service: Restart-Service WinRM
Once done, only administrators will be able to connect remotely using PowerShell, effectively blocking remoting access for non-admin users.
3.1: Disable Remote PowerShell Access for All Users
The previous section used the Set-PSSessionConfiguration cmdlet to restrict remote access for specific endpoints. However, in some cases, if you want to completely turn off PowerShell Remoting for everyone (including admins), run:
|
1 |
Disable-PSRemoting |
This stops the WinRM service and removes related firewall exceptions, disabling all remote PowerShell endpoints.
Note: Local (loopback) remoting on the same system remains available even after disabling remote access.
To re-enable it later, use:
|
1 |
Enable-PSRemoting -Force |
4. Lock Down Remote PowerShell Access with Constrained Endpoints
Constrained endpoints in PowerShell provide a robust method for securing remote access by restricting the actions that non-admin users can perform. You can restrict available cmdlets, functions, and modules so that users can perform only specific, approved tasks. This is achieved by creating a custom session configuration that defines these restrictions. Here’s how to configure a constrained endpoint using PowerShell:
- Create a Session Configuration File: Use the following command to define which commands, functions, and modules should be accessible in the restricted session.
1New-PSSessionConfigurationFile -Path C:\SessionConfigs\RestrictedAdmin.pssc -LanguageMode RestrictedLanguage -VisibleCmdlets @('Get-Service', 'Stop-Service') -VisibleFunctions @('Get-ProcessInfo') -VisibleModules @('Microsoft.PowerShell.Management')
- Register the Configuration File: Register the .pssc file as a new PowerShell session configuration (endpoint).
1Set-PSSessionConfiguration -Name "RestrictedAdminEndpoint" -ShowSecurityDescriptorUI
- Configure Permissions: Set which users or groups can access this endpoint. This will open a GUI where you can allow or deny access to specific users or groups. Once connected, those users will only have access to the limited commands defined in the configuration file.
1Set-PSSessionConfiguration -Name "RestrictedAdminEndpoint" -ShowSecurityDescriptorUI
5. Give Non-Admin Just Enough Administration for Remote PowerShell
Just Enough Administration (JEA) is a PowerShell security framework that enforces least-privilege access. It allows non-admin users to perform specific administrative tasks remotely, without granting them full rights.
JEA uses role-based, constrained endpoints to define exactly what cmdlets, scripts, and parameters users can run. This makes it a safer way to enable limited PowerShell Remoting for non-admins.
Before configuring JEA, make sure a few prerequisites are met.
- You have administrative privileges on the system.
- PowerShell Remoting (WinRM) is enabled.
- JEA module is available (included by default in PowerShell 5.1+).
- Additionally, if you plan to delegate roles across multiple users or computers, the system should be joined to a domain.
1. Create a JEA Role Capability File: A role capability file (.psrc) defines what commands users in a role can run, acting as a “permission template.”
For example, you can create different roles such as Helpdesk, Server Operator, or Auditor, each with distinct capabilities.To create a role capability file, follow these steps:
- Create a blank JEA session configuration template using the command below.
1New-PSSessionConfigurationFile -SessionType RestrictedRemoteServer -Path .\MyJEAEndpoint.pssc
- Create a custom module folder to host your JEA role capability file:
1New-Item -ItemType Directory -Path 'C:\Program Files\WindowsPowerShell\Modules\MyJEAModule\RoleCapabilities' -Force
- Now, create a role capability file that defines all the commands users can run.
1New-PSRoleCapabilityFile -Path 'C:\Program Files\WindowsPowerShell\Modules\MyJEAModule\RoleCapabilities\UserSupport.psrc'
- Edit the .psrc file, you can define which cmdlets, functions, or external programs users in this role are allowed to run. Here is a sample.
123456789101112@{VisibleCmdlets = @('Get-Service','Restart-Service','Get-Process','Get-EventLog')VisibleFunctions = @()VisibleExternalCommands = @()ScriptsToProcess = @()AliasesToExport = @()}
2. Create a Session Configuration File: A session configuration file (.pssc) links users or groups to role capability files and defines access, logging, and restrictions. It’s essential for JEA endpoints to enforce role-based access and ensure users can perform only authorized tasks.
Follow the steps below to create a JEA session configuration file that links the role to a specific remoting endpoint.
|
1 2 3 4 5 6 7 8 9 10 11 12 13 14 15 16 17 |
$TranscriptPath = 'C:\ProgramData\JEATranscripts' if (-not (Test-Path $TranscriptPath)) { New-Item -ItemType Directory -Path $TranscriptPath -Force | Out-Null } $SessionConfig = @{ # Specify where to save the session configuration file (.pssc) Path = 'C:\ProgramData\<YourSessionName>.pssc' # Map user or group to a specific role capability RoleDefinitions = @{ '<DOMAIN>\<UserOrGroup>' = @{ RoleCapabilities = '<RoleCapabilityName>' } # Example: 'CONTOSO\SupportTeam' = @{ RoleCapabilities = 'UserSupport' } } TranscriptDirectory = $TranscriptPath SessionType = 'RestrictedRemoteServer' RunAsVirtualAccount = $true Description = 'JEA configuration for <RoleCapabilityName> role' } |
✅ Tip: Replace domain, session name and path values as per your environment.
3. Register the JEA Configuration Session: Once the session configuration file is created, register it so PowerShell recognizes and enables the JEA endpoint. This activates the configuration and allows authorized users to connect with defined permissions.
|
1 |
Register-PSSessionConfiguration -Name 'UserSupportJEA' -Path 'C:\ProgramData\UserSupport.pssc' -Force |
If needed, you can also test the JEA endpoint by connecting from a client machine:
|
1 |
Enter-PSSession -ComputerName <ComputerName> -ConfigurationName UserSupportJEA -Credential (Get-Credential) |
When non-admins connect, they can execute only the cmdlets defined in the role capability file.
How does Remote PowerShell Access Restriction Apply?
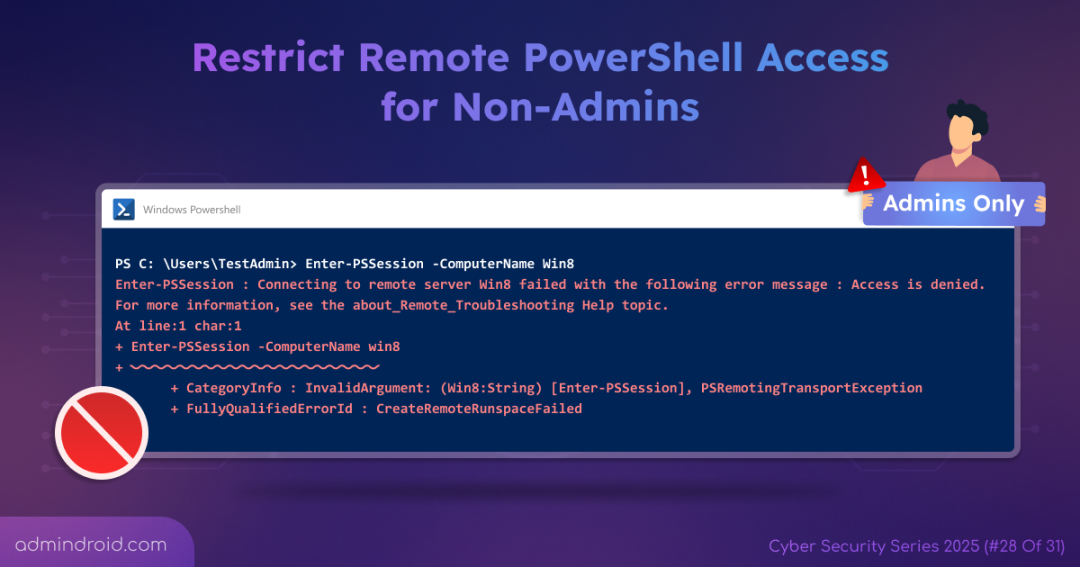
Once the policy takes effect, administrators can continue using remote Windows PowerShell without any issues. However, if a non-administrative domain user attempts to launch a remote PowerShell session, the attempt will fail with an error like:
Enter-PSSession : Connecting to remote server failed with the following error message: Access is denied.

This confirms that remote PowerShell access is restricted only to admins, effectively preventing non-admin users from running remote commands.
And that’s a wrap! We hope this guide helped you lock down remote PowerShell access for non-admins and strengthen your Active Directory security. Along with this, following remote desktop best practices further strengthens overall remote access security across your organization. Got questions or thoughts? Drop them in the comments below, and stay tuned for more exciting cybersecurity blogs coming your way. Stay safe and secure out there! 😉


